How to Add WordPress Search to Blog Archives Page (The Easy Way)
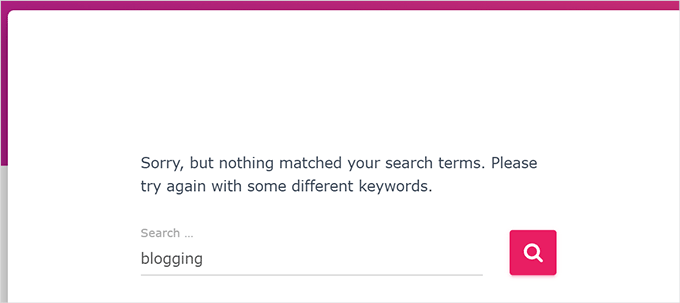
I’ve been running WordPress blogs for years, and one thing that used to frustrate me was seeing my visitors get stuck on archive pages. They’d land on a category or date archive, scroll for a bit, and then leave without finding what they needed.
I realized the real issue wasn’t the archives themselves, but how visitors were using them. People wanted a faster way to narrow down my blog posts instead of scrolling through everything.
That’s when I started testing different solutions and discovered that using a plugin like SearchWP made a huge difference. It powers a smarter search experience and lets you place a search bar right where your readers will use it.
In this guide, I’ll show you how to set it up step by step so your readers can find the right content faster and stay engaged with your blog longer. ⚡
Why Do You Need a Search Function on Your Blog Archives Page?
A search bar on your blog archives page makes it much easier for visitors to find exactly what they’re looking for. Instead of endlessly scrolling through older content, they can simply type a keyword and instantly see relevant results.
In WordPress, archive pages are automatically generated pages that group your content by type, such as:
- Your main blog page
- Category pages
- Tag pages
- Date-based archives
Adding a search bar on any of these archive pages can keep visitors engaged and make older content easier to discover.
A search bar can also nudge visitors to explore more pages on your blog, whether it’s a recent post or something from years ago.
On the flip side, without a search option, archive pages can feel cluttered or overwhelming. And your best content may get buried and overlooked.
Plus, if your blog has more than a few dozen posts or covers a variety of topics, adding a search bar isn’t just helpful. It’s essential for delivering a great user experience.
This is especially helpful for WordPress blogs with growing content libraries. For example:
- 📚 Educational blogs filled with tutorials and guides
- 🥘 Food blogs with hundreds of recipes organized by category or date
- 🌍 Lifestyle and travel sites sharing personal stories or destination reviews
- 🌐 Tech blogs publishing updates, reviews, and evergreen advice
- 🗞 Magazine-style or news sites with a steady publishing schedule
With that said, I’ll walk you through how to add WordPress search to the blog archives page.
Here’s a quick overview of all the steps I’ll cover in this guide:
- Step 1: Install and Activate SearchWP
- Step 2: Customize your Search Algorithm
- Step 3: Tell SearchWP What Content Is Most Important
- Step 4: Add the Improved Search to the Archives Page
- Step 5: Test and Optimize Your Archive Search Functionality
- Bonus Tip: Add Search by Category in WordPress Blogs
- FAQs About Adding WordPress Search to Blog Archives Page
- Additional Resources: More Guides to Improve WordPress Search
🧑💻 Pro Tip: Adding a search bar is just part of the solution. You’ll also want to make sure your archived posts are still relevant and up to date. If visitors land on outdated content, it can hurt their trust and lead them to leave, even if your search works perfectly.
To improve your content strategy, check out our guide on how to automatically schedule content updates to keep everything fresh and accurate.
Step 1: Install and Activate SearchWP
If you’d rather not install a plugin, then you can skip ahead to step 4, where I show you how to add a Search block to your archive pages. This will work with WordPress’s built-in search.
Just keep in mind that the default WordPress search is pretty limited. It only looks at basic post content and often shows results that aren’t very helpful.
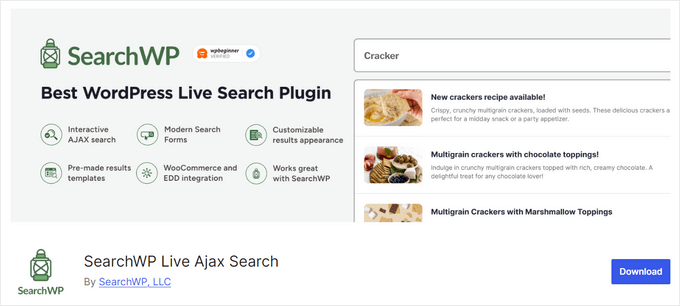
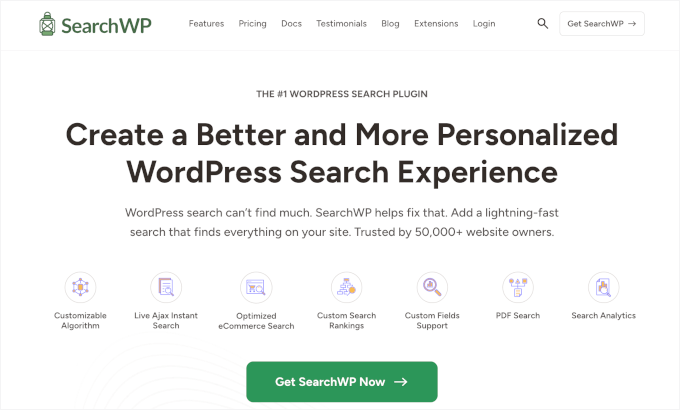
That’s why I recommend using SearchWP instead, which is the best WordPress search plugin on the market.
This plugin lets you improve your WordPress search algorithm in multiple ways. For example, you can add all types of content to the results, including custom post types, WooCommerce products, and even PDF content.
We use SearchWP on some of our business websites, and we’ve found that it works great. You can find out everything about it in our detailed SearchWP review.
To get started, you’ll need a SearchWP plan. You can head over to the SearchWP website and click ‘Get SearchWP Now’ to purchase the plan that best fits your needs.
After you sign up, you’ll get a user account. Simply log in to your new SearchWP account, download the plugin’s .zip file, and locate your license key.
You can find it in your SearchWP account under the ‘Downloads’ section. At this point, you need to copy your license key or leave the browser tab open so you can access it easily later.
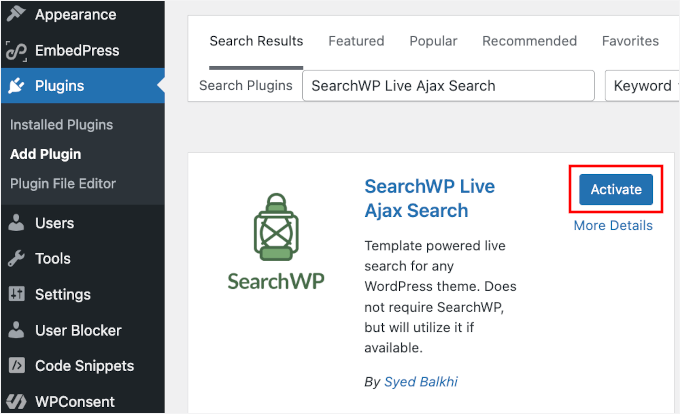
Next, let’s navigate to Plugins » Add New Plugin from your WordPress dashboard. From there, click the ‘Upload Plugin’ button at the top of the page.
On the next screen, click ‘Choose File’ and select the SearchWP .zip file you downloaded earlier.
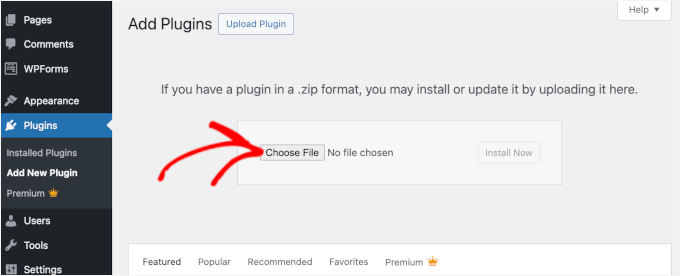
Click ‘Install Now’ then ‘Activate’ once the button appears.
If you need help, you can check out our guide on how to install a WordPress plugin.
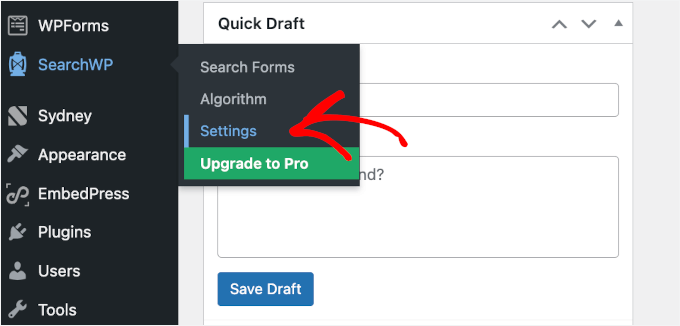
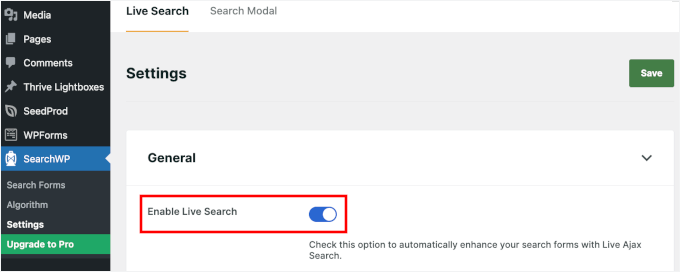
Once the plugin is activated, you’ll need to go to SearchWP » Settings » General.
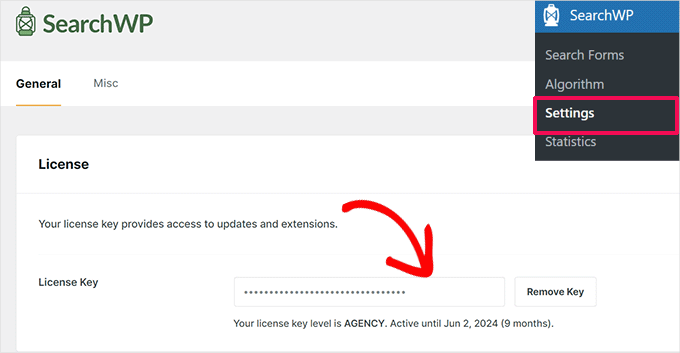
Then, go ahead and paste your license into the ‘License Key’ box.
Step 2: Customize your Search Algorithm
Once SearchWP is activated, the next step is to fine-tune your website’s unique search engine settings for your blog archive pages.
To do that, go to SearchWP » Algorithm in your WordPress admin dashboard and click ‘Add New.’
At the top, you’ll see the ‘Sources & Settings’ button. Go ahead and click on it.
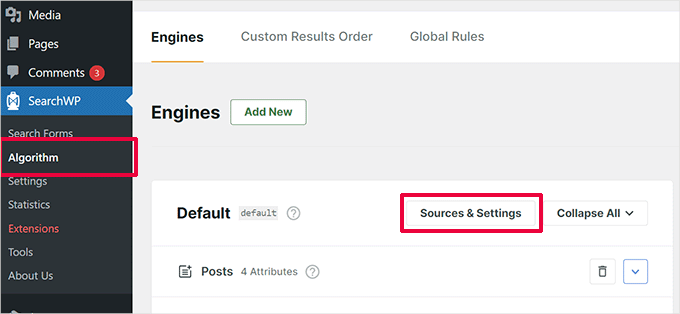
This is where you choose which content types SearchWP should include in your search results.
You’ll see options for posts, pages, media, and more.
By default, WordPress displays blog posts on archive pages. To make sure all your articles are searchable, you’ll definitely want to check the ‘Posts’ box.
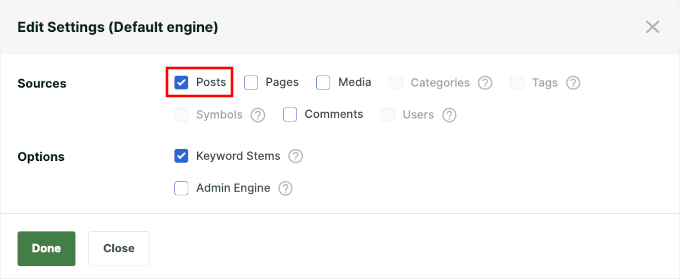
You may also be considering what additional elements are important to include.
If your site has a lot of valuable information on ‘Pages’ or ‘Comments,’ consider adding those too.
On the other hand, I recommend skipping sources like ‘Tags’ that could clutter results.
You might notice some options grayed out — this is normal for the ‘Default engine.’ They’ll be available if you create a new engine.
🧑💻 Pro Tip: Does your site use custom post types, like a ‘Portfolio’ for your projects, ‘Recipes’ for a food blog, or ‘Listings’ for a real estate site? If so, you’ll likely see the boxes for those custom post types here. You can check the boxes so all your valuable content is included in the search results.
You can then close the popup by clicking ‘Done.’
Step 3: Tell SearchWP What Content Is Most Important
After selecting your content sources, you can customize how SearchWP ranks the content in your search results. This helps show the most relevant results based on what your visitors are likely to look for.
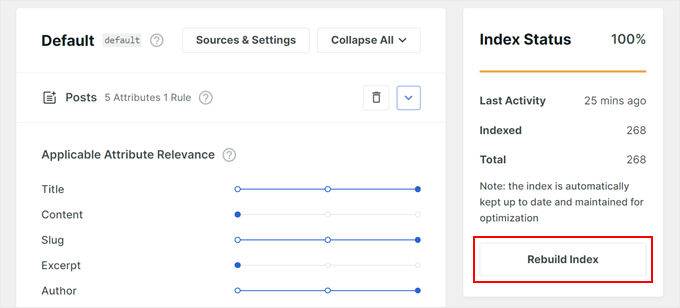
On the SearchWP » Algorithm screen, you can click ‘Add/Remove Attributes.’
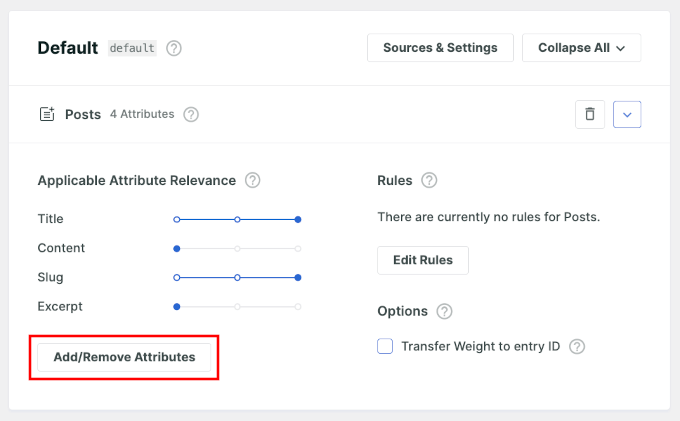
In the popup, you’ll choose which parts of your content you want SearchWP to consider.
They include sources such as:
- Title – Prioritize results that match the post or page title.
- Content – Index the main body text of your posts or pages.
- Slug – Include the post’s URL-friendly name (useful for SEO keywords).
- Excerpt – Search within manually written or auto-generated summaries.
- Author – Allow visitors to find content written by a specific author.
I recommend picking the ones that make searches more relevant and skipping unrelated sections.
For example, if your visitors rarely search by “Author,” leaving it out can help keep results clean and focused.
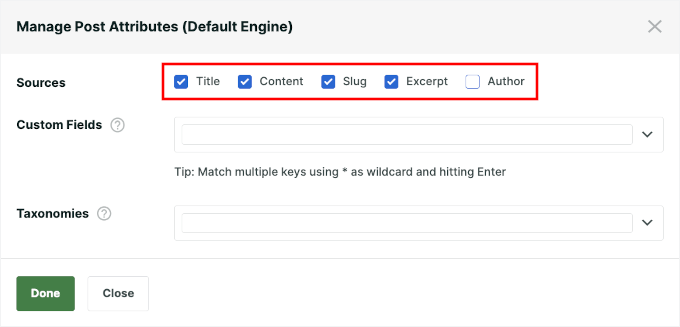
You can include extra content stored in custom fields. Additionally, you can let users find posts grouped under specific topics or labels in the ‘Taxonomies’ field.
Once you’ve added the attributes, you’ll see a set of sliders for each content source.
Think of these sliders as a scoring system that tells SearchWP which content is most important. By giving an attribute a higher ‘relevance weight,’ you’re telling the search plugin to give it more points.
For example, if you slide ‘Title’ far to the right, a post where the search term appears in the title will get a huge point boost.
This makes it much more likely to show up at the top of the results. So, this is a great way to ensure the most relevant content surfaces first.
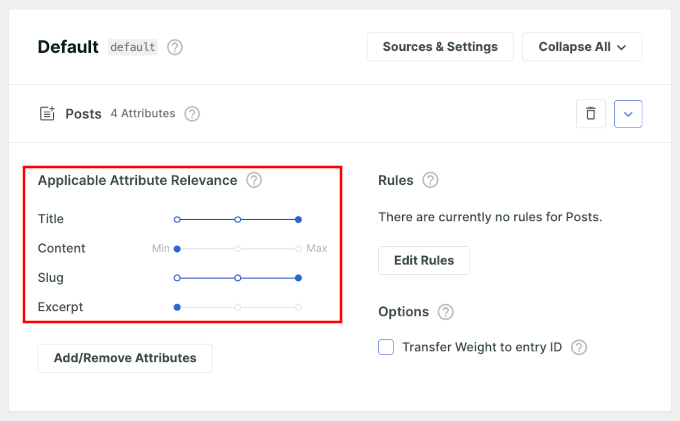
For most users, the default weights are a great starting point. You can always come back and fine-tune it later based on your site’s needs.
When you’re happy with the settings, click the ‘Save’ button in the top-right corner.
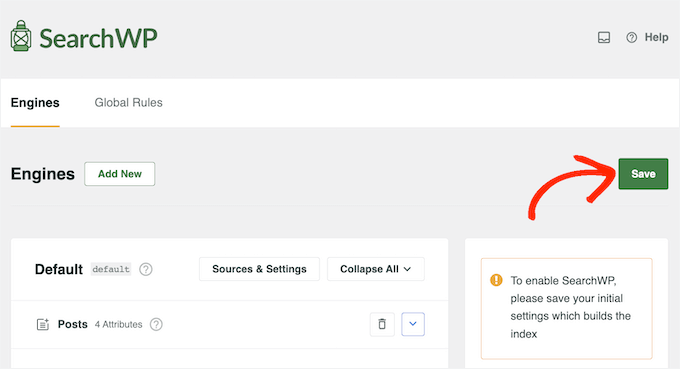
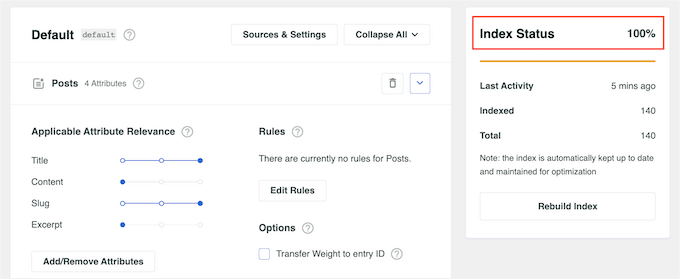
SearchWP will now start rebuilding the index automatically.
This might take a few minutes, depending on the amount of content on your site and the performance of your WordPress hosting server.
Once you see ‘Index Status: 100%’, it means all your content has been successfully indexed and your settings are ready to go.
Step 4: Add the Improved Search to the Archives Page
SearchWP is now powering your site’s search behind the scenes. The final step is to add a search bar directly to your archive pages so visitors can use it.
There are two easy ways to do this: using the Full Site Editor (FSE) or the WordPress search widget.
Which method you choose will depend on whether you’re using a block theme (option 1) or a classic theme (option 2). Keep scrolling to find the right choice for you.
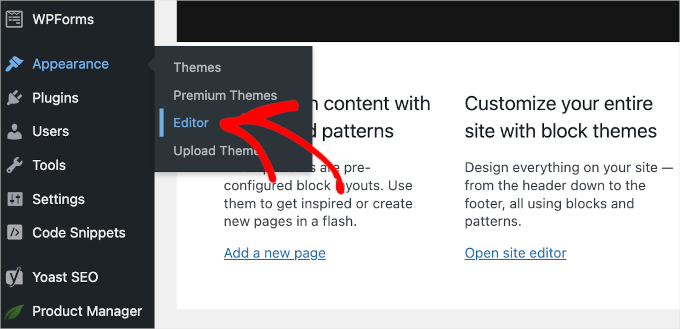
Option 1: Add the Search Bar to the Archives Page Using FSE
If your theme supports Full Site Editing (FSE), like Twenty Twenty-Four, you can go to Appearance » Editor in your WordPress dashboard to get started.
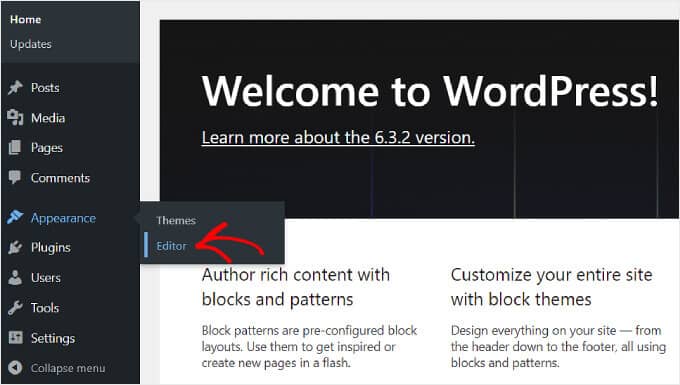
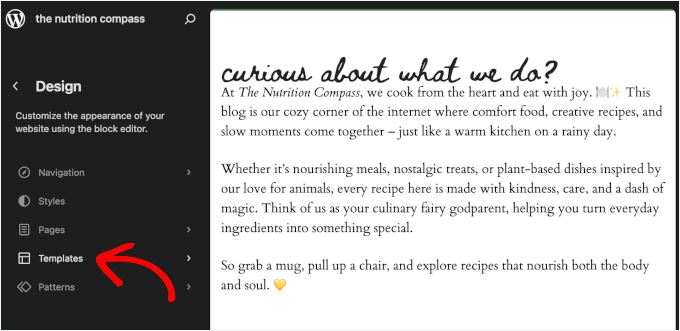
In the Site Editor, click ‘Templates’ from the left-hand menu.
Next, you’ll need to find the template that controls your blog archives.
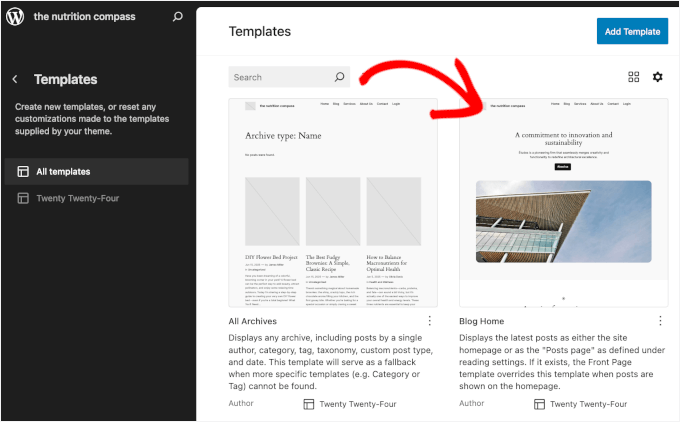
The name of this template can vary depending on your theme. It can be ‘Archive,’ ‘Blog,’ ‘Home,’ or ‘Index,’ among others.
The key is to select the one that your theme uses for the main blog listing. A good way to be sure is to click on one and see if you have the look for the Query Loop block (that’s what WordPress uses to display your list of posts).
📝 Note: In WordPress, “archive” doesn’t mean just one thing. It includes your main blog page, category pages, tag pages, and date archives. Standalone pages like “About Us” or “Contact” are not archives.
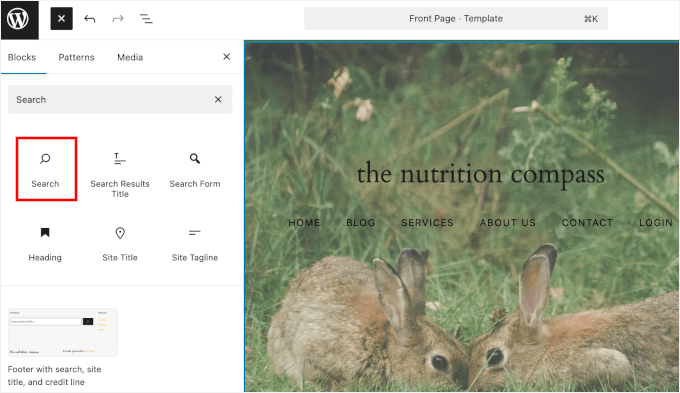
Now that you’ve found the right blog archives page and opened the template, you’ll need to add the search bar to it.
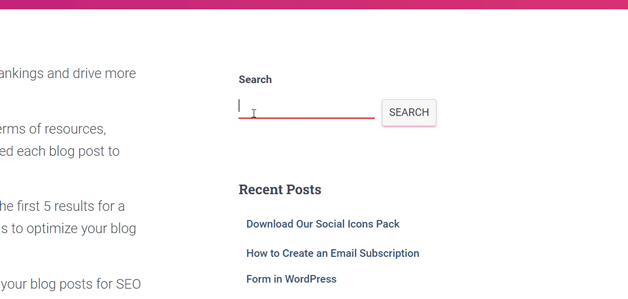
Simply click the ‘+’ button wherever you want, and look for the ‘Search’ block. Click on it to insert it in your template.
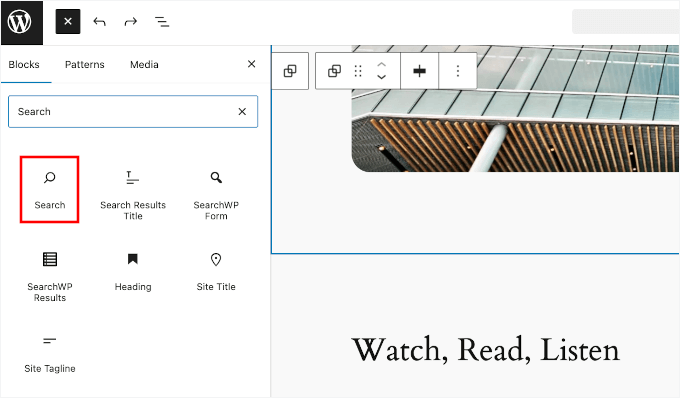
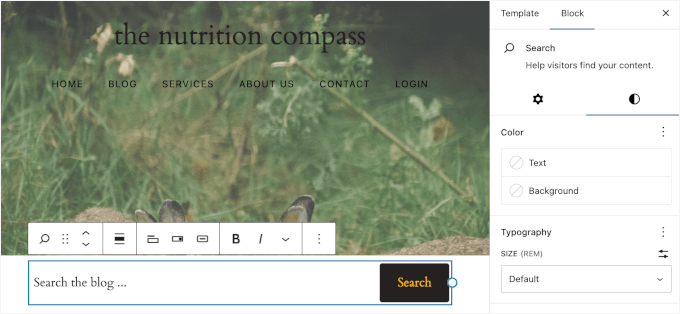
After you add the search block, you can go to the ‘Block’ tab in the right-hand panel to customize its style.
Here, you can adjust the block’s color, typography, position, to border to match your site’s design.

This is a great chance to add a touch of personality.
For instance, instead of the default ‘Search’, you could use something more engaging like ‘Find a recipe…’, ‘Search our tutorials…’, or ‘Looking for something specific?’ to guide your visitors.
When you’re happy with how everything looks, go ahead and click ‘Save’ in the top-right corner to apply your changes.
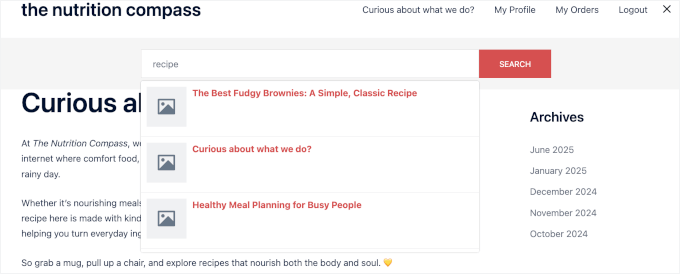
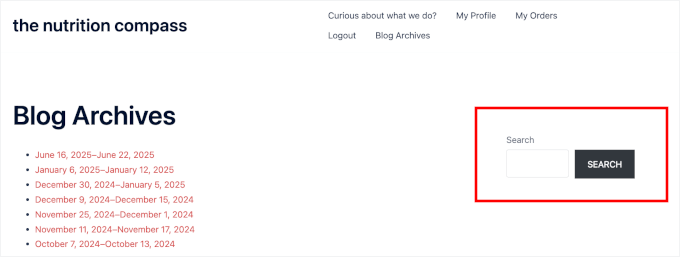
Now, if you visit your blog archive page, you can see your custom search bar in action.
Option 2: Add the Search Bar to the Archives Page with a Classic Theme
Adding the search bar to a widget area like a sidebar is the quickest and easiest method for most classic themes.
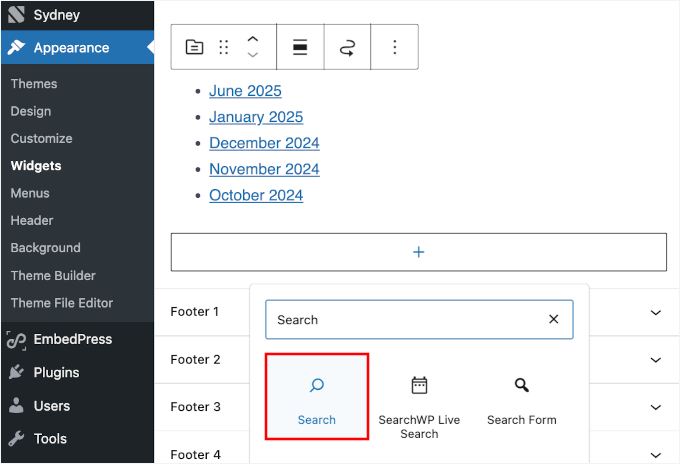
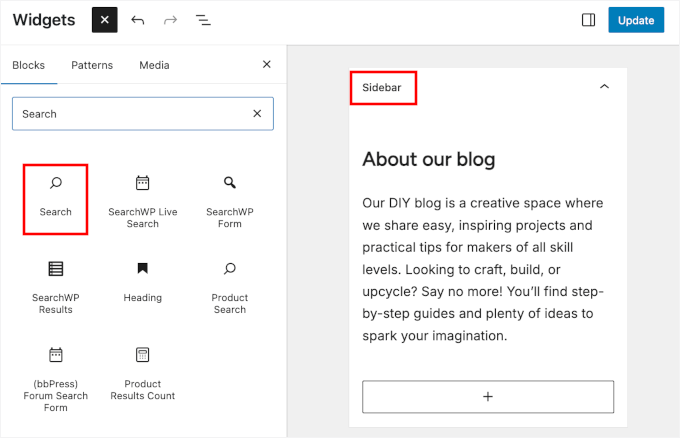
To get started, navigate to Appearance » Widgets.

On the next screen, you can choose where you’ll add a widget. The best part is that SearchWP automatically improves any default search bar. Whether it’s in the sidebar or somewhere else, the plugin enhances it behind the scenes.
For this tutorial, I’m going to add it to my site’s sidebar.
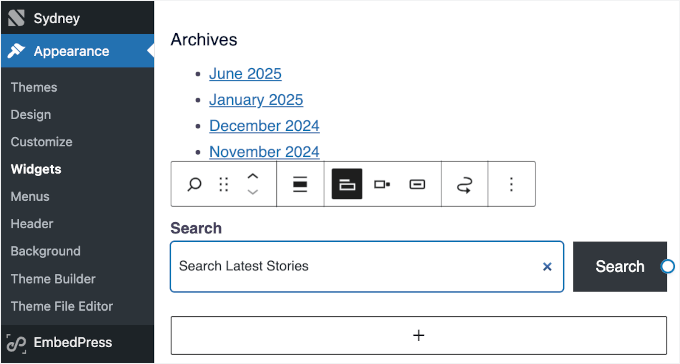
You can go ahead and click the ‘+’ button and look for the ‘Search’ widget.
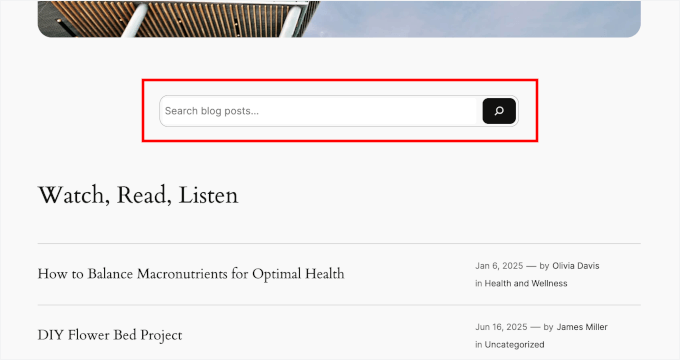
From here, you can update the label or placeholder to something more specific. For example, you can edit it to “Search blog posts…” or “Looking for a tutorial?”
Feel free to get creative and choose wording that best fits your content.
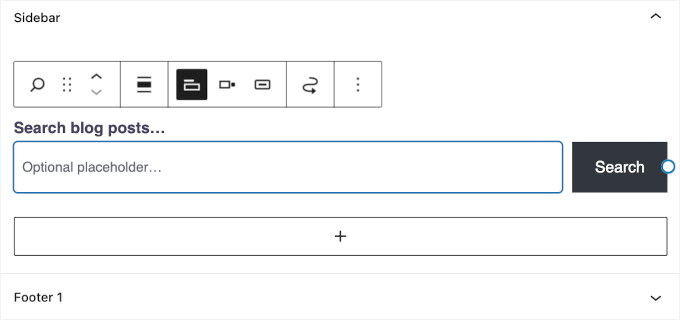
Once everything looks good, simply click ‘Update’ to save and apply the search bar to your site.
Now, if you visit your blog archive page, you can see your custom search bar in action.
📝 Note: You can also place the search bar directly above your list of posts, which usually involves editing your theme’s archive.php file.
However, editing theme files is for advanced users only. A single typo or mistake in these files can cause a critical error and make your entire website inaccessible.
If you must edit theme files, we strongly recommend creating a child theme first to avoid losing your changes when you update your theme.
Step 5: Test and Optimize Your Archive Search Functionality
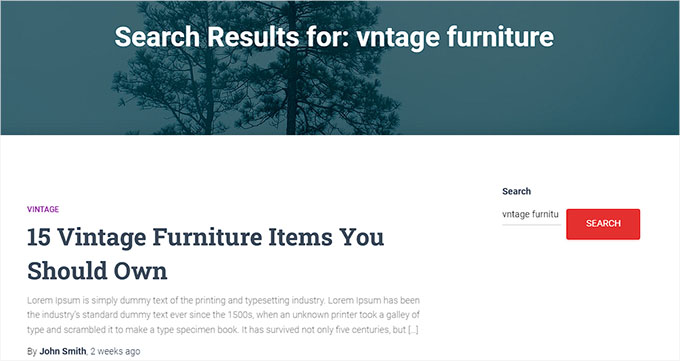
Now that your custom search bar is live on the blog archive page, it’s important to make sure everything is working smoothly across devices and browsers.
You can start by opening your website in incognito or private mode. This lets you view it as a new visitor would, without cached data affecting the results.
From here, you can test different search terms to make sure the right results appear. If anything seems missing or irrelevant, you can go back to SearchWP » Algorithm to adjust your content sources or attribute relevance settings.
If this doesn’t resolve the issues, you can try these quick fixes:
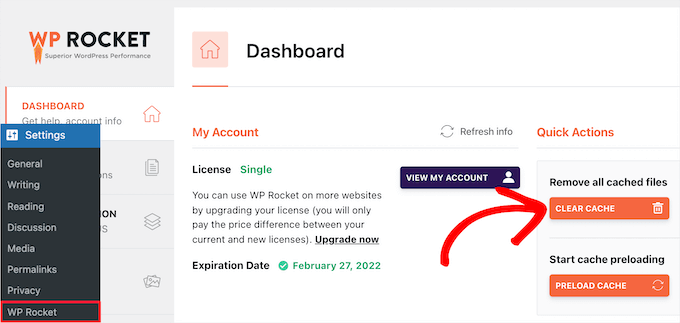
- Clear your cache – Cached JavaScript files can prevent SearchWP from loading correctly. Use a plugin like WP Rocket to clear the cache and optimize performance.
- Deactivate conflicting plugins – Temporarily disable other plugins one by one to see if one of them is causing issues.
- Rebuild the index – To force a fresh search data rebuild, you can go to SearchWP » Settings » General and click the ‘Rebuild Index’ button.
For more troubleshooting tips, you can refer to our guide on how to fix WordPress search not working.
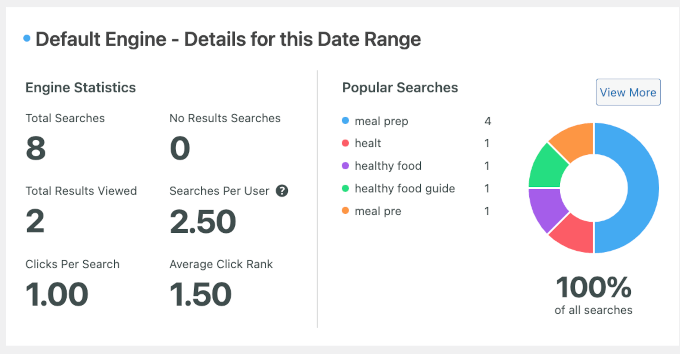
Once visitors start using your new search bar, you’ll want to know what they’re looking for.
This is where the SearchWP Metrics extension is incredibly powerful. It shows you exactly what terms people are searching for, which searches get no results, and more.
For details, you can check out our guide on how to see search analytics in WordPress.
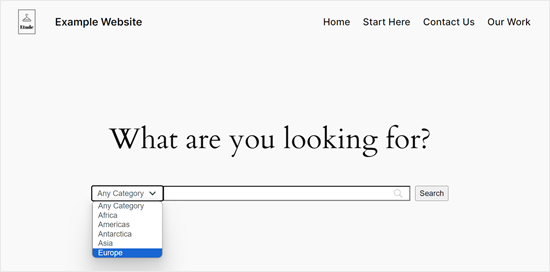
Bonus Tip: Add Search by Category in WordPress Blogs
Want to make your blog’s search even more useful? One easy way is to let visitors filter results by category.
Categories help organize your content and make it easier for readers to browse related posts. But when combined with search, they become even more powerful. This allows users to narrow down results and find exactly what they need.
Here are a few ways this can come in handy:
- Lifestyle or personal WordPress blogs: Let visitors search posts only within categories like Travel, Recipes, or Wellness.
- Tutorial or knowledge base sites: Allow users to search by topic, such as WordPress, SEO, or eCommerce.
- News sites: Help visitors focus on sections like Business, Sports, or Tech.
- WooCommerce stores: Let shoppers search by product category to find what they need faster and boost conversions.
With SearchWP, you can create a custom search form that limits results to a selected category. You can do this either through a dropdown filter or pre-defined settings.
For step-by-step instructions, check out our full guide on how to search by category in WordPress.
FAQs About Adding WordPress Search to Blog Archives Page
Still have questions? Let’s quickly go over some of the most common things WordPress users ask when setting up search on their blog archive pages.
How do I add a search bar to my WordPress blog archive page?
You can do this by editing your archive template. Just go to Appearance » Editor, find your blog archive template, and insert the Search block. You can also customize how the search form looks by adjusting the placeholder text, button style, margins, and more.
If you’re using a classic theme, you can add the search form to a widget-ready area like the sidebar.
What is the best search plugin for WordPress blog archives?
I recommend SearchWP because it’s the best WordPress search plugin on the market. It works seamlessly with archive pages and is much more accurate than the default WordPress search. Plus, it gives you full control over what content gets searched, how results are ranked, and even what custom fields or post types to include.
Can I make my old blog posts searchable in WordPress?
Absolutely. As long as your old posts are published and included in your search engine settings (like in SearchWP’s ‘Sources & Settings’ panel), they’ll show up in the results.
Can I limit archive search results to just blog posts or certain categories?
Yes, you can. For example, with SearchWP, you can customize your search engine to include only certain post types, like blog posts. You can even fine-tune it further by limiting searches to specific categories or tags using search filters or custom search forms.
How do I improve the search functionality on my WordPress site?
You can start by replacing the default WordPress search with a powerful plugin like SearchWP. It lets you include more content types, adjust relevance settings, and deliver better results overall. You can also improve the experience by customizing the search results page, using smart suggestions, or adding filters to narrow down results.
Additional Resources: More Guides to Improve WordPress Search
I hope this guide has helped you learn how to add WordPress search to your WordPress blog archives.
If you want to take your WordPress search to the next level, you may find these guides helpful:
- How to Add Live AJAX Search to Your WordPress Site
- How to Add Fuzzy Search in WordPress
- How to Make Blog Comments Searchable in WordPress
- How to Add PDF Indexing and Searching in WordPress
- How to Create a Searchable Member Directory in WordPress
- How to Create an Advanced Search Form in WordPress for Custom Post Types
If you liked this article, then please subscribe to our YouTube Channel for WordPress video tutorials. You can also find us on Twitter and Facebook.
The post How to Add WordPress Search to Blog Archives Page (The Easy Way) first appeared on WPBeginner.