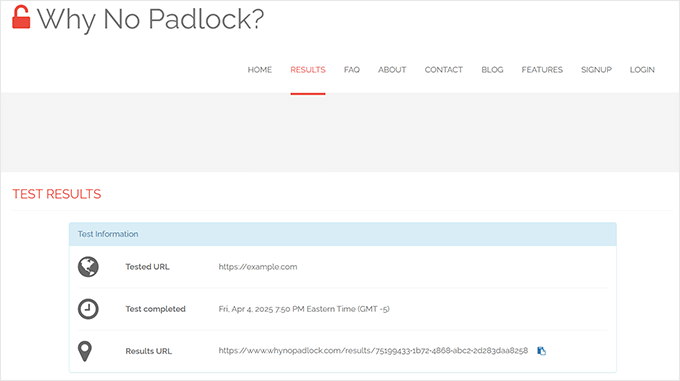
A friend reached out to me recently after discovering something alarming in their WordPress posts. They were using Yoast SEO Premium with the Classic Editor, and they found Yoast had been automatically inserting odd-looking CSS classes like ai-optimize-6, ai-optimize-9, directly into their content.
The problem is that these classes remain permanently embedded in the posts even after disabling Yoast AI Optimize or completely deleting the plugin. This goes against expected plugin behavior… that is, when you uninstall it, it should leave no trace in your content.
While these AI markers might not visually affect your site, they clutter up your source code. It could also potentially signal to AI content detectors, plagiarism checkers, and even search engines that your content was AI-generated or optimized.
In this guide, I’ll show you how to remove these hidden classes using a quick code snippet. I’ll also explain how to apply it safely and share the SEO plugin I recommend using as an alternative to Yoast.
Here are the things I will cover in this tutorial:
The ai-optimize-{number} CSS classes are added when you use Yoast SEO Premium’s AI features with the Classic Editor. They don’t appear on the front end, but they’re embedded in your content’s HTML, which can cause problems.
You can view them by visiting any post or page on your site and using the Inspect tool in your browser.
Here’s why I recommend removing them:
They clutter your HTML: These unnecessary classes make your code harder to read and parse.
They serve no purpose: They don’t affect how your content looks or functions. They’re just leftovers from the AI tool.
They can trigger AI detection tools: Some plagiarism checkers and AI content detectors pick up these patterns and may flag your post, even if you wrote it yourself.
They leave AI footprints across your site: If multiple sites use the same classes, Google might start associating that pattern with low-quality or mass-produced AI content.
They increase the risk of formatting conflicts: Unknown classes could interfere with your theme or plugins down the road.
There’s no upside to keeping these hidden markers, and several good reasons to clean them out.
The good news is that there is a quick fix, and I’ll show you how to do it safely in the next section.
Step 1: Make a Backup Before Making Changes
Before we move forward, I always recommend creating a full backup of your WordPress site. It only takes a few minutes and gives you peace of mind in case anything goes wrong.
I use Duplicator when I need a quick and reliable backup solution. It’s the best WordPress backup plugin on the market, it is beginner-friendly, and it works great whether you’re backing up or migrating your site.
✅ On-demand and automatic WordPress backups
✅ Safely stored in remote locations like Dropbox or Google Drive
Once your backup is ready, you’re safe to move on to the next step, where I will show you how to fix the problem.
Step 2: Add the Code Snippet to Remove ai-optimize Classes
Now that your backup is ready, it’s time to clean up those ai-optimize-{number} and ai-optimize-introduction classes.
I’ve put together a safe and flexible code snippet that works with both the Classic Editor and the Block Editor (Gutenberg), as well as bulk edits.
You don’t need to touch your theme files or mess with FTP. Instead, I recommend using the WPCode plugin to add this snippet. It’s what I use to manage code snippets on WordPress sites without risking anything important. (See my full WPCode review for more details.)
Tip: WPCode has a limited free version that you can use for this tutorial. However, I recommend upgrading to a paid plan to unlock its full potential.
First, you need to install and activate the WPCode plugin. See our tutorial on installing a WordPress plugin if you need help.
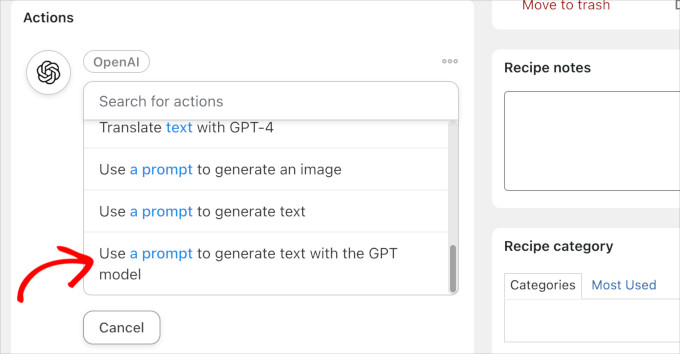
Once the plugin has been activated, go to the Code Snippets » + Add Snippet page and click on ‘+ Add Custom Snippet’ button under the ‘Add Your Custom Code (New Snippet)’ box.
Next, you need to provide a title for your code snippet. This could be anything that helps you identify this code easily.
After that, choose PHP Snippet from the ‘Code Type’ drop-down menu.
Now, you need to copy and paste the following code into the Code Preview box.
Here’s the full code snippet:
// For Classic Editor and programmatic updates
function strip_ai_optimize_classes($data, $postarr) {
    if (empty($data['post_content']) || $data['post_type'] !== 'post') {
        return $data;
    }
    $data['post_content'] = strip_ai_optimize_from_content($data['post_content']);
    return $data;
}
add_filter('wp_insert_post_data', 'strip_ai_optimize_classes', 10, 2);

// For Gutenberg/Block Editor
function strip_ai_optimize_classes_rest_insert($prepared_post, $request) {
    if (isset($prepared_post->post_content) && $prepared_post->post_type === 'post') {
        $prepared_post->post_content = strip_ai_optimize_from_content($prepared_post->post_content);
    }
    return $prepared_post;
}
add_filter('rest_pre_insert_post', 'strip_ai_optimize_classes_rest_insert', 10, 2);

// For bulk edit operations - this is the key addition
function strip_ai_optimize_classes_bulk_edit($post_id) {
    $post = get_post($post_id);
    if (!$post || empty($post->post_content) || $post->post_type !== 'post') {
        return;
    }
    $cleaned_content = strip_ai_optimize_from_content($post->post_content);
    if ($cleaned_content !== $post->post_content) {
        remove_action('post_updated', 'strip_ai_optimize_classes_bulk_edit');
        wp_update_post(array(
            'ID' => $post_id,
            'post_content' => $cleaned_content
        ));
        add_action('post_updated', 'strip_ai_optimize_classes_bulk_edit');
    }
}
add_action('post_updated', 'strip_ai_optimize_classes_bulk_edit');

// Catch bulk operations via the bulk_edit_posts action
function strip_ai_optimize_classes_bulk_action($post_ids) {
    if (!is_array($post_ids)) {
        return;
    }
    foreach ($post_ids as $post_id) {
        strip_ai_optimize_classes_bulk_edit($post_id);
    }
}
add_action('bulk_edit_posts', 'strip_ai_optimize_classes_bulk_action');

// Shared function to strip ai-optimize classes
function strip_ai_optimize_from_content($content) {
    if (empty($content) || !is_string($content)) {
        return $content;
    }
    return preg_replace_callback(
        '/class\s*=\s*["\']([^"\']*)["\']/',
        function($matches) {
            $classes = $matches[1];
            $classes = preg_replace('/\bai-optimize-\d+\b\s*/', '', $classes);
            $classes = preg_replace('/\s+/', ' ', trim($classes));
            if (empty($classes)) {
                return '';
            }
            return 'class="' . $classes . '"';
        },
        $content
    );
}
After adding the code, scroll down to the ‘Insertion’ section.
Then, select ‘Run Everywhere’ next to the ‘Location’ option.
Finally, go to the top of the page and switch the status toggle in the top-right to Active, and then click on the ‘Save Snippet’ button to store your changes.
Once you’ve added this snippet to your site using WPCode, it will automatically strip these AI-generated classes from any post you create or update in the future.
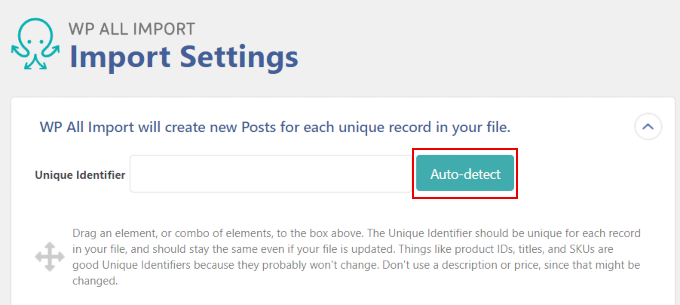
If you want to remove the ai-classes from existing content, you’ll have to bulk edit your existing content.
🌟Expert Tip: If you’re not comfortable editing code yourself, don’t stress!
Our team at WPBeginner offers Emergency WordPress Support Services to help you fix issues like this quickly and safely. We can clean up your content and set up your SEO plugin the right way.
Step 3: Bulk Update All Posts to Clean Up Existing AI Classes
Now that the code snippet is in place, it will automatically clean up any AI markers when you edit or publish a post. But to remove these classes from your older posts, you’ll need to bulk update them.
Don’t worry—this won’t change your content. It simply triggers the filter we just added so the hidden AI classes can be stripped out safely.
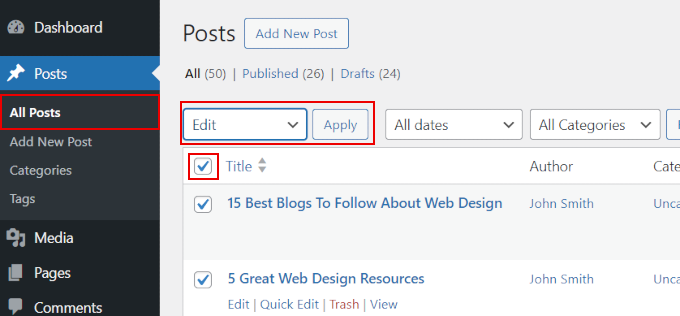
First, you need to go to the Posts » All Posts page in your WordPress dashboard and click ‘Screen Options’ at the top right.
From here, set the number of posts per page to 999 (This is the maximum number of posts you can show on this screen) and click ‘Apply’ to load all your posts.
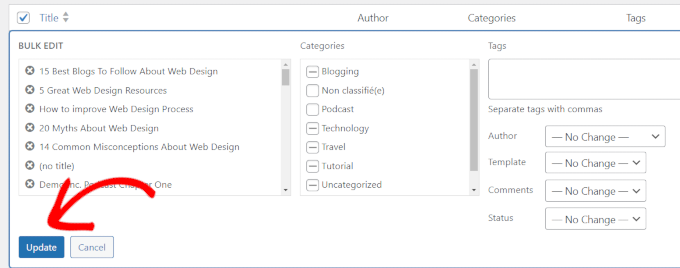
Next, select all posts on the page by clicking the top checkbox. After that, select ‘Edit’ by clicking on the Bulk Actions dropdown, then click ‘Apply’.
WordPress will now show you bulk editing options. Without changing anything else, simply click on the ‘Update’ button.
WordPress will now start updating all your posts. By doing this, it will also trigger the code you saved earlier and remove the AI classes.
Tip 💡: If you have more than 999 posts, just go to the next page and repeat this process until all posts have been updated.
This will clean the ai-optimize-{number} and ai-optimize-introduction classes from all your existing posts—no manual editing needed.
Bonus Tip: Switching to an Alternative SEO Plugin (Better and More Powerful)
Yoast SEO has been around for a long time, but lately, its innovations have slowed down.
I hope this guide helped you fix the ai-optimize class issue in Yoast SEO and set your site up for better long-term results. You’ve got this—and if you ever need a hand, we’re here to help.
If you liked this article, then please subscribe to our YouTube Channel for WordPress video tutorials. You can also find us on Twitter and Facebook.
A friend recently asked me, “Should I use WordPress or Django for my new website?” It’s a great question, and a common one. Choosing the right content management system (CMS) can shape your entire online experience.
While WordPress has always been my go-to for building websites, I’ve spent time exploring Django CMS as well. I’ve helped others decide between the two, and I’ve even tested Django on a few personal projects just to see how it stacks up.
In this post, I’ll share what I’ve learned from both platforms—their surprising strengths, their limitations, and why WordPress still comes out on top for creating websites.
Whether you’re launching a blog, a business site, or something more complex, this side-by-side comparison will help you figure out which CMS fits your needs best.
WordPress vs. Django CMS: A Brief Overview
Both WordPress and Django CMS are powerful content management systems (CMS), but they are designed for different kinds of tasks.
I’ve created a quick comparison table below to help you understand the main differences. It explains the key features of WordPress and Django CMS side-by-side:
Requires additional software like Oscar Commerce or Saleor
🔒 Security
Requires regular updates, security plugins
Strong security foundation out of the box
📈 Scalability
Scalable with optimization
Highly scalable
👥 Community
Huge, very broad
Small, developer-focused
👤 Target User
Non-developers
Developers
In the sections that follow, I’ll dive deeper into each of these points and help you decide whether WordPress or Django CMS is the right choice for your project.
☝ Important Note: This comparison is between Django CMS and self-hosted WordPress.org (not WordPress.com). See our guide on the differences between self-hosted WordPress.org and WordPress.com for more details.
How I Compared WordPress vs. Django CMS
I wanted to make sure this comparison was as thorough and fair as possible, so I didn’t just rely on spec sheets and marketing brochures. So, I dug deep, using my own experience and research.
Here’s how I approached it:
Real-World Projects: I’ve built countless websites with WordPress, from simple blogs to complex eCommerce stores. I’ve seen firsthand what it can do (and what it can’t). I also set up a test environment for Django CMS so I could try everything out myself.
Hands-on Testing: I didn’t just read about the features, I actually used them. I performed common tasks like creating pages, adding images, and installing plugins. This gave me a real feel for how each platform works in practice.
Feature Comparison: I compared the core features of each platform, including ease of use, customization options, security, scalability, and content management capabilities.
Finding the Right Fit: I considered different project types and identified the ideal use cases for each platform. For example, a small business website has different needs than a large enterprise platform.
Resources and Effort: I factored in the learning curve, development time, and ongoing maintenance required for each platform. This helps you understand the true cost of ownership.
Growing with Your Project: A content management system should be able to grow with your business. I looked at how easy it is to get started with each platform and how well they handle increasing complexity as your website grows.
Why Trust WPBeginner?
We’ve been building websites with WordPress for over a decade and have seen it evolve from a simple blogging platform to the powerhouse it is today. We’ve used it to create everything from small business websites to large online stores, including this site, WPBeginner.
While we’re big fans of WordPress, we also keep a close eye on other platforms like Django CMS. We’ve even experimented with it on personal projects to understand its strengths and weaknesses firsthand.
Our goal here isn’t to sell you on one platform or the other. It’s to give you an honest, unbiased comparison based on our real-world experience. We’ll share the good, the bad, and the ugly so you can make the best decision for your specific needs.
Want to learn more about how we maintain accuracy and integrity here at WPBeginner? Check out our detailed editorial guidelines.
Since I’m going to go into a lot of detail in my comparison of WordPress vs. Django CMS, you may want to use this table of contents to quickly navigate the article:
WordPress and Django CMS are both powerful tools, but they’re designed for different kinds of projects. Picking the right one from the start can save you headaches (and potentially a lot of money) down the road.
I remember when I first started building websites, I tried everything from hand-coding HTML to using clunky website builders. Then I discovered WordPress, and I immediately knew that it was what I was looking for.
Suddenly, I could build beautiful, functional websites without needing a computer science degree. I’ve used it for everything from simple blogs to complex eCommerce sites.
So, what is WordPress, anyway? It’s the most popular website builder and CMS on the planet, powering over 43% of the web. It’s free, open-source, and incredibly versatile. Plus, there’s a massive community of users and developers ready to help you out.
Getting started is a breeze, especially with one-click installs offered by hosts like Bluehost and Hostinger (I’ve used both, and they make it super easy).
As my projects got more complex, I started hearing about Django CMS. It’s a favorite among developers who want more flexibility and control. I even tried using it for a personal project, and it was a completely different experience.
Think of it as building a house from scratch. With Django, you have complete control over every detail, but it requires a lot more technical know-how.
Django CMS is built with Django, a powerful framework that uses the Python programming language.
It is a set of tools and libraries that provide a foundation for building web applications. It’s also free and open-source, but it’s definitely geared towards developers.
You’ll need to be comfortable with coding and server administration to get the most out of it. It’s ideal for large, complex projects that demand a high level of customization and scalability.
Now that you have a basic understanding of both platforms, let’s dive deeper into the key differences between WordPress and Django CMS.
Ease of Use: Which CMS is Easier to Learn?
Ease of use is a big concern for many website builders. You’re probably looking for a platform that’s simple to navigate without prior technical expertise.
Let’s see how WordPress and Django CMS compare in terms of user-friendliness.
WordPress: Easy to Use Most of the Time
WordPress is known for its user-friendly nature. Setting up a basic blog in WordPress can be done in a matter of hours.
The block editor is intuitive, like building with digital Lego bricks. You can easily drag and drop different content blocks to create pages without coding.
And getting started is super easy. Most web hosts, like Bluehost (my personal favorite), offer one-click WordPress installs.
That means you can literally have a website up and running in minutes. WPBeginner readers get a special discount, so you can get started for just $1.99 per month.
After WordPress is installed, you’ll be able to access the admin dashboard. From here, you can customize your site’s design, add new pages, and manage your content. It’s very straightforward.
Django is built for developers who love the flexibility and control of coding. But if you’re a beginner or prefer a no-code approach, it will feel overwhelming.
You’ll need to know how to code in Python and be familiar with web development concepts to use Django CMS effectively. I’ve talked to friends who tried to use Django CMS without coding experience, and it often leads to frustration.
Even simple tasks, like changing your website’s theme or adding a contact form, often require coding or working with Django’s templating system.
Django CMS’s content editor is relatively straightforward, similar to WordPress’s older classic editor.
It lets you work with formatted text, but not create complex layouts like the newer WordPress block editor.
But most customization happens behind the scenes in code. This can be a steep learning curve for non-developers.
Here’s a quick overview of what makes Django CMS less user-friendly for non-developers:
Installation and setup require technical knowledge of server administration and command-line tools, such as SSH and virtual environments.
Theme customization involves editing HTML, CSS, and Django templates, which requires familiarity with Django’s templating language.
Plugin management often requires installing and configuring Python packages.
While the content editor is simple, managing content structures and advanced features often requires coding.
All that said, if you have a strong technical background, all of this may sound ideal.
🏅 Winner for Ease of Use – WordPress
For non-programmers, WordPress is the clear winner. It’s intuitive, user-friendly, and packed with features that make building a website a breeze.
Django CMS, while powerful, is best left to the developers. If you’re looking for a quick and easy way to get online, WordPress is your best bet.
Customization Options: Making Your Website Your Own
Customization options are essential for creating a unique and functional website. So, how do WordPress and Django CMS compare in terms of customization?
WordPress: Customization Made Easy
WordPress is famous for its flexibility. I’ve built countless websites using the CMS, and I’m always amazed by how much you can change without writing a single line of code. The secret is the large selection of themes and plugins.
Themes transform your website’s appearance with just a few clicks. Thousands of free and premium themes mean you’re bound to find something that perfectly matches your style.
Looking for recommendations? Here are some of my favorite themes.
If you want more customization options, most themes offer built-in options to change colors, fonts, and layouts effortlessly.
Then there are plugins, which are like apps for your website. They add all sorts of functionality, from contact forms and online stores to SEO tools and security enhancements.
With over 59,000 free plugins in the WordPress plugin directory and countless premium plugins, the possibilities are nearly endless. Just see my pick of the best WordPress plugins for all websites to get an idea of what they can do.
Django CMS: Customization for Coders
Django CMS takes a different approach to customization. Instead of using visual interfaces and drag-and-drop builders, you customize your website using code.
If you’re a Python developer, this may sound perfect. You can build virtually anything you can imagine to your exact specifications. While it requires more development time upfront, the level of customization you gain can only be achieved using code.
Features like custom product displays, complex filtering options, and unique checkout processes are all possible thanks to Django’s code-centric approach.
Here’s a glimpse into Django CMS’s customization options:
Pre-built themes can be used as starting points for custom development. But most Django CMS projects involve building a custom theme from scratch.
Django apps extend functionality like WordPress plugins. However, installing and configuring them requires some coding knowledge, and the selection is not as extensive as the WordPress Plugin Directory.
Django’s templating system provides control over your website’s HTML structure and content presentation.
Django CMS integrates with other systems through APIs, allowing you to connect your website with CRM software, marketing automation tools, and more.
If you’re not a developer, you’ll need to hire one to customize your Django CMS website. While this adds to the cost, it also gives you more control over customization.
🏅 Winner for Customization Options – WordPress
If you want easy, no-code customization, WordPress is the clear winner. Its huge library of themes and plugins makes it simple to create a unique website without touching any code.
Django CMS offers ultimate flexibility for developers, but it comes at the cost of increased complexity.
Content Management: Keeping Your Content Organized
Effective content management is essential for websites with frequent updates. You need a CMS that makes it easy to create, organize, and manage all that content.
So, how do WordPress and Django CMS compare in this department?
WordPress: Content Management Powerhouse
WordPress began its journey as a blogging tool, and content management remains one of its greatest strengths. From personal blogs to extensive content hubs, WordPress excels thanks to its flexibility and user-friendliness.
Writing and editing content in WordPress is a breeze. The block editor is incredibly straightforward, allowing you to add text, images, and videos with simple drag-and-drop actions.
You can group your posts together in different ways using categories and tags. You can think of categories as the main sections of my website, and tags as a detailed index.
WordPress also has a built-in media library that makes managing images and videos super easy. You can upload, organize, and insert media into your content with just a few clicks.
And if you’re working with a team, WordPress’s user role management is extremely helpful. You can assign different roles (administrator, editor, author, and more) with specific permissions.
This makes sure that everyone has the access they need without risking accidental deletions or unwanted changes.
Need even more content management features? No problem! WordPress has thousands of plugins that can add everything from custom content types to advanced SEO tools.
Django CMS: Content Management for Developers
Django CMS offers a basic interface for creating and editing content. But it lacks the intuitive user-friendliness of WordPress. I’ve found that even simple tasks, such as creating pages or managing menus, can sometimes require technical knowledge.
And while Django CMS does offer user roles and permissions, configuring them is often more complex than in WordPress. Customizing roles or creating new ones typically involves coding or working with Django’s admin interface, which can be a hurdle for non-developers.
For instance, imagine you need to create custom user roles with specific permissions. In WordPress, this would be straightforward. Meanwhile, in Django CMS, it requires writing custom code.
Here’s a closer look at Django CMS’s content management features:
You can create and organize pages within a hierarchical structure. However, customizing page templates and adding advanced features often requires coding.
Adding a navigation menu is easy, but complex menu structures or dynamic menus might require custom development.
Managing user access and capabilities is possible, but customization often involves code.
You can track content changes and revert to previous versions of your content.
Django CMS offers multilingual capabilities, but configuring multiple languages can be complex.
While Django CMS offers powerful content management tools, its developer-centric approach can be challenging for non-technical users.
🏅 Winner for Content Management – WordPress
For most users, especially those without a technical background, WordPress is the clear winner for content management. It offers a user-friendly interface, powerful features, and a huge ecosystem of plugins for content creation, organization, and management.
Django CMS is more flexible for developers, but it comes at the cost of increased complexity.
eCommerce: Selling Online
Selling online requires a comprehensive eCommerce platform. Let’s compare WordPress and Django’s online store capabilities.
WordPress: Great for Selling Online
WordPress doesn’t have eCommerce features out of the box. But you can quickly set up an online store with the help of plugins like WooCommerce. I’ve used WooCommerce a lot for my own projects, and I found it to be very powerful and easy to use.
After installing WooCommerce, it guides you through the setup. Then, you can add products, set up payment methods (like Stripe or PayPal), and decide how to ship things right from the familiar WordPress dashboard.
You can easily customize WooCommerce using plugins and themes designed specifically for online stores. There are plugins available for detailed shipping costs, managing subscriptions, and even adjusting prices according to specific rules.
If you need a simpler way to sell online, especially for digital items or services, I would also suggest looking at Easy Digital Downloads (EDD).
Django also doesn’t have eCommerce features built in. However, its power and flexibility let you build the exact online store you want, piece by piece.
This approach gives you total control over everything in your store. You control how data is stored, how the site operates behind the scenes, what users see, and how it integrates with other services. It’s great for making unique online stores with custom features.
While you can build an eCommerce site completely from scratch using Django, there are several tools and frameworks that can help you build faster:
Oscar Commerce is a set of open-source tools for making eCommerce sites with Django. It provides a foundation for features such as product lists, shopping carts, checkout pages, and order management.
Saleor started as a Django program but has grown into a powerful, headless eCommerce platform. It can build modern online stores with separate front ends and backends.
There are also simpler tools and libraries if you only need certain eCommerce features.
Building a custom store with Django requires coding knowledge. It’s a good fit for businesses with complex needs, but it’s not a suitable choice for beginners.
🏅 Winner for eCommerce – WordPress
In most cases, WordPress wins in the eCommerce category.
That’s because you can easily turn WordPress into an eCommerce platform by installing an eCommerce plugin like WooCommerce or Easy Digital Downloads. You can quickly get started selling online at an affordable price, and the large WordPress community means it’s easy to find help and information.
Django may be better for building custom online stores where you need full control over every small detail and have a large budget. For example, your developers could build a system with complex billing rules and smart ways to suggest products for specific customers.
That said, you can still get advanced eCommerce functionality with WordPress as long as you have the right tools. For instance, you can add wholesale features using Wholesale Suite or create custom eCommerce automations with Uncanny Automator.
Performance: Speed Matters
Website performance is crucial for user experience, search engine rankings, and your bottom line. So, let’s see how WordPress and Django CMS compare.
WordPress: Performance Requires Optimization
WordPress is incredibly popular, and out of the box, it’s generally fast enough for most small websites. But as your site grows, with more content, plugins, and fancy features, things can start to slow down.
I’ve seen this happen with friends’ websites. One of the biggest causes of this is poorly coded themes and plugins. That’s why it’s important to select the perfect WordPress theme and the right WordPress plugin.
And speaking of tools, a caching plugin is essential for any WordPress site. Caching works by taking a ‘snapshot’ of your web pages and storing them temporarily, instead of generating them from scratch every time a visitor arrives.
This significantly reduces server load and speeds up your site. I personally recommend WP Rocket for its user-friendly interface and powerful optimization features.
We used it for a long time here at WPBeginner and had a great experience with it. You can see our full WP Rocket review for more information.
Django CMS is built on the high-performance Django framework, which is designed for speed and efficiency from the ground up.
Because features and customizations are built with code, there’s less reliance on plugins or extensions that could add bloat and slow down a website.
Django’s efficient architecture and the streamlined, custom-coded nature of the site can result in better performance, lower page load times, and the ability to handle higher traffic volumes.
But it’s important to remember that even with Django CMS, poorly written code can negatively impact performance. If you’re not an experienced Django developer, you should hire one to make sure your site is optimized for speed and efficiency.
Beyond just being fast, Django is also incredibly scalable. This means a Django CMS site can easily grow with your business, handling a large increase in traffic, content, and features without a significant drop in performance.
🏅 Winner for Performance – Django CMS
Out of the box, Django CMS generally outperforms WordPress in terms of speed and efficiency (as long as you’re using efficient coding practices). However, with proper optimization, WordPress can also achieve excellent performance.
If you’re willing to put in the effort (or hire someone who is), then WordPress can handle even high-traffic events. But if speed is your top priority and you have the technical expertise, Django CMS might be a better choice.
Security breaches can devastate a website. They can result in lost data, frustrated users, and a damaged reputation.
So, let’s talk about how WordPress and Django CMS compare when it comes to keeping your site safe.
WordPress Security: Staying Ahead of the Threats
With the right precautions, WordPress can be incredibly secure. I’ve used it for years on countless sites, and I’ve learned a few tricks along the way.
First of all, it’s best to keep everything updated. The WordPress core software is regularly patched for security vulnerabilities, so those updates are your first line of defense.
I always recommend setting up automatic updates whenever possible because it’s one less thing to worry about.
Next, you’ll want to be picky about your themes and plugins. Just like I wouldn’t install software from a suspicious website on my computer, I’m careful about what I add to my WordPress sites.
It’s best to stick to reputable sources like the official WordPress directory and well-known developers. And remember, you’ll need to keep those plugins and themes updated, too. Updates often fix security vulnerabilities that could be used to hack your website.
On top of following these best practices, I also recommend using a security plugin. This tool will typically offer malware scanning, firewall protection, and more.
Django CMS uses the Django framework’s strong security foundation right out of the box. This is a major advantage for developers who want to prioritize security from the ground up.
For instance, when users submit content on a Django site, the system automatically cleans it up. This prevents a common type of attack called XSS (Cross-Site Scripting), where malicious code tries to sneak onto your site through user input.
Also, for every form you fill out on a Django site, there’s a unique, invisible security token attached to it. This makes it much tougher for attackers to hijack your session or trick you into doing something unintended.
That said, Django requires a lot of the same security best practices as WordPress (or any other CMS), such as regular updates, strong passwords, and two-factor authentication.
Secure coding practices and proper configuration are also important, especially when dealing with sensitive data.
If you’re not a developer, you’ll need to hire a Django expert to make sure your site is configured securely, and you may need them to run regular security audits.
🏅 Winner for Security – Django CMS
Django CMS is more secure out of the box, thanks to the framework’s built-in protections. However, with proper precautions, like regular updates, careful plugin selection, and a solid security plugin, WordPress can also be very secure.
Ultimately, the security of any website depends on your diligence and the steps you take to protect it, regardless of the platform you choose.
Community and Support
A supportive community and readily available resources are essential when building a website. Let’s see how WordPress and Django CMS compare for community and support.
WordPress: A Global Community at Your Fingertips
WordPress is the most popular website builder and has a huge, global community of users, developers, and designers.
Whether you’re stuck on a coding problem, need help choosing a plugin, or just want some general advice, there’s always someone willing to help. And there are plenty of helpful WordPress resources, including Get Started documents, courses, workshops, and lessons.
You’ll find answers to almost any question you can imagine. You can learn more on the official Learn WordPress and Make WordPress pages.
And here at WPBeginner, we offer many different tutorials like this one, a newsletter, free video tutorials, the WPBeginner Engage Facebook Group, a YouTube channel, and more.
Django CMS has a smaller, more niche community compared to WordPress. This smaller community means you’re interacting with a highly skilled and dedicated group of individuals who are willing to share their expertise.
However, the smaller community does mean fewer readily available resources. You’ll find less documentation, fewer online tutorials, and a smaller selection of pre-built themes and plugins.
This can make it more challenging to find solutions to common problems. You might have to rely more on your own problem-solving skills or reach out directly to the community for assistance.
The Django CMS community is active on platforms like Stack Overflow and specialized forums. While it might take a bit more effort to find answers, the quality of support is often very high. You’re more likely to get in-depth technical assistance from experienced developers.
Here are some key differences in community support:
While Django CMS has official documentation, it’s often more technical and assumes a higher level of coding knowledge compared to WordPress’s user-friendly documentation.
The Django CMS community is active on various platforms, but the overall size and activity level are significantly lower than WordPress’s massive online presence.
A smaller selection of readily available themes and plugins means you’ll likely need to invest more time in custom development or searching for suitable third-party solutions.
If you’re comfortable with independent learning and problem-solving, the smaller Django CMS community might not be a major drawback. However, it doesn’t compare to WordPress’s large and active community, which offers readily available resources.
🏅 Winner for Community and Support – WordPress
For most users, WordPress offers better support due to its large, active community and readily available resources.
However, developers will appreciate Django’s smaller, more focused community, although it requires more independent problem-solving.
Cost: Which CMS Is More Affordable?
WordPress and Django differ significantly in their overall cost. I’ll give you some real-world examples so you can get a better idea of what to expect.
WordPress: Budgeting for Your Site
WordPress itself is free, but you’ll need web hosting and a domain name (around $10-20 per year). Web hosting is where your website is stored, and a domain name is your site’s address.
Hosting costs can range from a few dollars a month for basic shared hosting (perfect for beginners) to hundreds or even thousands for high-performance managed hosting (ideal for larger sites with lots of traffic).
Let me give you a few examples of what to expect:
💵 Basic Blog: $50-150 per year (hosting, domain, a simple theme)
💸 Small Business Website: $100-500 per year (hosting, domain, a slightly more advanced theme, a few premium plugins)
💰 eCommerce Store: $ 500-2,000+ per year (hosting, domain, a premium WooCommerce theme, several specialized plugins, potentially some custom development)
I’ve used both shared and managed hosting, and the best choice really depends on your specific needs.
For example, when WPBeginner was launched, we first used shared hosting to keep costs low. As the site grew, we switched to managed hosting for better performance and security.
While there are many excellent free themes and plugins available, premium options can significantly enhance your site’s functionality and design.
I often recommend premium plugins for features like advanced SEO or eCommerce functionality. These can be one-time purchases or ongoing subscriptions. Either way, you’ll need to factor those into your budget.
Finally, if you need custom development work, you might need to hire a developer or designer. This can add to the overall cost, but it’s often worth the investment for a truly unique and functional website.
Like WordPress, Django CMS is free. But because it’s more developer-focused, the overall cost is usually higher.
You’ll still need hosting and a domain name, but you’ll likely need more powerful (and more expensive) hosting options like VPS or cloud hosting to handle Django’s requirements.
I’ve found that this can be a significant difference in ongoing expenses compared to basic WordPress hosting. Expect to pay $50-200+ per month for suitable hosting.
The most significant cost difference, however, typically comes from development. Django CMS almost always requires a developer for setup, customization, theme creation, and maintenance.
I’ve seen projects range from a few thousand dollars for a basic setup to tens of thousands for complex, custom-built applications. While you’ll save on premium themes and plugins (Django customization is done through code), developer fees are a substantial part of your budget.
For example, a simple Django CMS website could cost $3,000-$8,000 in initial development costs, while a complex web application could easily exceed $20,000.
🏅 Winner for Affordability: WordPress (Usually)
WordPress is more affordable for most users, especially those starting with a smaller budget. I’ve helped a lot of different people launch websites on a tight budget using WordPress. The lower hosting costs and free themes and plugins make it a great choice for getting started.
However, for some complex custom projects, Django might be a better long-term investment, despite the higher upfront development costs.
The Verdict: Choosing the Right CMS for Your Needs
For most users, especially those who prefer not to work with code, WordPress is the clear winner. Launching websites with WordPress is easy, even for people with limited technical skills. It’s quick to set up, easy to use, and incredibly versatile thanks to the massive library of themes and plugins.
If you want a user-friendly way to create and manage content, WordPress is hard to beat. It’s like having a trusty toolbox filled with all the tools you need to build just about anything.
However, if you’re tackling a complex project that demands serious customization, high scalability, and robust security right out of the box, then Django CMS might be a better choice.
To help you make the right decision, here’s a table summarizing the typical users and primary use cases each platform is designed for:
Who It’s For
WordPress
Django CMS
Typical Users
Bloggers, small businesses, content creators, non-developers
Developers, large enterprises, startups needing custom solutions
Primary Use Cases
Blogs, portfolios, simple business websites, eCommerce stores (with plugins)
Complex web applications, custom CRMs, data-driven sites, highly scalable platforms
I always recommend carefully considering your priorities, technical skills, and budget before making a decision.
Expert Tip: Want a beautiful WordPress website without all the hassle? Our team offers affordable WordPress Website Design Services, including:
A dedicated project manager
Multiple revisions
Design services for blogs, eCommerce stores, and more
Prices start at just $799 for a new website. Check out our Design Services page for more information!
FAQs About WordPress vs. Django CMS
Now that you have read our comparison of WordPress vs. Django CMS, you may still have some questions. Here are some brief answers to frequently asked questions.
Is WordPress or Django easier for beginners?
WordPress is much easier to use for beginners and users without coding experience. It has a user-friendly interface, one-click installation, and a large library of themes and plugins. This makes it quick to set up and manage content.
Is Django CMS good?
Yes, Django CMS is considered a good content management system. It’s a strong choice for complex projects where a standard, off-the-shelf content management system (CMS) might be too limiting. However, most users will find WordPress a better choice for their blog or website.
Which is better for content, WordPress or Django CMS?
I prefer WordPress for content-focused websites. Its core design and editor are built for usability, and extending content types is simple using themes and plugins.
Django CMS provides an editing interface, but setup and customization require coding expertise.
Do I need coding skills to use WordPress or Django?
You can build functional websites with WordPress without coding skills, thanks to its user-friendly dashboard and extensive plugin ecosystem. However, you can choose to hire a developer if you need extensive customization.
Django, on the other hand, fundamentally requires coding skills for development, setup, and customization.
Is WordPress or Django more customizable?
WordPress provides extensive customization for non-developers through themes for appearance changes and plugins for adding features. Django offers customization at the code level due to its nature as a framework.
Which platform is more secure, WordPress or Django?
Django CMS is often considered to have a stronger built-in security foundation. However, if you keep its core, themes, and plugins up to date, then WordPress can also be very secure, especially when you use a reputable security plugin.
Is WordPress faster than Django?
Django CMS is designed for speed and has a performance advantage, particularly for complex and high-traffic websites. However, if you spend time optimizing WordPress, its performance can also be excellent.
Which is more affordable, WordPress or Django?
WordPress can be a more affordable option for getting started, especially for basic websites. There are many free themes and plugins, and basic hosting can be inexpensive. However, costs for premium themes, plugins, and development help can add up.
Django projects typically require developer involvement from the start, which can lead to higher upfront costs. But for complex projects, this can be a worthwhile investment for long-term scalability and maintainability.
Are there a lot of resources for Django?
WordPress has a much larger community and more resources, including documentation, tutorials, and available developers.
Django CMS has a smaller but active and developer-focused community. There are resources, but nowhere near as many as for WordPress.
When should I choose WordPress vs. Django CMS?
I recommend choosing WordPress if you need a user-friendly CMS for blogs, small business websites, or content-focused sites where ease of use is important.
You may want to opt for Django CMS if you are building complex websites, web applications with content management needs, or projects requiring high levels of customization, scalability, and security.
Bonus Resources: Website Building & Content Management
I hope this tutorial helped you compare WordPress vs. Django and their pros and cons.
You may also want to see some other helpful resources we have at WPBeginner:
When I first started building websites, I thought about using Drupal. It’s a strong platform, but it was too complicated and hard to learn, especially for beginners.
That’s why I chose WordPress instead. It’s powerful, easy to use, and now, it’s what I use for all my websites.
Over the years, I’ve helped many business owners and developers switch from Drupal to WordPress. I know it can feel overwhelming to move your whole website without losing content or breaking anything.
That’s why I created this simple guide to help you migrate from Drupal to WordPress safely and easily. It walks you through each step, using methods I’ve tested and improved with others who have made the same switch.
Whether your website is small or large, I’m here to help you make the change as smoothly as possible. Let’s get started together!
Why Migrate From Drupal to WordPress?
Drupal and WordPress may look similar. But in practice, these website builders are very different.
I’ve found that Drupal, while incredibly capable, can sometimes feel complex and overpowered.
Simple content updates start taking longer than they should. Finding the right developer to make tweaks isn’t always easy or cheap. And honestly, the backend can feel overwhelming sometimes.
In my experience, WordPress is much more user-friendly, which is why I always recommend it to people looking to make a website.
Think of it as your favorite everyday tool that’s easy to pick up and intuitive to use. It makes many tasks very easy to do, like writing and publishing a new blog post, adding an image to a page, or installing a simple contact form.
Drupal, on the other hand, is more like a highly specialized toolkit. It is precise and powerful, but it can feel like overkill for your daily needs. It can be difficult to do something that’s simple in WordPress, like setting up a custom page layout.
Step 1. Back Up Your Drupal Website and Link Structure
Before you start migrating your Drupal site, you need to create a safe copy of everything.
It’s also a great idea to back up the link structure of your website. You’ll use this information later to make sure you don’t lose your search engine rankings.
Backing Up Your Drupal Website Using a Module
You can back up your Drupal website easily using a module, or more advanced users can do it manually (see below).
The Backup and Migrate module makes backing up a Drupal website pretty straightforward.
Just visit Administration » Extend and you will find the module in the ‘Other’ section. Simply click the checkbox next to the module and then click the ‘Install’ button at the bottom of the page.
Note: If you don’t see it listed, then the module’s files haven’t yet been added to Drupal. This is a little technical, and you may need to contact your hosting provider for support.
More advanced users can install the module by using SSH. You will need to navigate in the terminal to the root directory of your Drupal installation and type in the following command:
composer require 'drupal/backup_migrate:^5.1'
Once the module is installed, you’ll find it in your Drupal admin menu. It allows you to create backups of your database, files, or both. For a full site backup, you’ll want to back up everything.
Backing Up Your Drupal Website Manually
Alternatively, if you’re comfortable with the technical side of things, then you can also back up your Drupal site manually.
First, you’ll need to back up your website files using your hosting provider’s file manager or FTP software.
When the file manager opens, click on the public_html folder in the left menu and then select your website’s folder in the left pane. You need to right-click on that folder and create the ‘Compress’ option from the menu.
When asked for a compression type, you should select the ‘Zip Archive’ option. After your website has been compressed, you can close the confirmation message.
Next, you need to find the compressed zip file in the public_html folder. Right-click the file and select the ‘Download’ option. Make sure you store this backup file in a secure location.
Next, you’ll need to back up your database using phpMyAdmin. You will find this useful tool in the account dashboard of most reputable hosting providers.
For example, on Bluehost, you will find it by clicking on the Hosting tab and then scrolling down the page.
Clicking the phpMyAdmin button will launch the application in a new browser tab.
From here, click to select your Drupal database from the left column and then click on the ‘Export’ button at the top.
When you are asked to select the export method, you should select ‘Custom’. It will show you all of the database tables in your Drupal website.
To create a full backup, make sure all of the tables are selected.
You now need to scroll down to the ‘Output’ section and select the ‘Save output to a file’ option.
For compression, select the ‘zipped’ option.
Finally, scroll to the bottom of the page and click the ‘Go’ button.
The compressed database file will be saved to your computer, and you can store it safely, along with the file backup you created earlier.
Backing Up Your Link Structure
Next, you need to back up your link structure. This is important for SEO and making sure that people can find your content online.
You need to make a list of all your current Drupal URLs so that you can set up redirects later in WordPress. This way, if someone clicks an old link to your Drupal website, then they’ll be automatically sent to the right page on your new WordPress site.
I like to use a Chrome extension called Link Klipper. It’s free, easy to use, and can quickly save all the links from a website. You can easily install it in your browser using the link above.
Next, you need to visit your Drupal website’s homepage in your Chrome browser. Once there, just click the Link Klipper icon in your browser toolbar and choose the option that says ‘Extract All Links’.
Link Klipper will do its thing and grab all the links from your homepage and the pages it can find linked from there. It will download these links as a comma-separated values (CSV) file.
When you open that CSV file in Excel or Google Sheets, you’ll see a complete list of your Drupal URLs. Make sure you save this file somewhere safe because you’ll need it later.
Step 2. Installing and Setting Up WordPress
The requirements for both Drupal and self-hosted WordPress are quite similar. You’ll need a domain name and a WordPress hosting account to start with WordPress.
If you already have a domain name and website hosting account for your Drupal website, then you can use them for your WordPress website as well.
Alternatively, if you want to move to a different hosting provider, then I recommend using Bluehost, which is one of the top hosting companies recommended by WordPress. They offer WordPress hosting and a free domain name for just $1.99 a month.
Alternatives: If you’d like to explore a few other good options, then Hostinger and SiteGround are also worth considering. They both have strong reputations in the WordPress hosting world and offer good performance. For more options, see my expert pick of the best WordPress hosting providers.
For this guide, I’ll use screenshots from Bluehost to give you a visual example of the process.
You need to navigate to the Bluehost website and click the green ‘Get Started Now’ button.
You’ll then land on their pricing page, which shows you different hosting plans. Their ‘Basic’ plan is perfect for most websites.
Pick a plan that suits you by clicking the ‘Select’ button under it.
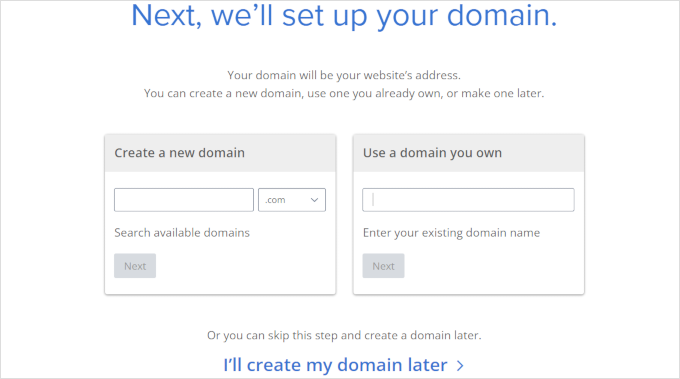
Next, you’ll be asked about the domain name you want to use. This is your website’s address, like www.yourwebsite.com.
You need to select ‘I’ll create my domain name later.’ This gives you time to migrate everything before pointing your domain to WordPress.
Why set up a domain later? 🤔 If you already have a domain connected to your Drupal site, then choosing this option lets you set up WordPress without affecting the live site. Once everything is ready, I’ll show you how to point your domain to WordPress.
After the domain step, you’ll need to fill in your account details (name, address, and so on) and your payment information to complete the purchase.
Bluehost will then send you a confirmation email with your login details. Keep this email safe! You’ll need those details to log in to your hosting account dashboard.
When you log in to your Bluehost account for the first time, they install WordPress automatically for you.
Now, just look for the ‘Edit Site’ button in your hosting dashboard and click it. That will take you straight to your WordPress admin area, where you can manage your new website.
And that’s it. You’ve now successfully installed WordPress.
Expert Tip: Working with a different hosting provider? We have a detailed WordPress installation tutorial that goes through every single step.
Step 3. Importing Your Drupal Content
To make the migration process as smooth as possible, I’ll show you how to use a free WordPress plugin called FG Drupal to WordPress. It automates a lot of the heavy lifting involved in moving content between these two platforms.
First, you need to install and activate the plugin. For more details, see my step-by-step guide on how to install a WordPress plugin.
You’ll then find the importer tool under Tools » Import in your WordPress dashboard menu. You’ll see a list of different import options. Look for ‘Drupal’ in the list and click the ‘Run Importer’ link.
This will launch the FG Drupal to WordPress importer. Now, you’ll need to give the importer some information about your Drupal website so it can connect and grab your content.
The first thing it will ask for is your Drupal website URL.
Next, it needs your Drupal database details to get all your posts, pages, and other content. You’ll need to provide:
⛁ Database Host: This is usually localhost if your Drupal and WordPress sites are on the same server. If not, you’ll need to get this from your Drupal hosting provider.
⛁ Database Name: The name of your Drupal database.
⛁ Database User: The username used to access your Drupal database.
⛁ Database Password: The password for that database user.
⛁ Table prefix: Drupal uses table prefixes to keep things organized in the database. You’ll need to enter your Drupal table prefix here. It’s often something like drupal_.
You may have written this information down when you first set up your Drupal website. Otherwise, advanced users can use FTP to find the details in your Drupal settings.php file. Or simply contact your Drupal hosting provider and ask for assistance.
Once you’ve entered all the database details, click the ‘Test database connection’ button in the importer. If everything is correct, then you should see a ‘Connection successful’ message.
Below the connection settings, you’ll see some additional options in the importer. These let you control what gets imported, like featured images, content images, and other things.
Just leave the default settings as they are for your first import.
When you’re ready, you can start the import by clicking the big ‘Start / Resume the Import’ button. The importer will start fetching your content from your Drupal website and bringing it into WordPress. It will also import your images, blog comments, and more.
The time it takes depends on the amount of content you have. Once the import is finished, you should see a success message.
The FG Drupal to WordPress plugin can also help you fix internal links.
Sometimes, after a migration, links within your content might still be pointing to your old Drupal site structure. The plugin can try to update these to point to your new WordPress site.
Scroll down to the bottom of the importer page and click the ‘Modify internal links’ button.
Step 4. Pointing Your Domain Name to Your New WordPress Website
Now that your content is imported into WordPress, you need to make sure people will find your new site when they type in your domain name.
If you already have a domain name for your Drupal website (like yourwebsite.com), then you want to keep using that same domain for WordPress. You need to adjust your nameservers to point to your new WordPress site.
Your new WordPress hosting provider, like Bluehost, Hostinger, or SiteGround, will give you the nameserver information you need.
It usually looks like a pair of addresses, something like:
You change these settings with your domain name registrar, the company where you originally registered your domain name.
Sometimes, your domain registrar might be the same company as your hosting provider. But often, they’re separate. Common domain registrars include companies like Network Solutions and Namecheap.
You need to log in to your account at your domain registrar’s website. Once you’re logged in, find the settings for your domain name. Look for something like ‘DNS Settings’, ‘Nameservers’, ‘Domain Management’, or ‘Manage DNS’.
For example, here is the screen you will see on Bluehost.
Once you’ve updated your nameservers, it takes a little while for these changes to spread across the internet. This is called DNS propagation.
DNS propagation can take anywhere from a few hours to, in some cases, up to 24-48 hours. During this time, some people might still see your old Drupal website, while others might start seeing your new WordPress site.
Step 5. Setting Up Permalinks and Redirects
Your old Drupal site had its own way of structuring URLs. WordPress does things a bit differently with permalinks.
Because the URLs for each post will be different, anyone who has a link to your old Drupal content will end up seeing a frustrating ‘404 Page Not Found’ error on your new WordPress site.
To prevent broken links, you have to set up SEO-friendly permalinks in WordPress and redirect your visitors from your old Drupal URLs to the right pages on your new WordPress site.
Setting Up WordPress Permalinks
WordPress gives you a few different options for how your website addresses (URLs) are structured. These are called permalinks.
The ‘Post name’ setting is a popular choice. It creates nice, clean URLs that usually include the title of your page or blog post. This structure can be helpful for both visitors and search engines because it makes the URL easy to read and gives a clear idea of what the page is about.
In your WordPress dashboard, go to Settings » Permalinks. You’ll see a section called ‘Common Settings’. Find the option labeled ‘Post name’ and click the radio button next to it to select it.
Then, just scroll down to the bottom of the page and click the ‘Save Changes’ button. Done!
Setting Up Redirects from Your Old Drupal URLs
Now you need to set up redirects to make sure your old Drupal links still work. To do this, you will need that list of old Drupal URLs you grabbed using Link Klipper in Step 1.
Tip: If you use the premium version of FG Drupal to WordPress to import your Drupal content, then it can automatically create these redirects for you.
To set up redirects easily in WordPress, you need to install and activate a plugin called Redirection. It’s free and it makes managing redirects a breeze. If you need help, see my guide on how to install a WordPress plugin.
Once activated, you’ll find the Redirection plugin settings under Tools » Redirection in your WordPress menu.
In the Redirection plugin interface, you’ll see fields for Source URL and Target URL:
Source URL is where you enter your old Drupal website URL – the one you want to redirect from. Just include the part after the domain name, like /my-old-page.
Target URL is where you enter the new WordPress URL for the same page. Again, just include the part after the domain name, like /my-new-page.
Make sure the ‘301 – Moved Permanently’ option is selected for the ‘Match’ type (it’s usually the default). This tells search engines that the page has permanently moved to a new location, which is important for SEO.
Finally, click the ‘Add Redirect’ button to save the redirect.
Now, you’ll need to go through your list of old Drupal URLs and repeat these steps for each URL you want to redirect. It can be a bit repetitive if you have a lot of pages, but it’s worth the effort to avoid broken links and keep your SEO intact.
If you’re already using the All in One SEO (AIOSEO) plugin, or if you’re planning to use it to improve your website’s SEO, then it also has a redirection manager built in.
It’s a powerful WordPress SEO plugin that lets you easily set up full site redirects, plus it offers many other features to help your website rank higher in search results.
For example, its 404 error tracking can easily catch broken links, and you can add schema markup, custom breadcrumbs, local SEO modules, and much more.
Step 6. Setting Up Your WordPress Theme
To make your WordPress website look amazing, you need to choose and install a theme. These are ready-made design templates for your site that control its appearance, including the colors, fonts, layout of your pages, and how your blog posts are displayed.
There are plenty of free themes and premium themes available for every possible niche and industry you can imagine.
In my experience, clean and simple designs tend to work best for most websites. They look more professional, they’re easier for visitors to navigate, and most importantly, they put the focus where it should be: on your content.
To help you narrow things down, I put together a guide on selecting the perfect WordPress theme. It walks you through the key things to consider and helps you avoid some common traps.
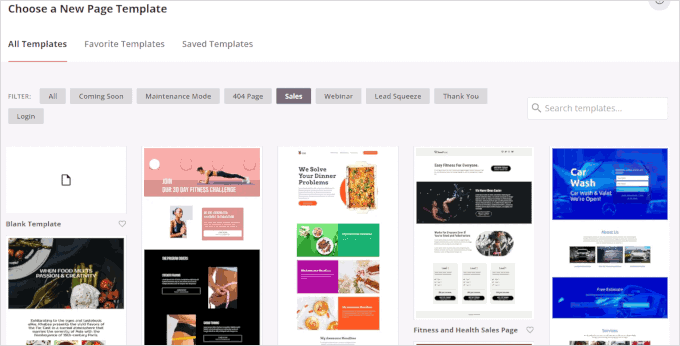
Alternatively, you can easily create a custom WordPress theme using drag-and-drop with the SeedProd website builder plugin. This is a great option if you want to perfectly match your old site’s look without writing code, giving you full control over the design.
Of course, if you prefer, you can always hire professionals to design and code a completely custom WordPress website for you.
Step 7. Install Essential WordPress Plugins
WordPress plugins are easier to install than Drupal modules. Thousands are available, both free and paid. So, I created a guide on how to pick the best plugins for your website.
But first, let me introduce you to some must-have plugins that I recommend for pretty much every new WordPress site:
WPForms lets you create all sorts of WordPress forms – contact forms, surveys, order forms, and more. I use it on my own websites to allow readers to contact me and gather their feedback.
SeedProd is a powerful drag-and-drop website builder. It lets you easily customize your WordPress design, create unique page layouts, or even build a complete custom theme.
AIOSEO (All in One SEO) helps you optimize your blog for better search engine rankings. It’s the most powerful SEO plugin for WordPress.
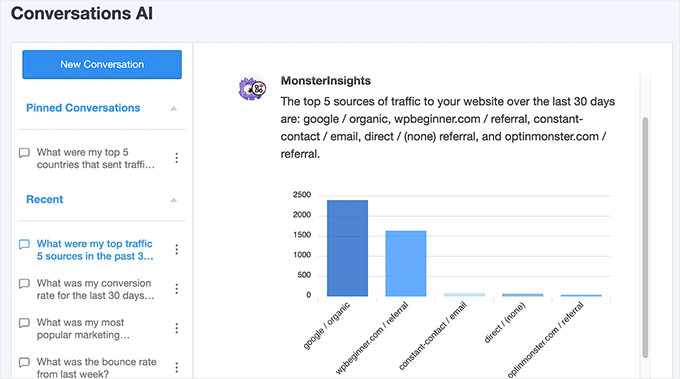
MonsterInsights connects to Google Analytics and makes it easy to understand your traffic and visitor behavior right inside your WordPress dashboard.
OptinMonster helps you create popups, slide-in forms, and other opt-in forms to grow your email list and boost conversions.
Alternative: Get Professional Help to Migrate Your Drupal Website
While many of you will be able to follow this guide to migrate from Drupal to WordPress, it’s still a pretty technical project. Maybe you’re not very techy or are simply too busy to do it yourself.
If that sounds like you, then our WPBeginner professional services team can lend a hand. We’ve helped tons of people with their WordPress websites, and we can help you too.
Here are a couple of ways we can make your Drupal to WordPress migration easier:
Premium WordPress Support Services: Reach out to our team anytime you get stuck, have questions, or just want some personalized help with your migration. We can guide you through specific steps, troubleshoot issues, or even take over certain tasks for you.
Quick Site Launch Service: Want a completely fresh start with a brand new, custom WordPress website? Our Quick Site Launch service team can design and build a website from the ground up. And we can handle the whole content migration from Drupal.
If you’re curious to learn more about these services or if you just have some questions about migration in general, then we’re here to chat! You can easily get in touch with our support team on our Website Design Services page.
Bonus: Learning WordPress
Now that you have a new WordPress website, you’ll want to learn more. Luckily, we have lots of free resources to help you quickly become a WordPress pro:
The WPBeginner Blog is the heart of WPBeginner. It’s a WordPress learning library packed with thousands of easy-to-follow tutorials, guides, and how-to articles.
The WPBeginner Dictionary helps you understand all the WordPress terms and jargon, like a WordPress translator.
WPBeginner Videos walk you through common WordPress tasks step-by-step, visually, from basic to more advanced techniques.
Our WPBeginner YouTube Channel is packed with WordPress tips, tutorials, and how-tos to help you stay up-to-date with the latest WordPress goodness.
The WPBeginner Blueprint gives you a peek behind the scenes and shows you our recommended WordPress setup.
WPBeginner Deals offer exclusive discounts and coupons on WordPress themes, plugins, hosting, and more.
When I first looked into hosting WordPress on Google Cloud, I thought, “This could be the upgrade I’ve been waiting for.”
The idea of running my site on the same infrastructure powering Google Search and YouTube? That was exciting. But it also raised a lot of questions.
There’s no question that Google Cloud offers serious speed and reliability. But I quickly realized that it’s not built with beginners in mind. Between managing virtual machines, setting up your server, and configuring DNS, it’s easy to get stuck.
The good news is that you don’t have to do it the hard way. Whether you want a simple managed solution or you’d rather roll up your sleeves and do it all yourself, I’ll show you both options.
By the end of this guide, you’ll know exactly how to host WordPress on Google Cloud and which path I recommend based on real-world experience.
Why Host WordPress on Google Cloud?
Google Cloud is known for speed, stability, and high-powered infrastructure. It powers everything from YouTube to Gmail, and it’s built to handle huge amounts of traffic without any issues.
That’s why a lot of website owners, including myself at one point, start thinking: “If I host my WordPress site on Google Cloud, won’t I get the same performance?”
And in theory, yes — you can. But there’s a big difference between having access to Google Cloud and actually knowing how to use it well for WordPress. It’s like buying a race car without knowing how to drive it.
That’s where most people get stuck. The platform itself is amazing, but it’s built for engineers and DevOps teams, not regular WordPress users trying to publish content or grow an audience.
So if you’ve been wondering whether Google Cloud is the right choice for your WordPress site, you’re not alone.
In the next section, I’ll show you the easiest way to tap into its power, without having to configure anything manually.
After that, I’ll walk you through two hands-on methods if you prefer the DIY route.
You can use the jump links below if you want to skip ahead:
Method 1: Use SiteGround to Host WordPress on Google Cloud
If you want the speed and reliability of Google Cloud without the technical setup, then SiteGround is the option I recommend — and personally use.
We also host WPBeginner on SiteGround. Describing the move, Syed Balkhi, founder of WPBeginner, wrote:
After testing SiteGround across multiple projects and seeing how well their platform handled real-world demands, I knew it was the right move for WPBeginner.
SiteGround runs its entire platform on Google Cloud infrastructure, so you get the same performance without having to manage it all yourself.
You don’t need to worry about setting up servers, installing software, or handling updates. Everything from performance tuning to WordPress security is already taken care of. You just log in, install WordPress, and start building your website.
SiteGround makes it easy for anyone to get started. Their dashboard is clean and beginner-friendly, and you get powerful features out of the box, including automatic caching, free CDN, daily backups, built-in security, and one-click staging environments.
Pros of Using SiteGround
Built on Google Cloud’s fast and reliable infrastructure
No technical setup required — perfect for beginners
Excellent customer support with real WordPress experts
Includes caching, backups, security, and CDN out of the box
Flat monthly pricing, with no surprise bills
Cons of Using SiteGround
Not ideal if you want full server-level control or custom OS-level tweaks
More advanced developers might prefer a DIY cloud setup for niche use cases
Pricing: Unlike Google Cloud Platform’s pay-as-you-go pricing, SiteGround offers fixed pricing starting from $2.99 per month.
If you just want to build your site and have it run fast, stay secure, and never think about server maintenance, this is the easiest and most reliable way to do it.
How to Host WordPress on Google Cloud Using SiteGround
First, you need to visit SiteGround’s website and choose a WordPress hosting plan.
I recommend choosing the Startup plan if you are just getting started, or the GrowBig plan if you are upgrading from a regular shared hosting service.
Next, you will be asked to choose a domain name. SiteGround offers a free domain name with each hosting plan for the first year.
If you already have a domain name, you can use that as well.
After that, you will be asked to provide personal information to create your account.
Just fill in the information and go to the payment section to complete your signup.
Once you have completed the purchase, you need to log in to your SiteGround account.
From here, simply click WordPress » Install & Manage.
Select WordPress, or if you want to build an online store, then select WordPress + WooCommerce.
Simply follow the on-screen instructions to complete the setup wizard.
Congratulations 🎉 Your WordPress website is running on Google Cloud. It is already fully optimized and ready to go.
How to Manually Host WordPress on Google Cloud
There are multiple ways to manually host WordPress on Google Cloud. You can use a ready-to-deploy instance or deploy it manually yourself.
Here is a comparison table to understand the difference between the two approaches:
Feature
Manual VM Setup
Click to Deploy
Ease of Use
Requires Linux experience and command line
Easier with a guided setup wizard
Installation Speed
Slower – install and configure everything yourself
Faster – WordPress and stack are auto-installed
Customization
Full control over software and server settings
Limited with a pre-configured environment
Learning Value
Learn about the system setup in depth
Good for getting started without diving deep into system setup
Maintenance
You’re fully responsible
You’re still responsible, but there are pre-installed tools
Use Case
Developers, technical users, or testing environments
DIY users who want to try GCP hosting
Method 2: Use Google Cloud Marketplace to Install WordPress (Click to Deploy)
If you’re not comfortable running server commands or want a quicker way to get started, then Google Cloud offers a ‘Click to Deploy’ version of WordPress in their Marketplace.
It sets up a fully functional WordPress site with a few clicks, including your virtual machine, database, and web server stack.
Here are the pros and cons of using the Click to Deploy method.
Pros:
Faster and easier than manual setup
No need to SSH or install software manually
Great for users new to Google Cloud
Cons:
Less flexibility because you’re using a pre-configured environment
Still responsible for backups, updates, and security
Some users report difficulty scaling or customizing Click to Deploy sites later
Overall, if you’re experimenting or building a personal project, this method is a great way to get started.
Step 1. Create a New Google Cloud Project
To begin, log in to your Google Cloud account and create a new project from the dashboard.
Step 2. Turn on billing
After creating your project, you need to enable billing.
From the left-hand menu, click on Billing and follow the on-screen instructions.
Step 3. Select Click to Deploy WordPress Package
Once billing is active, click the search bar at the top of the dashboard and type in “WordPress.”
From the results, you need to choose the option labeled ‘WordPress – Click to Deploy’ by Google Cloud.
On the next screen, go ahead and click the ‘Get Started’ button.
After that, you may be asked to agree to the terms of service and enable APIs. Simply follow the instructions to move to the next step.
Step 4. Configure Your WordPress Deployment Settings
On the next screen, you’ll see a form with several options for setting up your WordPress instance.
Let’s walk through each one so you know exactly what to choose.
Start by giving your deployment a name. This is just a label inside your Google Cloud dashboard, and you can use something like wordpress-1 or mywebsite.
For the Deployment Service Account, leave it set to ‘New Account’. Google Cloud will automatically create the right permissions to manage your instance.
Next, choose a zone where you want your website to be hosted.
Pick a region closest to your target visitors. For example, asia-southeast1-c for Asia or us-central1-a for the United States.
Under Machine type, you should stick with General Purpose. Then choose ‘e2-small (2 vCPU, 2 GB memory)’, which is a good balance between cost and performance.
In the Administrator email address field, you need to enter your real email address. This is where Google will send notifications and status updates related to your server.
Below that, you’ll see optional features. I recommend keeping both Install phpMyAdmin and HTTPS Enabled checked. This adds a database manager and an SSL certificate to your install.
For Boot Disk, leave it as Standard Persistent Disk with 20 GB selected. That’s enough for most small to medium WordPress sites.
In the Networking section, make sure both checkboxes are selected to allow HTTP and HTTPS traffic. This ensures visitors can reach your site in their browsers.
You can leave Google Cloud Operations unchecked unless you plan to use advanced monitoring tools. They’re not required for running a typical WordPress site.
Once you’ve reviewed everything, simply click the blue ‘Deploy’ button at the bottom. Google Cloud will now set everything up for you behind the scenes.
Once finished, you will see the status of your deployment. From here, you need to copy the ‘Instance Nat IP’. This is your site’s external IP, and you will need it in the next step.
Step 5. Connect Your Custom Domain to Google Cloud
To use your own domain name with your deployed WordPress instance on Google Cloud VM, you’ll need to update your domain’s DNS settings to point to the external IP address of your VM (virtual machine) instance.
Tip: If you don’t already have a domain name, I recommend Domain.com. It’s my go-to domain name registrar due to transparent pricing and ease of use.
First, go to the Google Cloud Console, open the ‘VM instances’ page, and copy the external IP address of your virtual machine.
This is the address your domain needs to point to.
Next, log in to your domain registrar’s dashboard — this is where you bought your domain, like Domain.com, GoDaddy, Bluehost, or other registrars.
I will show you instructions for Domain.com, but it is pretty much the same for all domain registrars.
Find the DNS settings or ‘Manage DNS’ section for your domain.
Here, you need to delete any A records that are currently pointing to a different IP address.
After that, click on the ‘Add Record’ button at the top.
In the form that appears, make sure the record type is set to A. In the ‘Refers to’ dropdown, choose Other Host. Change the Name or Host field to @ if you’re pointing the root domain (e.g., example.com).
In the IP address field, you need to enter the external IP address of your Google Cloud VM. For example, if your VM’s IP is 35.247.XX.XX, then you have to type that in.
Set the TTL (Time to Live) to the default value and then click the ‘Edit’ button to save the changes.
If you also want to support www.yourdomain.com, repeat the process and add another A record with the host set to www, pointing to the same IP.
It may take a few minutes for the DNS changes to propagate. Once that’s complete, visiting your domain in a browser should take you to your Google Cloud-hosted website.
After saving your DNS changes, it may take a few minutes (up to 24 hours, but usually much faster) for them to propagate globally.
Once that’s done, visiting your domain should load your website. You may still need to update your WordPress website address so that it uses your domain name instead of the IP address.
Method 3. Manually Host WordPress on Google Cloud VM
This method is for advanced users, developers, and learners. For this method, you’ll manually configure your VM and use the SSH command line to install software.
Step 1. Create a Project
To begin, you’ll need to sign in to your Google Cloud account and create a new project from the Cloud Console.
Once your project is created, the next step is to enable billing.
Step 2. Enable Billing
Simply click on the Billing label from the left column and follow the on-screen instructions.
Step 3. Enable Computer Engine
Once billing is set up, you need to click on the ‘Compute Engine’ option from the left column (or use the search bar at the top to find it) and click ‘Enable’ to start using the API.
This unlocks the tools that you’ll use to create and manage your server.
Step 4. Create a Virtual Machine
Once you have enabled the Compute Engine, you can now create a Virtual Machine instance (VM instance for short).
A VM instance is your own virtual private machine that you can turn into a VPS server to host your website on the Google Cloud platform.
On the next screen, you will be asked to configure your VM instance.
First, you need to provide a name for your VM, which could be anything that helps you easily identify it. And choose a region and zone where you want to host it.
Below that, you’ll see pre-configured setups for different use cases. I recommend using E2, which is low-cost and perfect for hosting a WordPress website.
Below that, you’ll be able to configure your instance further by adding more memory or CPU cores to it.
Next, you need to click ‘Create’ to continue to the next step.
Google Cloud console will now create your Virtual Machine instance and redirect you to the VM management dashboard.
Step 5. Set up Firewall Rules
While your VM is ready, its firewall rules currently don’t allow incoming traffic requests.
Let’s change that.
Simply click on the ‘Set up firewall rules’ option.
This will bring you to the Network Security area and display your VM’s firewall rules.
Simply click on the ‘Create firewall rule’ option to continue.
On the next screen, you need to enter the following information into the fields:
Name: allow-http
Targets: All instances in the network
Source filter: IPv4 ranges
Source IP ranges: 0.0.0.0/0
Second source filter: None
Destination filter: None
Protocols and ports: Check ‘TCP’ and enter 80
Don’t forget to click ‘Create’ to save your firewall rule.
Your Virtual Machine is now ready for website traffic.
Step 6. Installing Web Server Software
Next, you need to use the SSH button in the Cloud Console to connect to your server. This command-line interface allows you to install software and give your virtual machine commands in text format.
You’ll need to use it to install the necessary software stack. This includes Apache or Nginx for your web server, PHP for WordPress, and MySQL or MariaDB for your database.
You can run it in your web browser. Once connected, you will see a black terminal screen.
Now, you will need to run several commands, one after another. I know it does sound a bit complicated, but trust me, it is not as difficult as it sounds. Simply copy and paste the commands below.
You’ll first start by updating your VM instance. This is kind of like updating your computer to ensure you have all the security updates installed:
Depending on your VM’s operating system, in some cases, mysql-server may not be available for installation. In that case, you can use MariaDB as a drop-in replacement for MySQL. It works perfectly with WordPress, and the commands are nearly identical.
Simply add the following command to install MariaDB instead:
During installation, you can accept the defaults or tighten things based on your comfort level (say yes to remove anonymous users, disable root login remotely, and so on).
Now that you have MySQL installed, you can create a database to use for your WordPress website.
You’ll be asked for a password. If you created one during the installation, you can use that. Or simply hit the Enter key on your keyboard.
You will now enter the MySQL server. This is where you will manage your WordPress database.
Let’s first create one by modifying and entering the following command:
CREATE DATABASE wordpress DEFAULT CHARACTER SET utf8 COLLATE utf8_unicode_ci;
GRANT ALL ON wordpress.* TO 'wpuser'@'localhost' IDENTIFIED BY 'strongpassword';
FLUSH PRIVILEGES;
EXIT;
Once the installation is finished, you need to restart your web server. This allows your web server to load the PHP and other installed modules on reboot.
Step 7. Connect Your Custom Domain to Google Cloud
To use your own domain name (like yourdomain.com) with your Google Cloud VM, you’ll need to update your domain’s DNS settings to point to the external IP address of your VM instance.
First, go to the Google Cloud Console, open the ‘VM instances’ page, and copy the external IP address of your virtual machine. This is the address your domain needs to point to.
Next, you have to log in to your domain registrar’s dashboard. This is where you bought your domain, like Domain.com, GoDaddy, Bluehost, or other platforms.
I will show you instructions for Domain.com, but it is pretty much the same for all domain registrars.
Find the DNS settings or ‘Manage DNS’ section for your domain.
Here, you need to delete any A records that are currently pointing to a different IP address.
Then, click on the ‘Add Record’ button at the top.
In the form that appears, make sure the record type is set to A. In the “Refers to” dropdown, choose ‘Other Host’. Change the Name or Host field to @ if you’re pointing the root domain (e.g., example.com).
In the IP address field, enter the external IP address of your Google Cloud VM. For example, if your VM’s IP is 35.247.XX.XX, type that in.
Set the TTL (Time to Live) to the default value and then click the ‘Edit’ button to save the changes.
If you also want to support www.yourdomain.com, repeat the process and add another A record with the host set to www, pointing to the same IP.
It may take a few minutes for the DNS changes to propagate. Once complete, visiting your domain in a browser should take you to your Google Cloud-hosted website.
After saving your DNS changes, it may take a few minutes (up to 24 hours, but usually much faster) for them to propagate globally. Once that’s done, visiting your domain should load your server instead of just the raw IP.
Step 8. Install SSL and Enable HTTPS
Before visiting your domain, it’s a good idea to set up an SSL certificate. This allows you to serve your WordPress site over HTTPS, which is more secure and preferred by search engines.
I recommend using Let’s Encrypt, which is a free and trusted certificate authority.
To make things easier, I’ll use a tool called Certbot to automatically issue and configure the SSL certificate for Apache or Nginx.
First, update your package list and install Certbot:
Certbot will ask a few questions, including your email for urgent notices. You can choose to redirect all traffic to HTTPS when prompted, and I recommend saying yes.
That’s it! You’ve now installed a free SSL certificate, and your site is available over HTTPS.
Note: Let’s Encrypt certificates are valid for 90 days, but Certbot automatically renews them. You can test auto-renewal with this command:
Finally, go to your domain in a browser, and you should see the WordPress installation screen.
You can now follow the steps to create your admin user and finish the setup. Need help? See our complete WordPress installation tutorial.
Troubleshooting Tip 💡: If you see a default server page instead of the WordPress installation screen. This means that a default index.html page is present in the root directory of your site. To delete it, connect to SSH again and enter the following command:
🎉 That’s it! You now have a working WordPress website running on Google Cloud with your custom domain.
Keep in mind that you’re also responsible for securing your WordPress site, managing backups, applying updates, and monitoring its performance. If you’re not confident doing those things, Method 1 (SiteGround) may be a better fit.
Google Cloud Hosting Costs Explained
One thing that can catch beginners off guard is how Google Cloud charges for hosting. Unlike traditional web hosts with flat monthly plans, Google Cloud uses a pay-as-you-go model that depends on how much you use their services.
When you launch a WordPress site on Google Cloud, whether manually or using Click to Deploy, you’re billed separately for your virtual machine, disk storage, network usage, and optional services, such as snapshots or load balancing.
For example, if you go with the default setup from Click to Deploy using an e2-small instance (2 vCPU, 2 GB RAM) and a 20 GB disk, the estimated monthly cost looks like this:
VM instance: $15.09/month
Persistent disk: $0.88/month
Total estimated monthly cost: ~$15.97/month
This doesn’t include bandwidth usage or backup storage. If your site gets a lot of traffic, or if you store large files or create snapshots, then the cost can increase without warning.
You’ll also need to monitor usage, set up budget alerts, and manually handle software updates, backups, and security patches. That can be a lot of work if you just want to focus on building your site.
That’s why, even though Google Cloud is incredibly powerful, I don’t usually recommend it for beginners — unless you’re prepared to manage everything yourself and optimize for cost.
Google Cloud vs. SiteGround – Cost Comparison
Feature
Google Cloud
SiteGround (Managed Hosting)
Monthly Cost (Starter Site)
~$15.97/month (e2-small + 20GB disk)
$2.99/month (Startup plan)
Traffic Costs
Usage-based billing (can increase with traffic)
Generous resources with each plan to handle traffic
Backup & Restore
Manual setup required
Automated backups included
Security
User-managed updates and firewall
AI-powered security and server monitoring
Support
No support for server setup (DIY)
24/7 expert WordPress support
Ease of Use
Requires technical skills and CLI access
Beginner-friendly dashboard and tools
SiteGround, on the other hand, provides the same Google Cloud infrastructure underneath, but with predictable pricing, automated security, expert support, and no unexpected bills.
If you’re building a serious website or running a business, the peace of mind and support alone are worth it.
Final Verdict: Why I Recommend SiteGround for Hosting WordPress on Google Cloud
Over the years, I have used all three methods: manual VM setup, Click to Deploy, and SiteGround. And my honest recommendation is simple.
If you love digging into server setups and want to learn cloud infrastructure hands-on, then the DIY method is a great project.
But if you’re focused on growing your business rather than managing infrastructure, then SiteGround is the smarter way to go.
You still get the power and reliability of Google Cloud behind the scenes. But everything else — performance optimization, backups, caching, staging, support — is handled for you by people who know WordPress inside and out.
We host WPBeginner on SiteGround, and many of our partner companies are also hosted on SiteGround.
If you’re building a serious website and don’t want to worry about server configuration, billing spikes, or keeping up with security patches, then SiteGround is where you should start.
Frequently Asked Questions About Hosting WordPress on Google Cloud
1. Can I host WordPress on Google Cloud for free?
Google Cloud offers a free tier, but it’s pretty limited. You might be able to run a low-traffic WordPress site for free using a small VM instance, but you’ll still need to monitor usage to avoid surprise charges. In my experience, it’s better to assume some cost if you’re serious about your site.
2. Do I need to be a developer to host WordPress on Google Cloud?
Not necessarily, but some technical comfort helps. The Click to Deploy method is beginner-friendly, while the manual VM setup does require familiarity with Linux, SSH, and server configuration.
If you’re not comfortable with that, then I recommend going with SiteGround — it’s built on Google Cloud and handles all the hard parts for you.
3. Which is better: Click to Deploy or manual VM setup?
Click to Deploy is faster and easier, making it great for testing or smaller projects. Manual setup gives you full control, better performance tuning, and tighter security if you know what you’re doing. I’ve used both, and it really comes down to how hands-on you want to be.
4. What’s the easiest way to host WordPress on Google Cloud?
Without a doubt, the easiest and most reliable option is using SiteGround. You get all the benefits of Google Cloud’s speed and infrastructure without having to deal with technical setup, scaling issues, or security patches. That’s why we use it for WPBeginner.
5. Will my WordPress site be faster on Google Cloud?
Yes — Google Cloud’s network is world-class. Whether you go with SiteGround or configure it yourself, you’ll get faster load times, low latency, and excellent uptime. But keep in mind that speed also depends on how well your site is optimized.
6. Is Google Cloud cheaper than shared hosting?
Not really. Once you factor in bandwidth, storage, and external IP costs, running your own VM can cost more than standard shared hosting. If you’re price-conscious, then SiteGround’s flat-rate plans are often more predictable and affordable in the long run.
Bonus WordPress Hosting Resources 🎁
The following are a few additional resources on hosting WordPress that you may find helpful.
Whether you choose SiteGround for simplicity or go the manual route for full control, hosting WordPress on Google Cloud is absolutely doable. I hope this guide has helped you pick the right path and feel more confident about launching your site.
If you liked this article, then please subscribe to our YouTube Channel for WordPress video tutorials. You can also find us on Twitter and Facebook.
I started my first blog with a shared hosting plan because I just needed the cheapest way to get my content online.
But as my blog grew and traffic picked up, I noticed things getting slower. Sometimes, my site would take forever to load, and I knew I had to make a change.
That’s when I found myself lost in comparison articles, trying to figure out the difference between upgrading shared hosting, moving to VPS or cloud hosting, or switching to managed WordPress hosting.
It all felt complicated. I didn’t have a big budget, and every option had its own set of pros, cons, and confusing jargon. I just wanted someone to explain it in plain English and tell me which one actually made sense for my situation.
If you’re in the same boat, this guide is for you. I’ll break down the differences, share what worked for me, and help you figure out which hosting option fits your needs, without all the guesswork.
What Is Web Hosting?
Web hosting is like renting space for your website on the Internet. When someone visits your site, they’re actually connecting to a special computer called a server that stores and delivers your website files.
That server keeps your site online, loads your pages, and handles all the behind-the-scenes work. Without hosting, your website simply can’t exist on the web.
There are different types of hosting, and each one offers a different balance of price, performance, support, and ease of use. Some plans are cheap and simple to get started with. Others give you more speed and flexibility, but can cost more.
Here’s a quick look at how shared hosting, cloud hosting, and managed WordPress hosting compare in terms of cost and beginner-friendliness:
Hosting Type
Best For
Key Benefit
Typical Cost
Shared Hosting
Beginners & personal blogs
Affordable and easy to start
$2.75–$10/month
Managed WordPress Hosting
Non-tech users & busy site owners
Hands-off speed and security
$5–$30/month
Cloud Hosting
Growing sites & resource-heavy projects
Scalable and high-performance
$10–$100+/month
As you can see, shared hosting is easy to get started, and managed WordPress hosting is good for non-tech and busy site owners. Cloud hosting becomes a strong contender once your site grows or you need more control.
Now, let’s look at each of these hosting options in detail and see how they stack up against each other.
How I Compared Shared Hosting, Cloud Hosting, and Managed WordPress
To help you choose the right hosting type for your WordPress site, I followed a hands-on, experience-driven approach backed by careful research:
Real-World Experience: At WPBeginner, we have been helping users with WordPress hosting decisions since 2009. We’ve personally used shared, managed, and cloud hosting across different projects and client websites.
Hands-On Testing: I’ve set up WordPress sites on all three hosting types to observe how they perform, how easy they are to manage, and what challenges beginners might face.
Feature Comparison: I compared critical differences in setup, support, scalability, speed, and pricing to help beginners understand what really matters.
Use Case Insights: I included real-world examples based on where each hosting type fits best, whether you’re launching a small blog, running a business site, or growing an online store.
Pricing Research: I verified current pricing trends and listed realistic starting costs for each hosting type to make comparisons easier for budget-conscious users.
Our goal is to make hosting choices feel less intimidating and help you start your WordPress journey with clarity and confidence.
📣 Why Trust WPBeginner?
WPBeginner has been the go-to resource for WordPress beginners since 2009. We’re trusted by millions of users worldwide and are known for making complex topics simple and easy to understand.
Our team has decades of combined experience working with WordPress hosting, from building personal blogs to running high-traffic sites across different hosting platforms.
We test what we write about. Each of our hosting recommendations is based on thorough testing done using industry-standard benchmarking tools.
Everything we recommend is based on what works in the real world, not just what sounds good on paper. We always put beginners first—because that’s who we’re here to help.
Want to learn more about how we create and fact-check our content? See our editorial process.
What Is Shared Hosting?
Most people, including me, start with shared hosting. It’s the most affordable option, which makes it perfect for getting your site off the ground.
With shared hosting, your website lives on the same server as many other sites. Think of it like renting a room in a big apartment building. You get your own space but share the same walls, electricity, and plumbing.
This setup works fine for starting a blog, personal websites, or anyone with light traffic. But things can slow down as more people visit your site, or your neighbors get noisy (meaning high traffic on other sites).
That’s exactly what happened to me. My blog was growing, but the site started lagging. I needed something faster—but at the time, I wasn’t ready to spend too much or manage anything complex.
Here’s a closer look at what you can expect with shared hosting.
Pros of Shared Hosting:
Affordable: Shared hosting plans often start under $5/month, making them perfect for beginners on a tight budget.
Beginner-Friendly: Most providers offer one-click WordPress installs, easy dashboards, and simple tools that don’t require technical knowledge.
Freebies Included: Many plans include a free domain name, email accounts, SSL certificate, and backups to help you get started.
Low Maintenance: Everything is managed for you, so you don’t have to worry about maintaining the server.
Large Support Communities: Since shared hosting is so common, there is a lot of help available, from tutorials to forums and live chat support.
Cons of Shared Hosting:
Slower Performance: Since resources are shared, your site may slow down if other websites on the server get busy.
Limited Resources: You usually get limited CPU, memory, and bandwidth, which can become a problem if your traffic spikes.
Less Control: You won’t be able to change server settings or install custom software that requires advanced configurations.
Best for: Shared hosting is an excellent fit if you’re launching a smaller site and don’t expect a lot of traffic right away. Here are some examples:
New or Personal blogs: A place to share your thoughts, stories, or hobbies.
Online portfolios: Ideal for freelancers, writers, designers, and photographers showcasing their work.
Small business websites: Great for local shops, consultants, or restaurants sharing menus, contact info, and services.
Nonprofits and community groups: An easy way to build awareness and share updates.
Test projects: If you’re trying out an idea or learning WordPress, shared hosting gives you a low-risk place to start.
Cloud hosting is like renting several apartments across different buildings instead of just one room. If something goes wrong in one building, then your site keeps running because the others can pick up the slack.
Instead of relying on a single physical server, cloud hosting spreads your website across a network of connected servers. This setup helps balance traffic loads and improves uptime and performance, especially during traffic spikes.
You might also come across dedicated hosting while doing your research. With that setup, your site lives on a single physical server in one location, and you get all of its resources to yourself. It’s powerful, but not as flexible or beginner-friendly as cloud hosting, which spreads things across multiple servers and is easier to scale.
I’ve helped clients migrate to cloud-based setups when they needed better speed and reliability. Cloud-based hosting offers a solid middle ground—more power than shared hosting without the hassle of managing everything yourself.
Pros of Cloud Hosting:
Scalable: Cloud hosting grows with your traffic. It can handle sudden spikes without crashing your site.
Better Performance: You get more consistent speed and uptime because your site uses multiple servers behind the scenes.
Resource Flexibility: Many cloud plans allow you to customize CPU, RAM, and storage based on your needs.
Redundancy and Stability: If one server fails, another takes over, so your site stays online.
Mid-Range Options: Some hosts offer affordable cloud plans that aren’t too technical, so you can get started without managing the setup yourself.
Cons of Cloud Hosting:
More Expensive: Cloud hosting usually costs more than shared or basic managed WordPress plans, especially for higher-tier resources.
Can Be Complex: Some cloud platforms require technical knowledge to manage, unless your plan is fully managed by the host.
Pricing Can Fluctuate: Some cloud providers use usage-based billing, which makes monthly costs less predictable.
Not Always Beginner-Friendly: Unless you’re using a simplified cloud hosting plan (like HostGator Cloud or Bluehost Cloud), it may feel overwhelming to new users.
Best for: Cloud hosting is ideal when your site is growing fast or if you expect traffic spikes. It offers more power and flexibility than shared hosting. Use cases include:
Online stores: eCommerce sites that need consistent speed during busy sales periods.
Business websites: Sites with increasing traffic that require better performance and uptime.
Membership or course sites: Platforms where users log in and access content regularly.
Media-heavy blogs: Blogs with videos, podcasts, or large images where loading speed matters.
Projects that need room to grow: If you’re planning ahead for future growth, cloud hosting gives you breathing room.
Hosting providers like SiteGround and Bluehost Cloud offer managed cloud hosting solutions. These solutions are easier to use, as the host handles server management.
On the other hand, cloud platforms like AWS and Google Cloud require you to manage server resources yourself.
What Is Managed WordPress Hosting?
Managed WordPress hosting is like living in a fully serviced apartment where everything is taken care of for you. You don’t have to fix the plumbing, mow the lawn, or even take out the trash—the company handles all of it behind the scenes.
With this type of hosting, everything is optimized specifically for WordPress. You get faster load times, stronger security, automatic updates, backups, and expert support—all without lifting a finger.
When I finally switched to managed WordPress hosting, it felt like a breath of fresh air. I could focus on writing and growing my site instead of worrying about updates, security scans, or caching plugins. It wasn’t the cheapest option, but the time and stress it saved me were worth every penny.
Pros of Managed WordPress Hosting:
Speed and Performance: Everything is tuned for WordPress, so your site loads faster right out of the box.
Security Handled for You: Malware scanning, firewall protection, and login hardening are often built in.
Automatic Backups and Updates: No more worrying about updating plugins or losing your data.
Expert Support: The support team knows WordPress inside and out, so they can actually help with plugin or theme issues.
Time-Saving: Great for business owners or content creators who don’t want to manage the technical side of things.
Cons of Managed WordPress Hosting:
Higher Costs: Managed hosting typically starts around $15–$30/month and goes up from there.
WordPress-Only: You can’t host other types of websites or apps—it’s just for WordPress.
Some Plugin Restrictions: Certain hosts may block plugins that conflict with their built-in tools, like performance or backup plugins.
Less Control: Advanced users might miss having access to full server settings or configurations.
Best for: Managed WordPress hosting is perfect for people who want a faster, safer site without managing any of the technical stuff. It’s ideal for:
Busy bloggers: Focus on content while the host handles speed, backups, and security.
Small business owners: Run your website without hiring a developer or learning server management.
eCommerce stores: Faster checkout and reliable uptime help keep your customers happy.
Non-tech creators: If you just want your site to work and not worry about how it works, this is the way to go.
Agencies and freelancers: Reliable performance and support help streamline client work and reduce headaches.
Shared vs Cloud vs Managed WordPress Hosting (Side-by-Side Table)
If you’re still unsure which hosting type is right for you, here’s a quick comparison to help you see the differences at a glance:
Feature
Shared Hosting
Cloud Hosting
Managed WordPress
Ease of Use
Very easy Beginner-friendly
Moderate Depends on host
Very easy Everything is handled
Performance
Basic Can be slow during peak times
High Good for growing traffic
High Optimized for WordPress
Scalability
Limited Upgrade options exist
Excellent Scales with demand
Good Can handle moderate growth
Maintenance
Low Managed by host
Moderate to high May need manual setup
None The host handles everything
Security
Basic Shared risks
Better Isolated resources
Excellent Includes firewall, scans, and backups
Best For
New bloggers Personal sites
Business sites Traffic spikes
Busy site owners Non-tech users
Price Range
$2.75–$10/mo
$10–$100+/mo
$5–$30+/mo
Each option has its place. It really comes down to how much traffic you expect, how comfortable you are with the technical stuff, and how much time you’re willing to spend managing your site.
How to Decide Which Hosting Is Right for You
Choosing a hosting plan doesn’t have to be stressful. The key is to think about where you are right now and where you want your site to go in the future.
Here are a few simple questions to help you narrow things down:
What’s your budget? Are you trying to start with the lowest possible cost, or do you have room to invest in convenience and performance?
How much traffic do you expect? Are you just starting out, or do you already have a regular audience that visits your site?
How tech-savvy are you? Do you feel comfortable managing settings and updates, or would you rather have someone else handle it?
How much time do you want to spend maintaining your site? Would you rather focus on your content and business, or do you enjoy digging into backend tools?
Still unsure? Let me walk you through a few common scenarios:
✅ You’re just getting started on a budget: Shared hosting is your best bet. It gives you everything you need to launch your site without spending much. You can always upgrade later.
🚀 Your business or blog is growing: Cloud hosting offers the speed and flexibility to handle more traffic without slowing down. It’s a good step up when your site needs more muscle.
🧘♂️ You want zero hassle and everything done for you: Managed WordPress hosting gives you peace of mind. You get great performance and expert support without dealing with updates or technical headaches.
The good news is that you can always start small and grow into what you need. Most hosting companies make it easy to upgrade your plan as your site evolves.
Our Personal Hosting Journey
I joined the WPBeginner team in 2012, and since then, I’ve worked with nearly every type of hosting while helping people launch and grow their WordPress websites.
In the early days, WPBeginner was hosted on HostGator, first on shared hosting, then on a custom cloud setup. It was affordable and flexible, which made it a good fit when we were focused on keeping costs low while handling decent traffic.
As the site grew, we moved to SiteGround, which is still our hosting provider today. We are on their Enterprise cloud infrastructure. But even their starter managed WordPress hosting plans are hosted on the Google Cloud, which is a massive upgrade from typical shared hosting platforms.
After testing SiteGround across multiple projects and seeing how well their platform handled real-world demands, I knew it was the right move for WPBeginner.
Syed Balkhi
Across our team and partner sites, we’ve used everything from shared hosting and managed WordPress plans to full cloud platforms. In most cases, I recommend starting simple, then upgrading only when you actually need more power or flexibility.
My Top Picks for Each Hosting Type
If you’re still unsure which hosting company to choose, here are my personal recommendations for each type based on real experience, performance, beginner-friendliness, and support.
These are the same providers we trust for our own projects and partner sites.
Bluehost is the easiest and most affordable way to get started. They’re officially recommended by WordPress, and WPBeginner users get a special deal starting at just $1.99/month—including a free domain, SSL, and 24/7 support (See my full Bluehost review for more details).
🔹 Alternatives:Hostinger (Starting from $2.69/mo) | DreamHost (Starting from $2.59)
SiteGround is what we use for WPBeginner. Their managed WordPress plans are fast, secure, and include powerful features like staging, backups, and expert WordPress support. Starting from $2.99/mo, they offer free domain, email accounts, SSL, and built-in caching (See my full SiteGround review for more details).
🔹 Alternatives:Rocket.net (Starts at $30/mo) | WordPress.com (Business plan starts at $12.50/mo)
SiteGround makes it incredibly easy to host your site on Google Cloud without having to manage servers yourself. Their cloud plans are easily scalable and beginner-friendly. We host WPBeginner and several partner websites with SiteGround, and it has been a great experience all around. For superior performance, I recommend their GrowBig plan, which starts at $4.99/mo, or GoGeek at $7.99/mo.
Tired of keeping up with WordPress updates, backups, and security fixes? Our team will handle everything behind the scenes so you don’t have to.
With 24/7 monitoring, expert support, and routine maintenance, you can focus on running your business while we keep your website safe and running smoothly.
What is the difference between cloud hosting and VPS?
VPS (Virtual Private Server) hosting gives you a fixed portion of resources on a physical server. It’s like having your own slice of a computer.
On the other hand, cloud hosting spreads your site across multiple servers, which means better scalability, uptime, and redundancy. If one server goes down, another takes over.
Is managed WordPress hosting worth the money?
Yes, if you want peace of mind and don’t enjoy managing technical stuff. Managed hosting handles updates, security, performance, and backups for you. It’s especially helpful if you run a business or blog and want to focus on content, not maintenance.
Can I switch hosting types later?
Absolutely. Most hosts make it easy to upgrade from shared to cloud or managed WordPress hosting. Just check with your provider about migration options or ask their support team to help with the move.
Do I need to know coding to use cloud or managed hosting?
No coding required! Many cloud hosting plans are fully managed, and managed WordPress hosting is designed for non-tech users. You can launch and run your site without touching a single line of code.
Which hosting type is best for eCommerce?
If you’re building an online store, cloud hosting or managed WordPress hosting is the better choice. They offer better performance and security for handling customer traffic, payments, and sensitive data. Managed WordPress hosting with WooCommerce support is especially beginner-friendly.
Start Small. Grow Confidently.
Choosing the right hosting is a big decision, but you don’t have to get it perfect on day one. You can start small with a hosting type that fits your current needs and then upgrade.
Shared hosting is a great starting point if you’re building something new. Cloud hosting gives you room to scale. Managed WordPress hosting makes life easier when you’re busy running a site or business.
No matter where you begin, you can always switch later as your site grows.
If you’re still unsure, check out our in-depth hosting reviews—or feel free to reach out to me or someone from the WPBeginner team. We’re always happy to help!
Helpful Guides to Get You Started 🎁
Now that you understand the different hosting options, here are some beginner-friendly tutorials to help you move forward. Whether you’re ready to launch your site or still exploring, these resources will confidently walk you through each step:
Best Free Website Hosting Compared – Our tutorial explains why free hosting is bad and shows reliable hosting options that are affordable.
I hope this guide helped you understand the difference between shared, managed, and cloud hosting offers. If you are still unsure, remember you are not locked in—you can start small and grow from there. 🙌
If you liked this article, then please subscribe to our YouTube Channel for WordPress video tutorials. You can also find us on Twitter and Facebook.
When I started working with small business owners, I noticed a pattern. Most of them were not using AI to its full potential, which created unnecessary work and left money on the table.
Some felt overwhelmed by the tech, and others were experimenting with AI but without seeing real results.
But once they understood what AI could actually do, everything changed. Suddenly, customer emails got answered faster, marketing became more impactful, and they had more time to focus on business growth.
In this guide, I’ll walk you through how small businesses can use AI today to save time, reduce stress, and get more done. No fluff—just practical examples, tools, and strategies that actually work.
How AI Helps Small Businesses Thrive
Running a small business means doing more with less—less time, fewer staff, and tighter margins. That’s where AI becomes a game-changer.
Instead of hiring for every task or burning out trying to do it all, you can use AI to handle repetitive work, analyze data, and support customers faster.
Whether it’s writing emails, summarizing reviews, scheduling appointments, or tracking trends, AI tools can save hours of manual work each week. And for many business owners, that translates into real cost savings—sometimes thousands per year.
Here are a few ways AI helps you save time, improve efficiency, and grow smarter:
Save Time on Daily Tasks: AI tools can handle email replies, social media captions, and appointment bookings so you don’t have to.
Make Smarter Business Decisions: Use AI to track customer behavior, spot trends, and find new revenue opportunities.
Improve Customer Experience: AI chatbots and email assistants can respond faster and more consistently, even during off-hours.
Cut Operational Costs:Automating routine tasks means you can grow without hiring more staff or outsourcing everything.
Boost Marketing & Sales: From writing blog posts to analyzing ad performance, AI can help you grow your business without extra overhead.
The key is to treat AI as a helper, not a replacement. With the right tools in place, it’s like giving your business an extra set of hands, without the extra payroll.
Here is an overview of the topics I will cover in this post. Feel free to use the jump links to go to different sections:
If you’re running a small business, you know it means wearing a lot of hats. You’re often the CEO, the marketing manager, customer support, and maybe even the accountant!
Juggling all those responsibilities can feel overwhelming, and there just aren’t enough hours in the day.
What if you had a smart assistant to help manage some of the load? That’s essentially what AI can do for your small business.
AI is a practical tool that can automate repetitive tasks, analyze data to give you insights, and streamline your workflows.
It won’t take over your business, but it will free up your time so you can focus on what really matters. Now, let’s look at some of the best ways AI can help your small business.
1. AI for Customer Service & Communication 🤖
When you’re running a small business, missed messages can mean missed money. You don’t have time to reply to every email, answer every direct message, or chase down every form submission.
This is where AI can quietly step in and save the day, answering questions, booking appointments, and making sure no customer slips through the cracks.
For example, AI-powered chatbots can handle simple FAQs 24/7—like “What are your hours?” or “Do you offer free shipping?”—while you sleep or focus on other parts of your business.
I recommend ChatBot.com, which helps you capture leads, answer product questions, and even route chats to the right person. It also works with tools like Facebook Messenger, so you can respond across platforms without juggling inboxes.
Phone support can be just as stressful, especially when you’re short-staffed. That’s why we use Nextiva at WPBeginner. This AI-powered business phone service offers call summaries, real-time coaching tips, and smart analytics so you can improve team performance without hiring more reps.
Email is another time sink. I recommend using tools like ChatGPT and Gemini to draft customer replies, onboarding emails, and marketing messages in minutes, not hours. You should still personalize everything, but the heavy lifting is already done.
And if you’re just getting started, check out our full beginner’s guide on how to use AI for customer service. It’s written specifically for small business owners.
2. AI for Marketing & Social Media 📱
Marketing often falls to the bottom of the to-do list when running a business. Creating posts, writing emails, and creating new content every week can feel like a full-time job.
But with the right AI tools, you can keep your marketing consistent, even if you’re short on time, budget, or ideas.
For example, I use All in One SEO to speed up content writing. It comes with a built-in Writing Assistant, which uses AI to optimize your content for search engines. This can help boost organic traffic and outrank your competitors.
AIOSEO can also generate SEO titles and meta descriptions, suggest internal links, and improve on-page SEO—all from your WordPress dashboard. This alone has saved me hours of manual work. For more details, check out my full All in One SEO review.
We’ve covered this in more detail in our guide on how to use AI for SEO, which includes tools for keyword research, headline writing, and more.
For visuals, Canva AI is great for generating quick graphics and branded content. Whether you need Instagram posts, blog banners, or product mockups, it makes design feel easy, even if you’re not a designer.
I also use ChatGPT’s 4o image generation to create AI images for blog posts and landing pages. This has saved me hundreds of dollars that I previously paid for stock images.
Plus, I use ChatGPT and Gemini to draft newsletter copy and social captions.
It’s not just about speed—it helps me stay consistent, even when creative energy is low.
Most small business websites lose sales because product pages aren’t optimized, customers leave with unanswered questions, or follow-ups fall through the cracks. But hiring a full team isn’t always an option.
That’s where AI comes in. It helps you create better customer experiences, respond faster, and sell smarter without adding to your workload.
StoreAgent.ai is one of my favorite WooCommerce tools. It uses AI to generate product descriptions, answer FAQs, summarize reviews, and even create SEO-friendly tags—all with a single click.
It helps you keep product pages updated and optimized without getting stuck writing copy from scratch.
I also recommend SeedProd’s AI builder to launch sales pages, product catalogs, and checkout flows in minutes. Just give it a short prompt, and it will generate a clean, mobile-friendly layout for your business.
This is the same visual builder we use on some of our partner brands. It’s fast, reliable, and great for getting something live without touching code. You can read our guide on how to create a website with AI to learn more.
If you want 24/7 sales support, AI chatbots from tools like ChatBot.com can guide visitors during checkout, answer last-minute product questions, and recover abandoned carts. See our ChatBot.com review to learn more.
I also recommend using an AI-powered CRM like HubSpot for email follow-ups and turning leads into conversions. It tracks user behavior, suggests the best time to send follow-ups, and helps you close more sales without the guesswork.
These tools don’t just save time—they help you convert more visitors, grow faster, and keep more revenue in your business.
4. Using AI for Customer Insights 📈
It’s hard to grow your business if you don’t know what your customers are doing on your site or how they feel about your products. But most small business owners don’t have time to dig through analytics dashboards or read dozens of reviews individually.
That’s where AI comes in. It turns complicated data into simple answers you can act on.
I use MonsterInsights to track how visitors behave on my website. Their AI Insights feature gives me clear summaries of what’s working, what’s not, and where my leads are coming from—all without opening Google Analytics.
Their Conversations AI tool lets me ask plain-English questions like “How’s my product page doing?” or “Where are my conversions coming from?” and get human-friendly answers right inside WordPress.
At WPBeginner, we use MonsterInsights for everything from content strategy to campaign tracking. You can read more in our full MonsterInsights review.
If you want to understand how your customers feel, not just what they click on, you can also try using ChatGPT for sentiment analysis. You can paste in reviews, survey responses, or social comments and ask it to identify what’s positive, negative, or neutral.
I’ve used this to quickly spot trends in feedback and even catch issues before they escalate. If you’d like to try it, our guide on the best ways to use OpenAI shows you how.
You can also use UserFeedback to run quick surveys and collect input directly from your visitors. Its AI summary feature turns all those replies into a digestible report, highlighting common requests, pain points, and suggestions.
5. AI for Security & Fraud Prevention 🔒
Security can feel invisible until something breaks. For small business owners, even one hacked site or fake transaction can mean lost revenue, chargeback fees, and less customer trust.
If you’ve been putting off security because it feels too technical or expensive, you’re not alone. The good news is that AI tools can protect your site in the background without adding to your workload.
At WPBeginner, we use Cloudflare to secure our website. It uses AI to monitor for bots, malware, and suspicious traffic, and stops attacks before they ever reach us. This protection runs 24/7, and it’s one of the reasons we feel confident launching new campaigns without worry.
If you accept online payments, then tools like Stripe Radar and PayPal Fraud Protection use machine learning to detect suspicious behavior.
They block high-risk payments before they go through, without any manual monitoring required on your end.
These systems get smarter over time, learning from global transaction data to stop even the newest scams. This kind of AI-powered prevention can save you from hours of cleanup and thousands in lost revenue.
If you’re using WooCommerce or Easy Digital Downloads, then both integrate easily with Stripe and PayPal. You get advanced security without any complicated setup.
As a small business owner, you probably have a long to-do list every day. But that doesn’t mean you need to do everything manually. AI-powered automation can handle repetitive tasks, freeing you up to work on the big stuff.
I use Uncanny Automator to connect my website tools and set up smart workflows. It’s like having a digital assistant that knows exactly when to act, based on what users do on my site.
Its OpenAI integration is where things get really fun. You can use it to:
Getting started with AI doesn’t mean overhauling your entire business overnight. You don’t need to be technical, and you don’t need a huge budget. You just need to start small, with tools that solve real problems you’re facing today.
For me, that meant automating repetitive tasks, speeding up content creation, and reducing time spent replying to emails. Once I saw those wins, it became easier to build momentum.
Here are a few smart ways to begin:
Pick your biggest time-waster: What drains your energy—support emails? Blog writing? Social posts? Choose one area and test an AI tool that can help.
Start with free or low-cost tools: Many of the AI tools I’ve tested offer free trials or entry-level plans. You can experiment before investing.
Don’t automate everything at once: AI works best when you give it clear, focused tasks. Let it help with one thing, then add more later.
Keep the human touch: AI can speed things up, but people still want to hear from you. Use it to assist, not replace your voice or decisions.
Track what’s working: Check results after a few weeks. Are you saving time? Getting more leads? Adjust if needed—or scale what’s working.
Trying AI for the first time can feel intimidating, but it doesn’t have to be. Start with one problem, find one tool, and go from there. You’ll be surprised at how quickly it pays off.
How to Pick the Right AI Tools (Without Wasting Time or Money)
If you’ve ever Googled “best AI tools,” you know how fast the list gets out of hand. Hundreds of options, all promising to save time or boost results. It’s easy to feel overwhelmed and stuck.
But here’s the truth: You don’t need dozens of tools. You just need the right one for the problem you’re trying to solve.
Here are some helpful picks based on what you want to get done:
For Content Writing:ChatGPT and Jasper are great for drafting emails, blog posts, and product descriptions. Jasper is better for polished marketing copy, but ChatGPT is perfect for quick drafts or brainstorming ideas.
For Visual Content:Canva AI can help you design graphics, social media posts, and ads—even if you’ve never touched a design tool before.
For Brainstorming and Research:Gemini (from Google) works well for outlining, summarizing articles, and researching content ideas.
Still not sure what to try first? Check out our guide to the best ChatGPT alternatives for bloggers and marketers. It breaks down what each tool is good at and who it’s best for.
The Best AI-Powered WordPress Plugins for Your Business
All the tools above are great for everyday business tasks, but what if you want to use AI directly inside your WordPress site?
That’s where AI-powered WordPress plugins come in. These tools bring AI right into your dashboard, so you can write, design, automate, and analyze without switching between platforms.
Here are the top AI-powered plugins I’ve tested that can save time, improve content, and help your business grow smarter:
All in One SEO – Includes an AI-powered Writing Assistant (powered by SEOBoost) to help you craft optimized meta titles and descriptions. It also gives smart link suggestions to improve internal SEO.
SeedProd – Comes with an AI-powered website builder. Just describe your business in a few words, and it creates pages, headlines, and layouts tailored to your niche.
WPForms – Lets you build forms using AI. Just type a prompt like “contact form for bakery orders,” and it creates a complete form in seconds. See our full review →
MonsterInsights – Uses AI to summarize analytics and provide plain-language answers to questions like “Which page got the most views last week?” See our full review →
OptinMonster – Helps you build smarter popups with AI. It can adjust your offers based on user behavior to increase conversions. See our full review →
Uncanny Automator – Connects your plugins and creates automated workflows with OpenAI support. You can use it to generate content, translate posts, send smart emails, and more. See our full review →
Thrive Ovation – Uses AI to collect and showcase testimonials. It can even turn customer feedback into social proof for your homepage or landing pages.
Each of these tools solves a specific problem—from SEO and forms to automation and analytics. Pick the one that meets your biggest need right now, and you’ll see results faster.
Final Thoughts: Avoiding Common Mistakes by Using AI the Right Way
AI is powerful, but it’s not magic. I’ve seen business owners get frustrated when they expect too much too fast, or when they try to automate everything and lose touch with their audience.
The biggest mistake? Thinking AI will run your business for you. It won’t. But it can help you run it more efficiently, especially if you stay in the driver’s seat.
Here are a few things to keep in mind as you move forward:
Review everything AI creates: Whether it’s an email, blog post, or chatbot response, read it. Edit it. Make it sound like you.
Start small, then scale: Automate one thing, see the results, and add more. Don’t try to set up 10 tools at once or you’ll burn out.
Don’t trust AI blindly: It gets things wrong. Always double-check facts, links, and any information you publish.
Stay connected to your audience: AI can help you communicate faster, but it can’t replace your voice. Keep your human touch.
Used the right way, AI can give you time back, reduce stress, and help you grow smarter. The key is to treat it like a tool, not a replacement for your experience, your instincts, or your relationships.
Start small, stay curious, and let AI support the business you’ve worked hard to build.
Frequently Asked Questions About Using AI
Here are some of the most common questions small business owners ask us about getting started with AI.
1. Is AI expensive for small businesses to get started with?
Not at all. Many AI tools offer free plans or affordable pricing. Even small wins—like automating customer emails or speeding up content creation—can quickly save you time and money.
2. Do I need to be tech-savvy or know how to code?
No. Most AI tools we use are beginner-friendly and require zero coding. If you can type a sentence or click a few buttons, you’re good to go.
3. Is it safe to use AI with customer data?
Yes, as long as you’re using trusted tools that follow privacy standards like GDPR. Just be mindful of what data you input, and always check the tool’s privacy settings and terms of use.
4. What if AI says something wrong or sounds robotic?
This happens! AI can get facts wrong or miss your tone. That’s why I always recommend reviewing and editing anything AI writes before hitting publish or send.
5. Can AI replace my customer support or marketing team?
In many cases, yes—at least partially. If you’re trying to cut costs, AI can absolutely take over tasks like answering FAQs, replying to emails, creating social media content, and even writing marketing copy. It won’t replace your strategy or your brand voice, but it can handle a surprising amount of the day-to-day work.
That means you may not need to hire a full support or marketing team—just someone to oversee, edit, or fine-tune what AI produces. It’s a practical way to stay lean while still keeping your business running smoothly.
Explore More AI Guides for Small Business Owners
Want to keep learning how AI can support your business goals? Whether you’re just starting or ready to dive deeper, these handpicked guides will help you take the next step—smarter, faster, and with more confidence.
Some of these tutorials show beginner-friendly walkthroughs. Others will help you scale what’s already working. All of them are written with small business owners in mind:
Many business owners feel stuck with HubSpot because they worry about losing their content, breaking their SEO rankings, or disrupting their email marketing. These are valid concerns – I had the same worries when I decided to migrate one of my HubSpot sites to WordPress.
The good news is that moving from HubSpot to WordPress is completely doable with the right approach. All you need is to follow the right steps in the right order.
Let me show you exactly how to move your site from HubSpot to WordPress while protecting your content, preserving your SEO rankings, and keeping your sanity intact.
Why Move Your Blog From HubSpot to WordPress?
Most people start using HubSpot because it is a powerful customer relationship manager (CRM) with marketing automation.
They tend to be really happy with it as a CRM, which doesn’t surprise me, as I love it myself. I even recommend it! See my detailed HubSpot review for more information.
However, what often happens is people start using the default blogging feature in HubSpot simply because it’s convenient. Then, they end up feeling limited.
I’ve worked with clients who started blogging on HubSpot and eventually felt the same way.
Now, I’ll be honest. HubSpot’s content management system is useful for landing pages and integrated marketing campaigns. But for blogging specifically? WordPress comes out on top.
Just making a simple design tweak or changing the layout of a post on HubSpot can feel like navigating a maze.
WordPress, on the other hand, is built for content. It started as a blogging platform and evolved into a powerhouse.
So, if blogging is a core part of your strategy, and you’re feeling a bit constrained by HubSpot, then WordPress can be super refreshing. You’ll get greater simplicity but more flexibility, more design control, and a whole lot more options to grow your blog the way you want.
Worried you won’t get to keep using all of HubSpot’s other powerful CRM features? The good news is that WordPress integrates seamlessly with the platform, so that won’t be an issue.
What to Expect When Migrating From HubSpot to WordPress
With any significant change, it’s helpful to know what lies ahead. Here is a brief roadmap of the journey we will take together:
First, we’ll get prepared. Imagine it as the preparation phase when you export your content from HubSpot and set up your new WordPress environment.
Then comes the actual migration. We’ll guide you through moving your valuable blog posts and important pages, and all the images that make your blog visually engaging.
Next, we’ll focus on maintaining your SEO. This is like making sure your mail is properly forwarded when you move. We’ll help you set up permalinks and redirects to avoid broken links and maintain your search engine rankings.
Finally, we’ll cover post-migration tasks. Think of this as settling into your new WordPress home. We’ll recommend some essential plugins and learning resources to help you get the most from WordPress.
All that said, you’re probably ready to move your site from HubSpot to WordPress! Here’s how you can do it step by step:
I’ll walk you through the entire process so you’ll be able to follow along even if you’re a beginner. But, if you change your mind at any time, you can always jump to the alternative option – which is getting help from the professionals.
Step 1. Export Your HubSpot Blog Content
Before you even think about touching anything in HubSpot, the first thing you’ll need to do is export your essential content. Later in this tutorial, you will import this content into WordPress.
It’s also wise to back up the link structure of your website. I’ll show you how to do both.
Exporting Your HubSpot Blog Content
The most important step in your WordPress migration is exporting your HubSpot blog content. Luckily, HubSpot makes it pretty easy to export your blog posts in a way you can import into WordPress.
Simply go to your HubSpot account and find your blog content at Content » Blog.
Now look for the ‘Export blog posts’ option on the ‘Actions’ drop-down menu.
This option will let you export your posts as a .CSV or Excel (XLS or XLSX) file. I personally like using the .CSV option because it can be easily imported into WordPress.
Once your blog has been exported, you will receive a link to the .CSV file in your email. You will have 90 days to download the file before it expires.
Exporting your blog posts like this is a great starting point because you can easily import them into your new WordPress website.
However, the export only includes your blog content, and not other pages like landing pages or sales pages. Later in this article, I’ll show you how to recreate those pages manually.
Backing Up Your Link Structure
Backing up your blog’s link structure is super important for SEO.
For this, you’ll need to gather a list of all the web addresses (URLs) from your HubSpot blog. This is important because we’ll use this list to create redirects. Redirects help maintain the SEO benefits you’ve built up over time, even after moving to WordPress.
For this, I like using a browser extension called Link Klipper, because it’s super handy. It’s also free and works with Chrome and compatible browsers.
To get started, install Link Klipper. Then, go to your HubSpot blog homepage. Click the Link Klipper icon in your browser toolbar and choose ‘Extract All Links.’
This will quickly grab all the links on that page and download them as a .CSV file. When you open this file in Excel or Google Sheets, you will see a list of your blog URLs.
Now, I recommend using Link Klipper as a quick and easy way to grab URLs. However, you can also use an online sitemap generator like XML-Sitemaps.com. This tool crawls your website and creates a list of URLs, which you can then export.
Sitemap generators can sometimes find more URLs than Link Klipper, as they crawl your entire site structure. XML-Sitemaps will generate the usual XML sitemaps, but also create a text file called urllist.txt containing all the URLs that you can easily use when creating redirects.
With your blog content, pages, and URLs exported, you’ve done a great job! You have a safety net and a set of files that can be imported into WordPress.
Step 2. Installing and Setting Up WordPress
You need hosting to run a WordPress website. It’s non-negotiable since it provides your site with the resources it needs to be online.
A good hosting provider is like a reliable landlord – you want them to be dependable and keep things running smoothly.
In short, WordPress hosting is where all your WordPress content and files will live. It’s what makes your blog accessible to the world.
Now, you might be thinking, ‘Can’t I just install WordPress on my current HubSpot hosting?’ Unfortunately, no. HubSpot is a closed platform. You can’t install WordPress on HubSpot.
So, you’ll need to get new hosting specifically for your WordPress blog. If you’re new to WordPress or just want a straightforward experience, I recommend Bluehost.
Right now, they’re offering a deal for WPBeginner readers that includes a free domain name and a huge discount on hosting. You can get started for just $1.99 a month.
Alternatives:Hostinger and SiteGround are also popular hosting providers. They have good reputations and offer different features and price points. It’s worth checking them out if you want to compare.
For this guide, just to show you the general process, I’ll use screenshots from Bluehost. But honestly, the steps for most good WordPress hosts are pretty similar.
You can get started by visiting the Bluehost website and clicking the ‘Get Started Now’ button.
You’ll land on a page showing different hosting plans. For a new blog, especially when you’re just migrating over, the Basic plan is usually perfectly fine.
Choose a plan that fits your needs by clicking the ‘Select’ button.
Next up, you’ll need to set up a domain name. This is your blog’s web address, like www.yourblogname.com.
Now, you probably want to keep using the same domain name you were using with your HubSpot blog, right?
The good news is that you can! Just choose the option that says ‘Use a domain you own’ and type in your current domain name.
Or, if you’re starting fresh with a new domain name, then you can choose to register a new one. This will be free for the first year.
Now, follow the steps to enter your account details and payment info and complete the purchase.
After you sign up, Bluehost (and most WordPress hosting providers) will send you a welcome email with your login details. Keep this email safe! You’ll need it to access your hosting account.
Now, here’s where picking a good WordPress hosting provider pays off.
When you log in to your Bluehost account for the first time, they will automatically install WordPress for you. I love how this streamlines setting up new WordPress websites.
From your Bluehost account page, go to ‘Websites’ then click ‘Edit Site.’
That should take you right into your brand-new WordPress dashboard.
Want a more thorough walkthrough of installing WordPress? My team has created a super detailed WordPress installation tutorial if you’re curious.
Step 3. Setting Up WordPress Theme
Alright, WordPress is installed. Now for the fun part: making it look like your website. That’s where themes come in.
WordPress themes are ready-made design blueprints for your blog. They control everything visual, like the colors, the fonts, and how your blog posts are laid out. It’s like choosing the style of your new house.
WordPress has a huge collection of themes. Seriously, thousands upon thousands. Free themes, paid themes, themes for every niche imaginable.
But having too many choices can be a bit paralyzing. To help you narrow down the options, my team has created a helpful guide on selecting the perfect WordPress theme.
In my experience, clean, uncluttered designs tend to work best. They look professional, they’re easy for readers to navigate, and they put the focus on your content – which is the most important thing.
Once you’ve chosen and installed a theme, you’ll be ready for the next big step: actually moving your content from HubSpot into WordPress.
Step 4. Importing Your HubSpot Blog Content
This step is like unpacking your moving boxes and arranging your furniture in your new WordPress home. It’s where your blog really starts to take shape.
At this point, you’re going to take the HubSpot content you exported earlier and import it into WordPress. To do that, I’m going to use a plugin called Import any XML, CSV or Excel File to WordPress.
First, you need to install and activate the plugin in your WordPress dashboard. If you need help, see our guide on how to install a WordPress plugin.
Once the plugin is activated, navigate to the All Import » New Import page in your WordPress dashboard. Once there, you should click the ‘Upload a file’ button.
Now, you’ll be asked to choose your import file. Remember the .CSV file you exported from HubSpot in step 1? You need to select it now and then click the ‘Import’ button.
The plugin will automatically detect the type of content you’re importing (usually “Posts” for blog posts). It’s pretty smart like that.
Next, click the ‘Continue to Step 2’ button. You will be shown a preview of the import file and can browse through a spreadsheet view of your posts, one at a time.
Once done, click ‘Continue to Step 3’ at the top or bottom of the page.
Now comes the important part: mapping fields. This is where you tell the plugin how the columns in your .CSV file correspond to fields in WordPress. Don’t worry, you only need to do this step once, not for each post.
For example, you’ll want to drag the column from your import file that contains your blog post titles to the Title field in WordPress.
You can do the same for the post content, tags, and any other data you exported from HubSpot. It’s like matching up labels on boxes when you’re unpacking – you want to put everything in the right place.
Once you’ve mapped all the fields, click ‘Continue to Step 4’ at the bottom of the page.
Next, you’ll be asked to set a unique identifier for your posts. This is used internally by WordPress to keep track of your imported content.
Just click the ‘Auto-detect’ button and the plugin will handle this for you.
Finally, click ‘Confirm & Run Import.’
The plugin will now start importing your content. The time it takes will depend on how much content you’re importing. For a large blog, it might take a few minutes.
Once it’s done, the plugin will show you an ‘Import Complete!’ message.
Now, you can navigate to Posts » All Posts in your WordPress dashboard. You should see your HubSpot blog posts there! Check them out to make sure all your blog posts are imported correctly.
Step 5. Recreating HubSpot Landing Pages in WordPress
Let’s talk about those special pages you might have built in HubSpot – landing pages, sales pages, or other custom pages.
Unfortunately, these often don’t transfer perfectly with a simple import like blog posts do. HubSpot’s page structure and design elements are quite different from WordPress.
So, the best approach for these pages is to recreate them in WordPress. It might sound like extra work, but it gives you the most control over the final result and makes sure everything looks right.
Now, while you could try to rebuild these pages using the standard WordPress block editor, it’s worth considering a dedicated page builder for landing pages.
The block editor is great for creating regular content pages and blog posts. It uses a system of blocks that you can easily add and arrange to build your page. However, for more complex layouts, a page builder plugin like SeedProd offers more advanced features and flexibility.
SeedProd is a drag-and-drop page builder specifically designed for creating landing pages, sales pages, and other marketing-focused pages. It offers a more visual and intuitive way to design intricate layouts without needing to write code.
Whenever I’ve used SeedProd, I’ve found it to be very user-friendly, even if you’re not a design expert. It has a visual interface, tons of pre-designed templates, and all sorts of elements you can just drag and drop onto your page.
Once SeedProd is active, you can go to SeedProd » Landing Pages in your WordPress menu and then click ‘Add New Landing Page.’
SeedProd will then show you a library of templates.
Browse through them and pick a template that looks similar to the HubSpot landing page you want to recreate.
Don’t worry about getting it exactly the same at this stage, you can customize everything later.
Next, give your new page a name and set the URL slug.
Click the ‘Save and Start Editing the Page’ button to open the SeedProd page builder.
Here’s where the fun begins! You’ll see a visual drag-and-drop interface. You can click on any element on the template and edit it – change text, images, colors, fonts, everything.
On the left-hand side, you’ll find a panel with all sorts of elements you can add to your page – headings, text blocks, images, videos, buttons, forms, and much more. Just drag and drop them onto your page to build your layout.
Take your original HubSpot landing page as a reference. Section by section, element by element, recreate it in SeedProd.
Want to explore other page builder options? Thrive Architect is another excellent page builder plugin for WordPress, and it’s also very visual and drag-and-drop based.
Thrive Architect is particularly strong if you are heavily focused on marketing and sales pages. It’s built by the team behind Thrive Themes, which is known for its conversion-focused tools. It excels at creating high-converting sales pages, opt-in pages, and webinar registration pages.
If your primary goal is to build pages specifically designed to drive conversions and sales, Thrive Architect is a powerful alternative to consider.
Yes, recreating your HubSpot landing pages in WordPress takes a bit of hands-on work. However, it’s the most reliable way to bring those important pages over properly.
And the great news is, using a page builder like SeedProd makes the process much smoother and allows you to build even more powerful and customized landing pages in WordPress.
Step 6. Importing Your HubSpot Images to WordPress
You might notice that after importing your content, your images are still being hosted on HubSpot’s servers. You’ve copied the text over, but the images are still living at their old address.
We need to bring those images into your WordPress Media Library. Why? Because it’s much better to host your images directly within your WordPress website. It’s more reliable, often faster, and gives you more control.
Imagine if HubSpot changed its image hosting structure or, worse case, you decided to close your HubSpot account completely down the line. Your images could disappear!
Note: You may notice that this plugin is outdated, but I tested it for this tutorial, and it was working fine. For details, see this guide on whether you should use outdated plugins.
Once activated, you need to trigger the bulk image import using the WordPress bulk edit feature. Don’t worry, you’re not actually editing anything, but just using the bulk edit to tell WordPress to re-process your posts and pages.
Head over to Posts » All Posts in your WordPress dashboard. Select all the posts where you imported content from HubSpot. You can usually do this by checking the checkbox at the very top of the post list.
Then, in the ‘Bulk actions’ dropdown menu, choose ‘Edit’ and click the ‘Apply’ button.
A bunch of bulk edit options will appear. Don’t panic! You don’t need to change anything here. Just click the blue ‘Update’ button at the bottom.
What this does is tell WordPress to re-save all the selected posts. And that action triggers the Auto Upload Images plugin to kick in.
The plugin will scan the content of each post, look for external image URLs (pointing to HubSpot), and then automatically download each image and import it into your WordPress Media Library.
It will then update the image URLs in your posts to point to the newly imported images in your Media Library.
Next, you need to repeat this exact same process for your Pages. Simply go to Pages » All Pages, select all your pages, choose ‘Edit’ in bulk actions, apply, and then just click ‘Update’.
After you’ve done this bulk update for both your posts and pages, go to Media » Library in your WordPress dashboard. You should see all those images from your HubSpot blog and pages in your WordPress Media Library!
Step 7. Pointing Your Domain Name to Your New WordPress Website
If you were already using a custom domain name for your HubSpot blog (like yourblogname.com), then you definitely want to keep using that same domain for your WordPress blog.
Why? Branding, for starters. You want people to find you at the same address. But also, and maybe even more importantly, for SEO.
Search engines have already associated your domain name with your content and authority. Keeping the same domain helps you maintain your search engine rankings.
To make this happen, you need to adjust your domain name settings. Specifically, you’re going to change something called nameservers.
Nameservers are like the internet’s phonebook for domain names. When someone types your domain name into their browser, the nameservers tell the internet where your website is hosted.
Right now, your domain name is likely pointing to HubSpot’s servers, where your HubSpot blog was hosted. We need to update it to point to your new WordPress hosting account.
Your WordPress hosting provider (like Bluehost, Hostinger, or SiteGround) will give you the nameserver information you need. It usually looks like a pair of addresses, something like:
Your hosting provider will have the exact nameservers you need to use.
I usually find this information in my hosting account dashboard, but you can also check the welcome email they sent you when you signed up. If you’re not sure, then their support team can help you out. See the tips in my guide on how to contact WordPress support.
Okay, so where do you actually change these nameserver settings? That’s at your domain name registrar. This is the company where you registered your domain name in the first place.
Sometimes, your domain registrar is the same company as your hosting provider. But often, they are separate. Common domain registrars include companies like Domain.com, Network Solutions, or Namecheap.
You’ll need to log in to your account at your domain registrar. Find the settings for your domain name. Look for something like ‘DNS Settings’, ‘Nameservers’, or ‘Domain Management’.
For example, if your domain is registered with Bluehost, then the nameserver settings in their domain management area will look something like this:
The exact steps vary depending on your domain registrar. But the general idea is always the same: you need to replace the old nameservers (the ones pointing to HubSpot) with the new nameservers provided by your WordPress hosting company.
Once you’ve updated your nameservers, it takes a little while for these changes to spread across the internet. This is called DNS propagation.
DNS propagation can take anywhere from a few hours to, in rare cases, up to 48 hours. During this time, some people might still see your old HubSpot blog, while others might start seeing your new WordPress blog. This is totally normal, don’t worry!
After DNS propagation is complete, when users enter your domain name into their browsers, they will be automatically directed to your WordPress site at its new hosting location.
Step 8. Setting Up Permalinks and Redirects
You’re in the home stretch now! You’ve moved your content and images and pointed your domain to your new WordPress blog. But there’s another really important step for a smooth migration: setting up permalinks and redirects.
Your HubSpot blog probably had its own way of creating URLs. WordPress, naturally, has its own system too, called permalinks.
And here’s the thing. It’s highly likely that your old HubSpot URLs are different from how WordPress creates URLs by default.
Without proper URL redirection from your old HubSpot blog to your new WordPress site, visitors following the old blog post URLs will encounter 404 errors. These broken links not only frustrate users but also negatively impact your search engine rankings since Google penalizes sites with too many broken links.
To fix this issue, you need to do two key things:
Set up SEO-friendly permalinks in WordPress so your new URLs are clean and readable.
Set up redirects to automatically send visitors from your old HubSpot URLs to the correct pages on your new WordPress site. It’s like setting up a forwarding address when you move house.
Let’s start with permalinks.
Setting Up WordPress Permalinks
WordPress gives you control over how your website addresses (URLs) are structured. This is managed through permalink settings.
While you can choose any permalink structure, for the sake of this example, let’s choose ‘Post name’.
‘Post name’ permalinks create clean, easy-to-understand URLs that clearly include the title of your page or blog post. It incorporates keywords from your title, providing an additional SEO advantage and making it readable for people.
For example, instead of a URL that looks like this, which gives no context at all
yourblog.com/?p=123
You get something much nicer and more informative, like:
yourblog.com/your-blog-post-title
See the difference? The second option is much clearer.
Setting this up is quick and easy. In your WordPress dashboard, go to Settings » Permalinks.
You’ll see a section called ‘Common Settings.’ Find the option labeled ‘Post name’ and select it.
Then, just scroll down to the bottom of the page and click the ‘Save Changes’ button.
Done! Permalinks are set up. From now on, WordPress will use the post name structure for all your new blog posts and pages.
Setting Up Redirects From Your Old HubSpot URLs
Now for the redirects, which are extremely important for a smooth migration. Remember that list of old HubSpot URLs you grabbed using Link Klipper way back in the export step? We’re going to put it to good use.
To set up redirects in WordPress without pulling your hair out, I recommend the Redirection plugin. It’s free, it’s powerful, and it makes setting up redirects straightforward.
The first step is to install and activate the Redirection plugin. If you need help, then see our guide on how to install a WordPress plugin.
Once activated, you’ll find the Redirection plugin settings under Tools » Redirection.
In the Redirection plugin interface, you’ll see fields for Source URL and Target URL.
Source URL is where you enter your old HubSpot URL. But here’s a little trick: you only need to enter the part of the URL after your domain name. For example, if your old HubSpot blog post URL was https://your-hubspot-blog.com/blog/my-awesome-post, then you’d just enter /blog/my-awesome-post.
Target URL is where you enter the new WordPress URL for the same content. Again, just the part after your domain name. So, if your new WordPress URL for that post is https://your-wordpress-blog.com/my-awesome-post/, then you’d enter /my-awesome-post/.
Make sure the ‘301 – Moved Permanently’ option is selected for the Redirect Type. Using a 301 redirect is important for search engine optimization, or SEO. It signals to search engines that your content has moved permanently to a new address, and it helps you preserve link equity.
Link equity is the SEO ‘value’ or authority your old pages have built up over time, and 301 redirects help transfer that valuable equity to your new WordPress pages, maintaining your search engine ranking.
Finally, click the ‘Add Redirect’ button to save your redirect.
Now, you need to go through your entire list of old HubSpot URLs and repeat these steps for each one. Yes, it can take a bit of time, especially if you have a lot of blog posts. But it’s essential for a smooth transition.
Once you’ve added all your redirects, test them! Type your old HubSpot URLs into your browser and make sure they correctly redirect you to the right pages on your new WordPress site.
Alternative: Using All in One SEO (AIOSEO) for Redirects
Now, if you’re thinking about SEO seriously (and you should!), you might want to consider All in One SEO (AIOSEO). I use this plugin on my own websites, and it’s fantastic.
Yes, it’s a premium plugin, but it’s packed with SEO features to help your blog rank higher – and it includes a really handy Redirection Manager that lets you set up full site redirects.
What I really appreciate is that AIOSEO is an all-in-one SEO powerhouse. Instead of juggling separate plugins for redirects, sitemaps, schema, and everything else SEO-related, AIOSEO puts it all in one place.
Plus, its Redirection Manager is quite powerful and makes setting up even complex redirects straightforward. It’s a real time-saver and keeps my SEO workflow streamlined.
Step 9. Add Your HubSpot CRM to WordPress
Now, if you’re like many HubSpot users, then you’re probably using HubSpot CRM to manage your leads and customer interactions. Good news! You can easily connect your new WordPress blog to your existing HubSpot CRM.
Think of it as keeping the best of both worlds – the flexibility of WordPress for your blog and the robust CRM capabilities of HubSpot.
The official HubSpot plugin lets you connect your WordPress site to your HubSpot account and unlock a bunch of useful features right within your WordPress dashboard.
With the HubSpot plugin, you can:
Capture leads from your WordPress site: Easily add HubSpot forms to your WordPress pages and blog posts to capture contact information.
Track website visitors: The plugin adds HubSpot tracking code to your WordPress site, showing how visitors interact with your content and identifying potential leads.
Access HubSpot CRM tools from WordPress: Get quick access to your HubSpot contacts, deals, and tasks directly from your WordPress admin area.
Use live chat: Embed your HubSpot live chat widget on your WordPress site to engage with visitors in real time.
Analyze your marketing performance: View HubSpot analytics dashboards within WordPress to monitor your blog’s performance and lead generation efforts.
Once activated, the plugin will add a new HubSpot menu to your WordPress admin sidebar. This will take you to the setup wizard, where you can click the ‘Sign in here’ link at the top.
Once you have signed in, simply follow the prompts to connect the plugin to your existing HubSpot account.
After connecting, you can explore the HubSpot plugin settings to customize features like form embedding, live chat, and tracking options.
And that’s it! You’ve now integrated your WordPress blog with HubSpot CRM. You can now manage your blog content in WordPress while still making the most of HubSpot’s powerful CRM and marketing tools.
One of the best things about using WordPress is that you can easily extend your site’s features with plugins.
There are thousands of WordPress plugins available, both free and paid.
At WPBeginner, we put together a guide on how to pick the best plugins for your website. It’s worth a read to learn how to evaluate plugins and pick the right ones for your specific needs.
But to get you off to a flying start, here are a few top plugins we often recommend for almost every new WordPress blog:
WPForms is a fantastic plugin for creating all sorts of forms – contact forms, surveys, order forms, and more. I use WPForms on my own websites and love how user-friendly it is.
SeedProd is a drag-and-drop website builder that makes customizing your design a breeze. You can create custom page layouts beyond your theme’s standard options.
AIOSEO (All in One SEO) is one of the most popular and powerful SEO plugins for WordPress. It helps you optimize your blog for better search engine rankings.
MonsterInsights makes it easy to understand your blog traffic and visitor behavior. It connects WordPress to Google Analytics and shows you key stats in your dashboard.
OptinMonster is a powerful toolkit for growing your email list and boosting conversions. It helps you create popups, slide-in forms, and other opt-in forms to capture email addresses.
For even more plugin ideas and recommendations, be sure to check out our comprehensive list of essential WordPress plugins. It’s packed with plugins we use and trust.
Alternative: Get Professional Help to Migrate Your HubSpot Website
Okay, I’ve walked through all the steps to migrate your blog from HubSpot to WordPress. And you know what? For many of you, following these steps will be totally doable!
But let’s be real. Even with a detailed guide, moving a website from HubSpot to WordPress is still quite a technical project. And time-consuming.
Perhaps you’re not super comfortable with the website side of things. Or maybe you’re already juggling a million tasks and just want this migration done quickly, correctly, without headaches.
If that sounds like you, then WPBeginner can help. Our WordPress Website Design service team can design and build you a brand-new, custom WordPress website that’s perfectly tailored to your needs. They can handle the migration of your content from HubSpot, too.
If you’re curious to learn more about these services, or if you just have some questions, then you can easily chat with our support team on our Website Design Services page. They can give you all the details and help you figure out if professional migration help is the right path for you.
Bonus: Learning WordPress
You’ve made the move from HubSpot to the wonderful world of WordPress!
Now, you might be looking at your new WordPress dashboard and thinking, ‘Okay, this is different!’ And you’d be right. WordPress works in its own way, and it has a lot of features and options that might be new to you if you’re coming from HubSpot.
Luckily, I can recommend tons of completely free resources to help you become a WordPress pro in no time. Here are just a few that I think you’ll find super helpful:
WPBeginner Blog: This is the heart of WPBeginner. Think of it as your go-to library for everything WordPress. You’ll find thousands of easy-to-follow tutorials, guides, and articles.
WPBeginner Dictionary: WordPress has its own vocabulary! Our dictionary helps you understand all the WordPress terms and jargon.
WPBeginner Videos: Prefer to learn by watching? Our video tutorials walk you through common WordPress tasks step-by-step, visually.
WPBeginner YouTube Channel: Even more video help! Our YouTube channel is packed with WordPress tips, tutorials, and how-tos.
WPBeginner Blueprint: Curious about the tools and plugins we use here at WPBeginner? The Blueprint gives you a peek behind the scenes.
WPBeginner Deals: Who doesn’t love a good deal? In our Deals section, we gather exclusive discounts and coupons on WordPress themes, plugins, hosting, and more.
So, don’t feel overwhelmed by learning WordPress. With WPBeginner as your guide, you have all the resources you need right at your fingertips. Dive in, explore, and start enjoying the power and flexibility of WordPress!
I know how frustrating it can be when you visit your website and see a big “Not Secure” warning in the browser. It feels like something’s broken—and worse, your visitors can see it too. 😬
That little message can scare people off before they’ve even had a chance to look around. They might leave without reading a word, filling out a form, or making a purchase.
Google shows this warning when your site doesn’t have an SSL certificate. That means your site isn’t using HTTPS, and the browser is letting visitors know their connection might not be private.
Luckily, the fix is straightforward, and I’ll walk you through it step by step. I’ve used the same process on my own websites and helped countless others do the same with WordPress.
🌟Expert Tip: Not confident about fixing errors yourself? Why not leave things to the professionals?
Our team at WPBeginner offers Emergency WordPress Support Services, available 24/7. We can fix everything from SSL errors to plugin issues at affordable prices for small businesses and website owners.
Why Does Google Show “Not Secure” on Your Website?
When I see the “Not Secure” warning pop up on a site, I know it usually means one thing: the site isn’t fully encrypted. Google shows this warning when a website doesn’t use HTTPS or there’s something wrong with its SSL certificate.
For reference, HTTPS (Hypertext Transfer Protocol Secure) is the secure version of HTTP. It uses something called an SSL/TLS certificate to encrypt the connection between your website and your visitors.
And the Google “Not Secure” message isn’t just a minor warning you can ignore. Most visitors don’t stick around when they see that alert. It signals a lack of trust, and that affects everything from conversions to your search rankings.
Let me walk you through the four most common reasons I’ve seen this warning appear on WordPress websites.
1. Your Website Doesn’t Have an SSL Certificate
SSL certificates encrypt the connection between your website and your visitors. Without one, browsers assume your site is unsafe, because technically, it is. Any data people enter on your site, like personal or credit card details, could be intercepted.
That’s why Chrome and other browsers flash the “Not Secure” warning for sites that still use plain HTTP. I’ve seen this happen to brand-new sites where SSL just wasn’t enabled yet, or even older sites where it was never installed.
2. Your SSL Certificate Is Expired or Invalid
Sometimes the SSL certificate is there, but it’s expired or wasn’t installed properly. This is one of the first things I check when someone asks why their site suddenly shows a warning.
You can usually spot this SSL issue by clicking the padlock (or the missing padlock) in your browser’s address bar.
Even with a valid SSL certificate, your site can still show as “Not Secure” if it’s loading some content over HTTP. I’ve seen this a lot when people switch their site to HTTPS but forget to update old links to images, scripts, or stylesheets.
This is known as mixed content, and browsers don’t like it. The fix is simple—you just need to update any insecure URLs so everything loads over HTTPS. Later in this tutorial, I will show you how to do this.
4. Your Site Has HTTP URLs in WordPress Settings
Another thing I always double-check is the site URL settings inside WordPress. If the WordPress Address or Site Address is still set to HTTP, your site may continue to trigger security warnings even if SSL is working fine.
You can find these settings by going to Settings » General in your WordPress dashboard. Then, switch both URLs to use HTTPS to ensure that every page loads securely. I will show you how to do this later on.
Now that I’ve covered what causes the “Not Secure” warning, let’s take a look at how to fix it and prevent it from coming back.
How to Fix the “Not Secure” Warning in Google Chrome
Seeing the “Not Secure” warning on your site can be frustrating. You want your visitors to feel safe, not greeted with a warning label.
Luckily, the fix usually isn’t complicated. In most cases, it comes down to enabling an SSL certificate, updating a few WordPress settings, or cleaning up what’s known as mixed content.
I’ve gone through this troubleshooting process on dozens of sites—both my own and for others—and I’ll show you exactly what to do to secure your site and get rid of that warning for good.
Step 1. Get a Free SSL Certificate for Your Website
The first thing I do when fixing a “Not Secure” warning is check if an SSL certificate is installed. This small piece of security tech encrypts data between your website and visitors—and it’s what enables HTTPS.
Years ago, SSL certificates could be expensive. Some companies still charge a premium, but the good news is you don’t need to pay for one, especially if you’re just starting out.
Most WordPress hosting providers now offer free SSL certificates with their plans. I’ve used this option on dozens of websites, and in most cases, enabling it only takes a couple of clicks from your hosting dashboard.
If you’re using Bluehost, just log in to your account and head to your website settings. Then click the ‘Security’ tab.
From there, you’ll see the option to enable the free SSL certificate. Just toggle it on, and you’re good to go.
Note: The screenshots above show the Bluehost dashboard. If you’re using a different host, then things might look slightly different, but the SSL setting is almost always in the security section.
For hosts that use cPanel, you’ll need to launch it from your hosting dashboard. Scroll down to the ‘Security’ tab and click on the SSL/TLS icon.
And if your host doesn’t offer free SSL, don’t worry—you can still get one through Let’s Encrypt.
Even with an SSL certificate, your site might still load as “Not Secure” if the WordPress settings are incorrect. You can fix this by updating your site’s URL.
Simply go to the Settings » General page in your WordPress dashboard.
Then, make sure both the ‘WordPress Address (URL)’ and ‘Site Address (URL)’ fields use https:// instead of http://.
Don’t forget to click on the ‘Save Changes’ button to store your settings.
WordPress will now start using https:// for all URLs across your website. However, some HTTP URLs may still be stored in your WordPress database, which may cause issues moving forward.
Next, I will show you how to fix those URLs easily.
Step 3. Fix Mixed Content Issues in WordPress
One reason for the ‘Not Secure’ warning is mixed content issues. This happens when some parts of your website load using an HTTP (insecure) URL.
Almost all of these URLs are stored in your WordPress database and added by your WordPress theme or plugins. You may also have http:// URLs in your blog posts and pages.
To fix this, you will need a search and replace plugin to find http URLs and replace them with https://. The best plugin for the job is Search & Replace Everything.
I use Search and Replace Everything because it is fast and efficient. More importantly, it is super easy to use even for beginners.
First, you need to install and activate the Search and Replace Everything plugin. For details, you can see this guide on how to install WordPress plugins.
Upon plugin activation, go to the Tools » WP Search & Replace page to start using the plugin.
In the ‘Search for’ field you need to enter http:// and in the ‘Replace with’ field add https://.
After that, you need to click on ‘Select All’ to ensure all tables in your WordPress database are included in the search.
Finally, click on the ‘Preview Search & Replace’ button.
The plugin will then perform the search and show you a preview of the results. This allows you to review the data before it is permanently changed.
Carefully review the results, and once you are satisfied, click on the ‘Replace All’ button.
The plugin will then make changes to your WordPress database and replace all HTTP URLs with HTTPS.
Step 4. Set Up an HTTP to HTTPS Redirect in WordPress
After switching a site to HTTPS, one of the steps I never skip is setting up a redirect from HTTP to HTTPS. Without it, people might still land on the insecure version of your site through old links or bookmarks.
The most reliable way to fix this is by adding a redirect rule to your .htaccess file. Here’s the snippet I use on most WordPress websites:
RewriteEngine On
RewriteCond %{HTTPS} !=on
RewriteRule ^(.*)$ https://%{HTTP_HOST}%{REQUEST_URI} [L,R=301]
You’ll want to place this block above the existing HTTPS server block in your site’s Nginx config file—usually found in /etc/nginx/sites-available/ or /etc/nginx/conf.d/.
Once you’ve added the redirect, don’t forget to reload Nginx for the changes to take effect:
After making these changes, you should test your website to ensure everything is working correctly.
You can use the SSL Labs SSL Test to check your certificate and confirm your site is fully secured. Simply enter your domain name, and it will check the SSL implementation on your domain name.
Another alternative tool that I have often used is Why No Padlock? What I like about it is that it explains issues in plain language, which is helpful for beginners.
Finally, try visiting your site in Incognito mode. If you still see the “Not Secure” warning, you need to clear your WordPress cache or wait a few minutes for changes to take effect.
Make Your Site Feel Safe for Every Visitor
No one wants their site to scare away visitors with a browser warning. The biggest damage is losing the trust of your customers and visitors.
I hope this guide helped you fully secure your WordPress site with HTTPS so that your visitors won’t have to think twice about trusting it.
Bonus Resources
I follow this WordPress security guide on all websites I work on. This step-by-step guide offers an easy action plan to properly secure your WordPress website.
The following are a few additional resources that I think you’ll find helpful:

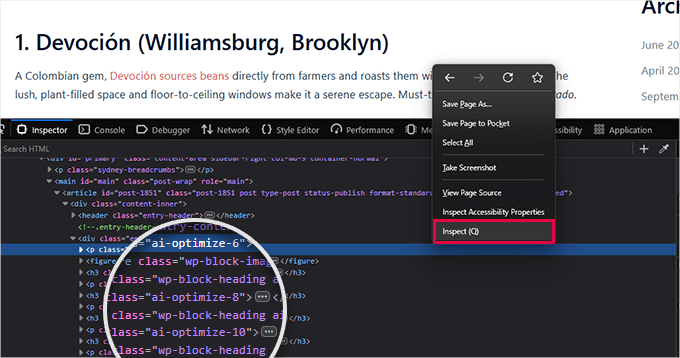
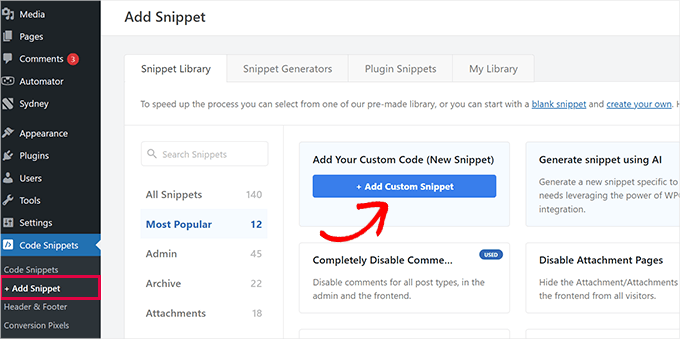
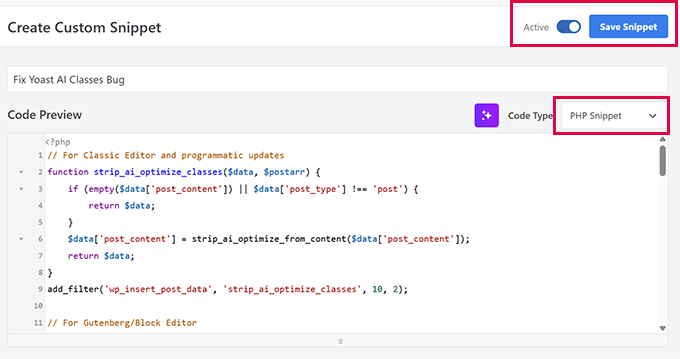
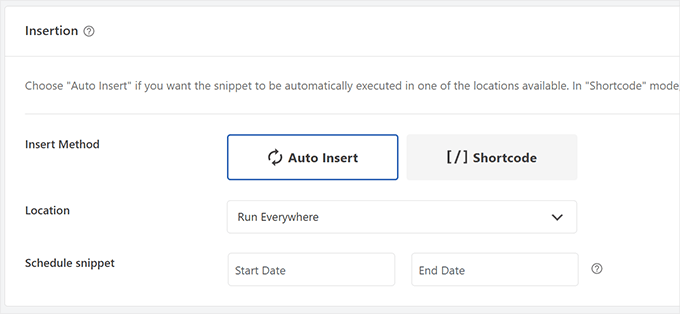

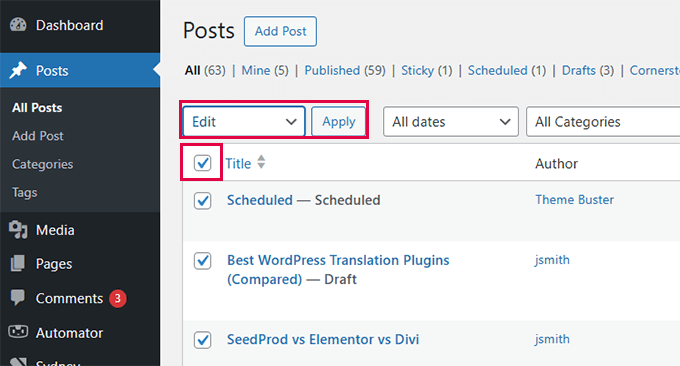
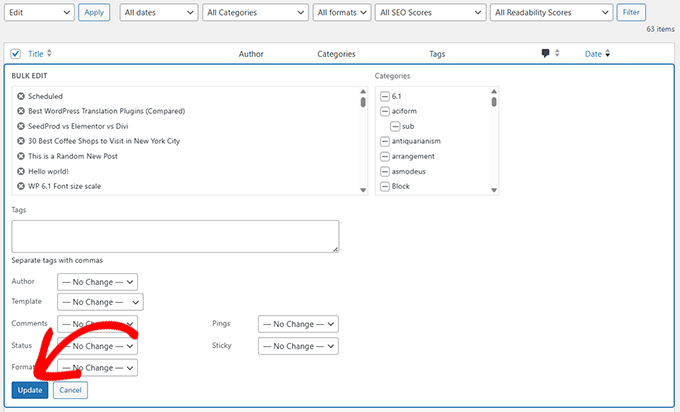
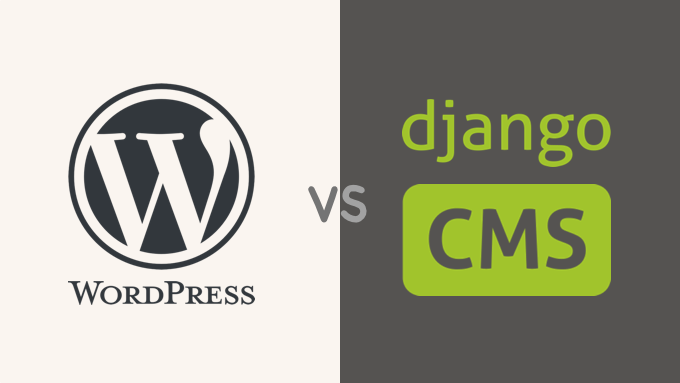

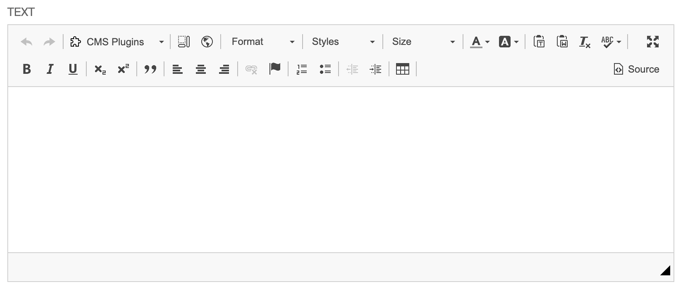
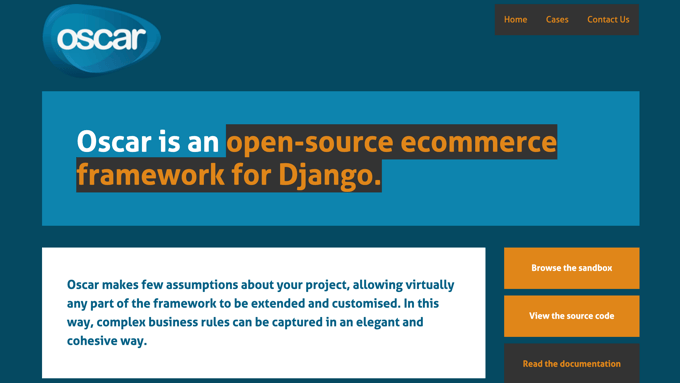
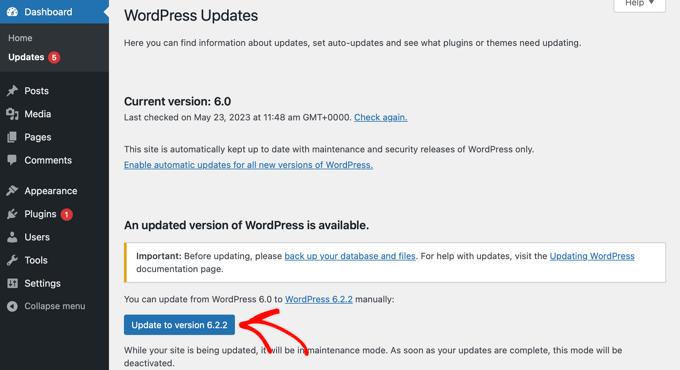

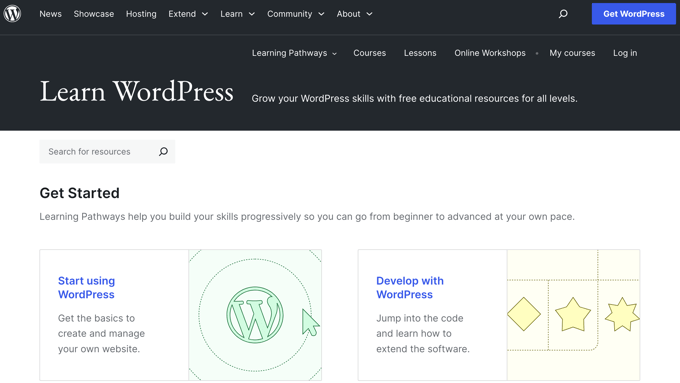
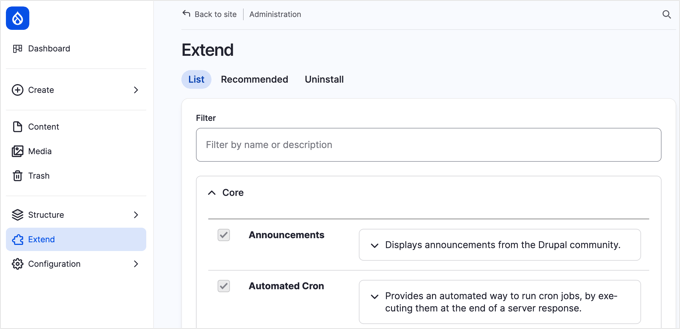

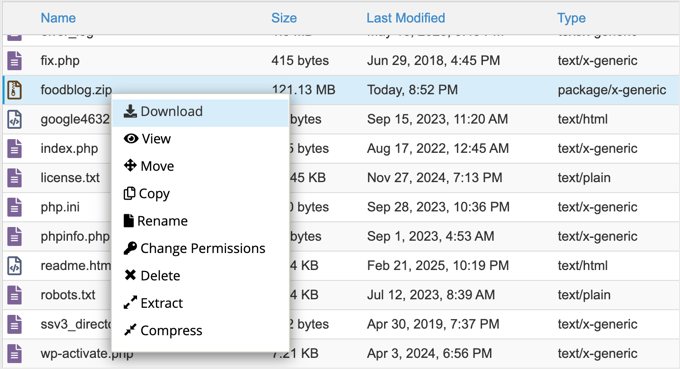
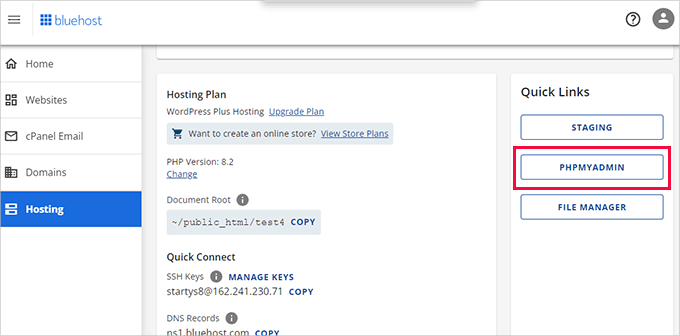
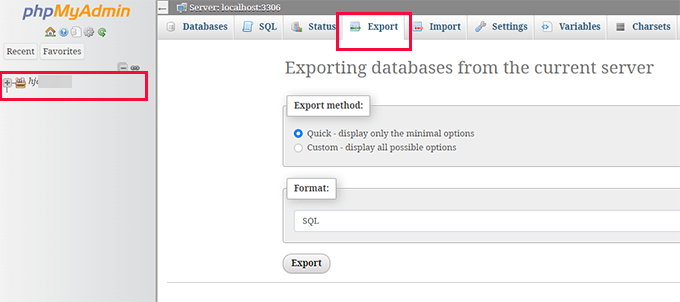
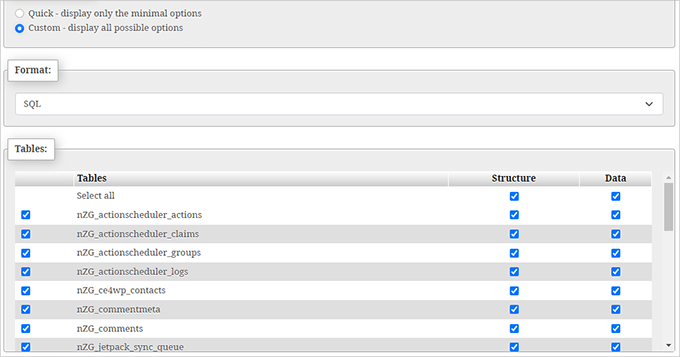
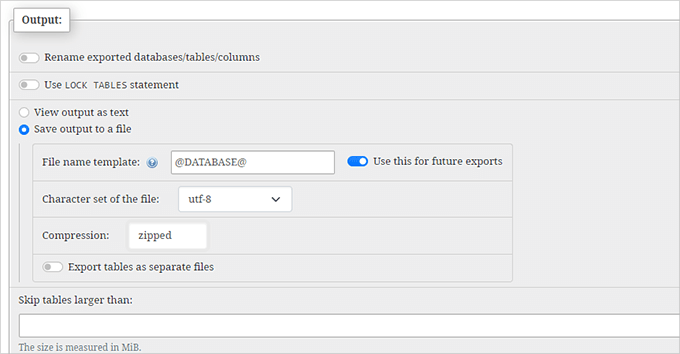
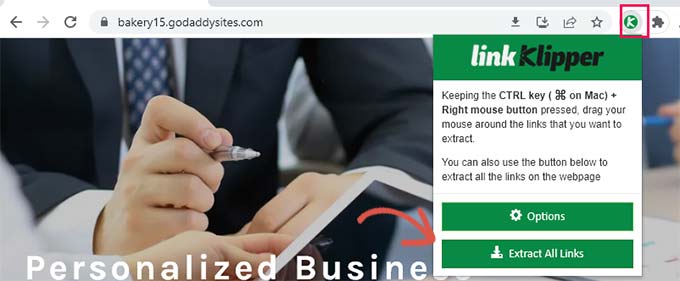
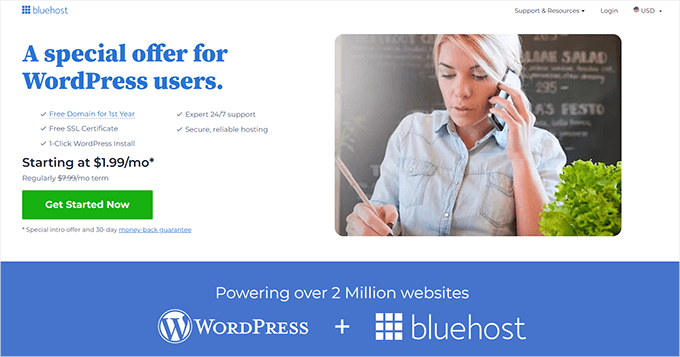
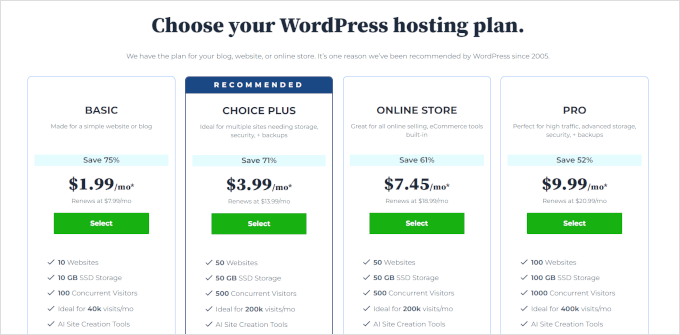
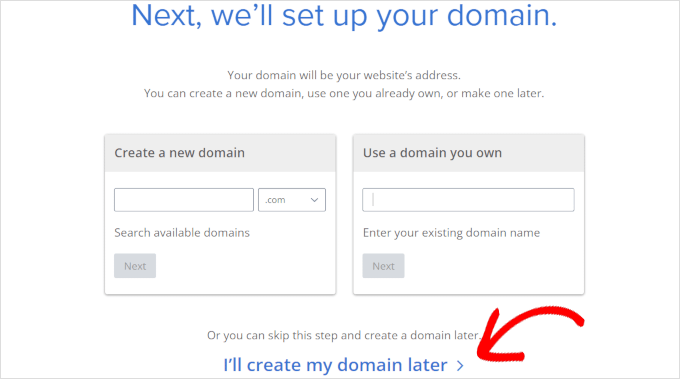
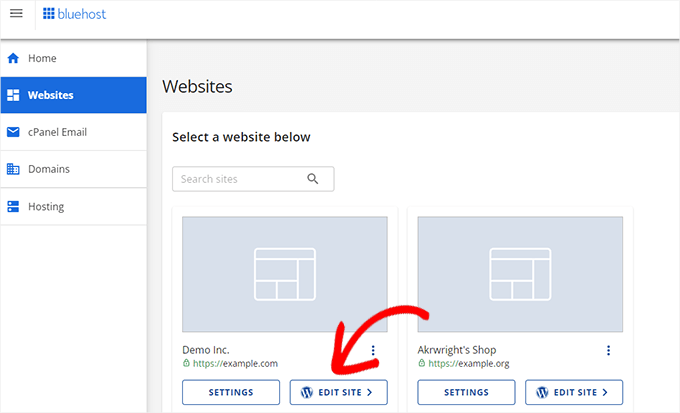
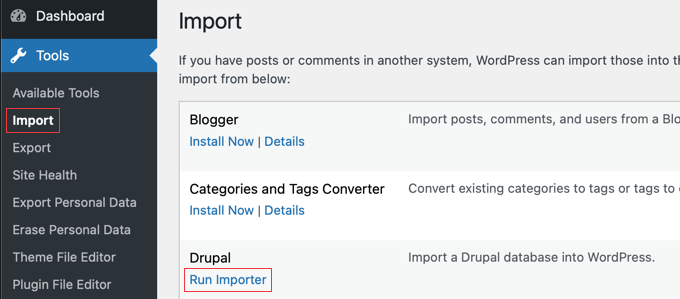

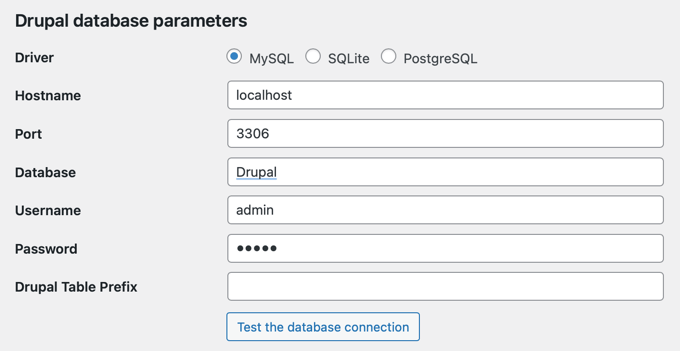
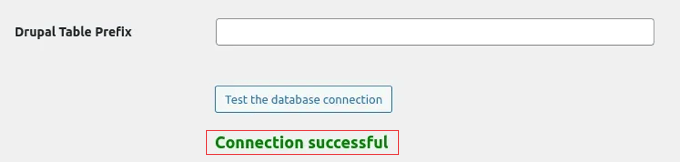

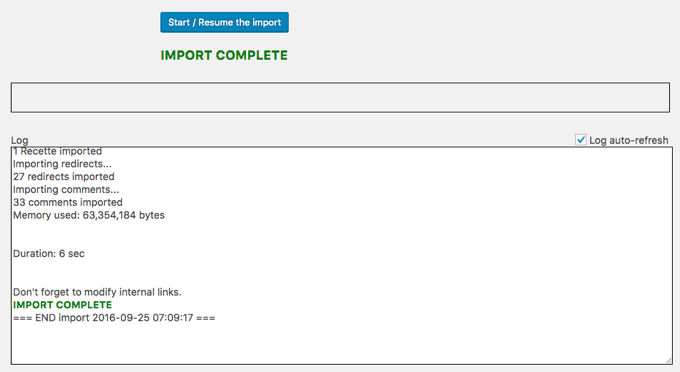
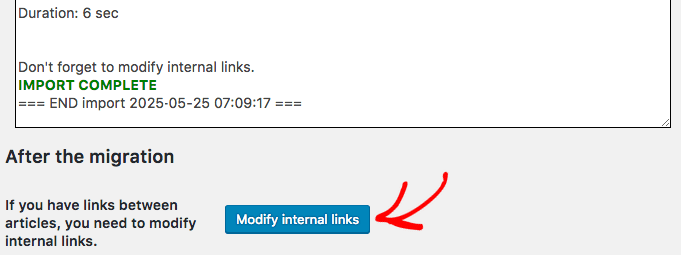
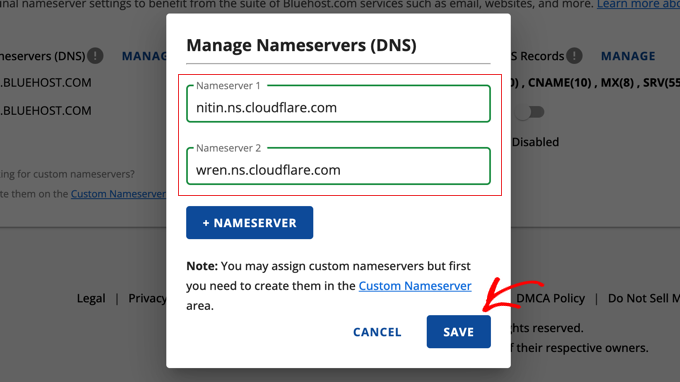
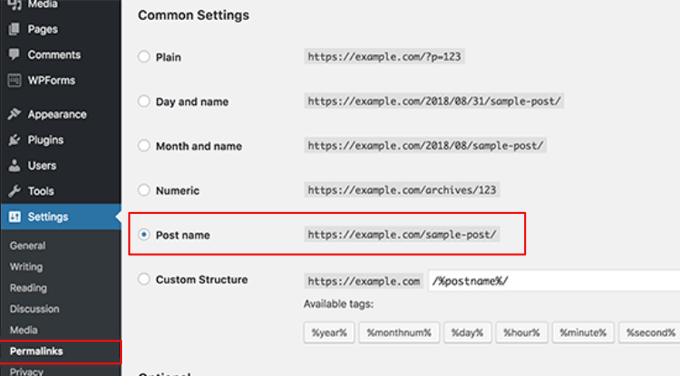
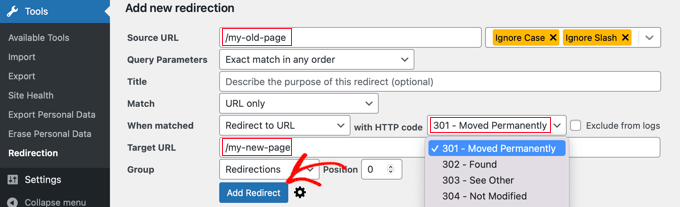
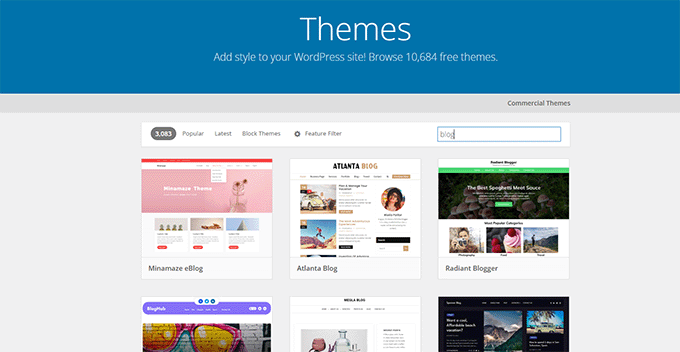
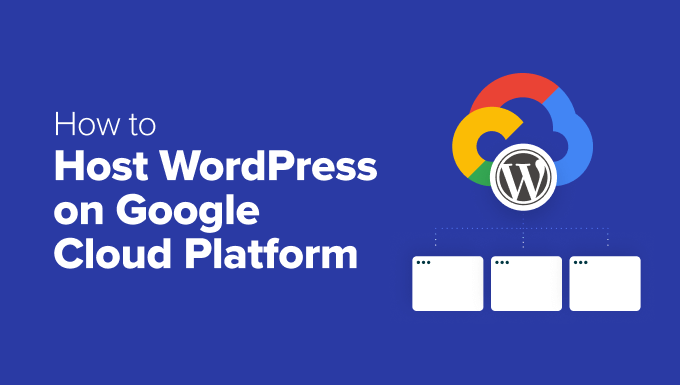
 Syed Balkhi
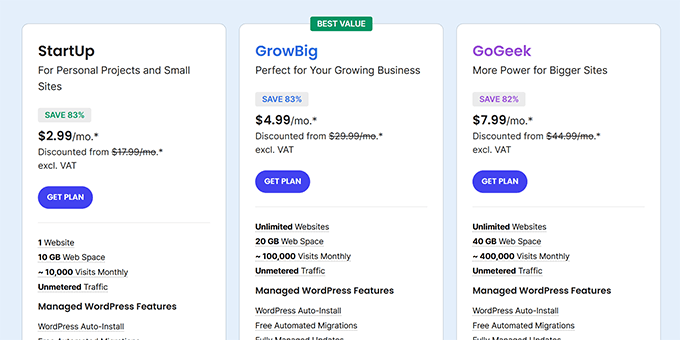
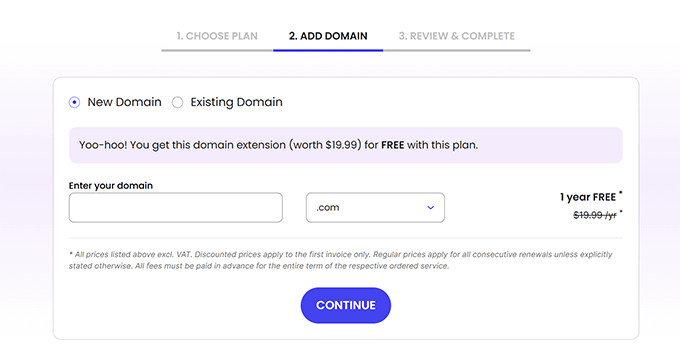
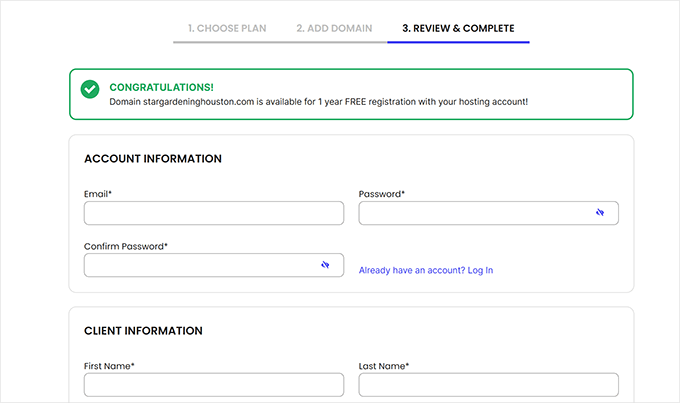
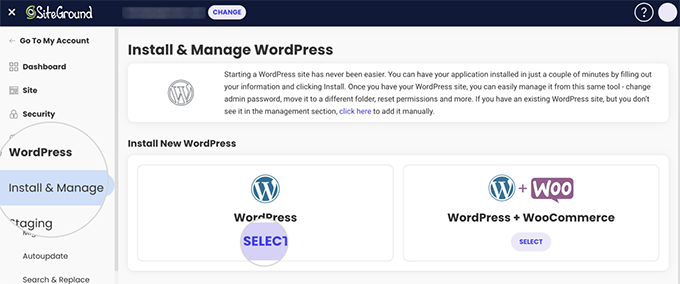

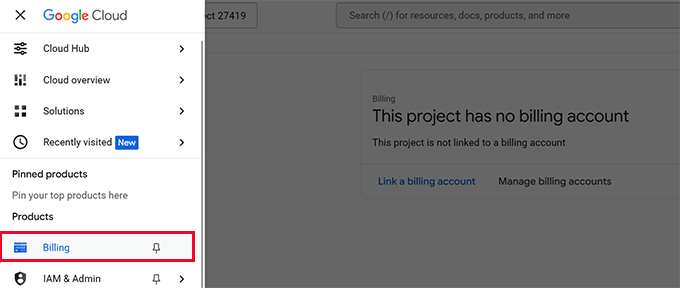
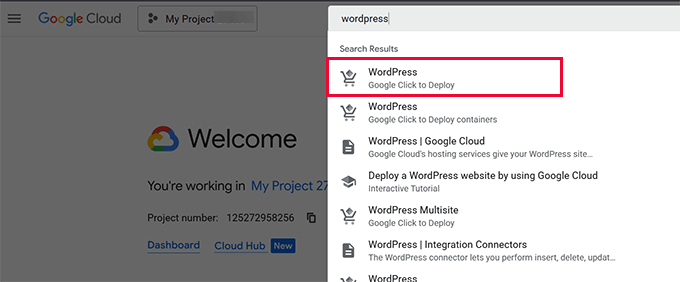
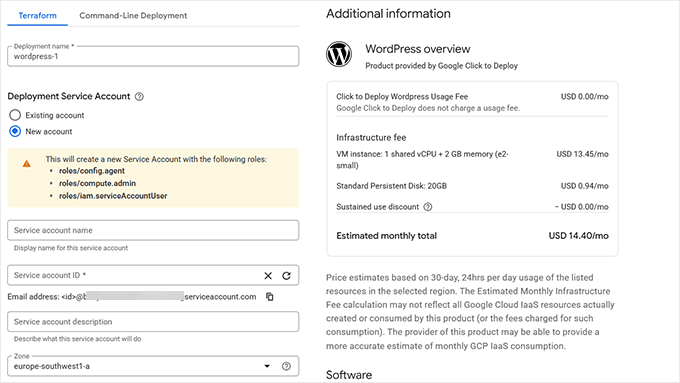

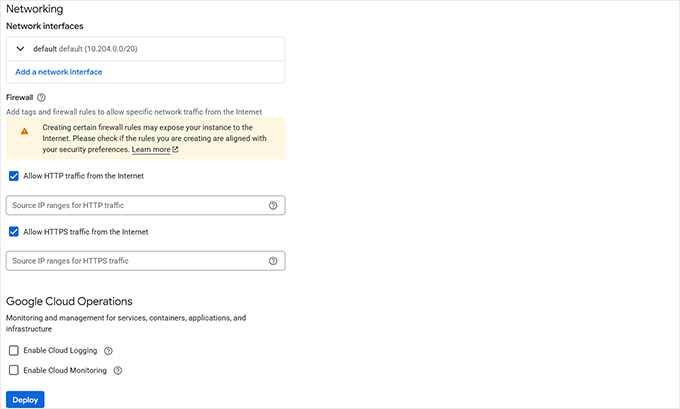
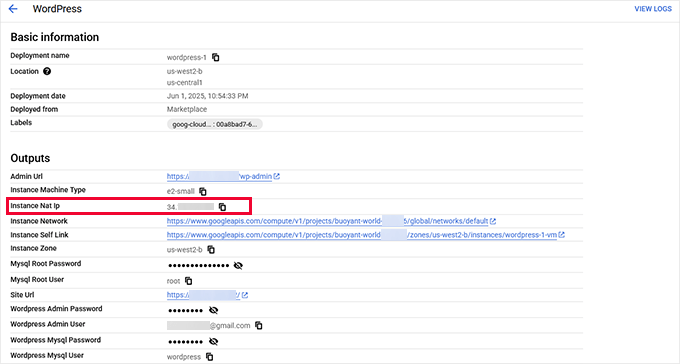

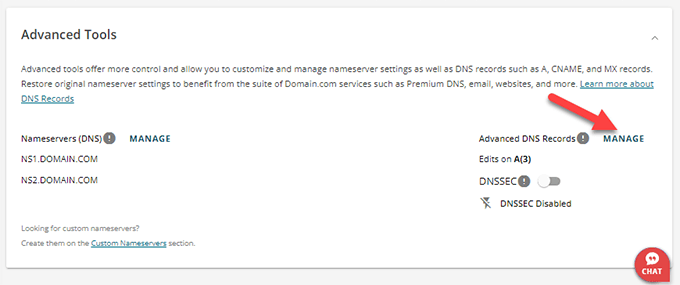
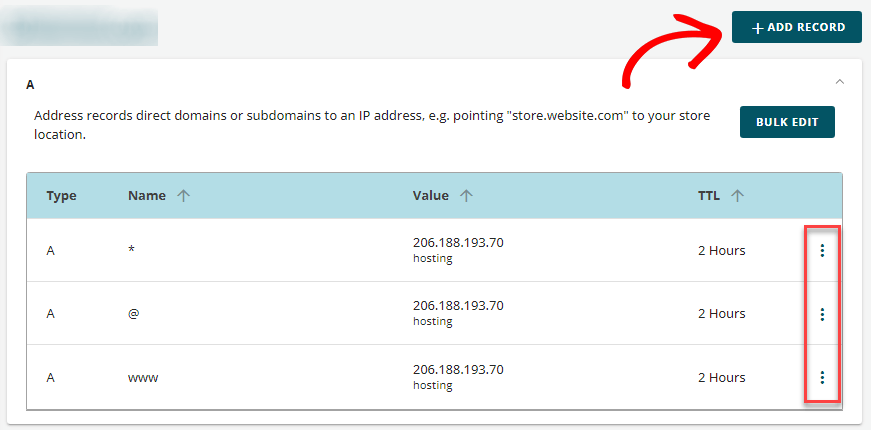
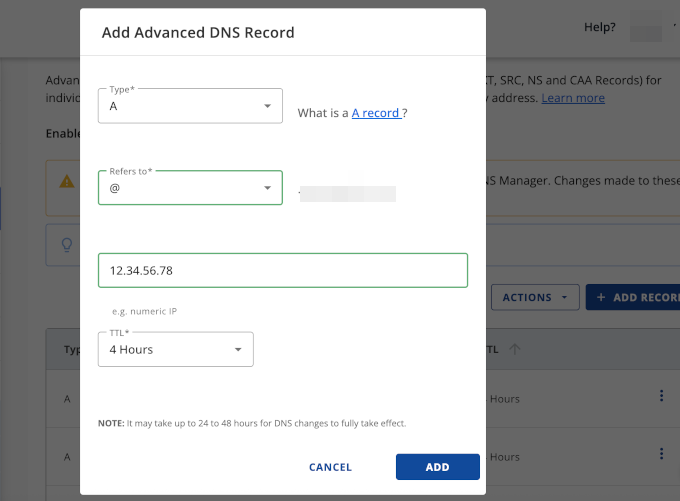

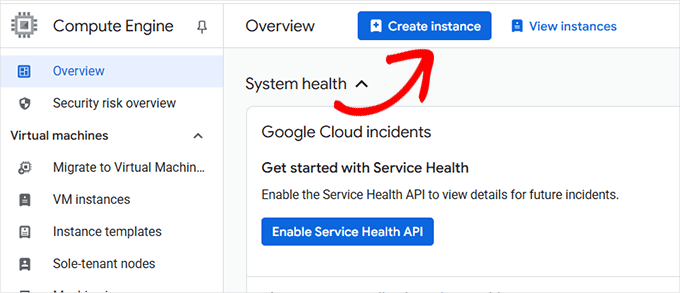
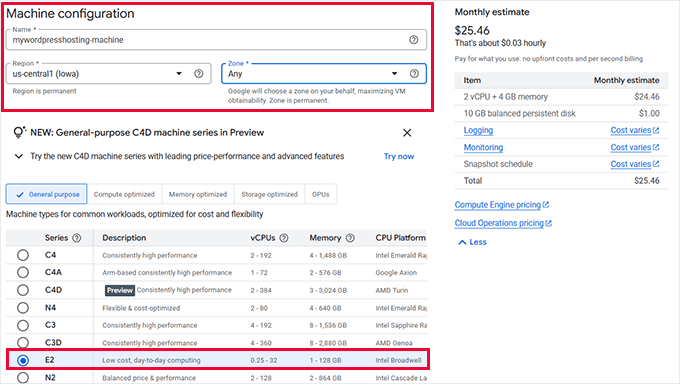
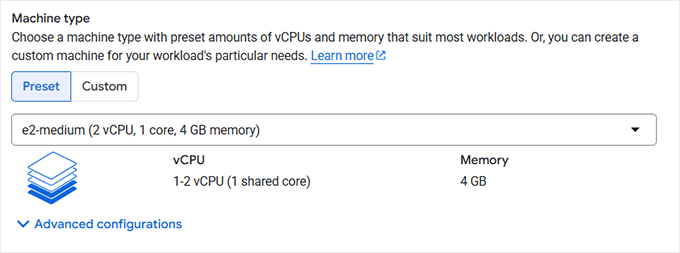


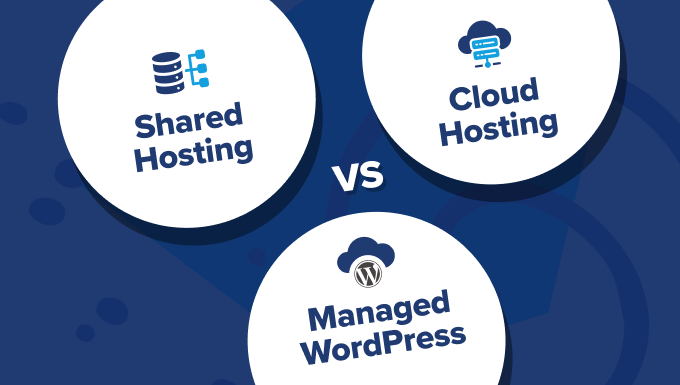
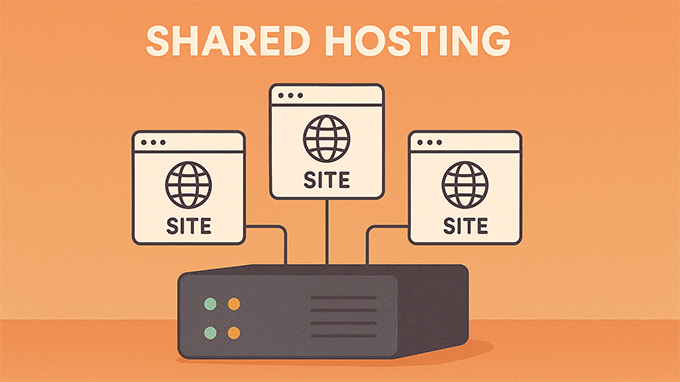
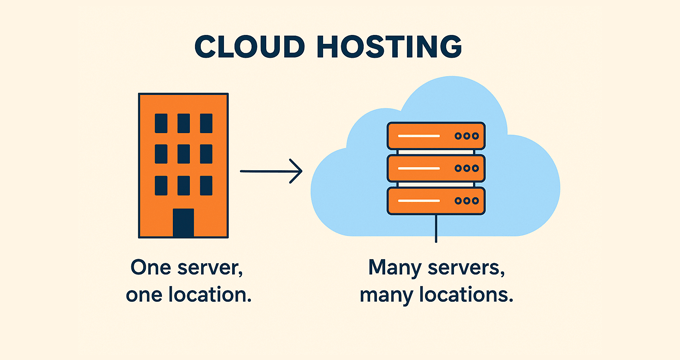
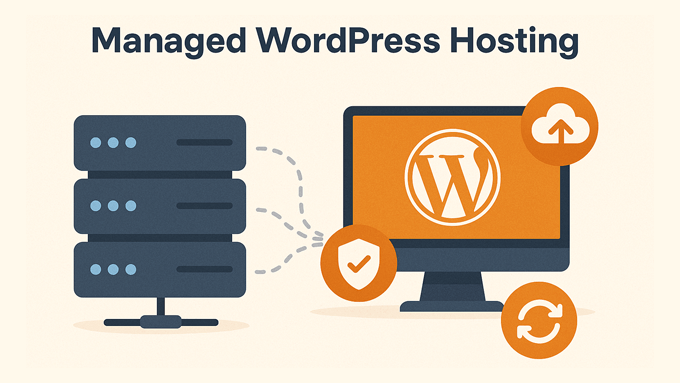
 Syed Balkhi