Reading view

What’s New in WordPress 6.8? (Features and Screenshots)

WordPress 6.8 is finally here 🥳, and we’ve been testing it since the early beta. It’s the first major release of 2025 with several important changes.

You’ll notice speed improvements after the update, thanks to the new speculative loading feature that makes pages feel like they load before you click them.

This update also introduces better design tools, stronger password protection, and a more polished site editor.

We’ve explored all the new features, and in this guide, we’ll walk you through what’s changed, with examples and screenshots along the way.

A deep dive into the latest WordPress 6.8 release with features and screenshots

⚠️ Heads up! If you’re not using managed WordPress hosting, then you’ll need to run the update yourself.

No stress — we’ve put together a step-by-step guide on how to update WordPress safely.

ℹ️Important: As always, please don’t forget to create a complete WordPress backup before updating to the new release.

Here is a quick list of what’s new in WordPress 6.8:

Speed Boost with Speculative Loading 🚀

WordPress 6.8 now includes speculative loading, a clever technique that helps your site feel faster for visitors.

It works by quietly loading pages in the background before someone clicks a link. This way, the next page opens almost instantly.

Think of it like setting the table before your guest even walks into the room. By the time they sit down, everything’s already ready.

Speculative loading explained

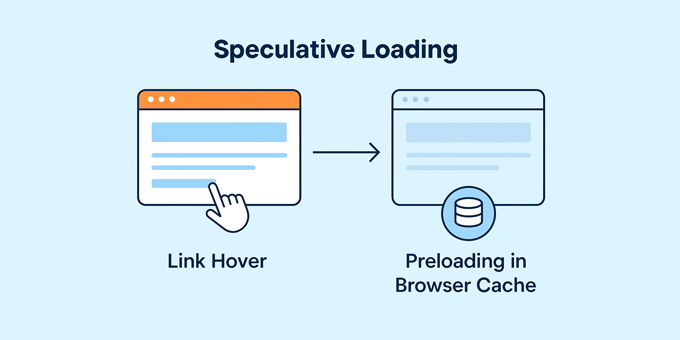
This is powered by the Speculation Rules API. WordPress watches for signs like hovering over a link and starts preloading that page just in case.

Developers can fine-tune how this works by setting rules, such as choosing which links get preloaded and when.

💡 Losing customers due to a slow website? Take a look at our Site Speed Optimization service. For a small fee, our real WordPress experts can completely optimize your website for blazing performance. 🚀

Style Book Now Works with Classic Themes 🎨

In WordPress 6.8, the Style Book is now available for classic themes that support the Full Site Editor.

Previously, this feature was limited to block themes only. Now more users can access it, even if they haven’t switched to a block-based design.

The Style Book gives you a visual overview of how your blocks look, including buttons, headings, forms, and more, all in one place.

You’ll find it by going to Appearance » Design » Styles when using a compatible classic theme. This makes it easier to preview and manage styles without needing to edit templates.

Classic Theme with the new design tab

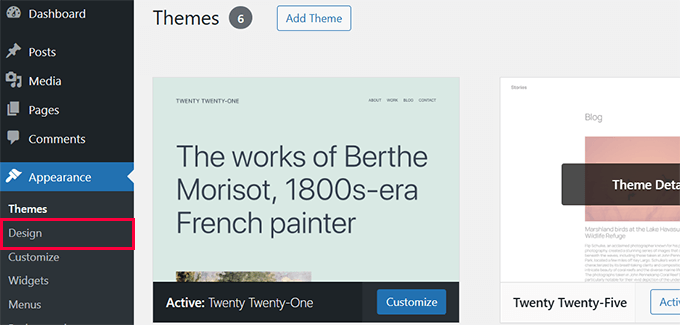
WordPress has also moved site patterns to Appearance » Design » Patterns. Grouping these settings together helps keep your workflow organized.

It’s a welcome upgrade if you’re using a classic theme but still want access to modern styling tools.

New Design and Editing Features in WordPress 6.8 🖌️

WordPress 6.8 introduces several updates that make customizing your site faster and more intuitive. Whether you’re adjusting global styles or editing individual blocks, these new features help you work more efficiently.

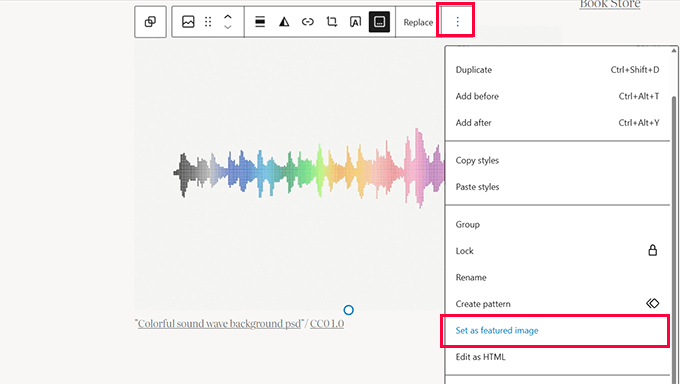
Set Any Image Block as a Featured Image

With just one click, you can now turn any image block into a featured image.

This makes the process quicker and avoids the need to go into post settings. And don’t worry — deleting the image block won’t remove the featured image from your post.

Set an image block to be used as featured image

Switch Section Styles from the Toolbar

In zoomed-out mode, the toolbar now lets you switch between different section styles on the fly.

This is great for experimenting with layouts without hunting through menus or sidebars.

Shuffle between styles

Global Styles Panel in the Site Editor

The Styles panel inside the Site Editor sidebar now makes it easier to manage your site’s look and feel.

You can adjust fonts, colors, spacing, and layout all in one place. This is a big time-saver when you want to update your site’s design without digging through settings.

A global Styles panel in the Editor sidebar

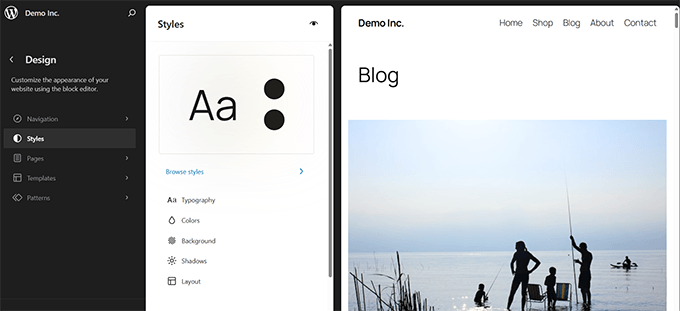
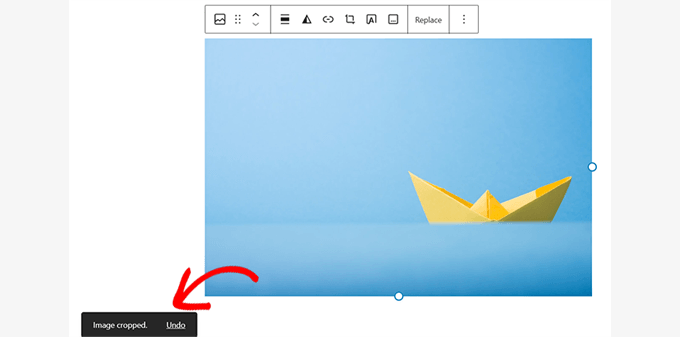
Image Editing Now Includes an Undo Option

After editing an image, like cropping or rotating, you’ll see a success notice with an undo link.

This makes it easier to roll back edits if something doesn’t look right.

Success notices when images are edited

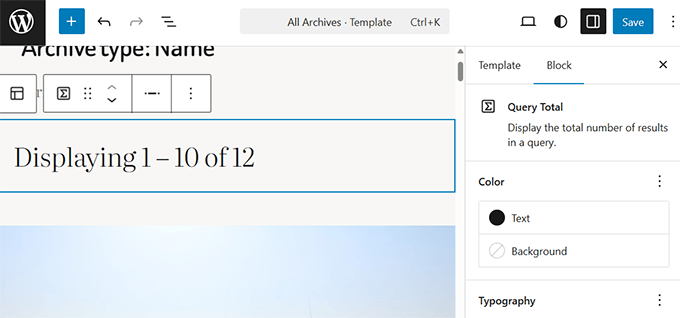
New Query Total Block

A new block called Query Total lets you display the total number of posts shown in a Query Loop.

It’s useful for archive pages, category filters, or search results where users want to know how many posts are being shown.

Query Total Block shows number of items returned for a query

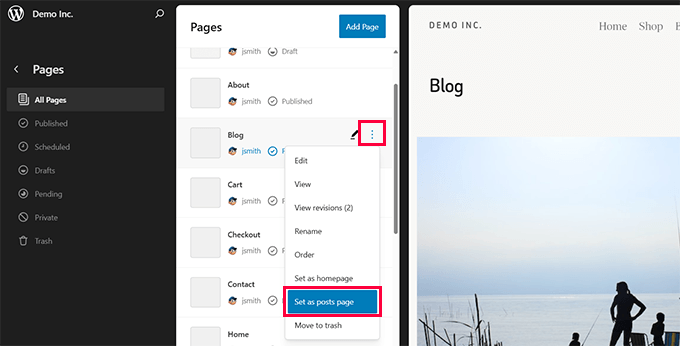
Quickly Set a Posts Page from the Page List

In the Site Editor, you can now assign any page as your blog’s posts page directly from the page list view.

This small improvement makes setting up your site’s structure much more straightforward.

Easily set posts page in site editor

New Option to Ignore Sticky Posts in Query Loops ♾️

If you’ve ever been frustrated by sticky posts always showing at the top of a query loop, then WordPress 6.8 has a fix.

You can now choose to ignore sticky posts when creating a custom post layout using the Query Loop block.

Query loop sticky posts

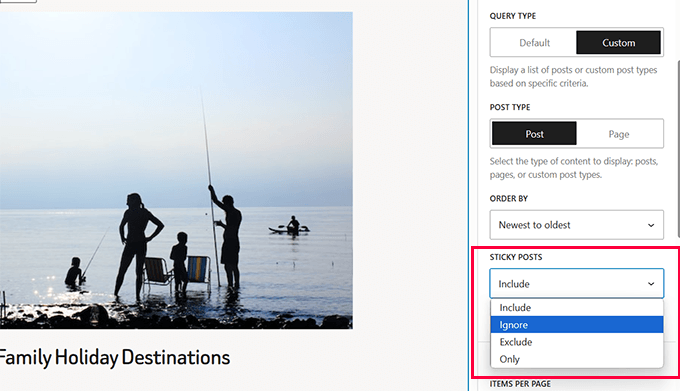
This gives you better control over the order of your posts, which is especially useful for category pages, blog archives, or custom layouts.

It’s a small checkbox, but it can make a big difference in how your content is displayed.

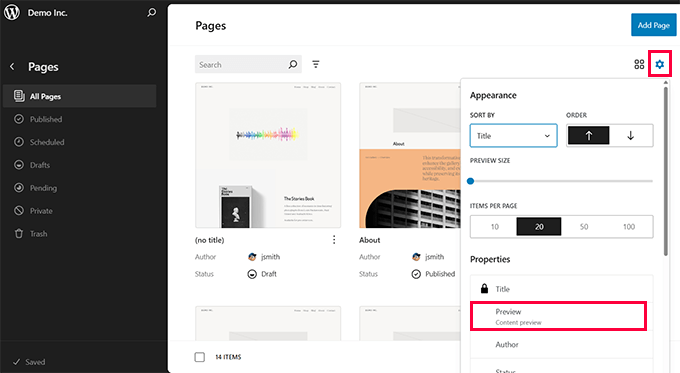
More Control Over Data Views 🪟

WordPress 6.8 brings helpful improvements to Data Views, making it easier to manage content in the admin area.

Now, layouts behave more consistently across post types. For example, you can choose to show content previews in the grid view for pages.

Pages grid showing content preview

You can also change the density of tables in list views.

Depending on your preference, this helps you see more content at once or keep things more spacious.

Set table view density

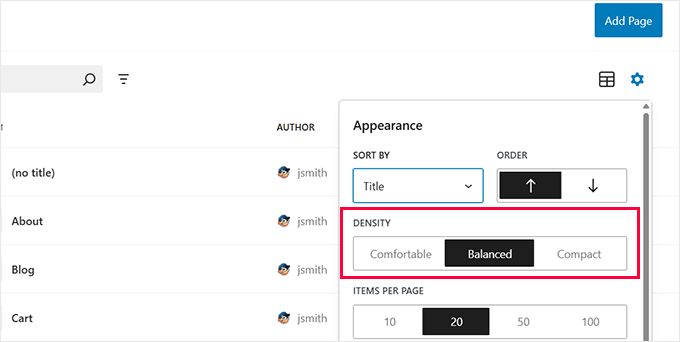
These changes don’t jump out at first, but they really smooth out the experience of managing your site.

Stronger Password Security with bcrypt 🔒

WordPress password security has been due for an upgrade, and it finally arrived in 6.8.

WordPress now uses bcrypt for hashing passwords. It’s much harder to crack and is widely trusted by developers for good reason.

Before this, WordPress used a system called phpass that relied on MD5 hashing. It worked, but it’s outdated, and a sophisticated attack could compromise it.

Expert Tip💡: Even with stronger password hashing, it’s still smart to add two-factor authentication. That way, hackers can’t log in even if they somehow get your password.

Bcrypt adds what’s called a “work factor.” That means it takes longer to process each guess, which slows down attacks and keeps your WordPress account safe.

If you’re running a site, you don’t have to change anything. WordPress will handle it for you quietly in the background.

It’s one of those updates you won’t notice day to day, but we’re glad it’s finally here.

Miscellaneous Enhancements in WordPress 6.8

Alongside the big features, WordPress 6.8 includes several smaller improvements that help polish the overall experience:

  • Labels across WordPress now consistently say “Add Item” instead of “Add New Item” when you’re adding something new. This small detail helps create a more predictable editing experience. [#61219]
  • The date format settings screen now includes two extra options to choose from. These presets save time if you’re not comfortable creating custom date formats. [#55685]
  • You can now embed Canva designs directly into your posts using the oEmbed block. This makes it easier to share visuals without needing extra steps. [#58840]
  • Focus styles have been refined, link text is now clearer, and form controls are easier for screen reader users to navigate. [Accessibility Overview]

Under the Hood Changes in WordPress 6.8

WordPress 6.8 also brings several behind-the-scenes improvements that developers and power users will appreciate. These changes improve performance, consistency, and flexibility under the hood:

  • A new function called wp_register_block_types_from_metadata_collection() allows multiple block types to be registered with a single call. This helps plugin developers streamline their code. [Read more]
  • The Interactivity API now has official best practices to guide developers building dynamic block experiences. These recommendations help keep frontend code clean and predictable. [Read more]
  • A new REST API filter makes it possible to expose menus publicly. This makes it easier to pull navigation data into headless or frontend apps. [Read more]
  • WordPress now properly localizes PHPMailer error messages and ensures plugin update emails match the administrator’s language. These changes improve the international user experience. [Read more]
  • Redundant title attributes have been removed across core to improve accessibility. This benefits screen reader users and makes interfaces cleaner. [#24766]
  • Block Hooks now work with synced patterns. This creates consistent block behavior across templates, post content, and navigation areas. [#62704]
  • Site owners can now remove the “Disable the visual editor” checkbox from user profiles. This is helpful when you want to simplify the editing experience or enforce block editing. [#34681]
  • New contextual classes have been added to the body tag. They make it easier to style different parts of a website with custom CSS. [#19736]

Final Thoughts on WordPress 6.8

We’ve been following WordPress 6.8 development from planning to the release, and it’s great to see so many thoughtful improvements packed into this update.

The new design tools make it easier to build beautiful websites. Performance updates like speculative loading help your site feel faster without extra effort.

Even behind the scenes, changes like bcrypt password hashing and better accessibility make a real impact, especially if you’re running a busy or growing site.

If you haven’t updated yet, then we recommend doing so after backing up your site. And once you’re in, take a few minutes to explore the new features — they’re easy to miss but fun to use.

If you liked this article, then please subscribe to our YouTube Channel for WordPress video tutorials. You can also find us on Twitter and Facebook.

The post What’s New in WordPress 6.8? (Features and Screenshots) first appeared on WPBeginner.

  •  

How to Add Trust Badges to Checkout Pages in WordPress (& Boost Sales)

Looking to boost your online store’s conversion rates? You’re not alone. When we first started selling products online, we noticed that many visitors would abandon their carts right at checkout.

The reason? They weren’t sure if they could trust our website with their payment information.

That’s when we discovered the power of trust badges. After adding them to our checkout pages, we saw an immediate improvement in sales. These small but powerful symbols help reassure customers that their transactions are secure and legitimate.

And fortunately, adding trust badges to your WordPress checkout pages isn’t complicated at all. Whether you’re selling physical products or digital downloads, this step-by-step guide will show you how to set up trust seals in WordPress.

You’ll learn which badges work best and where to place them for maximum impact. By the end of this tutorial, you’ll have everything you need to boost your store’s credibility and increase your sales.

Add Trust Badges to Checkout Pages in WordPress (& Boost Sales)

Before we dive into the beginner’s guide, here are some quick links to help you navigate to the sections that you’re interested in:

What Are Trust Badges?

Trust badges are visual elements or icons designed to reassure visitors that your website or online store is secure, reliable, and credible. You have probably seen them on checkout pages, product pages, or even website footers.

They often include badges like ‘Secure Checkout,’ ‘Money-Back Guarantee,’ ‘Verified Seller,’ or ‘Free Shipping.’ These symbols act as subtle but powerful signals that help customers feel safe making a purchase from your store.

Trust badges

Trust badges are especially important for online stores because customers are sharing sensitive information like credit card details.

A well-placed trust badge, such as one showing your site uses SSL encryption or is backed by a reputable payment processor, can ease concerns and help to reduce cart abandonment.

Even small design choices, like adding a PayPal or Stripe logo, can have a big impact on customer confidence.

Trust badge for Stripe

WordPress makes it easy to add trust badges using plugins, widgets, or even custom code.

Whether you run a WooCommerce store or sell digital products with Easy Digital Downloads, adding trust badges is a simple step that can directly affect your sales.

The Benefits of Using Trust Seals in Your Online Store

Adding trust badges to your WordPress site is about more than looking professional. It also gives your customers the confidence to take the next step.

When visitors trust your site, they are more likely to stick around, make a purchase, and even return for more.

Here are some key benefits of using trust badges on your site:

  • ✔️Reduce Cart Abandonment: One of the biggest reasons customers abandon their carts is fear of fraud or security concerns. Displaying trust badges like ‘Secure Checkout’ or ‘SSL Secured’ reassures them that their information is safe.
  • ✔️Boost Conversions: Trust badges directly impact your sales. When customers see that your store is verified or offers guarantees, they feel more confident buying from you. In fact, a study found that adding trust badges to checkout pages increased conversions by up to 42%.
  • ✔️Build Credibility: Badges like ‘Verified Seller’ or those from well-known payment processors (like PayPal or Stripe) make your site look more credible.
  • ✔️Encourage Repeat Purchases: When customers have a positive, trustworthy experience, they are more likely to come back. Badges like ‘Money-Back Guarantee’ or ‘100% Satisfaction Guaranteed’ tell buyers that you stand by your products and can build long-term loyalty.
  • ✔️Improve Perceived Value: Trust badges also improve how customers view your products and services. A badge like ‘Free Shipping‘ has a psychological boost because users love the idea of getting more value without additional cost.

Types of Trust Badges That You Can Use

You must keep in mind that not all trust badges are created the same, and each serves a specific purpose to address different customer concerns. From security to shipping guarantees, the type of trust badge you use can make a big difference in how customers perceive your store.

Here are some of the most common types of trust badges used on WordPress sites.

Secure Checkout Badges

One of the biggest concerns for customers when it comes to online shopping is whether their personal and payment information is safe. This is where secure checkout badges come into play.

These badges, often displayed as a padlock icon or labeled with ‘SSL Secured,’ let shoppers know your site is using SSL encryption to protect sensitive data.

SSL Protected badge

In WordPress, secure checkout badges can be automatically added if you are using a reliable SSL certificate.

Many hosting providers even include SSL for free.

SSL certificate in OptinMonster

Pairing this with a visible badge on your checkout page makes it clear to customers that their payment details are safe from hackers or breaches.

Payment Processor Badges

Another layer of reassurance comes from using payment processor badges. Logos from trusted payment providers like PayPal or Stripe tell customers that their transactions are being handled by well-known and secure systems.

For instance, we use a ‘PayPal Verified’ logo on the MonsterInsights checkout page. This immediately ensures customers that they have the option to pay securely through a trusted platform.

PayPal Verified badge

This simple addition can make all the difference when a hesitant shopper is deciding whether or not to complete their purchase.

Credit Card Logo Badges

Another idea for trust badges is to display credit card logo badges on your checkout page. These badges, like Visa, MasterCard, American Express, and others, let customers know that they can securely make payments using their preferred card.

It helps visitors feel more confident about sharing their payment information since they recognize these major payment brands. It is a simple way to show that your website supports safe and secure transactions.

Add credit card badges

We recommend placing these card logos where they are easy to spot, like near the payment options or checkout button.

Customer Satisfaction Badges

Customer satisfaction badges are a great way to boost confidence and encourage people to make a purchase. These badges signal to potential buyers that your store values their experience and offers reliable services.

For instance, Money-Back Guarantee is a customer satisfaction badge that reassures customers that if they are not happy with their purchase, they can get their money back.

Money back guarantee badge

Similarly, a Free Shipping Badge can instantly make your store more appealing. It is an easy way to increase conversions by highlighting a benefit that many customers look for when shopping online.

You can also add a Verified Seller Badge if you have a store on a platform like Etsy. This will allow you to show that your store is credible and trustworthy.

Trusted seller badge

Client and Partner Logo Badges

Displaying your clients’ logos on your website is a powerful way to build credibility and trust.

When potential customers see that well-known brands or companies work with you or are using your product, it gives your business a stamp of approval.

For example, at OptinMonster, we show a list of logos of all the famous brands that are using our product.

Client brands logos

Third-Party Endorsement Badges

Third-party endorsement badges are another tool for improving your credibility. They show that your business has been recognized or approved by an external organization or expert.

These badges act as independent validation that your products or services meet certain standards, making potential customers feel more confident about their purchase decisions.

For instance, seals from trusted organizations, like the Better Business Bureau (BBB) or security certification seals (like Norton or McAfee), can go a long way in reassuring customers that your site is safe.

Third party endorsement badge

If your business has won any industry awards or been featured in top publications, then you can also show these badges. They will serve as proof that experts or influencers in your field recognize your business’s quality and success.

Method 1: How to Add Custom Trust Badges to Checkout Pages in WooCommerce (Custom Code)

If you’ve already designed your WooCommerce checkout page and want to add trust badges to it, then this is the method for you. It’s also a free method if you don’t want to invest in a dedicated WooCommerce plugin like FunnelKit (Method 2).

We’re going to be working with custom code here, which can be a bit risky and even break your website. That’s why we’re going to use WPCode.

It is the best WordPress code snippets plugin on the market. After thorough testing, we have concluded that it is the easiest and safest way to add custom code. To learn more, see our WPCode review.

Note: Keep in mind that you will also need to add your own trust seal images to the WordPress media library. For details, see our guide on how to properly add images in WordPress.

First, you need to install and activate the WPCode plugin. For step by step instructions, see our tutorial on how to install a WordPress plugin.

Note🚨: The plugin also has a free version that you can use for this tutorial. However, upgrading to the pro plan will give you access to smart conditional logic, block snippets, and a cloud library of code snippets.

Upon plugin activation, head over to the Code Snippets » + Add Snippet page from the WordPress dashboard.

Here, click the ‘Use Snippet’ button under the ‘Add Your Custom Code (New Snippet)’ option.

Choose 'Add Your Custom Code (New Snippet)' option

You will now be directed to a new screen where you must add a code snippet name. This name will only be for your identification and will not be shown to any users.

Then, choose ‘HTML Snippet’ as the ‘Code Type’ from the popup.

Select 'HTML Snippet' in WPCode

Go ahead and add the following custom code into the ‘Code Preview’ box:

<div class="wpcode-trust-badge" style="text-align: center;">
	<img src="/wp-content/uploads/2025/03/trust-badge.png" width="100" alt="Trusted" />
</div>
Hosted with ❤️ by WPCode

After that, be sure to replace the placeholder image URL with the URL of your trust badge image to display it correctly on the checkout page.

Keep in mind that you’ll need to upload the trust badge image to your WooCommerce store and retrieve its URL from the WordPress media library. If you’re unsure how to do this, check out our tutorial on how to get the URL of images you upload in WordPress.

You can add as many trust badge images as you like.

Add the trust badges code snippet and your images URLs

Now, scroll down to the ‘Insertion’ section and choose the ‘Shortcode’ option.

Then, toggle the ‘Inactive’ switch to ‘Active’ and click the ‘Save Snippet’ button.

Choose the Shortcode option and save your snippet

Once you do that, WPCode will generate a shortcode that you will be adding to your WooCommerce checkout page.

Simply click the ‘Copy’ button and store the shortcode somewhere safe.

Copy Shortcode

Now, open your store’s checkout page in the WordPress block editor.

Related Post🔍: If you are just getting started with creating a store, then see our WooCommerce made simple guide for in-depth instructions.

Here, you need to choose a suitable place within the checkout block to display your trust badge, ensuring it’s highly visible to customers.

While the ‘Shortcode’ block isn’t available in this section, the trust badge shortcode will still work correctly when placed inside a ‘Paragraph’ block.

Add shortcode within the checkout block

Finally, click the ‘Update’ or ‘Publish’ button to store your changes.

Now, visit your WooCommerce store to see the trust badges in action.

Preview of trust badges in WooCommerce

Method 2: How to Add Trust Badges to WooCommerce Checkout Pages (Plugin Method)

If you want to add trust badges to your WooCommerce checkout page without using custom code, then FunnelKit Funnel Builder is a great option.

It comes with professionally designed checkout templates that already include trust badges, helping you create a high-converting checkout experience with minimal effort.

Keep in mind that this version will involve creating an entirely custom WooCommerce checkout page. So, if you just want to add trust badges to your existing checkout page, then please go to Method 1.

We’ve tested FunnelKit a lot over the years, and it’s a great tool for improving your WooCommerce store. For details, see our complete FunnelKit review.

First, you need to install and activate the FunnelKit Funnel Builder plugin. For details, see our tutorial on how to install a WordPress plugin.

Note🚨: Most of the checkout page templates will be locked in the free plan. That’s why we recommend using the FunnelKit Pro version.

Once you’ve activated the plugin, you need to go to the FunnelKit » Store Checkout page and click the ‘Create Store Checkout’ button.

The FunnelKit builder WooCommerce plugin

You can now choose from any of FunnelKit’s professionally designed checkout page templates.

To take a closer look at the trust badges for each template, simply click the ‘Preview’ button.

Preview templates

We’re using the Hific template, which has multiple trust badges related to security.

When you find a template you want to use, go ahead and click on the ‘Import This Funnel’ button.

Click the Import This Funnel button

Doing this will show a prompt on the screen.

Go ahead and click the ‘Activate’ button. Once you do that, type in the name for your store’s checkout page.

How to create a custom WooCommerce checkout page using free WordPress plugins

You will now be able to edit the checkout page according to your liking.

For step-by-step instructions, see our guide on how to customize checkout pages in WooCommerce.

Customizing the WooCommerce checkout page on your online store

Once you are done, head back to the Store Checkout page and click on the ‘Draft’ button.

Then, choose the ‘Publish’ option from the dropdown menu.

Publishing a custom checkout page to your online store

Now, visit your WooCommerce store to see the custom checkout page.

Here, you will see the trust seals at the bottom.

Funnelkit checkout page preview

For more details on getting the most out of FunnelKit, see our guide on how to make a high-converting sales funnel in WordPress.

Method 3: How to Add Trust Badges to Checkout Pages for Digital Products

If you sell digital goods with Easy Digital Downloads (EDD), then it’s actually super easy to add trust badges to your checkout pages. You’ll just need to make sure that you first have a functional store for selling digital downloads in WordPress.

You’ll also need the WPCode plugin because it comes with built-in EDD locations that make it even easier to add trust badges to your store.

Note🚨: Keep in mind the EDD specific locations are only available in the pro version of WPCode. If you use the free plan, then you can use the shortcode method instead.

Important: Keep in mind that you will also need to add your own trust seal images to the WordPress media library. For details, see our guide on how to properly add images in WordPress.

First, you will need to install and activate the WPCode plugin. For details, see our guide on how to install a WordPress plugin.

Upon plugin activation, visit the Code Snippets » + Add Snippet page and choose the ‘Add Your Custom Code (New Snippet)’ option.

Then, select ‘HTML Snippet’ as the code type.

Select 'HTML Snippet' in WPCode

Now, simply add the following custom code into the ‘Code Preview’ box:

<div class="wpcode-trust-badge" style="text-align: center;">
	<img src="/wp-content/uploads/2025/03/trust-badge.png" width="100" alt="Trusted" />
</div>
Hosted with ❤️ by WPCode

Once you do that, make sure to add the URL of your trust badge image from the media library. If you’re not sure where to find it, then please see our guide on how to get the URL of images you upload in WordPress.

Then, scroll down to the ‘Insertion’ section and choose the ‘Auto Insert’ mode.

Auto inserting a custom WordPress code snippet

After that, you need to expand the ‘Location’ section and switch to the ‘eCommerce’ tab.

Next, scroll down to the ‘Easy Digital Downloads’ section and select the ‘After the Checkout Cart’ option. Now, your trust badges will automatically be added to your EDD checkout page.

Choose After the checkout cart as location

If you’re using the free version of WPCode, then you’ll need to copy the WPCode shortcode and paste it into your checkout page. For details, see our guide on how to add shortcodes in WordPress.

Go ahead and toggle the ‘Inactive’ switch to ‘Active’ from the top.

Then, click the ‘Save Snippet’ button to store your settings.

Save your EDD trust badges snippet

Now, visit the checkout page in your digital downloads store.

Here, you will notice that the trust badges are showing in your chosen location.

Preview of trust badges in EDD

Bonus Tips for Using Social Proof in Your Online Store

Using random icons on your checkout page won’t automatically boost conversions. Instead, you need the right trust signals in the right places.

Here are a few tips to get the most out of social proof in your WordPress store:

  • 🎨Match the Badges to Your Store’s Design: Trust badges should stand out just enough to grab attention without clashing with your design. Avoid oversized, pixelated, or mismatched badges that make your checkout page look cluttered.
  • 🔥Test and See What Works Best: Not all badges work the same for every store. Try different placements, designs, and messaging to see what resonates with your customers. A/B testing can help you find the perfect combination.
  • Show more social proof with customer reviews. Showing positive reviews from happy customers can also convince shoppers to complete their purchases. For details, see our guide on how to show Google, Facebook, and Yelp reviews in WordPress.
  • 💰Show real-time purchase notifications. Showing users that other customers are buying your products can convince them to do the same. Learn how to do this in our guide on how to create a live sale notification in WooCommerce.

Related Guides for Boosting Sales in WordPress

If you liked this article, then please subscribe to our YouTube Channel for WordPress video tutorials. You can also find us on Twitter and Facebook.

The post How to Add Trust Badges to Checkout Pages in WordPress (& Boost Sales) first appeared on WPBeginner.

  •  

How to Keep Personally Identifiable Info Out of Google Analytics

Recently, we discovered something alarming while auditing one of our clients’ websites. Email addresses and phone numbers were showing up in their Google Analytics reports, exposing sensitive visitor information that they never intended to collect.

Collecting personally identifiable information from users can be a major issue. Not only does it violate privacy regulations like GDPR, but it also puts your business at risk of hefty fines and losing the trust of your customers.

But here’s the good news: preventing personally identifiable information (PII) from ending up in your analytics is actually quite straightforward once you know how.

We’ve spent years working with Google Analytics across hundreds of websites, and we’ve developed a foolproof system to keep sensitive data out of your reports. In this guide, we’ll show you exactly how to protect your visitors’ privacy while still getting all the valuable insights you need from your analytics data.

How to Keep Personally Identifiable Info Out of Google Analytics

What Is Personally Identifiable Information, and Why Should You Protect It?

Personally Identifiable Information (PII) is any data that, when combined, can reveal a person’s identity.

Some common examples of PII include:

  • Full name (first and last)
  • Email address
  • Phone number
  • Home address
  • Credit card information
  • Login credentials (usernames and passwords)
  • IP addresses (when linked to individuals)

The problem is that PII often sneaks into Google Analytics through URLs.

Let’s say that users submit personal details on contact forms or login pages on your WordPress site. This data can be embedded in the URL of the next page they visit.

The URL might look like this:

www.example.com/contact-us/[email protected].

In that example, we can see that the URL shows the user’s email address.

Why Should You Keep Personal Info Out of Analytics?

Privacy laws like GDPR are serious about protecting personal data. That’s one reason why Google doesn’t allow businesses to collect or store PII.

If your Google Analytics account is capturing PII, you could end up in trouble, facing hefty fines or having your account suspended.

And it’s not just a technical issue – it can have real consequences for your business. Users expect businesses to respect their privacy. But if they feel their data isn’t safe, they might take their business elsewhere.

That’s why it’s so important to keep PII out of your Google Analytics data.

With that in mind, we’ll show you how to keep personally identifiable information (PII) out of Google Analytics. Here’s a quick overview of the 2 methods we’ll share with you:

Ready? Let’s get started.

Method 1. Using a Plugin to Keep Personally Identifiable Info Out of Google Analytics

Google Analytics can be overwhelming to navigate, especially when trying to ensure compliance with privacy regulations.

Managing cookie consent, anonymizing IP addresses, and adjusting privacy settings can quickly become overwhelming. For many people, sorting through these settings and ensuring compliance is no easy task.

If you’re a WordPress user, then we have good news for you.

MonsterInsights is the best WordPress analytics plugin, and it integrates seamlessly with Google Analytics 4 (GA4). With its Privacy Guard feature, it offers privacy-friendly tracking that you can manage directly from your WordPress dashboard.

ℹ️ Quick note: MonsterInsights powers our conversion tracking at WPBeginner, helping us monitor traffic, forms, buttons, referral links, and more with ease. See why we love it in our detailed MonsterInsights review!

Step 1. Install and Activate the MonsterInsights Plugin

First, let’s get started by creating a MonsterInsights account. Just head over to the website and click the ‘Get MonsterInsights Now’ button.

MonsterInsights' homepage

You can then go ahead and choose a plan. For this tutorial, we recommend the Plus plan or higher, as it includes the Privacy Guard feature to help with compliance.

After signing up, you can install and activate the MonsterInsights plugin on your WordPress site. For step-by-step instructions, see our guide on how to install a WordPress plugin.

Step 2. Connect MonsterInsights to Your Google Analytics Account

Upon activation, you’ll need to connect the MonsterInsights plugin to your Google Analytics account.

In your WordPress dashboard, you need to go to Insights » Launch the Wizard to start the setup.

The MonsterInsights setup wizard

After that, you’ll select the category that best describes your website.

MonsterInsights gives 3 options – business site, publisher (blog), or eCommerce (online store).

The MonsterInsights setup wizard

After selecting a category, simply click ‘Save and Continue’ to proceed.

On the next screen, you can click ‘Connect MonsterInsights’ to start the connection process.

How to connect WordPress to Google Analytics using MonsterInsights

Then, you can follow the prompt to sign in to your Google Analytics account.

Upon signing in, you can select the website you want to track from the dropdown menu.

Connect WordPress site to Google Analytics using MonsterInsights

From here, go ahead and click the ‘Complete Connection’ button. MonsterInsights will then automatically install Google Analytics on your WordPress website.

For details, feel free to refer to our guide on how to install Google Analytics in WordPress.

Step 3. Enable the Privacy Guard Feature

Keeping Personally Identifiable Information (PII) out of your tracking doesn’t have to be complicated.

With MonsterInsights’ Privacy Guard, you can do it in just a few clicks!

This feature automatically scans your website for sensitive information. It checks for any private details and prevents them from being stored in your analytics reports.

These details can be:

  • Form submission data, such as personal information entered in contact or registration forms.
  • URL data, which is the full web address of the page, including the domain name, path, and any additional information.
  • Query parameters, which are the bits of data in URLs, like “?id=1234.” They often track specific user actions or provide extra information to the website.

To do this, let’s navigate to the Insights » Settings » Engagement tab.

The Engagement tab

From here, you can go ahead and turn on the ‘Privacy Guard’ switch – that’s it!

MonsterInsights will now help protect personally identifiable information and keep you compliant with privacy laws.

Enabling Privacy Guard

⚠️ Important Disclaimer: No plugin can guarantee 100% legal compliance because every website is different. We strongly recommend consulting an Internet law attorney to ensure your site meets all legal requirements for your location and specific use case.

This is not legal advice – just a friendly heads-up to help you stay informed!

Method 2. Keeping Personally Identifiable Info Out of Google Analytics

In this method, we’ll guide you through configuring the settings that you need to keep PII out of Google Analytics directly from its dashboard.

This option is best for advanced users, as it gives you full control over the setup.

Additionally, since this method isn’t limited to WordPress, you can follow along even if you made your website with a different website builder.

First, you’ll need to sign in to your Google Analytics account.

Signing in to Google Analytics

Go ahead and click on the ‘Sign in to Analytics’ button.

In the dashboard, let’s hover over the sidebar and click the ‘Admin’ menu.

Locating the Admin menu

Once inside, you’ll want to locate the ‘Data collection and modification’ section.

After that, let’s click on ‘Data streams.’

The Data Streams menu

This will take you to the table, which lists all your data streams.

Now, you can select your website from the list.

List of data streams

This will open the ‘Web stream details’ slide-in.

From here, let’s scroll down to the ‘Events’ section and click ‘Redact data.’

Redact data menu

On the next screen, you will see the ‘Redact data’ menu.

The ‘Choose what to redact’ section of this slide-in has two switches at the top.

Let’s first redact email addresses by flipping the switch. Google Analytics will then automatically exclude email addresses from the data it collects.

Enabling email redact

Then, you can filter out other PII by entering query parameters.

To do this, you’ll need to enable the switch for ‘URL query parameter.’ Then, you can enter your query parameters in the respective field.

For example, here, we added ‘name,’ first_name,’ ‘last_name,’ and ‘ip_address.’

Enabling URL query parameter redact

Once everything looks good, you can save your settings.

Google Analytics will now help protect PII and keep your site privacy-compliant.

⚠️ Important Disclaimer: Configuring settings manually in the GA4 dashboard requires precise knowledge of which data needs to be redacted.

This can be tricky, and even a small mistake may result in sensitive information being collected.

We recommend thoroughly reviewing your data collection settings to ensure all PII is properly excluded. Always take the necessary precautions, as improper configuration could lead to compliance issues.

Bonus Tips for Privacy Compliance on Your Website

Keeping personal info out of analytics reports is just one way to comply with privacy regulations. We also recommend following these tips:

For more details, just see our complete guide to GDPR compliance for WordPress users.

FAQs About Keeping Personally Identifiable Info Out of Google Analytics

Keeping PII out of Google Analytics is important for privacy and compliance. If you still have questions, feel free to take a look at some quick answers to common questions:

How does Google handle user data and privacy concerns?

Google takes privacy seriously. It anonymizes data and complies with strict regulations like GDPR.

While Google provides tools to help businesses protect user privacy, it’s ultimately up to the businesses to make sure they don’t collect personally identifiable information (PII).

Does Google Analytics collect personally identifiable information?

Not by default. But if you’re not careful, PII can sneak in through URLs, form submissions, or custom tracking settings. That’s why it’s important to set things up correctly.

Do all sites with analytics need cookie warnings?

Yep! If your site tracks users with cookies (like Google Analytics does), then privacy laws like GDPR and CCPA require you to show a cookie notice and get user consent.

Further Reading: More Analytics and Tracking Guides

Understanding how to keep PII out of Google Analytics is just the beginning! If you want to fine-tune your tracking, improve data accuracy, and stay compliant with privacy laws, then check out these helpful guides:

📊 Google Analytics 4: A Beginner’s Guide – Learn how to set up GA4 on your WordPress site and make the most of its powerful features.

That’s all there is to it! We hope this guide has helped you learn how to keep personal info out of Google Analytics. You may also like to see our guide on how to get a custom email alert in Google Analytics or our expert pick of the best WordPress GDPR plugins.

If you liked this article, then please subscribe to our YouTube Channel for WordPress video tutorials. You can also find us on Twitter and Facebook.

The post How to Keep Personally Identifiable Info Out of Google Analytics first appeared on WPBeginner.

  •