Reading view

Designing For TV: The Evergreen Pattern That Shapes TV Experiences

Television sets have been the staple of our living rooms for decades. We watch, we interact, and we control, but how often do we design for them? TV design flew under my “radar” for years, until one day I found myself in the deep, designing TV-specific user interfaces. Now, after gathering quite a bit of experience in the area, I would like to share my knowledge on this rather rare topic. If you’re interested in learning more about the user experience and user interfaces of television, this article should be a good starting point.

Just like any other device or use case, TV has its quirks, specifics, and guiding principles. Before getting started, it will be beneficial to understand the core ins and outs. In Part 1, we’ll start with a bit of history, take a close look at the fundamentals, and review the evolution of television. In Part 2, we’ll dive into the depths of practical aspects of designing for TV, including its key principles and patterns.

Let’s start with the two key paradigms that dictate the process of designing TV interfaces.

Mind The Gap, Or The 10-foot-experience

Firstly, we have the so-called “10-foot experience,” referring to the fact that interaction and consumption on TV happens from a distance of roughly three or more meters. This is significantly different than interacting with a phone or a computer and implies having some specific approaches in the TV user interface design. For example, we’ll need to make text and user interface (UI) elements larger on TV to account for the bigger distance to the screen.

Furthermore, we’ll take extra care to adhere to contrast standards, primarily relying on dark interfaces, as light ones may be too blinding in darker surroundings. And finally, considering the laid-back nature of the device, we’ll simplify the interactions.

But the 10-foot experience is only one part of the equation. There wouldn’t be a “10-foot experience” in the first place if there were no mediator between the user and the device, and if we didn’t have something to interact through from a distance.

There would be no 10-foot experience if there were no remote controllers.

The Mediator

The remote, the second half of the equation, is what allows us to interact with the TV from the comfort of the couch. Slower and more deliberate, this conglomerate of buttons lacks the fluid motion of a mouse, or the dexterity of fingers against a touchscreen — yet the capabilities of the remote should not be underestimated.

Rudimentary as it is and with a limited set of functions, the remote allows for some interesting design approaches and can carry the weight of the modern TV along with its ever-growing requirements for interactivity. It underwent a handful of overhauls during the seventy years since its inception and was refined and made more ergonomic; however, there is a 40-year-old pattern so deeply ingrained in its foundation that nothing can change it.

What if I told you that you could navigate TV interfaces and apps with a basic controller from the 1980s just as well as with the latest remote from Apple? Not only that, but any experience built around the six core buttons of a remote will be system-agnostic and will easily translate across platforms.

This is the main point I will focus on for the rest of this article.

Birth Of A Pattern

As television sets were taking over people’s living rooms in the 1950s, manufacturers sought to upgrade and improve the user experience. The effort of walking up to the device to manually adjust some settings was eventually identified as an area for improvement, and as a result, the first television remote controllers were introduced to the market.

Early Developments

Preliminary iterations of the remotes were rather unique, and it took some divergence before we finally settled on a rectangular shape and sprinkled buttons on top.

Take a look at the Zenith Flash-Matic, for example. Designed in the mid-1950s, this standout device featured a single button that triggered a directional lamp; by pointing it at specific corners of the TV set, viewers could control various functions, such as changing channels or adjusting the volume.

While they were a far cry compared to their modern counterparts, devices like the Flash-Matic set the scene for further developments, and we were off to the races!

As the designs evolved, the core functionality of the remote solidified. Gradually, remote controls became more than just simple channel changers, evolving into command centers for the expanding territory of home entertainment.

Note: I will not go too much into history here — aside from some specific points that are of importance to the matter at hand — but if you have some time to spare, do look into the developmental history of television sets and remotes, it’s quite a fascinating topic.

However, practical as they may have been, they were still considered a luxury, significantly increasing the prices of TV sets. As the 1970s were coming to a close, only around 17% of United States households had a remote controller for their TVs. Yet, things would change as the new decade rolled in.

Button Mania Of The 1980s

The eighties brought with them the Apple Macintosh, MTV, and Star Wars. It was a time of cultural shifts and technological innovation. Videocassette recorders (VCRs) and a multitude of other consumer electronics found their place in the living rooms of the world, along with TVs.

These new devices, while enriching our media experiences, also introduced a few new design problems. Where there was once a single remote, now there were multiple remotes, and things were getting slowly out of hand.

This marked the advent of universal remotes.
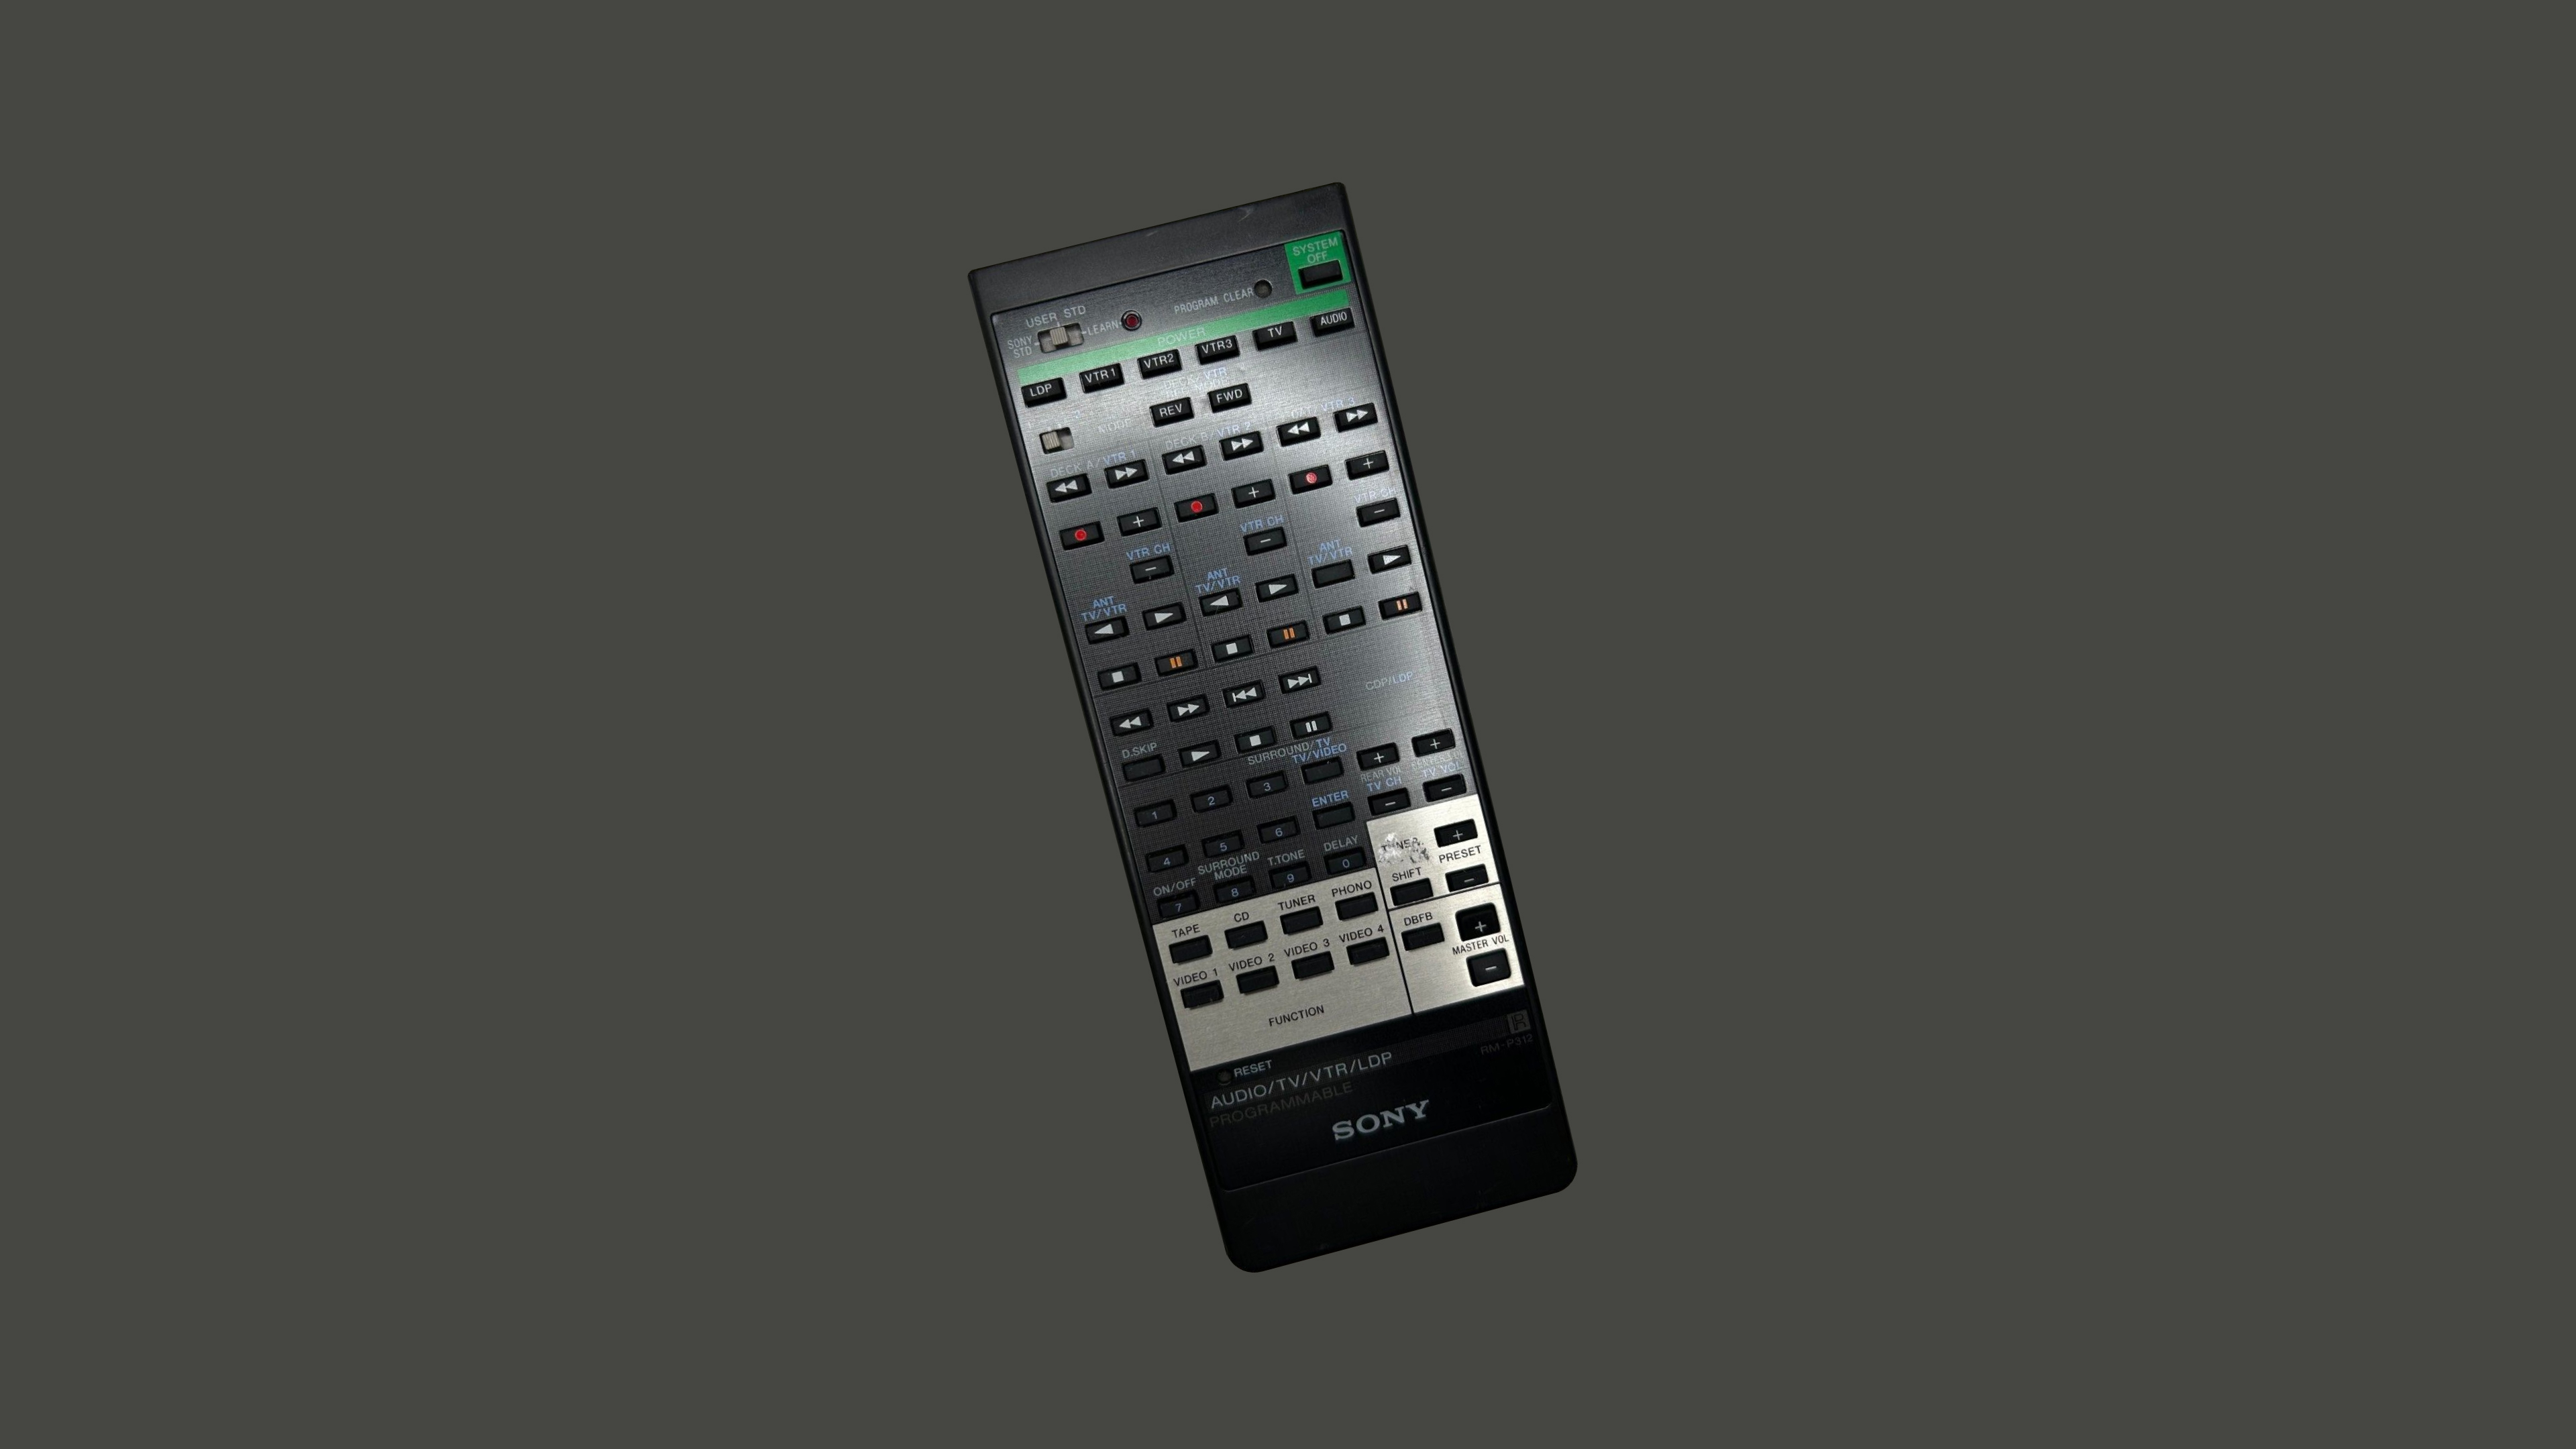
Trying to hit many targets with one stone, the unwieldy universal remotes were humanity’s best solution for controlling a wider array of devices. And they did solve some of these problems, albeit in an awkward way. The complexity of universal remotes was a trade-off for versatility, allowing them to be programmed and used as a command center for controlling multiple devices. This meant transforming the relatively simple design of their predecessors into a beehive of buttons, prioritizing broader compatibility over elegance.

On the other hand, almost as a response to the inconvenience of the universal remote, a different type of controller was conceived in the 1980s — one with a very basic layout and set of buttons, and which would leave its mark in both how we interact with the TV, and how our remotes are laid out. A device that would, knowingly or not, give birth to a navigational pattern that is yet to be broken — the NES controller.

D-pad Dominance

Released in 1985, the Nintendo Entertainment System (NES) was an instant hit. Having sold sixty million units around the world, it left an undeniable mark on the gaming console industry.

The NES controller (which was not truly remote, as it ran a cable to the central unit) introduced the world to a deceptively simple control scheme. Consisting of six primary actions, it gave us the directional pad (the D-pad), along with two action buttons (A and B). Made in response to the bulky joystick, the cross-shaped cluster allowed for easy movement along two axes (up, down, left, and right).

Charmingly intuitive, this navigational pattern would produce countless hours of gaming fun, but more importantly, its elementary design would “seep over” into the wider industry — the D-pad, along with the two action buttons, would become the very basis on which future remotes would be constructed.

The world continued spinning madly on, and what was once a luxury became commonplace. By the end of the decade, TV remotes were more integral to the standard television experience, and more than two-thirds of American TV owners had some sort of a remote.

The nineties rolled in with further technological advancements. TV sets became more robust, allowing for finer tuning of their settings. This meant creating interfaces through which such tasks could be accomplished, and along with their master sets, remotes got updated as well.

Gone were the bulky rectangular behemoths of the eighties. As ergonomics took precedence, they got replaced by comfortably contoured devices that better fit their users’ hands. Once conglomerations of dozens of uniform buttons, these contemporary remotes introduced different shapes and sizes, allowing for recognition simply through touch. Commands were being clustered into sensible groups along the body of the remote, and within those button groups, a familiar shape started to emerge.

Gradually, the D-pad found its spot on our TV remotes. As the evolution of these devices progressed, it became even more deeply embedded at the core of their interactivity.

Set-top boxes and smart features emerged in the 2000s and 2010s, and TV technology continued to advance. Along the way, many bells and whistles were introduced. TVs got bigger, brighter, thinner, yet their essence remained unchanged.

In the years since their inception, remotes were innovated upon, but all the undertakings circle back to the core principles of the NES controller. Future endeavours never managed to replace, but only to augment and reinforce the pattern.

The Evergreen Pattern

In 2013, LG introduced their Magic remote (“So magically simple, the kids will be showing you how to use it!”). This uniquely shaped device enabled motion controls on LG TV sets, allowing users to point and click similar to a computer mouse. Having a pointer on the screen allowed for much more flexibility and speed within the system, and the remote was well-received and praised as one of the best smart TV remotes.

Innovating on tradition, this device introduced new features and fresh perspectives to the world of TV. But if we look at the device itself, we’ll see that, despite its differences, it still retains the D-pad as a means of interaction. It may be argued that LG never set out to replace the directional pad, and as it stands, regardless of their intent, they only managed to augment it.

For an even better example, let’s examine Apple TV’s second-generation remotes (the first-generation Siri remote). Being the industry disruptors, Apple introduced a touchpad to the top half of the remote. The glass surface provided briskness and precision to the experience, enabling multi-touch gestures, swipe navigation, and quick scrolling. This quality of life upgrade was most noticeable when typing with the horizontal on-screen keyboards, as it allowed for smoother and quicker scrolling from A to Z, making for a more refined experience.

While at first glance it may seem Apple removed the directional buttons, the fact is that the touchpad is simply a modernised take on the pattern, still abiding by the same four directions a classic D-pad does. You could say it’s a D-pad with an extra layer of gimmick.

Furthermore, the touchpad didn’t really sit well with the user base, along with the fact that the remote’s ergonomics were a bit iffy. So instead of pushing the boundaries even further with their third generation of remotes, Apple did a complete 180, re-introducing the classic D-pad cluster while keeping the touch capabilities from the previous generation (the touch-enabled clickpad lets you select titles, swipe through playlists, and use a circular gesture on the outer ring to find just the scene you’re looking for).

Now, why can’t we figure out a better way to navigate TVs? Does that mean we shouldn’t try to innovate?

We can argue that using motion controls and gestures is an obvious upgrade to interacting with a TV. And we’d be right… in principle. These added features are more complex and costly to produce, but more importantly, while it has been upgraded with bits and bobs, the TV is essentially a legacy system. And it’s not only that.

While touch controls are a staple of interaction these days, adding them without thorough consideration can reduce the usability of a remote.

Pitfalls Of Touch Controls

Modern car dashboards are increasingly being dominated by touchscreens. While they may impress at auto shows, their real-world usability is often compromised.

Driving demands constant focus and the ability to adapt and respond to ever-changing conditions. Any interface that requires taking your eyes off the road for more than a moment increases the risk of accidents. That’s exactly where touch controls fall short. While they may be more practical (and likely cheaper) for manufacturers to implement, they’re often the opposite for the end user.

Unlike physical buttons, knobs, and levers, which offer tactile landmarks and feedback, touch interfaces lack the ability to be used by feeling alone. Even simple tasks like adjusting the volume of the radio or the climate controls often involve gestures and nested menus, all performed on a smooth glass surface that demands visual attention, especially when fine-tuning.

Fortunately, the upcoming 2026 Euro NCAP regulations will encourage car manufacturers to reintroduce physical controls for core functions, reducing driver distraction and promoting safer interaction.

Similarly (though far less critically), sleek, buttonless TV remote controls may feel modern, but they introduce unnecessary abstraction to a familiar set of controls.

Physical buttons with distinct shapes and positioning allow users to navigate by memory and touch, even in the dark. That’s not outdated — it’s a deeper layer of usability that modern design should respect, not discard.

And this is precisely why Apple reworked the Apple TV third-generation remote the way it is now, where the touch area at the top disappeared. Instead, the D-pad again had clearly defined buttons, and at the same time, the D-pad could also be extended (not replaced) to accept some touch gestures.

The Legacy Of TV

Let’s take a look at an old on-screen keyboard.
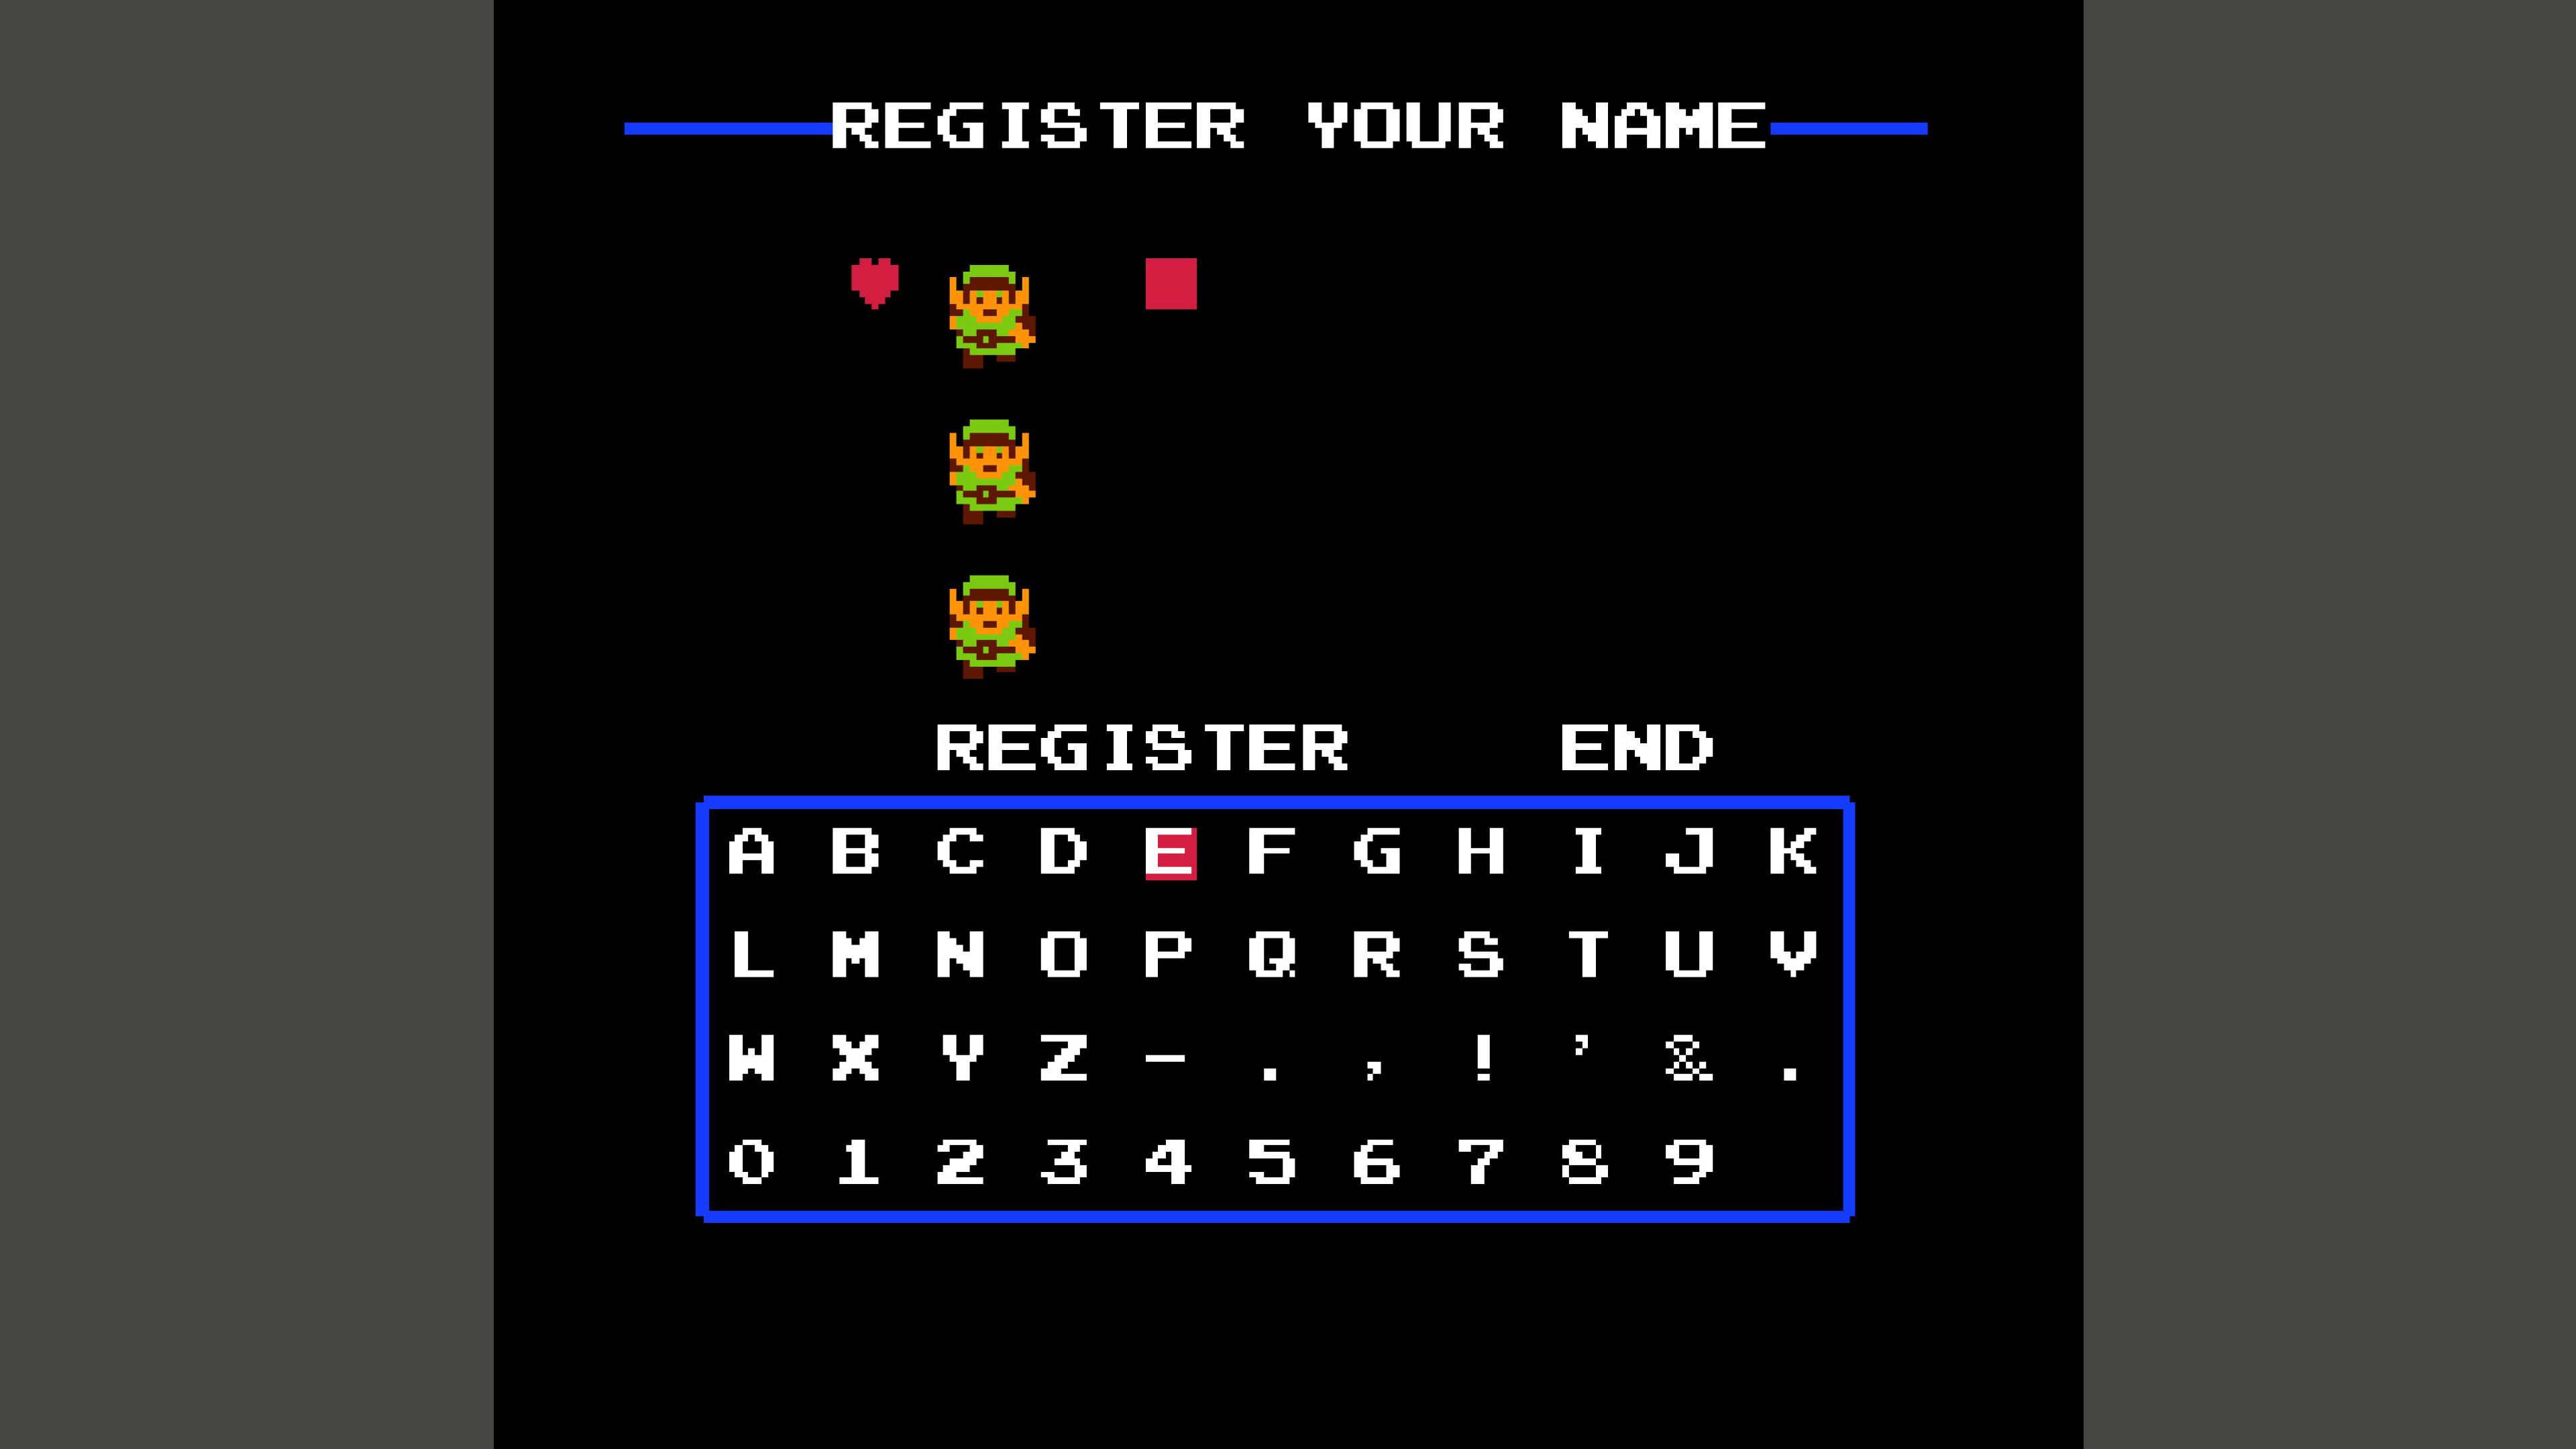
The Legend of Zelda, released in 1986, allowed players to register their names in-game. There are even older games with the same feature, but that’s beside the point. Using the NES controller, the players would move around the keyboard, entering their moniker character by character. Now let’s take a look at a modern iteration of the on-screen keyboard.

Notice the difference? Or, to phrase it better: do you notice the similarities? Throughout the years, we’ve introduced quality of life improvements, but the core is exactly the same as it was forty years ago. And it is not the lack of innovation or bad remotes that keep TV deeply ingrained in its beginnings. It’s simply that it’s the most optimal way to interact given the circumstances.

Laying It All Out

Just like phones and computers, TV layouts are based on a grid system. However, this system is a lot more apparent and rudimentary on TV. Taking a look at a standard TV interface, we’ll see that it consists mainly of horizontal and vertical lists, also known as shelves.
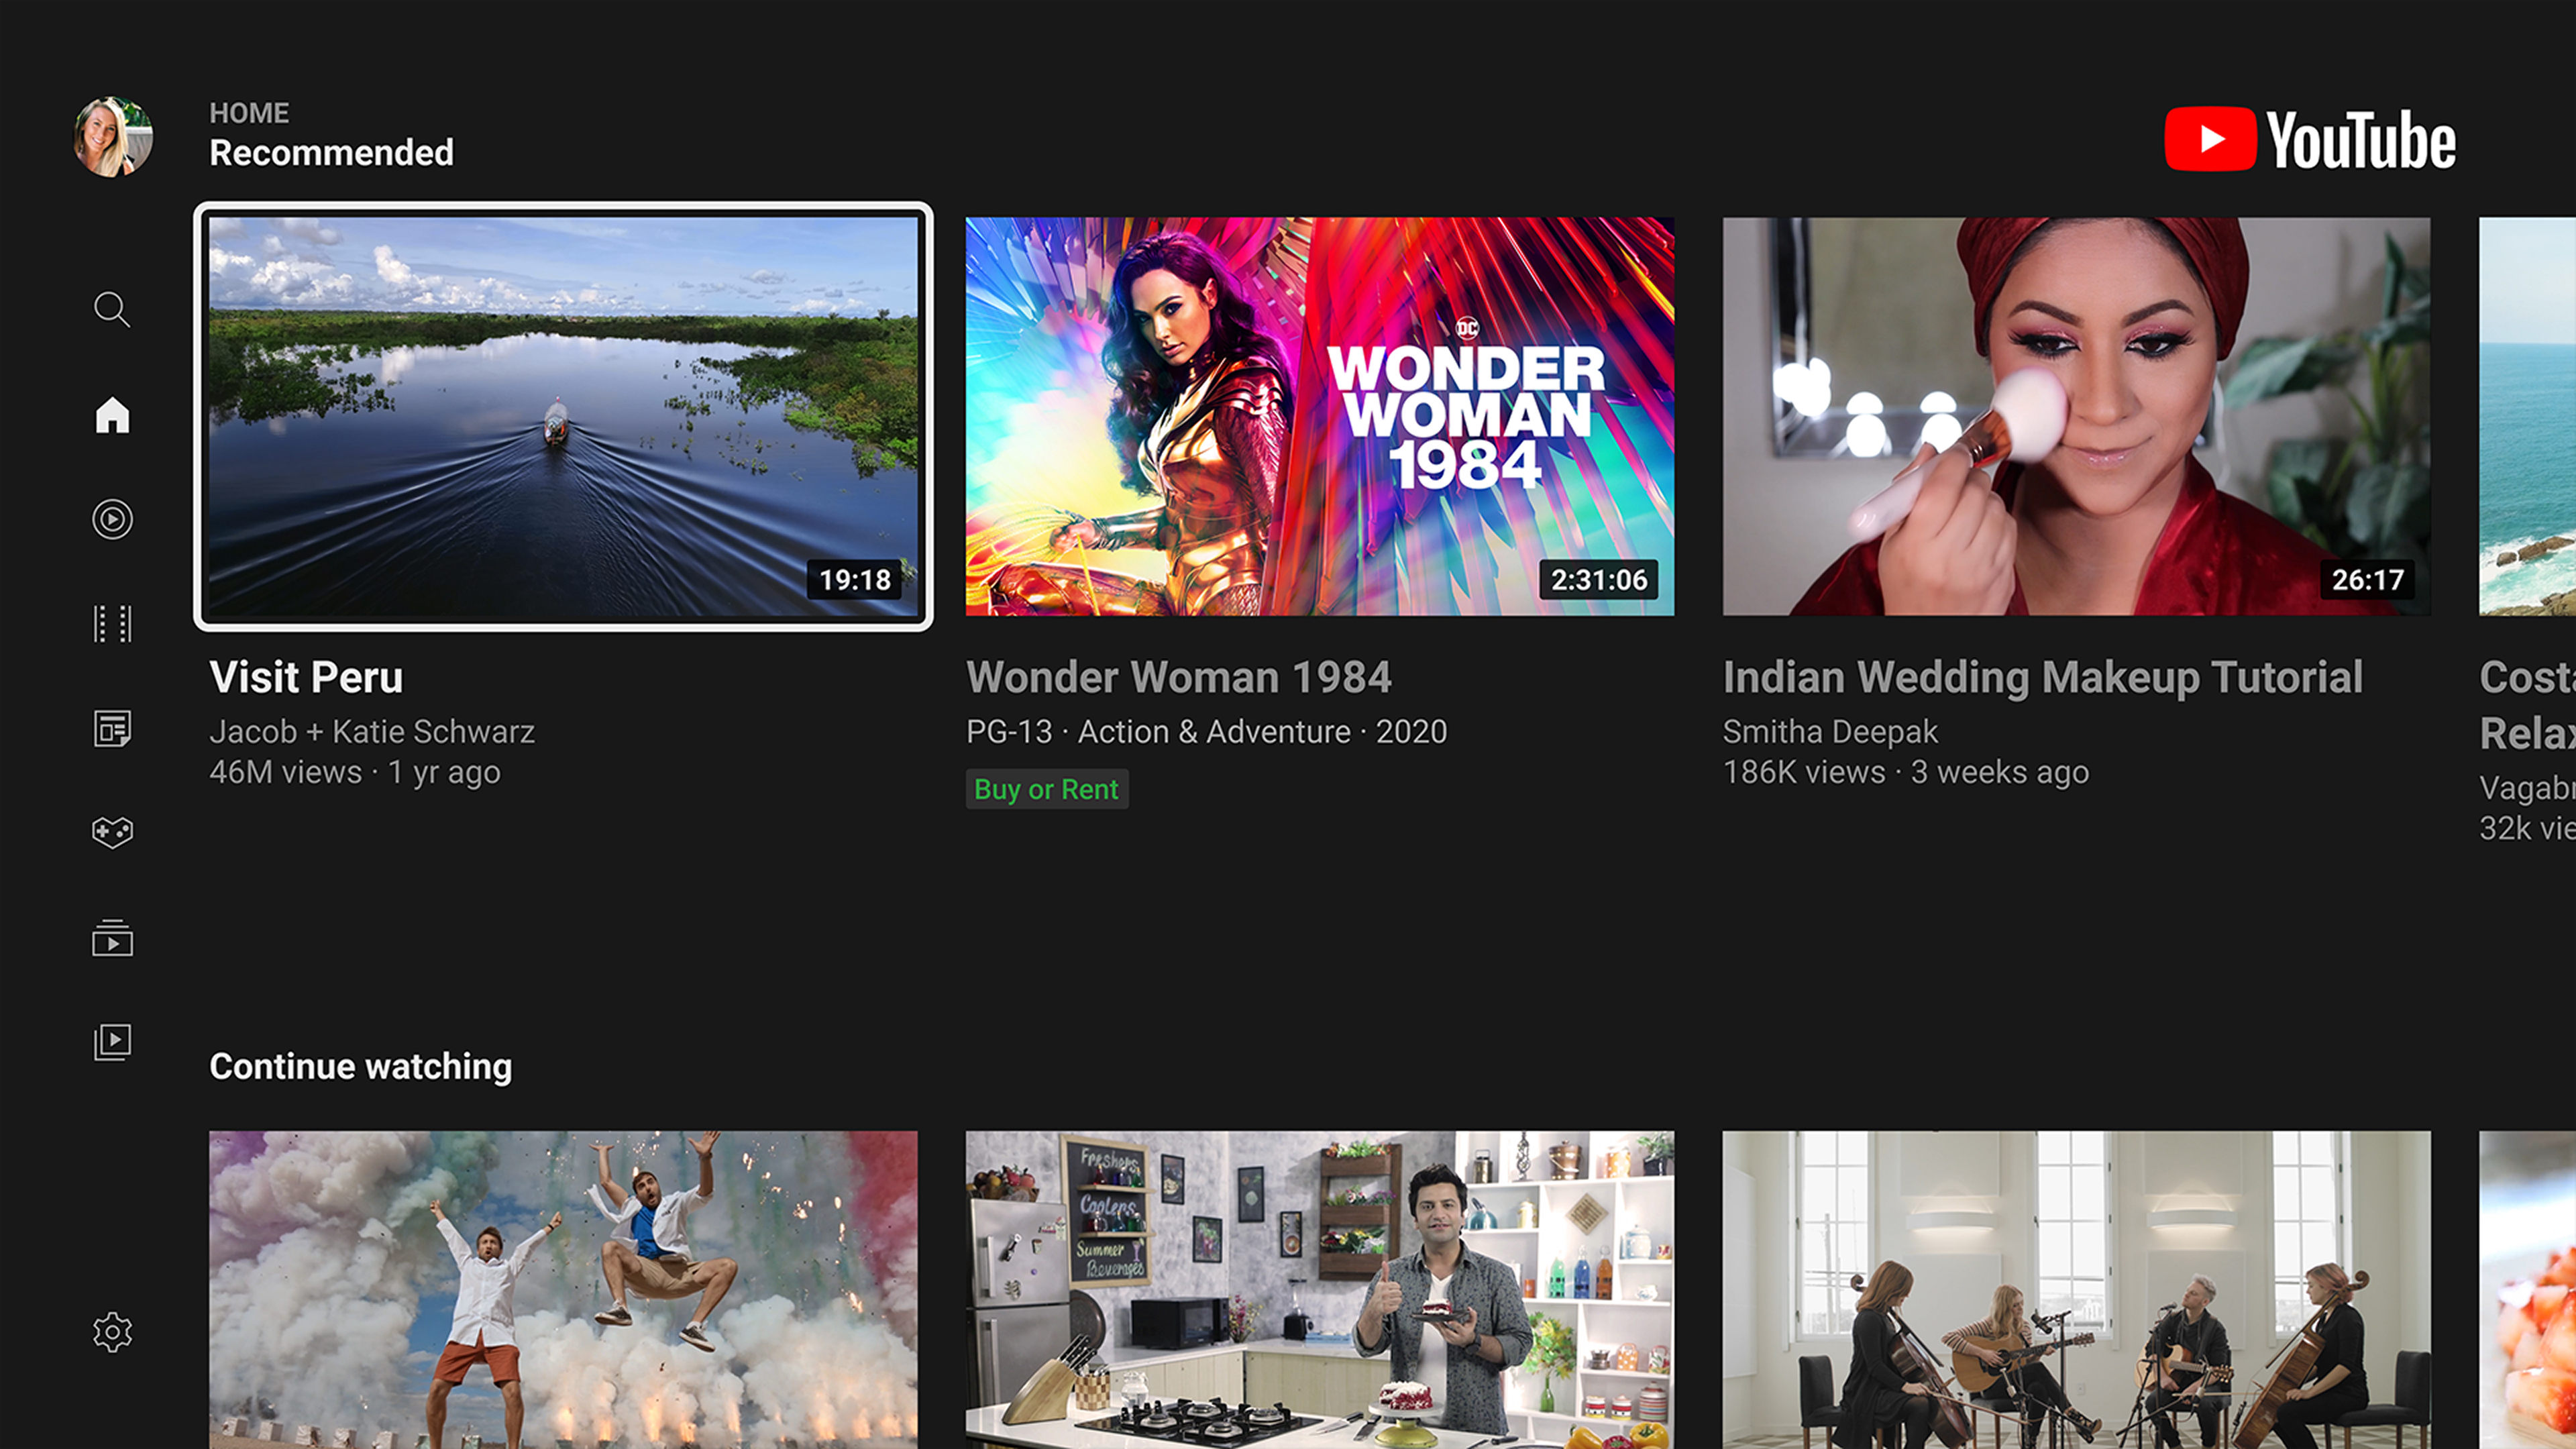
These grids may be populated with cards, characters of the alphabet, or anything else, essentially, and upon closer examination, we’ll notice that our movement is restricted by a few factors:

  1. There is no pointer for our eyes to follow, like there would be on a computer.
  2. There is no way to interact directly with the display like we would with a touchscreen.

For the purposes of navigating with a remote, a focus state is introduced. This means that an element will always be highlighted for our eyes to anchor, and it will be the starting point for any subsequent movement within the interface.

Simplified TV UI demonstrating a focus state along with sequential movement from item to item within a column.

Moreover, starting from the focused element, we can notice that the movement is restricted to one item at a time, almost like skipping stones. Navigating linearly in such a manner, if we wanted to move within a list of elements from element #1 to element #5, we’d have to press a directional button four times.

Simplified TV UI demonstrating a focus state along with sequential movement from item to item within a row.

To successfully navigate such an interface, we need the ability to move left, right, up, and down — we need a D-pad. And once we’ve landed on our desired item, there needs to be a way to select it or make a confirmation, and in the case of a mistake, we need to be able to go back. For the purposes of those two additional interactions, we’d need two more buttons, OK and back, or to make it more abstract, we’d need buttons A and B.

So, to successfully navigate a TV interface, we need only a NES controller.

Yes, we can enhance it with touchpads and motion gestures, augment it with voice controls, but this unshakeable foundation of interaction will remain as the very basic level of inherent complexity in a TV interface. Reducing it any further would significantly impair the experience, so all we’ve managed to do throughout the years is to only build upon it.

The D-pad and buttons A and B survived decades of innovation and technological shifts, and chances are they’ll survive many more. By understanding and respecting this principle, you can design intuitive, system-agnostic experiences and easily translate them across platforms. Knowing you can’t go simpler than these six buttons, you’ll easily build from the ground up and attach any additional framework-bound functionality to the time-tested core.

And once you get the grip of these paradigms, you’ll get into mapping and re-mapping buttons depending on context, and understand just how far you can go when designing for TV. You’ll be able to invent new experiences, conduct experiments, and challenge the patterns. But that is a topic for a different article.

Closing Thoughts

While designing for TV almost exclusively during the past few years, I was also often educating the stakeholders on the very principles outlined in this article. Trying to address their concerns about different remotes working slightly differently, I found respite in the simplicity of the NES controller and how it got the point across in an understandable way. Eventually, I expanded my knowledge by looking into the developmental history of the remote and was surprised that my analogy had backing in history. This is a fascinating niche, and there’s a lot more to share on the topic. I’m glad we started!

It’s vital to understand the fundamental “ins” and “outs” of any venture before getting practical, and TV is no different. Now that you understand the basics, go, dig in, and break some ground.

Having covered the underlying interaction patterns of TV experiences in detail, it’s time to get practical.

In Part 2, we’ll explore the building blocks of the 10-foot experience and how to best utilize them in your designs. We’ll review the TV design fundamentals (the screen, layout, typography, color, and focus/focus styles), and the common TV UI components (menus, “shelves,” spotlights, search, and more). I will also show you how to start thinking beyond the basics and to work with — and around — the constraints which we abide by when designing for TV. Stay tuned!

Further Reading

  • The 10 Foot Experience,” by Robert Stulle (Edenspiekermann)
    Every user interface should offer effortless navigation and control. For the 10-foot experience, this is twice as important; with only up, down, left, right, OK and back as your input vocabulary, things had better be crystal clear. You want to sit back and enjoy without having to look at your remote — your thumb should fly over the buttons to navigate, select, and activate.
  • Introduction to the 10-Foot Experience for Windows Game Developers” (Microsoft Learn)
    A growing number of people are using their personal computers in a completely new way. When you think of typical interaction with a Windows-based computer, you probably envision sitting at a desk with a monitor, and using a mouse and keyboard (or perhaps a joystick device); this is referred to as the 2-foot experience. But there's another trend which you'll probably start hearing more about: the 10-foot experience, which describes using your computer as an entertainment device with output to a TV. This article introduces the 10-foot experience and explores the list of things that you should consider first about this new interaction pattern, even if you aren't expecting your game to be played this way.
  • 10-foot user interface” (Wikipedia)
    In computing, a 10-foot user interface, or 3-meter UI, is a graphical user interface designed for televisions (TV). Compared to desktop computer and smartphone user interfaces, it uses text and other interface elements that are much larger in order to accommodate a typical television viewing distance of 10 feet (3.0 meters); in reality, this distance varies greatly between households, and additionally, the limitations of a television's remote control necessitate extra user experience considerations to minimize user effort.
  • The Television Remote Control: A Brief History,” by Mary Bellis (ThoughtCo)
    The first TV remote, the Lazy Bone, was made in 1950 and used a cable. In 1955, the Flash-matic was the first wireless remote, but it had issues with sunlight. Zenith's Space Command in 1956 used ultrasound and became the popular choice for over 25 years.
  • The History of The TV Remote,” by Remy Millisky (Grunge)
    The first person to create and patent the remote control was none other than Nikola Tesla, inventor of the Tesla coil and numerous electronic systems. He patented the idea in 1893 to drive boats remotely, far before televisions were invented. Since then, remotes have come a long way, especially for the television, changing from small boxes with long wires to the wireless universal remotes that many people have today. How has the remote evolved over time?
  • Nintendo Entertainment System controller” (Nintendo Wiki)
    The Nintendo Entertainment System controller is the main controller for the NES. While previous systems had used joysticks, the NES controller provided a directional pad (the D-pad was introduced in the Game & Watch version of Donkey Kong).
  • Why Touchscreens In Cars Don’t Work,” by Jacky Li (published in June 2018)
    Observing the behaviour of 21 drivers has made me realize what’s wrong with automotive UX. [...] While I was excited to learn more about the Tesla Model X, it slowly became apparent to me that the driver’s eyes were more glued to the screen than the road. Something about interacting with a touchscreen when driving made me curious to know: just how distracting are they?
  • Europe Is Requiring Physical Buttons For Cars To Get Top Safety Marks,” by Jason Torchinsky (published in March 2024)
    The overuse of touchscreens is an industry-wide problem, with almost every vehicle-maker moving key controls onto central touchscreens, obliging drivers to take their eyes off the road and raising the risk of distraction crashes. New Euro NCAP tests due in 2026 will encourage manufacturers to use separate, physical controls for basic functions in an intuitive manner, limiting eyes-off-road time and therefore promoting safer driving.

  •  

Optimizing PWAs For Different Display Modes

Progressive web apps (PWA) are a fantastic way to turn web applications into native-like, standalone experiences. They bridge the gap between websites and native apps, but this transformation can be prone to introducing design challenges that require thoughtful consideration.

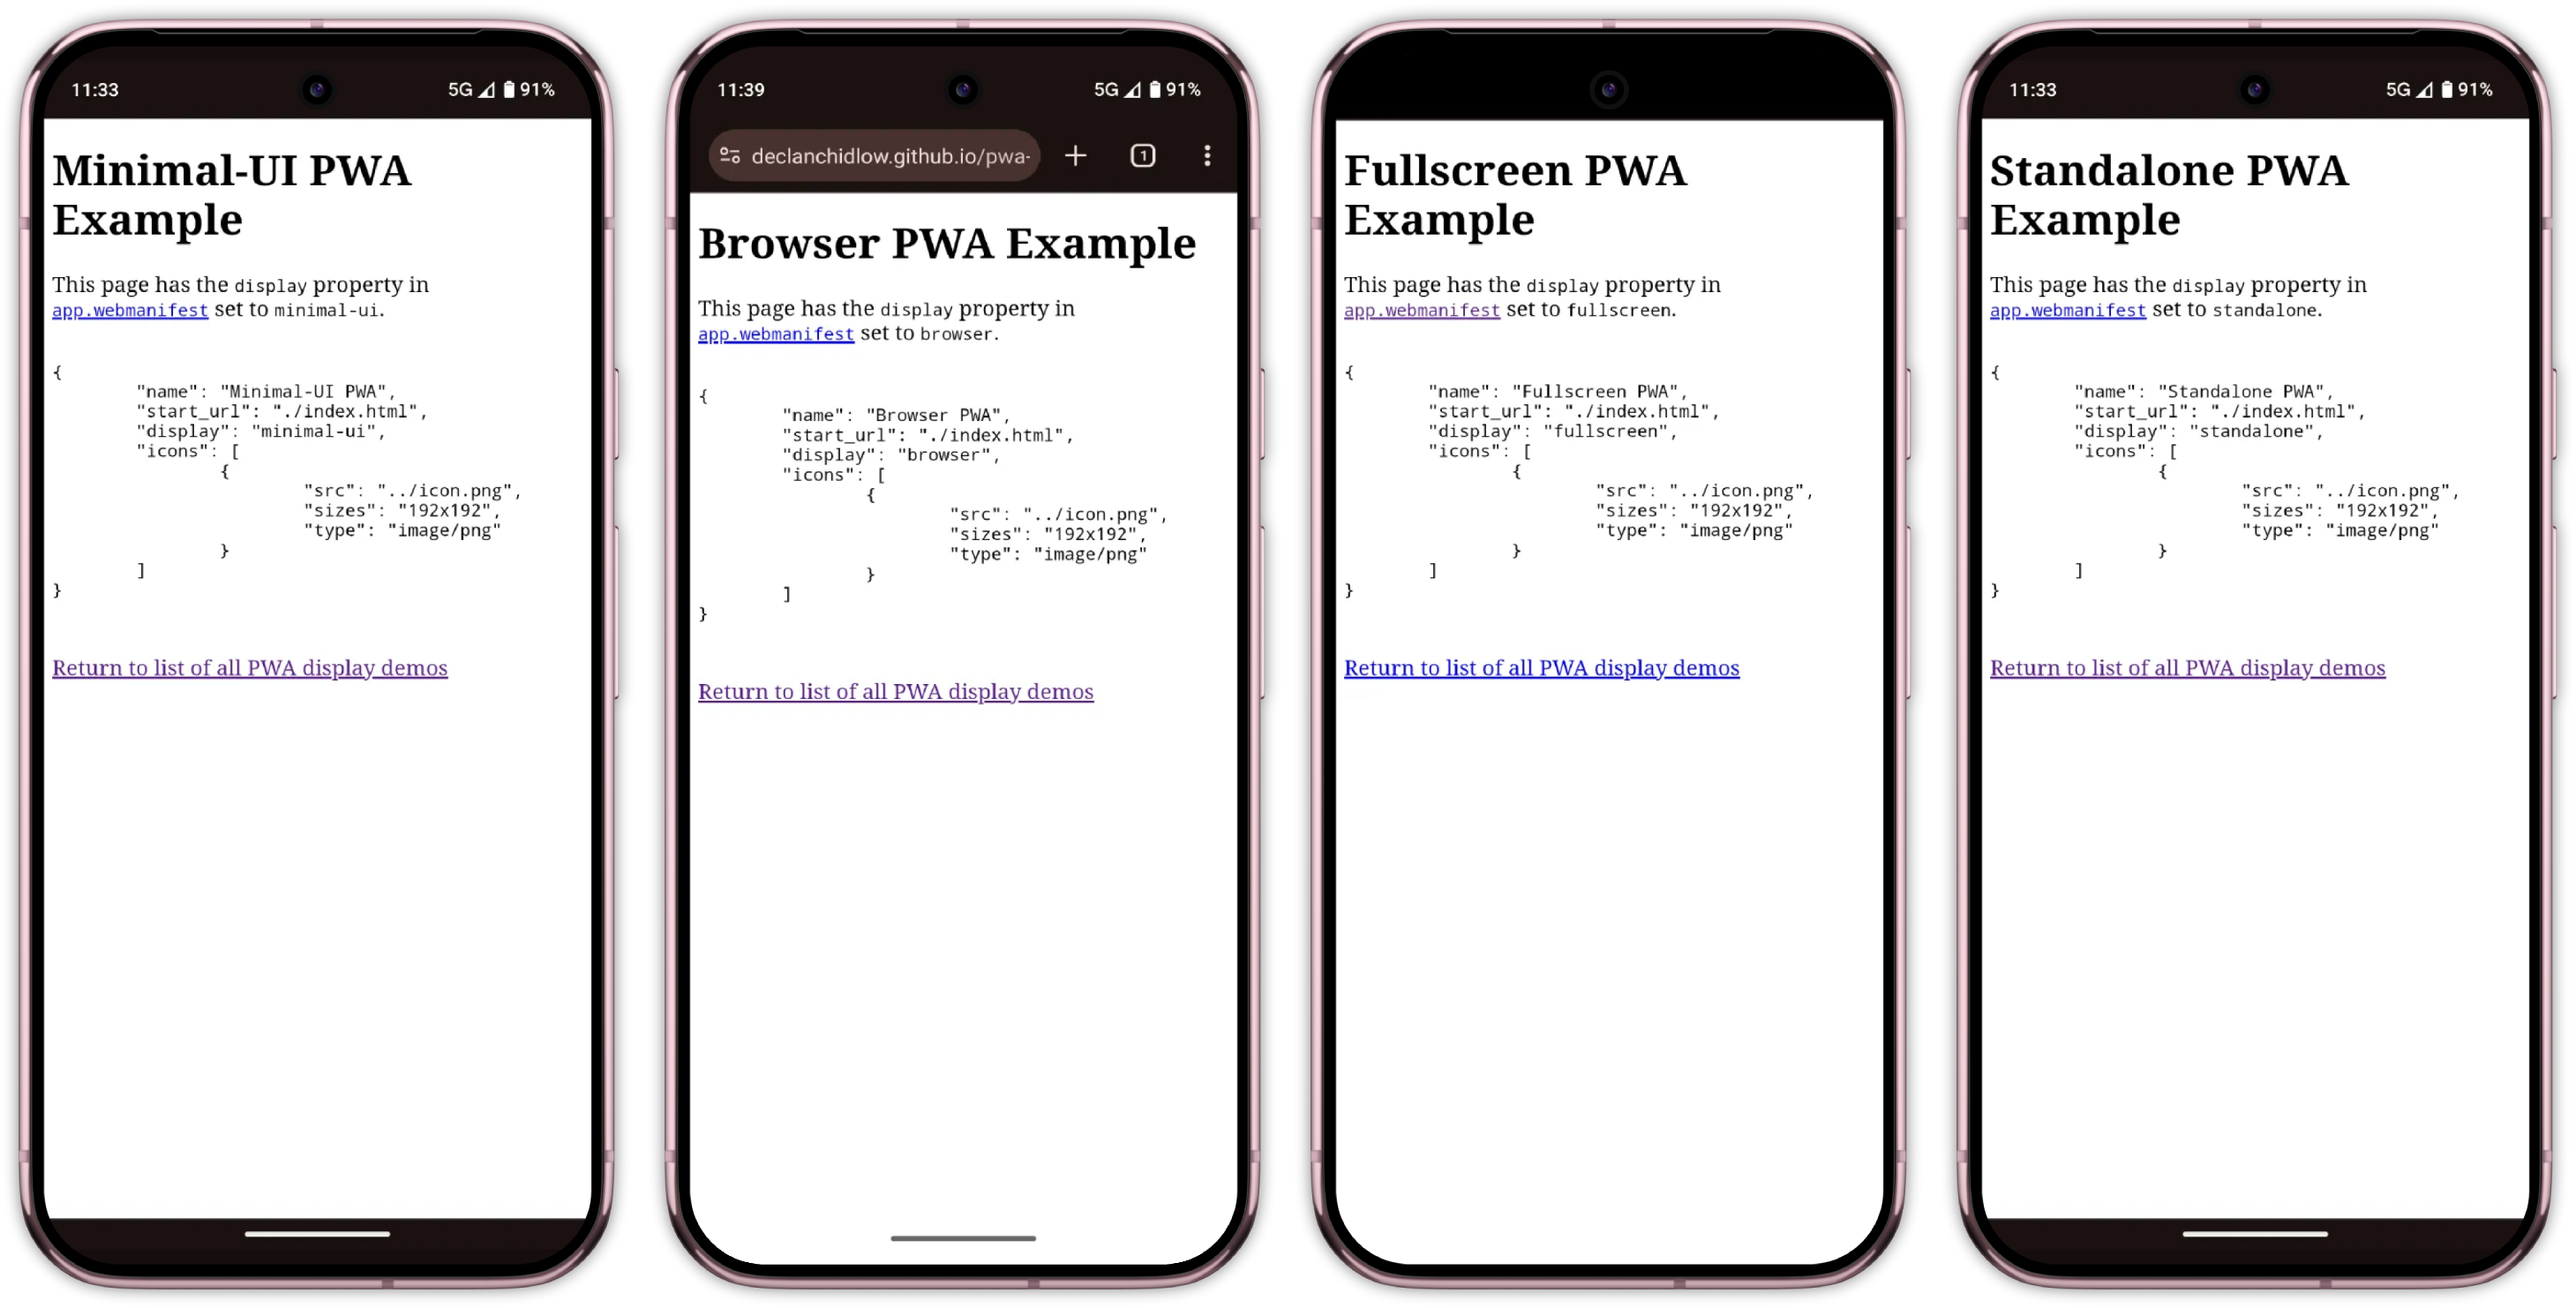
We define our PWAs with a manifest file. In our PWA’s manifest, we can select from a collection of display modes, each offering different levels of browser interface visibility:

  • fullscreen: Hides all browser UI, using the entire display.
  • standalone: Looks like a native app, hiding browser controls but keeping system UI.
  • minimal-ui: Shows minimal browser UI elements.
  • browser: Standard web browser experience with full browser interface.

Oftentimes, we want our PWAs to feel like apps rather than a website in a browser, so we set the display manifest member to one of the options that hides the browser’s interface, such as fullscreen or standalone. This is fantastic for helping make our applications feel more at home, but it can introduce some issues we wouldn’t usually consider when building for the web.

It’s easy to forget just how much functionality the browser provides to us. Things like forward/back buttons, the ability to refresh a page, search within pages, or even manipulate, share, or copy a page’s URL are all browser-provided features that users can lose access to when the browser’s UI is hidden. There is also the case of things that we display on websites that don’t necessarily translate to app experiences.

Imagine a user deep into a form with no back button, trying to share a product page without the ability to copy a URL, or hitting a bug with no refresh button to bail them out!

Much like how we make different considerations when designing for the web versus designing for print, we need to make considerations when designing for independent experiences rather than browser-based experiences by tailoring the content and user experience to the medium.

Thankfully, we’re provided with plenty of ways to customise the web.

Using Media Queries To Target Display Modes

We use media queries all the time when writing CSS. Whether it’s switching up styles for print or setting breakpoints for responsive design, they’re commonplace in the web developer’s toolkit. Each of the display modes discussed previously can be used as a media query to alter the appearance of documents depending.
Media queries such as @media (min-width: 1000px) tend to get the most use for setting breakpoints based on the viewport size, but they’re capable of so much more. They can handle print styles, device orientation, contrast preferences, and a whole ton more. In our case, we’re interested in the display-mode media feature.

Display mode media queries correspond to the current display mode.

Note: While we may set display modes in our manifest, the actual display mode may differ depending on browser support.

These media queries directly reference the current mode:

  • @media (display-mode: standalone) will only apply to pages set to standalone mode.
  • @media (display-mode: fullscreen) applies to fullscreen mode. It is worth noting that this also applies when using the Fullscreen API.
  • @media (display-mode: minimal-ui) applies to minimal UI mode.
  • @media (display-mode: browser) applies to standard browser mode.

It is also worth keeping an eye out for the window-controls-overlay and tabbed display modes. At the time of writing, these two display modes are experimental and can be used with display_override. display-override is a member of our PWA’s manifest, like display, but provides some extra options and power.

display has a predetermined fallback chain (fullscreen -> standalone -> minimal-ui -> browser) that we can’t change, but display-override allows setting a fallback order of our choosing, like the following:

"display_override": ["fullscreen", "minimal-ui"]

window-controls-overlay can only apply to PWAs running on a desktop operating system. It makes the PWA take up the entire window, with window control buttons appearing as an overlay. Meanwhile, tabbed is relevant when there are multiple applications within a single window.

In addition to these, there is also the picture-in-picture display mode that applies to (you guessed it) picture-in-picture modes.

We use these media queries exactly as we would any other media query. To show an element with the class .pwa-only when the display mode is standalone, we could do this:

.pwa-only {
    display: none;
}

@media (display-mode: standalone) {
    .pwa-only {
        display: block;
    }
}

If we wanted to show the element when the display mode is standalone or minimal-ui, we could do this:

@media (display-mode: standalone), (display-mode: minimal-ui) {
    .pwa-only {
        display: block;
    }
}

As great as it is, sometimes CSS isn’t enough. In those cases, we can also reference the display mode and make necessary adjustments with JavaScript:

const isStandalone = window.matchMedia("(display-mode: standalone)").matches;
// Listen for display mode changes
window.matchMedia("(display-mode: standalone)").addEventListener("change", (e) => {
  if (e.matches) {
    // App is now in standalone mode
    console.log("Running as PWA");
  }
});
Practical Applications

Now that we know how to make display modifications depending on whether users are using our web app as a PWA or in a browser, we can have a look at how we might put these newly learnt skills to use.

Tailoring Content For PWA Users

Users who have an app installed as a PWA are already converted, so you can tweak your app to tone down the marketing speak and focus on the user experience. Since these users have demonstrated commitment by installing your app, they likely don’t need promotional content or installation prompts.

Display More Options And Features

You might need to directly expose more things in PWA mode, as people won’t be able to access the browser’s settings as easily when the browser UI is hidden. Features like changing font sizing, switching between light and dark mode, bookmarks, sharing, tabs, etc., might need an in-app alternative.

Platform-Appropriate Features

There are features you might not want on your web app because they feel out of place, but that you might want on your PWA. A good example is the bottom navigation bar, which is common in native mobile apps thanks to the easier reachability it provides, but uncommon on websites.

People sometimes print websites, but they very rarely print apps. Consider whether features like print buttons should be hidden in PWA mode.

Install Prompts

A common annoyance is a prompt to install a site as a PWA appearing when the user has already installed the site. Ideally, the browser will provide an install prompt of its own if our PWA is configured correctly, but not all browsers do, and it can be finicky. MDN has a fantastic guide on creating a custom button to trigger the installation of a PWA, but it might not fit our needs.

We can improve things by hiding install prompts with our media query or detecting the current display mode with JavaScript and forgoing triggering popups in the first place.

We could even set this up as a reusable utility class so that anything we don’t want to be displayed when the app is installed as a PWA can be hidden with ease.

/* Utility class to hide elements in PWA mode */
.hide-in-pwa {
  display: block;
}

@media (display-mode: standalone), (display-mode: minimal-ui) {
  .hide-in-pwa {
    display: none !important;
  }
}

Then in your HTML:

<div class="install-prompt hide-in-pwa">
  <button>Install Our App</button>
</div>

<div class="browser-notice hide-in-pwa">
  <p>For the best experience, install this as an app!</p>
</div>

We could also do the opposite and create a utility class to make elements only show when in a PWA, as we discussed earlier.

Strategic Use Of Scope And Start URL

Another way to hide content from your site is to set the scope and start_url properties. These aren’t using media queries as we’ve discussed, but should be considered as ways to present different content depending on whether a site is installed as a PWA.

Here is an example of a manifest using these properties:

{
    "name": "Example PWA",
    "scope": "/dashboard/",
    "start_url": "/dashboard/index.html",
    "display": "standalone",
    "icons": [
        {
            "src": "icon.png",
            "sizes": "192x192",
            "type": "image/png"
        }
    ]
}

scope here defines the top level of the PWA. When users leave the scope of your PWA, they’ll still have an app-like interface but gain access to browser UI elements. This can be useful if you’ve got certain parts of your app that you still want to be part of the PWA but which aren’t necessarily optimised or making the necessary considerations.

start_url defines the URL a user will be presented with when they open the application. This is useful if, for example, your app has marketing content at example.com and a dashboard at example.com/dashboard/index.html. It is likely that people who have installed the app as a PWA don’t need the marketing content, so you can set the start_url to /dashboard/index.html so the app starts on that page when they open the PWA.

Enhanced Transitions

View transitions can feel unfamiliar, out of place, and a tad gaudy on the web, but are a common feature of native applications. We can set up PWA-only view transitions by wrapping the relevant CSS appropriately:

@media (display-mode: standalone) {
  @view-transition {
    navigation: auto;
  }
}

If you’re really ambitious, you could also tweak the design of a site entirely to fit more closely with native design systems when running as a PWA by pairing a check for the display mode with a check for the device and/or browser in use as needed.

Browser Support And Testing

Browser support for display mode media queries is good and extensive. However, it’s worth noting that Firefox doesn’t have PWA support, and Firefox for Android only displays PWAs in browser mode, so you should make the necessary considerations. Thankfully, progressive enhancement is on our side. If we’re dealing with a browser lacking support for PWAs or these media queries, we’ll be treated to graceful degradation.

Testing PWAs can be challenging because every device and browser handles them differently. Each display mode behaves slightly differently in every browser and OS combination.

Unfortunately, I don’t have a silver bullet to offer you with regard to this. Browsers don’t have a convenient way to simulate display modes for testing, so you’ll have to test out your PWA on different devices, browsers, and operating systems to be sure everything works everywhere it should, as it should.

Recap

Using a PWA is a fundamentally different experience from using a web app in the browser, so considerations should be made. display-mode media queries provide a powerful way to create truly adaptive Progressive Web Apps that respond intelligently to their installation and display context. By leveraging these queries, we can do the following:

  • Hide redundant installation prompts for users who have already installed the app,
  • Provide appropriate navigation aids when making browser controls unavailable,
  • Tailor content and functionality to match user expectations in different contexts,
  • Create more native-feeling experiences that respect platform conventions, and
  • Progressively enhance the experience for committed users.

The key is remembering that PWA users in standalone mode have different needs and expectations than standard website visitors. By detecting and responding to display modes, we can create experiences that feel more polished, purposeful, and genuinely app-like.

As PWAs continue to mature, thoughtful implementations and tailoring will become increasingly important for creating truly compelling app experiences on the web. If you’re itching for even more information and PWA tips and tricks, check out Ankita Masand’s “Extensive Guide To Progressive Web Applications”.

Further Reading On SmashingMag

  •  

WPBeginner Spotlight 15: WordPress Admin UI Preview, New Payment Options, and Smarter Site Tools

August has been full of exciting updates in the WordPress ecosystem. From new features in major plugins to early previews of the redesigned admin interface, WordPress site owners have plenty to look forward to.

This month’s highlights cover tools for creating professional forms, accepting modern payments, managing events, and improving SEO. You can even schedule LinkedIn posts directly from WordPress.

Here’s a look at the most important news and updates you may have missed.

ℹ️ WPBeginner Spotlight brings you a monthly roundup of the most important WordPress news, plugin updates, and industry highlights. 📅✨

Got news to share? Whether it’s a new product launch, major update, or event, send us a tip here, and it could be featured in the next edition! 💬

Top WordPress news for August 2025

WPForms Launches PDF Addon and “Form Themes for All” 🎨

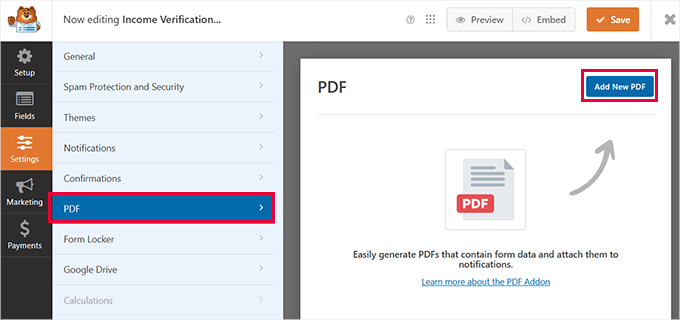
WPForms, the popular drag-and-drop form builder, has shipped two major updates designed to save time and improve form design: a brand-new PDF Addon and Form Themes for All.

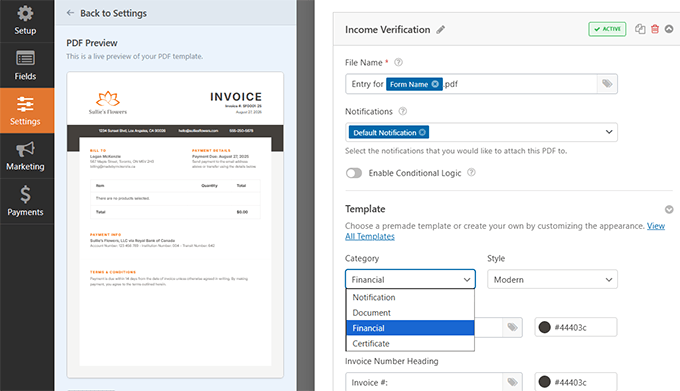
The PDF Addon automatically converts submissions into properly formatted PDFs and comes with templates for notifications, documents, financial forms, and certificates.

Add new PDF

The templates can be customized with smart tags, optional elements like logos or signatures, and formatting options for headings or bullet points. A live preview in the builder shows exactly how the final document will look.

Advanced settings include paper size, orientation, and delivery options. You can also restrict access with passwords, user roles, or conditional logic to generate different outputs based on a user’s answers.

Customizing PDF template

For many businesses, this means you can eliminate third-party PDF tools while streamlining client communication and recordkeeping.
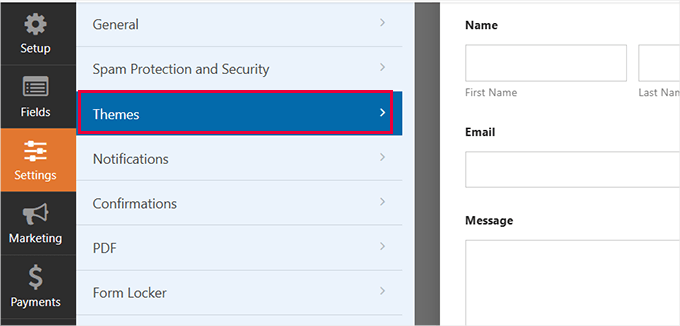
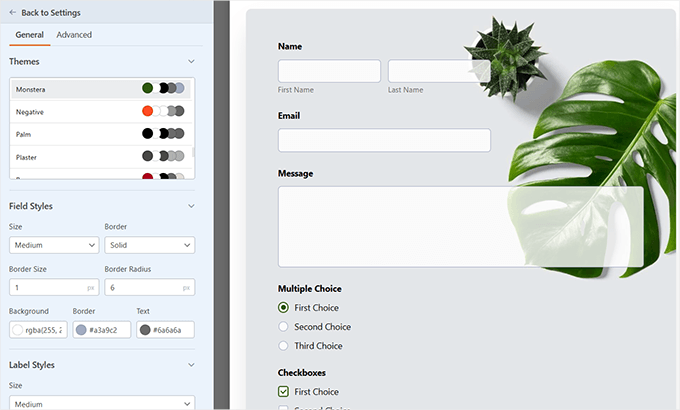
Alongside that, WPForms rolled out Form Themes for All, a feature that makes form styling effortless.

WPForms form themes

Users can choose from over 40 designer-made themes, apply them instantly, and customize backgrounds with stock or uploaded images.

This update makes it easier for small businesses, consultants, and marketing teams to create on-brand forms without writing CSS or waiting on developers.

Customizing form themes in WPForms

Together, the PDF Addon and Form Themes give WPForms stronger tools for both client communication and form design.

Note 📝: While form themes are available for all users, the PDF addon requires the PRO plan of WPForms.

Charitable Adds Modern Payments Interface with ACH, Cash App, SEPA, and More 💸

Charitable, a popular WordPress donation and fundraising plugin, has released version 1.8.8 with a modern payment form design and more payment options.

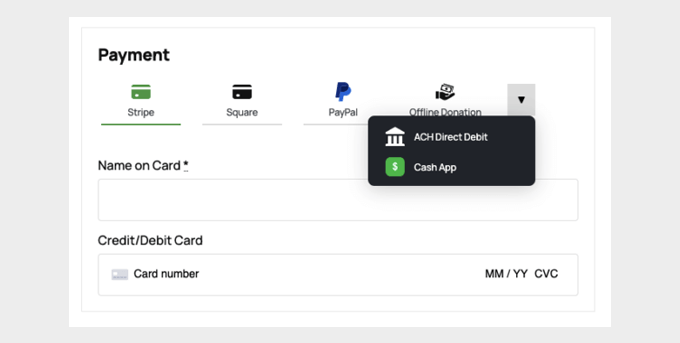
The updated payment form is cleaner and easier for donors to use. Organizations can switch between the modern and classic layouts with a single click.

When multiple gateways are active, Charitable now displays the top four options first. Any others appear in a dropdown to reduce clutter.

Charitable new payments UI

The update adds new Stripe methods: ACH Direct Debit in the US, SEPA Direct Debit and Cash App Pay in Europe, and BECS Direct Debit in Australia.

ACH gives US donors a lower-cost way to pay directly from bank accounts. On the other hand, SEPA and Cash App make giving easier for European supporters, while BECS adds trusted payments for Australians.

Charitable more payment options

PayPal and offline donations now also include clear instructions on what to do next. This helps donors finish the transaction without confusion.

Plus, the Addons screen has also been redesigned, making extra tools like recurring donations, peer-to-peer fundraising, and donor management easier to find.

Together, these updates reduce friction for your nonprofit business, cut fees, and give your donors more trusted payment options worldwide.

A Peek at the Upcoming WordPress Admin UI 🎨

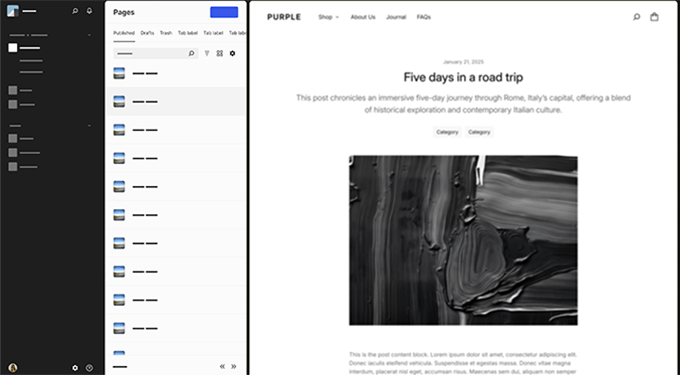
The WordPress core team has shared a new initiative called “Materials, Concepts & Screens”, which outlines future improvements to the WordPress admin interface.

The work-in-progress designs focus on creating a more consistent and modern experience across different WordPress admin screens.

The proposed WordPress  admin redesign mockup

Key concepts include improved typography, spacing, and color, along with a unified layout system for menus, forms, and notifications.

The goal is to reduce visual clutter and improve accessibility for both beginners and advanced users.

These changes are still under discussion but offer a glimpse of what may come in future WordPress releases.

ClickSocial Adds LinkedIn Scheduling  – Share Posts to Your Professional Network Directly From WordPress 📅

ClickSocial now allows users to schedule posts directly to personal LinkedIn profiles from inside WordPress. This update makes it easier for professionals to keep a consistent presence on the world’s largest business network.

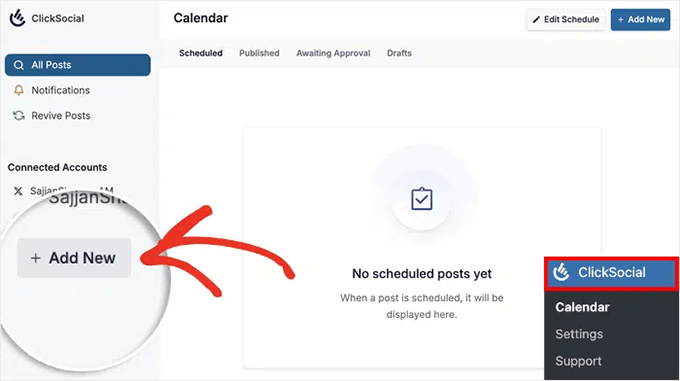
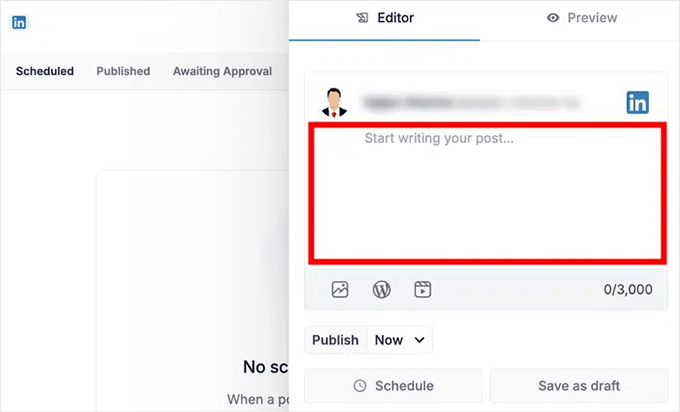
Like other platforms supported by ClickSocial, the setup is quick. Users can connect to LinkedIn, draft content in the familiar composer, and schedule it to publish automatically.

ClickSocial add new account

Posts can include text, links, images, or videos, making it easy to promote content, share expertise, and post updates without opening LinkedIn.

ClickSocial already supports Facebook, Instagram, and X. With LinkedIn added, WordPress users can now manage nearly all major social platforms in one place.

ClickSocial - Scheduling your LinkedIn post

The plugin also features a unified content calendar for planning campaigns across multiple networks. This helps ensure consistent posting without having to juggle multiple tabs or tools.

For WordPress users, the advantage is clear: all social scheduling happens inside the dashboard. This saves time, reduces distractions, and makes WordPress a central hub for publishing and promotion.

Sugar Calendar Simplifies Event Management with RSVP Add-On

Sugar Calendar is one of the best WordPress event calendar plugins on the market. They have recently released a major update with new tools that make event planning easier and more effective for site owners.

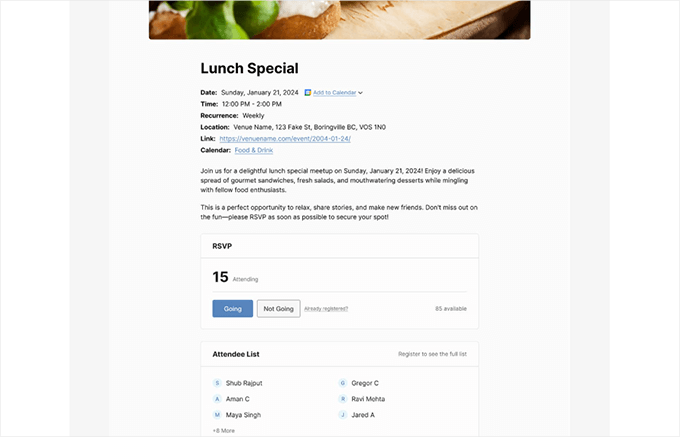
The update introduces the RSVP Add-On, which removes the need for email chains or spreadsheets. Guests can confirm attendance, add plus-ones, and update their status directly online.

Preview of the RSVP addon

Organizers can export attendee lists to CSV with one click. They can also choose to make attendees visible, which can boost social proof and encourage signups.

The update also adds Speaker Profiles for showcasing presenters. Visitors can browse events by speaker, making it easier to discover relevant sessions.

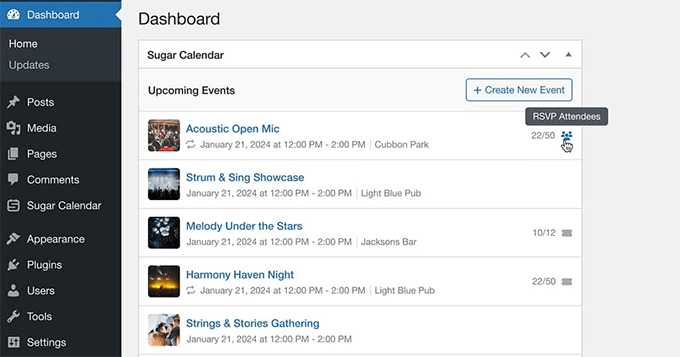
A new dashboard widget shows the next five events at a glance. This helps organizers quickly access details like ticket sales and attendee lists.

Sugar Calendar Dashboard widget

Additionally, event tags now provide clearer categorization and filtering. This helps schools, nonprofits, and businesses make it easier for visitors to find the events that interest them.
Together, these features give organizers better tools to manage event attendance, highlight speakers, and keep events organized. And attendees benefit from simpler signups and being able to find events more easily.

Easy Digital Downloads Multi-Currency Add-On Now Auto-Detects Visitor Location to Display Local Pricing

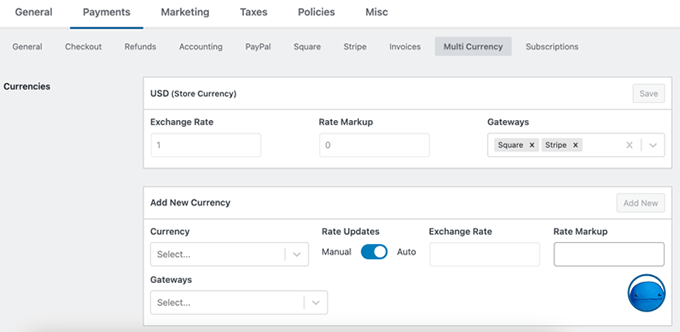
Easy Digital Downloads has updated their Multi-Currency add-on with automatic location detection. Stores can now instantly display prices in a visitor’s local currency.

It uses built-in geolocation to detect where a customer is browsing from, and prices update automatically to create a local shopping experience.

Store owners can still let visitors switch currencies manually. Alternatively, they can lock pricing to the detected currency with a “force detected currency” option.

Exchange rates now update automatically without API keys or third-party services. Site admins can also choose how often rates refresh, from hourly to weekly.

Easy Digital Downloads - Automatic exchange rates

For international sellers, this removes the hassle of manual conversions. Buyers see pricing in their own currency, which builds trust and helps avoid conversion fees.

The update works with all core EDD features, including software licensing, subscriptions, and discount codes. This makes it easier to sell digital products to a global audience.

All in One SEO Launches a New Site Audit Tool to Find and Fix SEO Problems

All in One SEO (AIOSEO) has introduced a new Site Audit module in version 4.8.6.

The feature scans your website for SEO, performance, and security issues directly inside WordPress.

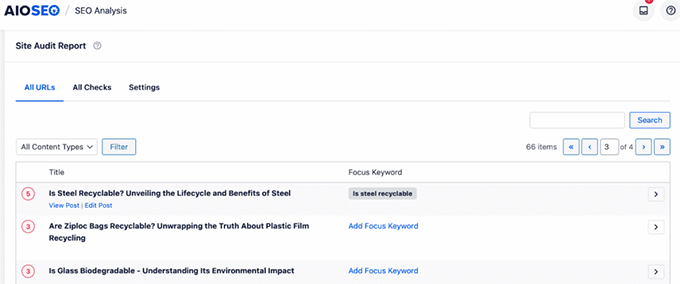
AIOSEO comprehensive Site Audit tool

The audit begins with your homepage, checking meta tags, headings, and performance so that you can fix critical issues on your most important page first.

A full site-wide scan then reviews every URL for errors. Two views are available: a page-by-page breakdown or an issue-based list of problems across your site.

AIOSEO: View issues reported by the Site Audit

Each URL shows how many issues it has. Clicking a result reveals page-level SEO details with tooltips and guidance on how to fix them.

The module also supports 1-click fixes. You can jump straight to the problem area in your content, which saves time compared to manual checks.

Additionally, adding missing focus keywords is possible without opening the page editor. This keeps SEO workflows fast and consistent.

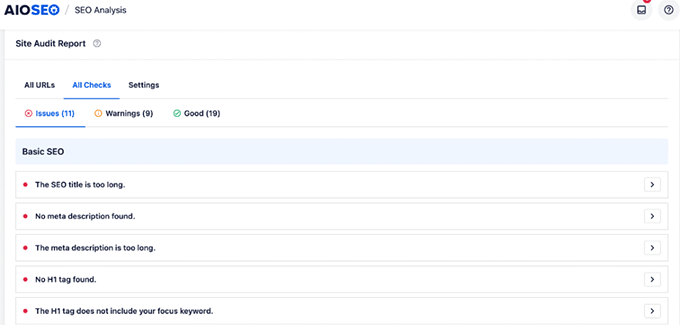
For users who prefer a broad overview, the All Checks view groups issues by type. This makes it easier to see which problems are urgent and which can wait.

AISEO - View issues by all checks

Overall, the Site Audit tool gives site owners practical, actionable SEO insights rather than overwhelming reports. It’s designed to help you quickly solve problems so that you can better rank your content in the search results.

In Other News 🗞️

OptinMonster – Convert Visitors into Subscribers & Customers

OptinMonster

OptinMonster helps you grow your email list and boost sales with high-converting popups, slide-ins, and smart targeting. Build campaigns without coding and reach the right audience at the right time.
  • WordPress 6.9 is scheduled for release on December 2, 2025. It will introduce streamlined Site Editor modes, improved template and block workflows, expanded Command Palette access, new developer APIs, and better navigation across the admin dashboard.
  • The Advanced Coupons plugin now lets store owners exclude specific customers or emails from using coupons. This is perfect for preventing misuse or creating VIP‑only promotions. It also introduces a cart‑total condition where coupon eligibility is based on the final checkout amount (including shipping, taxes, etc.).
  • Recover more sales and boost engagement with PushEngage’s new WhatsApp integration for Shopify. It features a free click-to-chat widget, plus automated messages for abandoned cart recovery, order updates, COD reminders, and win-back campaigns.

WPBeginner Maintenance Services 🛠️

WPBeginner Maintenance Services

Let the WPBeginner team take care of your site. From backups and speed checks to security and updates, our Maintenance Services keep your site running smoothly while you focus on growing your business.

  • AffiliateWP now offers Multi‑CAPTCHA protection (choose Google reCAPTCHA, hCaptcha, or Cloudflare Turnstile). It can be applied to both registration and login forms to block spam signups to your affiliate program.
  • Skip the gallery rebuild and migrate effortlessly using Envira Gallery’s new Importer add‑on. It lets you automatically pull in your existing FooGallery or Modula galleries (including layout matching and metadata) and replaces them site‑wide with Envira versions in minutes.

New Plugins & Tools

  • 🔥ClickSocial – The powerful social media scheduling plugin for WordPress now includes LinkedIn scheduling support.
  • Voice Feedback – Collect audio feedback directly from users on your site.
  • DB Reset PRO – Reset your WordPress database tables quickly for testing or fresh installs.

That’s all for this month’s WPBeginner Spotlight. Stay tuned for the next edition with more plugin launches, ecosystem updates, and WordPress news!

Got something exciting to share? Send us a message, and it might be included in the next issue.

If you liked this article, then please subscribe to our YouTube Channel for WordPress video tutorials. You can also find us on Twitter and Facebook.

The post WPBeginner Spotlight 15: WordPress Admin UI Preview, New Payment Options, and Smarter Site Tools first appeared on WPBeginner.

  •  

How I Save Time Scheduling LinkedIn Posts in WordPress

If you’ve ever tried sharing your blog posts on LinkedIn manually, then you know how time-consuming it can be. Switching between platforms, pasting content, and trying to keep a regular schedule takes more effort than it should.

I’ve been looking for ways to share more consistently on LinkedIn, and that’s when I realized WordPress could help. With the right setup, I don’t have to worry about missing posts or spending hours trying to stay on track.

In this guide, I’ll walk you through the two methods I’ve used. One gives you more control if you like to plan everything out, and the other runs quietly in the background so you can stay consistent without extra effort.

How to Schedule LinkedIn Posts in WordPress

Why Schedule LinkedIn Posts in WordPress?

Scheduling LinkedIn posts in WordPress helps you stay consistent and reach your audience at the right time. You can plan, publish, and promote posts directly from your WordPress dashboard without needing to switch platforms.

This saves you from the hassle of logging in to LinkedIn separately or copying and pasting your content.

It also makes it easier to hit those “golden hours” when there’s the most activity on LinkedIn—even if you’re busy working on your site.

Here are some key benefits of scheduling LinkedIn posts in WordPress:

  • Stay consistent – Keep your publishing flow steady without juggling multiple apps.
  • Post at the best times – Share updates when your audience is most active, even if you’re offline.
  • Plan strategically – Align your LinkedIn posts with your WordPress content calendar so everything works toward your business goals.
  • Reduce stress – Batch-create LinkedIn updates while writing your blog posts, instead of scrambling to post something at the last minute.

Plus, this approach works for a wide range of WordPress websites.

Here’s a quick overview of how you might be able to benefit, based on the type of website you run:

Website TypeIdeas for Scheduling LinkedIn Posts
Business websitesSchedule company news, product launches, case studies, and industry insights.
Online storesSchedule product spotlights, seasonal campaigns, and promotions.
Nonprofit and community websitesAnnounce events, share success stories, and attract supporters.
Portfolio websitesShare recent projects, client testimonials, or creative work.
Blogs and content sitesConsistently promote new articles, evergreen posts, and roundup content.
eLearning websitesPost online course resources, tips, and upcoming training schedules.

The best part is that you can do all this right inside WordPress. You can either choose an all-in-one solution and manage multiple platforms from a single dashboard or automate posts directly from your site.

Not sure which one’s right for you? Don’t worry – I’ll walk you through both so you can see which approach matches your workflow.

Which Method Should You Choose?

The right tool for scheduling LinkedIn posts in WordPress depends on how you like to work:

  • Method 1: ClickSocial. If you want an all-in-one solution, ClickSocial lets you schedule posts across multiple social platforms, including LinkedIn. You can also use Quick Share to automatically publish a LinkedIn post whenever you publish a new blog post.
  • Method 2: Uncanny Automator. If you prefer a more hands-off approach, Uncanny Automator might be a better fit. Once you set up an automation recipe, it will automatically share your WordPress posts to LinkedIn the moment they’re published.

Now, I’ll share two methods for scheduling LinkedIn posts in WordPress.

Here’s a quick overview of all the things I’ll cover in this guide:

Method 1: Schedule LinkedIn Posts Using ClickSocial

ClickSocial is the best WordPress social media scheduling plugin, especially for beginners and busy site owners who want everything in one place. With its visual calendar, you can easily plan, schedule, and adjust your posts as needed.

This setup works especially well for bloggers and business owners who want a clear overview of their content across different social media platforms.

On our partner brand websites, we use ClickSocial to streamline social scheduling, and it’s been a reliable time-saver. You can read our complete ClickSocial review to see all the details.

Step 1: Create Your ClickSocial Account & Get Your API Key

First, you’ll need to create your ClickSocial account before installing the plugin.

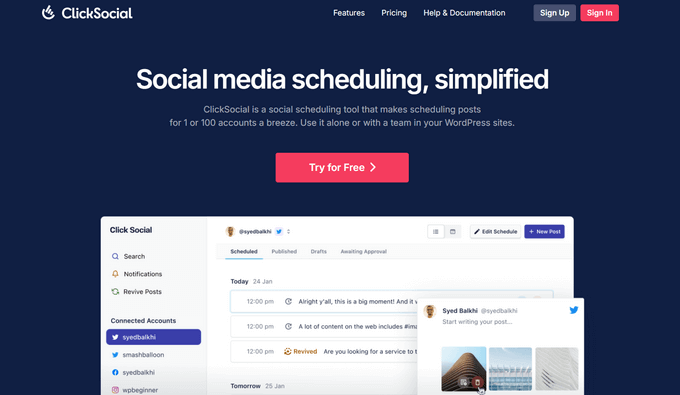
Head over to the ClickSocial website and click the ‘Sign Up’ button. Then, you can simply complete the registration process and make note of your login credentials.

ClickSocial

After you’ve signed up, you’ll want to get your API key so you can connect it to your WordPress site.

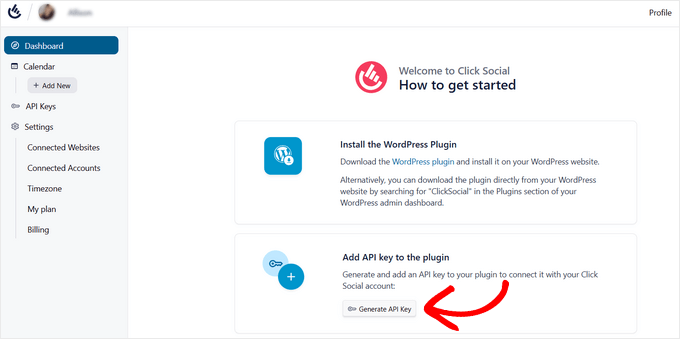
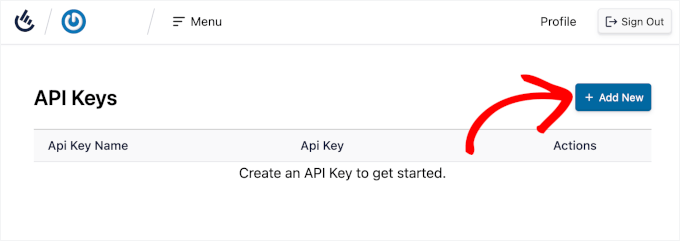
In your ClickSocial dashboard, look for the ‘Generate API Key’ button and click it.

Generate API key from ClickSocial dashboard

This will take you to the API Keys page.

Go ahead and click on the ‘Add New’ button.

Adding a new API key

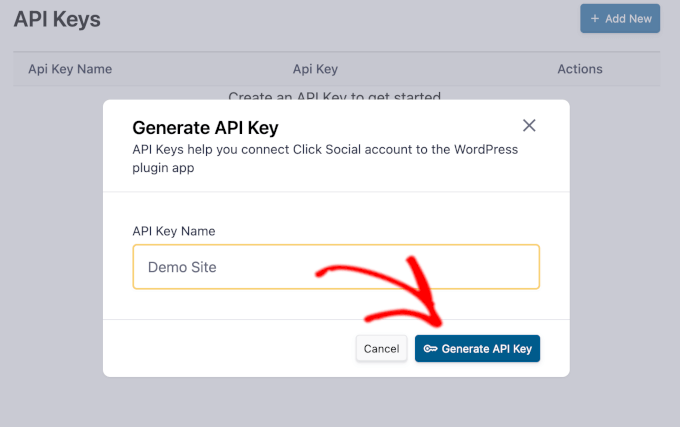
In the popup that appears, you’ll need to enter a name for your API key. I recommend using something clear, like your website or project name, so you can easily remember what it’s for later.

With that done, you can click the ‘Generate API Key’ button.

Naming the API key

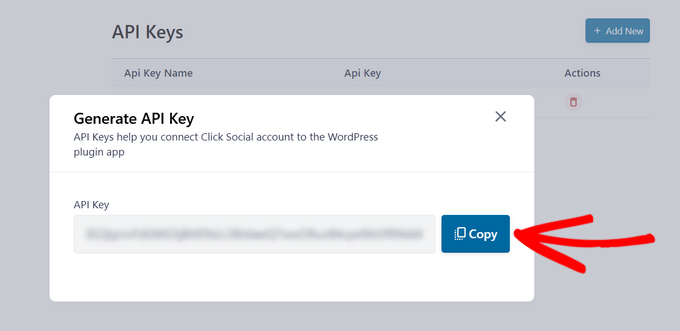
On the next screen, you’ll see your unique API key.

Be sure to copy this API key and store it in a safe place, like a password manager. For your security, ClickSocial will only show the full key this one time.

Copy the API key
Step 2: Install and Connect ClickSocial With Your WordPress Website

Now, you’re ready to install and activate the ClickSocial WordPress plugin.

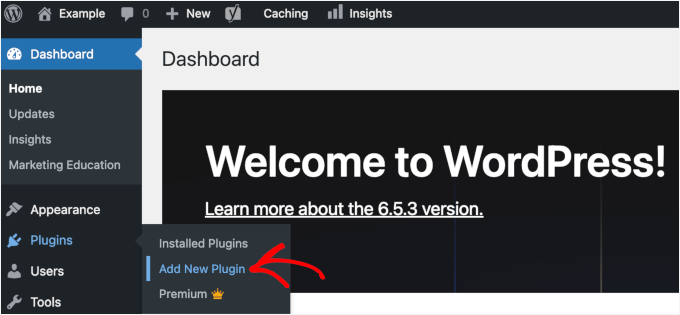
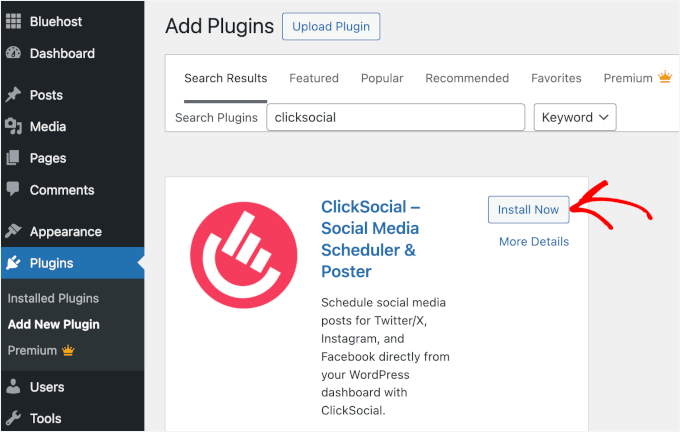
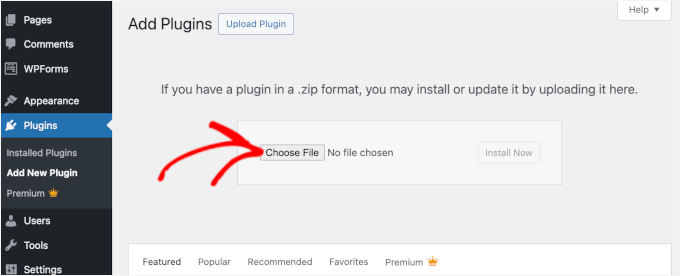
You can navigate to your WordPress dashboard and go to Plugins » Add New Plugin.

The Add New Plugin submenu under Plugins in the WordPress admin area

In the search bar at the top, type “ClickSocial” and press Enter.

When you see the plugin appear in the results, click ‘Install Now.’

Install ClickSocial plugin

Once the installation is finished, hit ‘Activate.’ For more detailed instructions, see our guide on how to install a WordPress plugin.

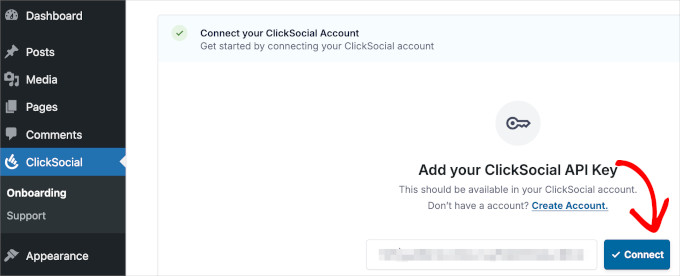
Next, the ClickSocial setup wizard will ask you to link your WordPress site using your unique API key.

If you accidentally navigate away, simply go to ‘Onboarding’ under the ‘ClickSocial’ tab. Enter your API key and click the ‘Connect’ button.

API key ClickSocial

Step 3: Connect Your LinkedIn Account to ClickSocial

Now that your website is connected to ClickSocial, you can connect your LinkedIn account.

From your WordPress dashboard, go to ‘ClickSocial’ to continue with the setup wizard. Under step 2, click the ‘Add Account’ button to get started.

Add account in ClickSocial

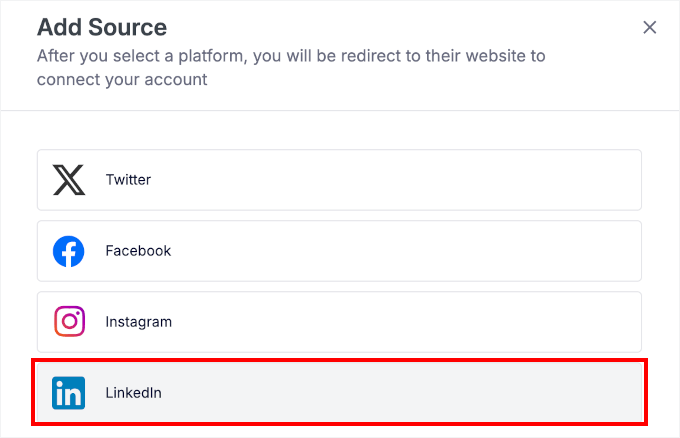
A popup will display the social media platforms you can connect, such as LinkedIn, Instagram, Facebook, and X (formerly Twitter).

For this tutorial, let’s select the LinkedIn option.

Adding LinkedIn as a source

This will open a new window where you can log in to LinkedIn and give ClickSocial permission to post for you.

Click ‘Allow’ to grant these permissions. Remember, this is completely safe, and you can revoke access at any time within your LinkedIn settings.

Granting LinkedIn connection permission

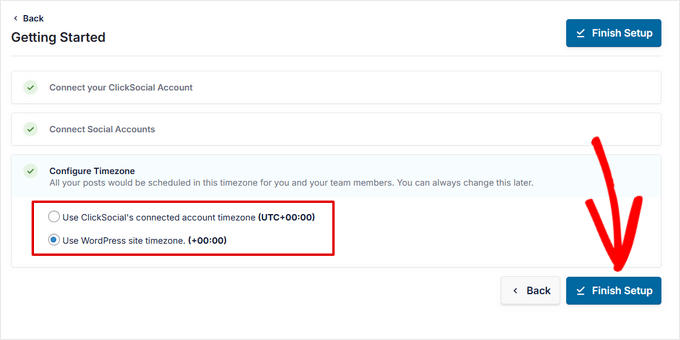
After authorizing the connection, you’ll need to choose your timezone settings.

You can either use ClickSocial’s connected account timezone or stick with your WordPress site’s timezone setting.
Finish ClickSocial setup

Click ‘Finish Setup’ to complete the onboarding process and the LinkedIn integration.

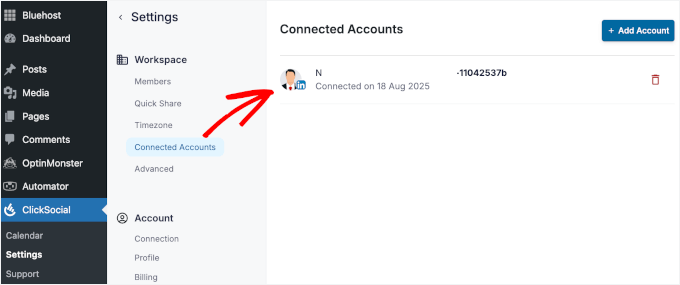
You should now see your LinkedIn account listed in ClickSocial » Settings in the ‘Connected Accounts’ tab under ‘Workspace.’

LinkedIn account connected
Step 4: Set Up Your LinkedIn Post Calendar

After connecting your LinkedIn account, ClickSocial will display your post calendar, so you can control your entire LinkedIn posting schedule.

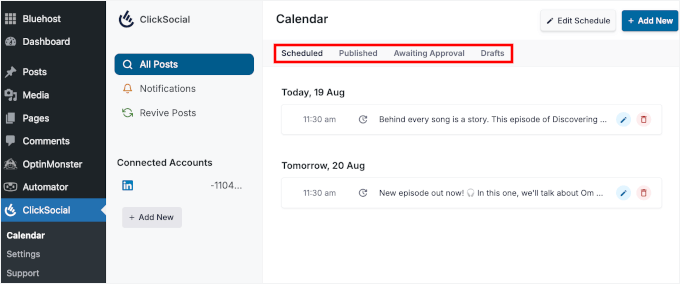
The calendar view shows you exactly when your posts will go live and helps you spot any gaps in your posting schedule.

You can see scheduled posts, published posts, drafts, and even manage approval queues if you’re working with a team.

ClickSocial's post calendar

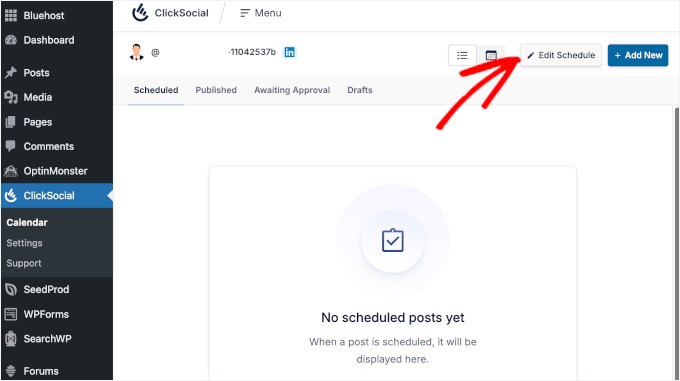
To set up your default posting times, click the ‘Edit Schedule’ button at the top of the calendar.

This way, you don’t have to pick a time every time you write a new blog post.

The Edit Schedule button in ClickSocial

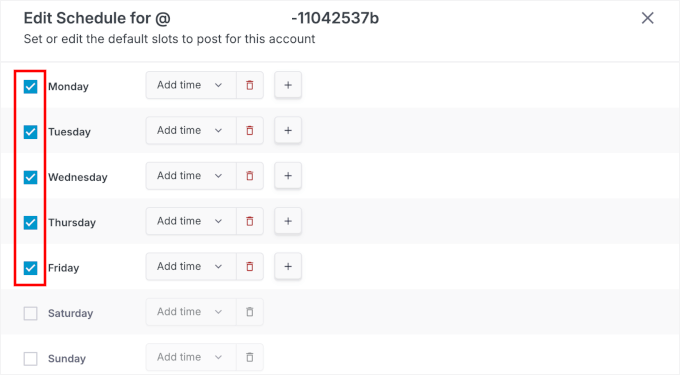
From here, select the checkboxes on the left side to select which days of the week you want to post on LinkedIn.

I typically choose Monday through Friday since that’s when my audience is most active.

Choosing the days for scheduling LinkedIn posts

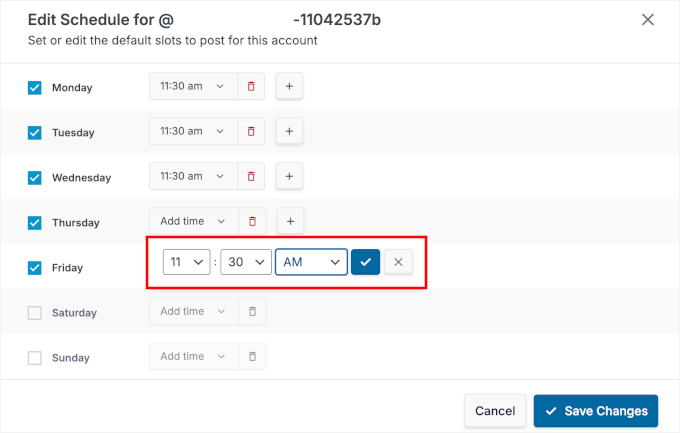
Once you’ve selected your posting days, use the dropdown menus on the right to set specific time slots for each day.

You can add multiple time slots per day using the plus (+) icon or remove unwanted slots with the red trash icon.

Choosing the time for scheduling LinkedIn posts

That said, I recommend starting with one post per day during business hours – around 9 AM or 1 PM works well for most industries.

You can always adjust these times later based on your audience’s engagement patterns.

When you’re happy with everything, go ahead and click ‘Save Changes’ to apply your new posting schedule.

🧑‍💻 Pro Tip: Even with a set schedule, you can still choose custom times for individual posts. I’ll show you how in the next step.

Step 5: Schedule Your LinkedIn Posts in WordPress

Now, you can start creating and scheduling your LinkedIn content. ClickSocial’s post composer makes this simple, even if you’re new to social media scheduling.

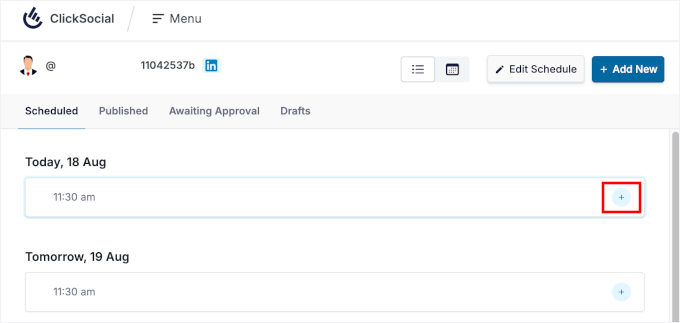
To add a new post, you can click the plus (+) icon next to an available time slot on your calendar.
Add a WordPress post to schedule

In the ClickSocial post composer, simply type your LinkedIn post content directly into the text field.

Below the text area, you’ll see several icons for adding other elements to your post:

  • Imageupload photos from your media library.
  • Link – add a link to existing WordPress blog posts.
  • Videoembed videos that support your message.

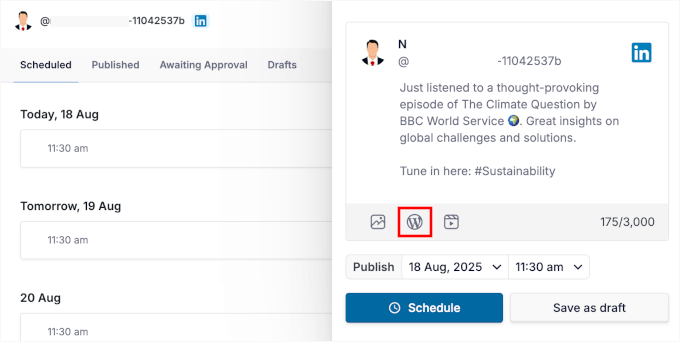
For this tutorial, I’ll add a link to an existing WordPress blog post, so I will click on the ‘WordPress’ icon.

The WordPress icon

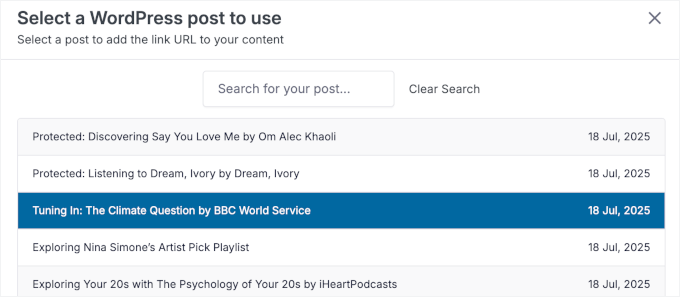
In the popup that appears, you’ll choose a WordPress post to auto-schedule.

Simply click on the post you want to add.

Selecting a WordPress post

You can choose more than one link if you need to. But I recommend selecting only one post to keep your content focused.

After that, scroll down the popup and click the ‘Add to Schedule’ button.

The Add to Schedule button

You should now see the link attached in the post composer.

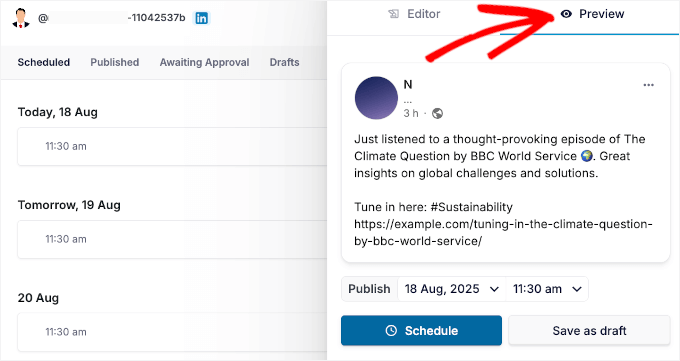
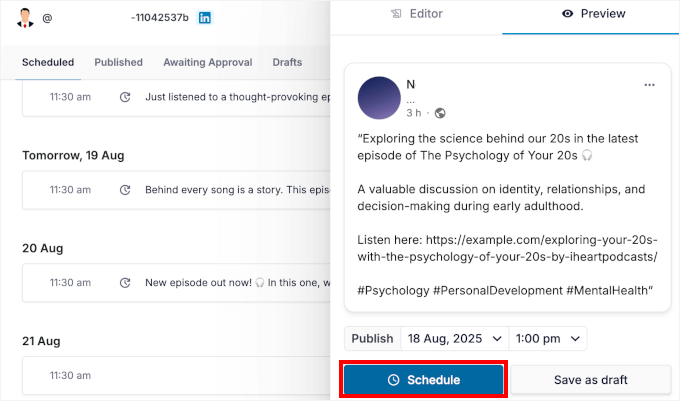
From here, you can switch to the ‘Preview’ tab to see exactly how your content will appear on LinkedIn.

Previewing scheduled LinkedIn post

If anything needs changing, you can go back to the composer to fine-tune the text or add hashtags.

When you’re happy with your draft, click the ‘Schedule’ button at the bottom.

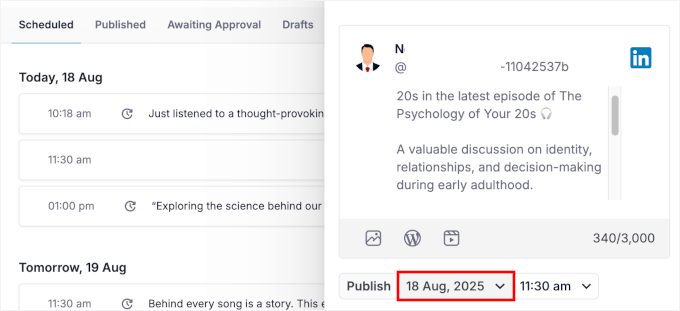
If you’d rather post at a custom time, just use the dropdowns next to ‘Publish’ to pick the date and time you want.

Customizing publishing date and time

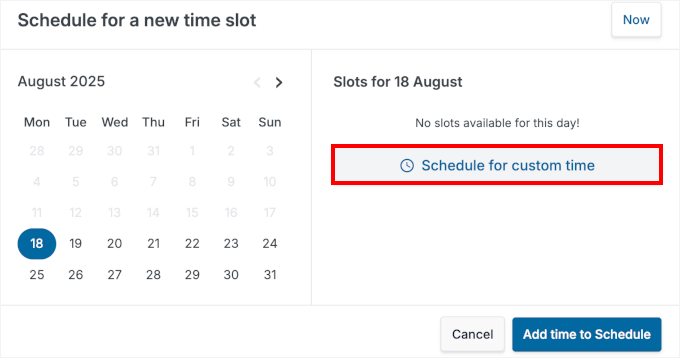
In the popup that appears, go ahead and select your desired publishing date from the calendar.

Then, click ‘Schedule for custom time.’

Scheduling for a custom time

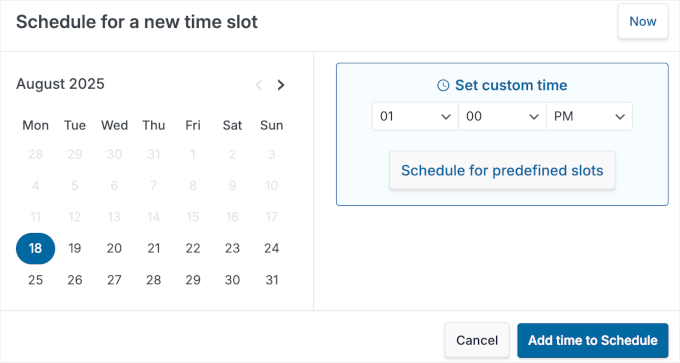
From the dropdown, you can specify the exact hour and minute.

After that, click the ‘Add time to Schedule’ button to confirm.

Adding custom time to schedule

This will bring you back to the post composer, where you can give your scheduled post another look. You can also switch to the ‘Preview’ tab to double-check everything.

And when you’re ready, you can hit the ‘Schedule’ button.

Schedule for custom time

And that’s it! You can repeat this process for any blog posts you’d like to schedule and share on LinkedIn.

When you’re finished, you’ll see all your upcoming posts in the ‘Scheduled’ tab. Here, I have a blog post set for the default slot and another scheduled at a custom time.

Custom time added to the Scheduled table

ClickSocial will automatically post your LinkedIn content at the time you’ve set.

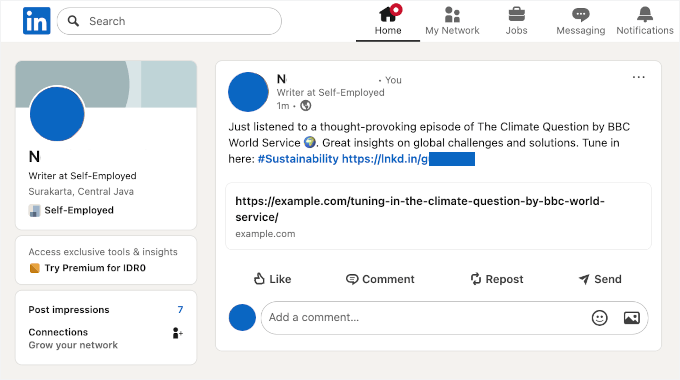
Here’s my demo scheduled LinkedIn post as an example:

Automated LinkedIn post example
Step 6: (Optional) Quick-Share Your WordPress Post to LinkedIn

Want your new WordPress posts to go straight to LinkedIn? With ClickSocial, you can do that by setting up Quick Share.

Instead of creating each LinkedIn post from scratch, Quick Share generates one for you as soon as you publish a blog post.

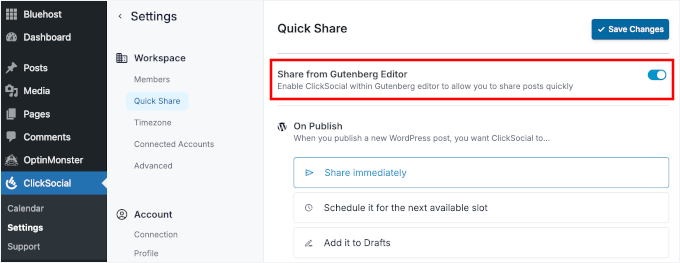
To set it up, navigate to ClickSocial » Settings » Quick Share from your WordPress dashboard.

Once inside, you can go ahead and toggle on ‘Share from Gutenberg Editor.’

Share from Gutenberg

Next, you can choose what should happen when a blog post is published:

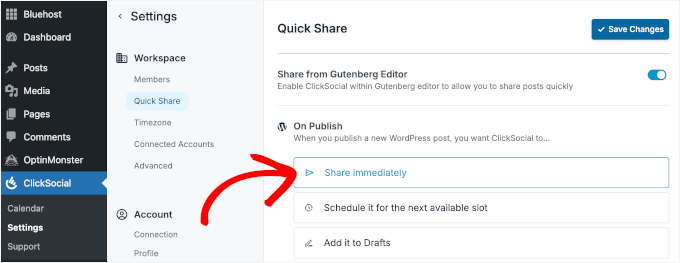
  • Share immediately – publish to LinkedIn the moment your blog goes live.
  • Schedule for the next available slot – fit the post into your existing posting calendar (you set this up in step 5).
  • Add to Drafts – save it for review so you can edit before posting.

For this tutorial, I’ll select ‘Share immediately’ so my LinkedIn post goes live at the same time as my blog post.

The Share Immediately option

You can then scroll down to the ‘Account’ section.

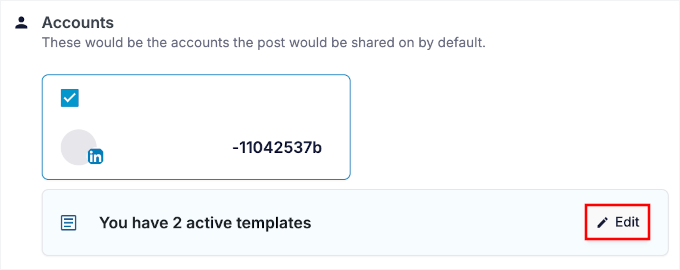
Here, click on your LinkedIn account’s box, then once again on the ‘Edit’ button to open the post composer.

Adding the LinkedIn accout for auto-share

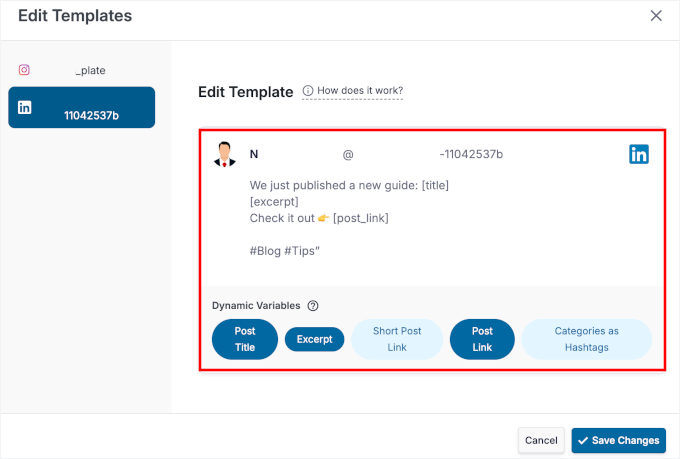
In the popup, you can build a template with dynamic variables like post title, link, excerpt, and more.

This ensures your LinkedIn post auto-generates based on your blog content.

Editing automated post template

When everything looks good, don’t forget to save your settings.

Now, whenever you publish a post, you’ll see the ClickSocial Share button in your WordPress content editor.

ClickSocial's Share button in the content editor

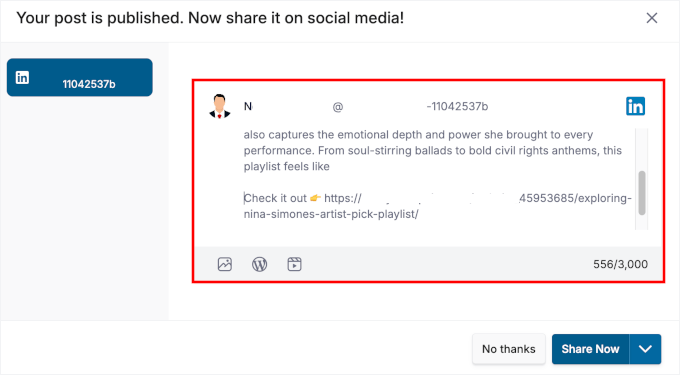
Clicking it will open a preview of your LinkedIn post.

From here, you can make final tweaks, like reviewing text, fixing formatting, or adding hashtags.

ClickSocial auto-share popup

Once everything looks good, you can hit ‘Share Now’ (or choose to schedule it for later).

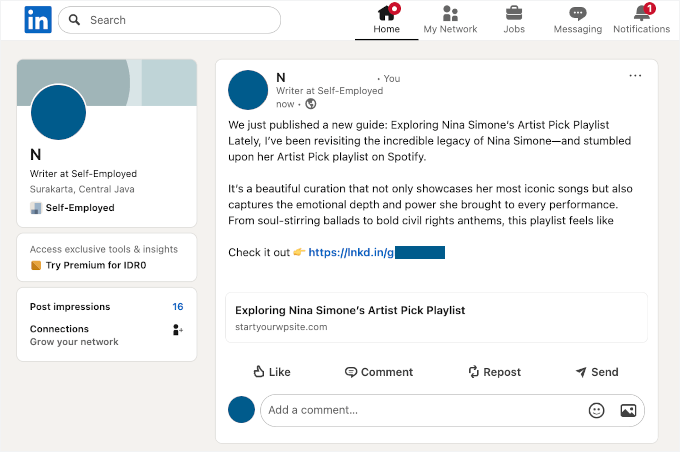
ClickSocial will then publish your post according to the settings you’ve chosen. Here’s an example of my automated LinkedIn post:

Automated LinkedIn post example

Method 2: Publish LinkedIn Posts Using Uncanny Automator

Uncanny Automator is ideal if you’d rather have your WordPress posts sent to LinkedIn automatically as soon as they’re published. It works through “recipes,” which are automated workflows that trigger an action, like posting to LinkedIn.

For more information, see our full Uncanny Automator review.

Step 1: Install and Activate Uncanny Automator

First, you need to install the Uncanny Automator plugin on your WordPress site. The plugin offers both free and pro versions, but the free version includes everything you need for basic LinkedIn automation.

📝 Note: While the free plugin is perfect for this task, Uncanny Automator Pro unlocks more advanced workflows. For example, you could add a 24-hour delay before sharing a post or only share posts from a specific category.

To install the plugin, navigate to Plugins » Add New Plugins in your WordPress dashboard.

The Add New Plugin submenu under Plugins in the WordPress admin area

Then, you can search for “Uncanny Automator” in the plugin directory.

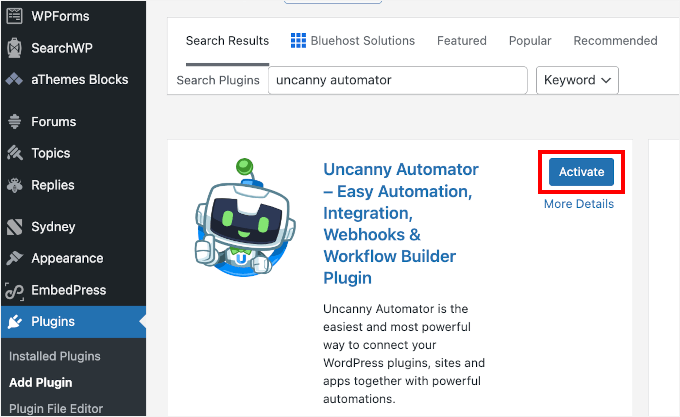
Once you’ve found it, click ‘Install Now’ and wait for the installation to complete, then click ‘Activate’ to enable the plugin.

If you need help, please see our complete guide on how to install a WordPress plugin.

Installing the Automator plugin

After activation, you’ll see a new Automator menu item in your WordPress dashboard. This is where you’ll create and manage all your automated workflows.

🔗 Related: Want more WordPress automation tips? See our beginner’s guides on WordPress email marketing automation and our expert picks for the best WordPress automation tools and plugins compared.

But first, let’s set up your free Uncanny Automator account, since you won’t be able to connect to LinkedIn without it.

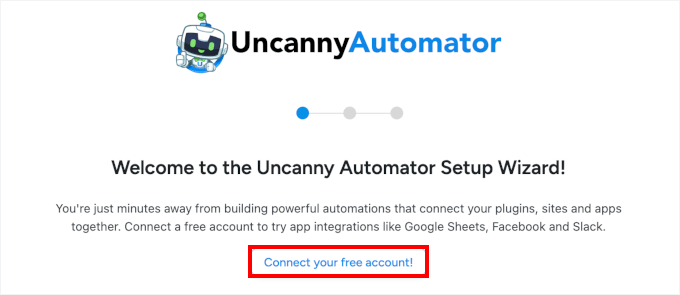
Let’s head over to ‘Automator’ and click the ‘Connect your free account!’

Automator setup

On the next screen, you’ll see a registration form. Simply fill in the required details, and you’ll be good to go.

Step 2: Create a New Recipe for LinkedIn Automation

With Uncanny Automator set up, you’re ready to create your first automation recipe.

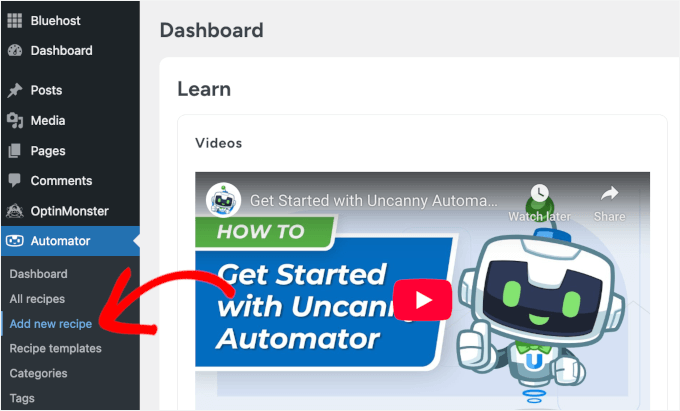
In your WordPress dashboard, go to Automator » Add new recipe.

Add new recipe in Automator

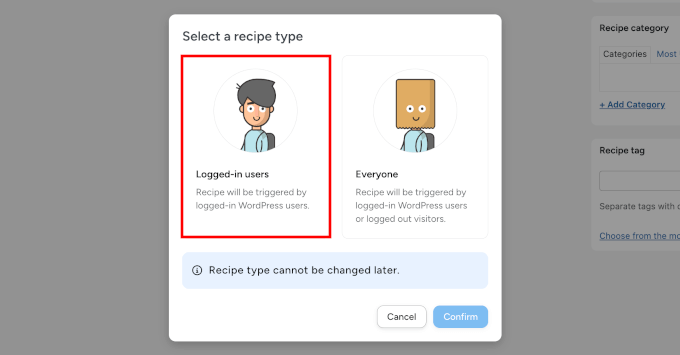
A popup will appear asking what type of recipe you’d like to create.

Here, you’ll want to select ‘Logged-in users’ from the options.

This makes sure the automation only runs when you or another trusted user publishes a post. It prevents accidental triggers from guest contributors or other user actions.

Select logged-in users

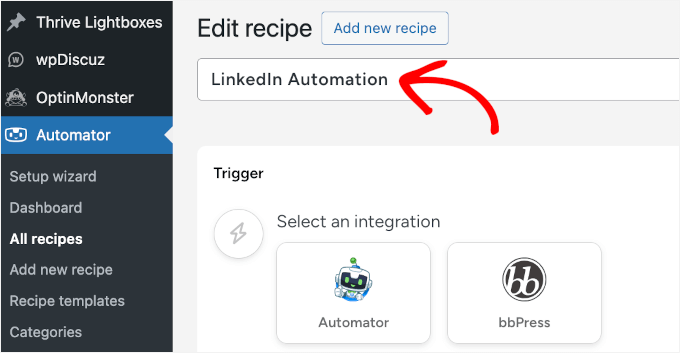
Next, you’ll need to give your recipe a descriptive name so it’s easy to recognize later.

Something like “Share New WordPress Blog Posts to LinkedIn” or “LinkedIn Automation” works well, since it reminds you exactly what the recipe does.

Plus, having a clear naming system really helps once you start creating more recipes for different platforms or content types.

Naming the LinkedIn automation recipe

With that done, you can click ‘Save’ to proceed to the recipe configuration screen.

Step 3: Configure Your Automation Trigger

A trigger is what tells Uncanny Automator when to run your recipe. In this case, you’ll want it to fire whenever you publish a new blog post on your WordPress site.

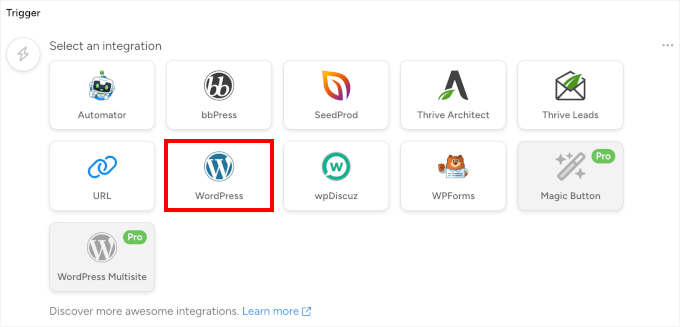
In the Trigger section, you’ll see a list of available integrations. Go ahead and choose ‘WordPress’ since the automation is based on WordPress activity.

Choosing WordPress as the trigger

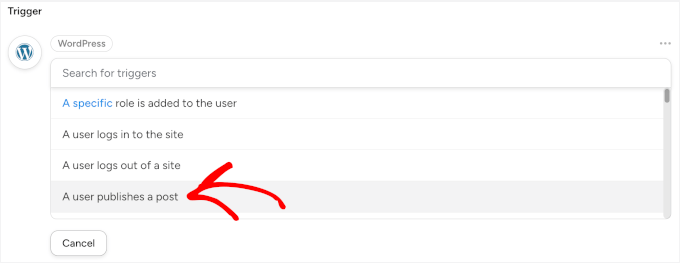
In the dropdown menu that appears, let’s select ‘A user publishes a post.’

This specific trigger ensures your recipe only runs when content goes from draft to published status.

Choosing a user publish a post

Uncanny Automator will then prompt you to select which post type should trigger the automation.

If you only want to share regular blog posts, select ‘Post’ from the dropdown menu.

Selecting the post type

But if you also publish other content types like case studies or portfolios that you’d like to share on LinkedIn, select ‘Any post type’ instead. This gives you more flexibility as your content strategy grows.

Once you’ve configured your trigger settings, don’t forget to click ‘Save.’

Step 4: Configure Your LinkedIn Auto-Share Action

Now, you’re ready to set up LinkedIn auto-sharing. In this step, you’ll tell Uncanny Automator what should happen each time a post is published.

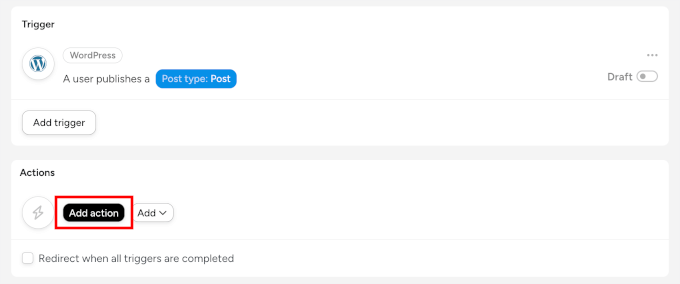
In the ‘Actions’ section, click ‘Add action’ to get started.

Clicking the Add action button

This will open the list of available integrations.

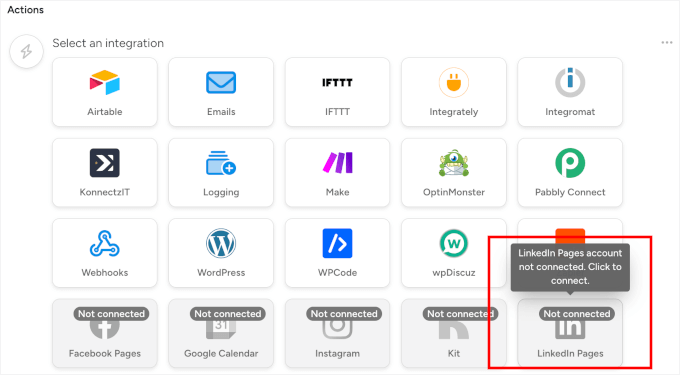
You can scroll down and select ‘LinkedIn’ from the menu.

Select LinkedIn as action

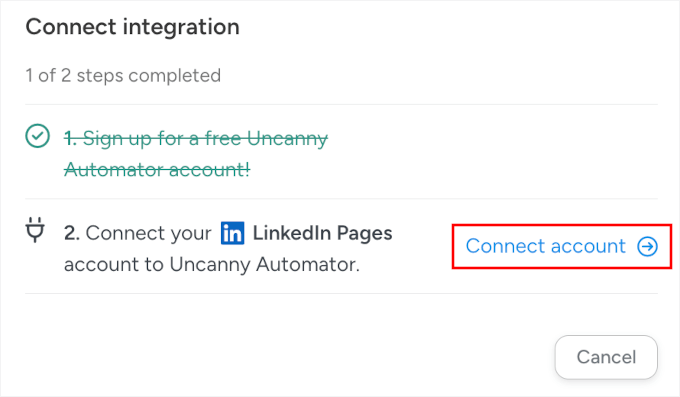
If this is your first time connecting LinkedIn to Uncanny Automator, you’ll see a ‘Connect account’ button in the popup that appears.

Go ahead and click it.

Connect LinkedIn page

LinkedIn will then ask you to confirm that Uncanny Automator can post for you.

Click ‘Allow’ to grant the necessary permissions. This process is completely secure, and you can always manage or revoke this access from your LinkedIn account settings.

Allowing LinkedIn connection

After connecting your LinkedIn account, Uncanny Automator will take you to the recipe editor.

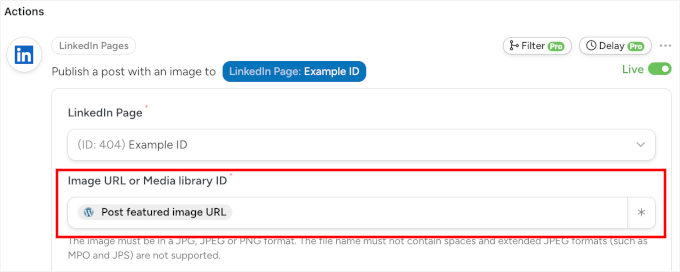
From here, let’s select ‘Publish a post with an image to a LinkedIn page’ from the action dropdown. This way, each LinkedIn post will have a featured image to help make it stand out.

Publish post with an image in LinkedIn option

You can then tell Uncanny Automator which image to use for your LinkedIn post. The best way to do this is to use the post’s featured image, so every new article will have its own unique visual.

To set this up, click the asterisk (*) button next to the ‘Image URL’ field. This will open a list of dynamic tokens. Search for ‘Post Featured Image URL’ and select it.

Now, your post’s featured image will be automatically included in your LinkedIn post.

Adding the Post featured image URL token

🧑‍💻 Pro Tip: For the best results on LinkedIn, make sure your featured images are at least 1200 x 627 pixels. This ensures your image looks sharp and professional in the feed.

For more social media image sizes, see our complete social media cheat sheet.

Alternatively, if you want every post to use the same default featured image, you can paste a specific image URL from your Media Library into this field instead of using a token.

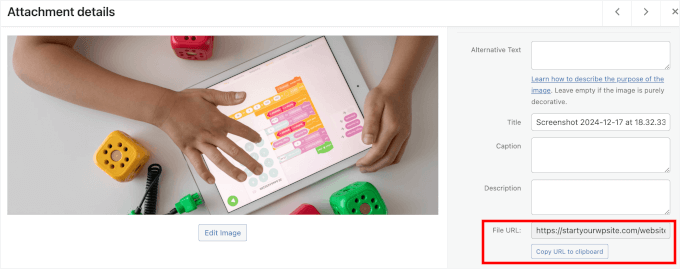
No worries if you don’t know the URL because you can grab it from your Media Library.

All you have to do is open your WordPress media library in a new tab, click on the image you want to add, and copy the value from the ‘File URL’ field.

Copying File URL from the media library

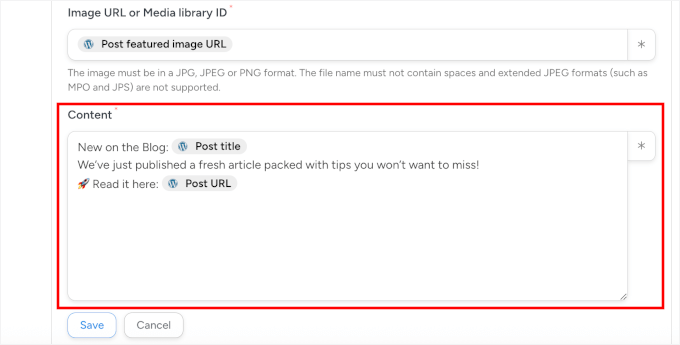
After setting the image, you can create a template for your post’s text in the ‘Content’ field. You can use a mix of your own words and dynamic tokens, which automatically pull information from your WordPress post.

To add tokens, click the asterisk (*) button and search for the one you need. For example, you might want to look for ‘Post Title’ and ‘Post URL’ and select them as your token.

Here is a simple template you can use: “New on the Blog: {Post Title} We’ve just published a fresh article packed with tips you won’t want to miss! 🚀 Read it here: {Post URL}.”

If you want, you can add some hashtags, like WordPress #LinkedInTips. But be sure they are suitable for all of your automated LinkedIn posts.

Publish post with an image in LinkedIn content details

This way, your LinkedIn post will automatically include your post title and link, along with hashtags if you add them.

With that done, you can click ‘Save’ to store your LinkedIn auto-share action settings.

Step 5: Activate Your LinkedIn Automation Recipe

At this point, your recipe is complete and ready to automatically share your blog posts on LinkedIn.

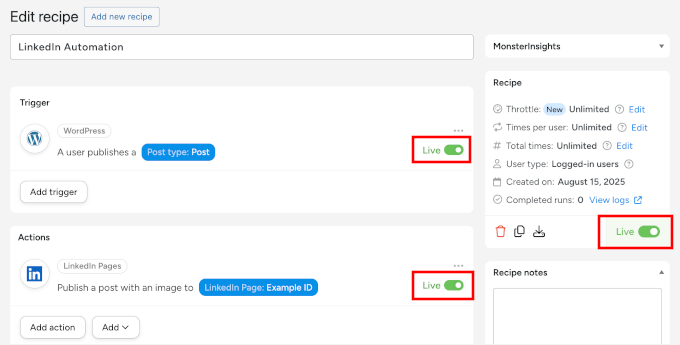
But in the recipe editor, you’ll notice the switches are set to ‘Draft.’ That just means the automation is created but not active yet.

You can go ahead and switch all the toggles from ‘Draft’ to ‘Live.’

Making recipe live

That’s it! Your recipe now runs in the background, taking care of LinkedIn whenever you publish new content.

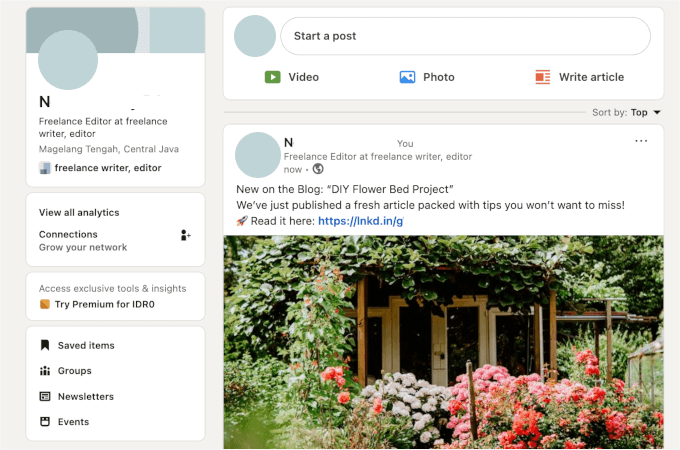
Here’s what my demo automated LinkedIn post looks like:

Automated Uncanny Automator LinkedIn post example

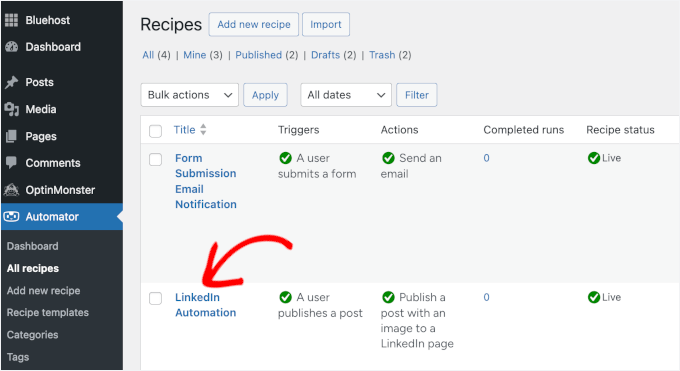
You can view all your active recipes by going to Automator » All Recipes in your WordPress dashboard.

From there, you can pause or update them anytime.

LinkedIn Automation in the list of all Uncanny Automator recipes

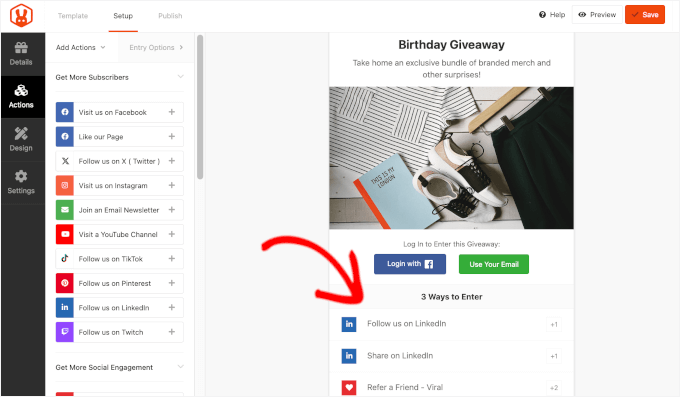
Bonus Tip: Grow LinkedIn Followers and Engagement with Giveaways

Running giveaways can also be a great way to grow your LinkedIn audience and boost engagement on your posts.

People love the chance to win something for free. And by tying the entry requirements to simple actions (like following your LinkedIn Page or engaging with a post), you can quickly expand your reach.

Here are a few smart goals you can set for your giveaway:

  • Grow followers – Require entrants to follow your LinkedIn Page to participate.
  • Boost post engagement – Ask participants to comment on or share your post on LinkedIn.
  • Increase brand awareness – Encourage referring friends or colleagues who might be interested in your product or service.
Giveaway entry requirements

To run the giveaway, I recommend using RafflePress, which is the best WordPress contest and giveaway plugin.

We use it to run our annual WPBeginner birthday giveaway, and it’s been working super well for us. See our full RafflePress review for more insights about the plugin.

And for step-by-step instructions, you can see our guide on how to run a giveaway/contest in WordPress.

FAQs About How to Schedule LinkedIn Posts in WordPress

Still have questions? Here are answers to some of the most common questions I get about scheduling LinkedIn posts in WordPress.

How do I automatically post from WordPress to LinkedIn?

You have two main options for automatically posting from WordPress to LinkedIn:

  • ClickSocial – Best if you want scheduling flexibility for LinkedIn and other social platforms.
  • Uncanny Automator – Best if you prefer instant sharing directly from WordPress.

Both integrate smoothly with LinkedIn once your account is connected, giving you two simple ways to streamline your workflow.

How can I keep up with posting daily on social media?

The trick is batching and scheduling. Instead of logging in every day, set aside one block of time each week to write and schedule your LinkedIn posts. With the right plugin, you can line up a whole week’s worth of content and let WordPress handle the publishing.

Can I use the same content across multiple platforms?

Yes, but with a twist. You can repurpose your WordPress blog post for LinkedIn, X (Twitter), or Facebook. Just make sure to adjust the tone, hashtags, or image size for each platform so your content feels native everywhere.

What is the best post scheduler plugin for WordPress?

The best social media scheduling plugin really depends on your workflow. If you want an all-in-one, beginner-friendly tool that lets you plan and schedule posts across multiple platforms without leaving WordPress, ClickSocial is the way to go.

But if you’d rather automate things so your new blog posts go straight to LinkedIn, Uncanny Automator is the perfect ‘set it and forget it’ solution.

Can you add a LinkedIn feed to a WordPress site?

Yes, you can, but LinkedIn’s options are more limited than those of other social platforms. LinkedIn’s official tools don’t easily allow for dynamic, multi-post feeds like you can create for Instagram or Facebook.

The most reliable method is to manually embed individual posts by copying the embed code for a specific post directly from LinkedIn and pasting it into your WordPress post or page.

Keep Learning: Social Media and WordPress Tips

I hope this guide has helped you schedule LinkedIn posts in WordPress. However, this is just one way to boost your social media presence.

If you want to take your social media strategy even further, here are some more guides to help you get started:

If you liked this article, then please subscribe to our YouTube Channel for WordPress video tutorials. You can also find us on Twitter and Facebook.

The post How I Save Time Scheduling LinkedIn Posts in WordPress first appeared on WPBeginner.

  •  

The Mind Behind NVIDIA’s AI Revolution

As AI continues to reshape industries, the technologies behind it are becoming just as fascinating as their applications. In this episode of Invisible Machines, Bryan Catanzaro, VP of Applied Deep Learning Research at NVIDIA, joins Robb Wilson and Josh Tyson to discuss his journey in AI and the innovations that turned NVIDIA from a graphics company into a $4T AI powerhouse.

What begins as a conversation about GPUs and machine learning quickly expands into a broader exploration of how organizational structure, visionary leadership, and collaboration can accelerate technological breakthroughs. Bryan also reflects on his 2019 Stanford keynote, where he called on librarians to help categorize data for emerging language models—a plea that highlights the human dimension of AI progress.

And then there’s the unexpected: Bryan draws a surprising link between human hair and technology, reminding listeners that innovation often starts in the most unassuming places.

The takeaway? True AI innovation combines cutting-edge research, human ingenuity, and a willingness to see the world differently. 

Listen to the episode now to hear Bryan Catanzaro share his insights and the stories behind the AI revolution.

The post The Mind Behind NVIDIA’s AI Revolution appeared first on UX Magazine.

  •  

Beyond Spreadsheets: Why AI Agent Runtimes Are the Next Operating Layer

For decades, business software has been built around human operators. Tools like spreadsheets, email, CRM systems, and call center software became the invisible scaffolding of modern organizations. If you can’t imagine a world without them, it’s not because they’re permanent—it’s because they’ve been the only way we’ve known how to work.

But as AI matures, the question isn’t how do we get better spreadsheets? It’s why do we need spreadsheets at all? The future of work will not be defined by incremental improvements to yesterday’s software—it will be defined by AI agent runtimes: the new execution environments where digital workers operate, coordinate, and evolve.


The End of Human-Centric Workflow

Traditional enterprise systems—ERP, CRM, ticketing tools, even email—were designed as human coordination layers. They help us capture data, pass tasks around, and monitor progress. In short: they exist because people had to be the ones doing the work.

With AI agents, that logic collapses. Agents don’t need a CRM to remember customer details, or a ticketing system to stay on task. They don’t need a call center dashboard to handle inbound requests—they are the call center.

Robb Wilson, co-author of Age of Invisible Machines and founder of OneReach.ai, frames it bluntly: “We won’t be trading in our spreadsheets for better spreadsheets. We’ll be getting rid of them”. Agentic AI doesn’t slot into existing workflows—it makes many of those workflows unnecessary.

As media theorist Marshall McLuhan once said, “We shape our tools, and thereafter our tools shape us.” (McLuhan, 1964). For decades, spreadsheets and CRMs shaped how organizations thought about problems. AI runtimes reverse this pattern: instead of shaping us, they dissolve the constraints of the old tools entirely.


What Is an AI Agent Runtime?

An AI agent runtime is an environment where autonomous, tool-using agents can live, collaborate, and execute complex tasks. Think of it as the operating system for digital workers.

Frameworks like LangChain or Microsoft’s Semantic Kernel provide building blocks to create agents.

Runtimes provide the space where those agents can actually run, interact with tools, and scale to enterprise use cases.

This distinction matters. A framework is like a programming language. A runtime is like the computer that runs the program. Without runtimes, enterprise agents remain prototypes, locked inside demos or limited workflows.


Why Spreadsheets Don’t Survive This Shift

Spreadsheets epitomize human-first tools. They exist to help people structure, calculate, and cross-reference data. But agents don’t need the interface layer—we built spreadsheets so humans could see and manipulate what machines already do well.

The same is true for ticketing systems, CRMs, and ERP tools. They’re coordination prosthetics—interfaces designed for human limitations. Once agents coordinate tasks with one another, those prosthetics fade away.

In this sense, agent runtimes are not “new software categories” layered on top of the stack. They are replacements for the stack itself.


From Model-Centric to Runtime-Centric

Over the past two years, attention in AI has been dominated by model releases: GPT-4, Claude, Gemini, LLaMA. Benchmarks like MMLU or HumanEval made headlines, but they were only part of the story. The real question now is: how do we make models useful at scale?

That’s where runtimes come in. Gartner predicts that “through 2027, over 40% of enterprise AI projects will be abandoned before deployment due to complexity and lack of orchestration” (Gartner, 2025). In other words: building an agent isn’t the hard part—operationalizing it is.

MIT researchers reached a similar conclusion, noting that 95% of AI agent prototypes fail to reach production because organizations lack the infrastructure to manage them (Forbes, 2025). Runtimes are the missing execution layer that turns fragile demos into sustainable systems.


Enterprise Implications: A New OS for Work

Consider customer service. Today, a company uses:

  • A CRM for storing records
  • A call center suite for handling tickets
  • Analytics dashboards for monitoring performance

In an agent runtime, those become redundant. Agents interact directly with customers, retrieve information from knowledge bases, and coordinate among themselves to escalate issues—all without handing tasks back to humans.

This is not about replacing humans entirely—it’s about reorganizing work around persistent digital collaborators. Enterprises will measure success not by how many systems they license, but by how effectively they orchestrate agents in runtime environments.

We can already see signals of this runtime-driven leverage in how businesses compete and consolidate. When a company acquires another, the biggest friction is usually operational: overlapping HR systems, duplicate compliance processes, redundant call centers. Historically, those costs were absorbed over years. With agent runtimes, they can be neutralized in months. Imagine onboarding thousands of employees or harmonizing disparate customer data without armies of analysts—agents do the stitching in real time.

On the competitive side, the advantage is just as stark. A company with runtime-enabled operations can strip away entire categories of overhead—ticketing, reconciliation, reporting—while rivals remain bound to legacy tools. That advantage compounds: the runtime operator can reinvest savings into growth, undercut competitors on pricing, or accelerate innovation. The message is clear: in markets where runtimes become the operating layer, the leverage will either be used to integrate faster or compete harder.


Competing Visions: Platforms vs. Toolkits

Different players are approaching this shift from different angles:

  • Microsoft is embedding agents across Office and Dynamics, signaling a transition but still tethered to legacy productivity metaphors.
  • LangChain and open-source frameworks provide flexibility but require heavy engineering lift to make them production-ready.
  • OneReach.ai has built its platform from the ground up as an agent runtime, focused on orchestration and integration across enterprise systems.

This tension—between building block frameworks and fully operational runtimes—mirrors earlier eras of software. Just as operating systems eventually standardized personal computing, runtimes will become the “OS” of organizational AI.


The Puzzle of Adoption

The irony is that while platforms like OneReach.ai very purposefully make agent runtimes possible—and a heck of a lot easier than they’d otherwise be—they also reveal just how incredibly hard adoption really is. Interestingly, technology itself is no longer the biggest barrier. The real puzzle is people: the mental models they cling to, the organizational habits they’ve built, and the fears that come with unfamiliar territory.

Imagine standing in 1993 and telling a board of directors, “the internet is the solution to your distribution, communication, and marketing challenges.” The idea would have sounded absurd. How could a patchwork of university networks replace warehouses, call centers, or print campaigns? The barrier wasn’t the technology itself—it was people’s inability to reimagine their work through a new medium. And even once you got them on board, there was still an immense amount of unfamiliar, uncharted work required to advance that vision. Not an easy task—even with the right tools in place and alignment at the top.

Enterprises aren’t just swapping out one tool for another. They’re learning to operate in a new world where software doesn’t just support their teams—it’s functionally members of their team. That requires reframing risk, rethinking governance, and building trust in systems that feel alien to many leaders. Technology may be ready, but the cultural readiness to embrace it lags far behind.


Thinking AI-First: From Tools to Teammates

The bigger challenge isn’t technical—it’s mental. Enterprises must learn to think AI-first, not tool-first. That means imagining workflows that don’t exist for human operators.

As Don Scheibenreif of Gartner said on the Invisible Machines podcast: “The enterprise that figures out how to treat AI as a team member, not just a tool, will have a lasting advantage.” (UX Magazine, Invisible Machines Podcast).

The companies still clinging to spreadsheets and CRMs will be outpaced by those designing entirely new work patterns around AI runtimes.

This shift is exactly what the AI First Principles initiative argues for: that organizations need to rebuild their assumptions around AI, rather than retrofitting old processes. Contributors to the initiative include a co-author of the Agile Manifesto, as well as leaders from Google, NASA, Meta, and Frog. Their collective point is clear—thinking AI-first is as much about new organizational DNA as it is about technology.


Preparing for the Post-Spreadsheet Era

How should leaders prepare?

  1. Audit dependency on human-first tools. Where are you relying on systems that exist only because humans needed coordination layers?
  2. Experiment with orchestration. Don’t just prototype agents—test how they interact in multi-agent environments.
  3. Rethink metrics. Success won’t be measured in “seats” or “licenses” but in organizational outcomes driven by agent collaboration.
  4. Upskill teams. Training shifts from “using tools” to “designing for orchestration.”

This is not another software upgrade cycle—it’s the dismantling of an entire layer of enterprise software.


Conclusion: A World Without Spreadsheets

Imagining work without spreadsheets or CRMs feels almost impossible—just as imagining a world without typewriters once did. But the logic is the same. When a new operating layer emerges, the tools built for the old layer disappear.

AI agent runtimes are that layer. They don’t just help us do old things faster—they make whole categories of old things irrelevant. If you can’t picture a world without today’s enterprise software, you’re not yet thinking AI-first. But you will need to.


Sources & References

The post Beyond Spreadsheets: Why AI Agent Runtimes Are the Next Operating Layer appeared first on UX Magazine.

  •  

Inside the AI Agent Factory: How Enterprises Are Standardizing Agent Behavior


In the early days of enterprise AI, experimentation was the rule. Teams launched pilot agents for marketing, HR, IT, and customer support—each built in isolation, with different tools, assumptions, and interfaces.

But as agentic AI matures and scales, the costs of that fragmentation are becoming clear.

Today, forward-looking organizations are taking a page from the UI world and building agent design systems: reusable standards that define how agents behave, interact, recover, and improve across domains.

This isn’t just a tooling shift—it’s a strategic evolution. And like all good design systems, it’s about consistency, scalability, and trust.


Why Agent Consistency Now Matters

When users encounter a human assistant, they don’t expect them to reboot their personality every Monday. The same should go for agents.

Yet many enterprises today suffer from fragmented agent deployments—one department’s AI behaves like a chatbot, another like a rule-based script, another like a rogue LLM improvising solutions.

The result? User confusion, brand inconsistency, and unreliable automation at scale.

“As agents take on more responsibility, they can no longer be one-off experiments. They need to operate within shared rules, shared memory, and shared accountability,” explains Robb Wilson, founder of OneReach.ai and author of The Age of Invisible Machines.


What Is an Agent Design System?

Much like UI design systems govern buttons, typography, and component behavior, an agent design system codifies how AI agents:

  • Interpret intent
  • Manage memory
  • Handle handoffs (to humans or other agents)
  • Communicate uncertainty
  • Deal with failure and recovery
  • Express tone, identity, and escalation pathways

It’s a meta-layer of design—part product, part process, part policy. And it’s essential for any company looking to scale AI responsibly.

At OneReach.ai, agent runtimes are built with orchestration and modularity in mind, enabling organizations to compose agents from consistent building blocks. That philosophy aligns closely with the AI-first approach Wilson advocates:

“In an AI-first world, intelligence becomes the interface. But intelligence needs guardrails. You can’t scale autonomy without orchestration.”


Core Components of an Agent Design System

So what goes into a mature agent design system? While each org will tailor it to their needs, leading teams focus on five pillars:

1. Behavioral Patterns

Just like UI patterns govern layout and flow, behavioral patterns define:

  • How agents initiate conversations
  • How they respond to ambiguity
  • When they ask for help
  • What tone they adopt in different contexts

2. Memory and Context Standards

Without a standard for memory:

  • One agent might “remember” preferences for 30 minutes
  • Another forgets immediately
  • A third stores data permanently without clear rationale

A good system defines:

  • Memory types (short-term, long-term, shared)
  • Retention rules
  • User override and visibility

3. Handoff Protocols

Agent → Human. Agent → Agent. Human → Agent.
Each of these transitions needs structure:

  • How is context transferred?
  • What affordances are shown to the user?
  • How do we manage delay, ambiguity, or error?

4. Failure and Recovery UX

Not all AI fails gracefully. But in enterprise systems, failure is inevitable—so recovery needs to be intentional.

  • Standard fallback behaviors
  • “I don’t know” UX
  • Human escalation rules
  • Retry and learning loops

5. Tone and Brand Alignment

Whether an agent books travel or triages a support ticket, users should feel it’s speaking the same “language” across use cases. This means:

  • Shared tone guides
  • Consistent voice design
  • Personality constraints

From Pilot Projects to Platforms

If this sounds like infrastructure work—that’s because it is. In fact, many organizations are beginning to treat agent behavior as a platform, not a feature.

OneReach’s orchestration platform exemplifies this shift. It offers enterprises the ability to deploy agents into persistent runtimes with unified memory, shared orchestration logic, and consistent interfaces. It’s not just about “training” an agent—it’s about standardizing its role inside an intelligent system.


Getting Started: How to Build Your Agent Design System

For AI/UX hybrid teams ready to scale responsibly, here’s how to get started:

  • Inventory your agents: Map every existing bot, agent, or assistant across the organization. Identify behavior drift and inconsistency.
  • Define your principles: Establish your “design philosophy” for agents. What’s your tone? What does success look like? What’s unacceptable? Here’s a great headstart: https://www.aifirstprinciples.org/
  • Document core behaviors: Create reusable blueprints for handoffs, confirmations, escalations, and memory handling.
  • Create governance pathways: Who approves agent behavior? Who audits logs? How is performance measured?
  • Integrate with runtime tools: Use platforms like Reach.ai to enforce orchestration, not just intention.

Final Thought

Agents are no longer just features—they’re coworkers. As they multiply across the enterprise, their consistency will define user trust, organizational alignment, and long-term success.

That’s what the agent design system delivers. Not just more AI—better AI, by design.

The post Inside the AI Agent Factory: How Enterprises Are Standardizing Agent Behavior appeared first on UX Magazine.

  •  

From Demos to Deployment: Orchestrating Agents Users Can Trust

“AI agents” and “RAG” dominate slides but not always production. To move from proof-of-concept to real value, organizations need a shared vocabulary and a practical stack: OAGI as the north star, agent platforms to govern and scale, agent runtimes to execute reliably, and agent orchestration patterns that make voice, tools, and humans collaborate without drama.

What is OAGI? (Organizational AGI)

OAGI reframes transformation from “smarter models” to institutional intelligence—systems that understand your policies, data, and workflows, and improve them over time. Rather than aiming at sci-fi generality, OAGI focuses on the generality your organization actually needs: agents that traverse org silos, invoke tools safely, escalate to humans, and learn from outcomes. UX Magazine’s Invisible Machines podcast tracks this shift in practice, highlighting how agentic systems become a company’s operating fabric—not a chatbot sidecar. (Invisible Machines podcast from UX Magazine)

Agent platforms vs. agent runtimes (and why the distinction matters)

If you only pick a framework, you still need a runtime and the operational plumbing. UX Magazine’s explainer makes this distinction explicit: frameworks help build agents; runtimes execute and manage them in real environments. Treating these as separate layers prevents many “it worked in the demo” failures. (UX Magazine Staff, “Understanding AI Agent Runtimes and Agent Frameworks,” UX Magazine, August 8, 2025)

“An AI agent is a system that uses an LLM to decide the control flow of an application.” —LangChain. (Harrison Chase, “What is an AI agent?,” LangChain Blog, June 28, 2024)

That crisp definition helps teams draw the boundary between conventional apps and agentic ones—where control flow is decided dynamically by the model and must therefore be instrumented and governed like any other critical system.

Agent orchestration and voice agents: designing beyond chat

Agent orchestration is how multiple agents coordinate with tools, data, and people: routing, guardrails, human-in-the-loop, and escalation. As real-time models mature, voice agents are moving from “nice to have” to frontline UX—requiring barge-in, interruptibility, and low-latency tool calls. Microsoft’s framing—“agents are the new apps for an AI-powered world”—signals a UI shift where speaking, pointing, and approving become the default interaction pattern. (Jared Spataro, “New Autonomous Agents Scale Your Team like Never Before,” The Official Microsoft Blog, October 21, 2024)

RAG that actually works in production

Most “the model hallucinated” postmortems are really retrieval problems. Solid RAG stacks pair hybrid search (dense + sparse) with reranking and thoughtful document chunking; they also measure retrieval quality (not just answer quality). In a 2025 survey of 250+ RAG papers, Doan et al. found hybrid retrieval with cross-encoder reranking consistently beat dense-only setups under tight latency budgets. (Oche, Folashade, Gholsal “A Systematic Review of Key Retrieval-Augmented Generation (RAG) Systems: Progress, Gaps, and Future Directions” 2025))

OneReach.ai vs. LangChain vs. Microsoft: when to use what

LangChain (+ LangGraph)Developer-first control.
Great for teams who want to own the internals: tool interfaces, planning strategies, memory, and graph-orchestrated state. You’ll get maximum flexibility, but also own reliability engineering, monitoring, and guardrails. Use it to build differentiated agents or your own platform layer. (Harrison Chase, “What is an AI agent?,” LangChain Blog, June 28, 2024)

Microsoft Copilot Studio (and the Copilot stack)Enterprise adjacency.
If you’re standardized on Microsoft 365, Graph, and Azure, Copilot Studio provides fast paths to identity, compliance, and data access—plus a maturing multi-agent story. Think high-leverage “agent as app” patterns within the Microsoft ecosystem. (Jared Spataro, “New Autonomous Agents Scale Your Team like Never Before,” The Official Microsoft Blog, October 21, 2024)

OneReach.aiOrchestration-first with OAGI in mind.
If your priority is orchestrating complex, cross-channel workflows (including voice) with strong governance and analytics, OneReach.ai is an agent orchestration platform built from years of R&D, thousands of deployments and the OAGI playbook popularized around Age of Invisible Machines. Notably, UX Magazine’s runtime explainer underscores the practical difference between frameworks and runtimes—a lens that’s useful when evaluating OneReach.ai’s emphasis on runtime-grade reliability versus framework-only approaches. (UX Magazine Staff, “Understanding AI Agent Runtimes and Agent Frameworks,” UX Magazine, August 8, 2025)

Put differently: if you want raw composition freedom, start with LangChain. If you want tight M365 integration and enterprise controls out of the box, use Copilot Studio. If you need omnichannel/voice, human-in-the-loop, and orchestration at scale under strong governance, evaluate OneReach.ai through the runtime/platform lens described above. 

Design principles that separate demos from durable systems

  1. Treat agents like products, not prompts. Give each agent a charter, owner, and SLA; monitor cost, latency, groundedness, and escalation rates.
  2. Invest in your runtime and reuse everywhere. Consolidate planning, memory, tool adapters, and fallback patterns so every new agent inherits reliability.
  3. Make voice first-class. Optimize turn-taking, barge-in, and recovery; voice is where trust is won or lost.
  4. Instrument retrieval. Define retrieval KPIs and iterate your retriever + reranker, not just prompts. The hybrid-plus-rerank baseline is a pragmatic default. (Oche, Folashade, Gholsal “A Systematic Review of Key Retrieval-Augmented Generation (RAG) Systems: Progress, Gaps, and Future Directions” 2025))
  5. Codify how you work. Use AI First Principles as a north star for decision-making, then apply an operational method like WISER to drive day-to-day delivery. (AI First Principles)

Why this matters now

The winners aren’t just building clever prompts—they’re standing up platforms and runtimes that make agents dependable, observable, and governable across the enterprise. As vendors converge on agents as the next app surface, UX leaders are uniquely positioned to translate OAGI into everyday workflows users love and trust.

References

  • UX Magazine — “Understanding AI Agent Runtimes and Agent Frameworks.” UX Magazine
  • UX Magazine — “A Primer on AI Agent Runtimes: Comparing Vendors to Help Your Company Choose the Right One.” UX Magazine
  • LangChain — “What is an AI agent?” (definition). LangChain Blog
  • LangGraph — “Agent architectures & agentic concepts.” LangChain AI
  • Microsoft — Copilot Studio blog (building AI agents, product updates). Microsoft
  • Doan et al. (2025) — “Retrieval-Augmented Generation: A Comprehensive Survey.” arXiv. arXiv
  • Liu et al. (2024) — “A Survey on RAG Meeting LLMs: Towards Retrieval-Augmented Large Language Models.” arXiv. arXiv
  • AI First Principles — Manifesto. AI First Principles
  • WISER Method — White paper. WISER
  • UX Magazine — Invisible Machines podcast hub. UX Magazine
  • Age of Invisible Machines — Official site for the book (revised edition information). invisiblemachines.ai
  • OneReach.ai — “Agentic AI: Fostering Autonomous Decision Making in the Enterprise.” OneReach

The post From Demos to Deployment: Orchestrating Agents Users Can Trust appeared first on UX Magazine.

  •  

What the AI Roll-Up Looks Like

When AI runtimes turn consolidation into super roll-ups

From Leverage to Intelligence

For decades, roll-ups have been a financial exercise. Private equity firms and strategic buyers bought clusters of companies, consolidated overlapping functions, and hoped the math of scale—cost-cutting plus a little top-line uplift—would generate returns.

That formula hasn’t gone away, but it’s being supercharged by something new: AI runtimes. Instead of just stitching companies together, acquirers are plugging each portfolio company into a shared AI operating system. These runtimes orchestrate agentic workflows across accounting, HR, customer support, marketing, and procurement—functions that typically drag down speed and margins.

The result isn’t just efficiency. It’s compounding intelligence. Every new company integrated into the runtime adds more data, more workflows, and more institutional learning that accelerates the next deal.

Robb Wilson, co-author of Age of Invisible Machines and CEO of OneReach.ai, coined the term “super roll-up.” He defines it simply: when each acquisition makes the playbook smarter and cheaper to apply. As Wilson puts it: “That’s when value creation stops being linear and starts compounding.”

Other investors have circled the idea. Euclid Ventures introduced the term “AI-First Roll-Up” (Euclid Ventures, 2024), describing a model built on large language models. It was an early step, but incomplete. LLMs improve analysis. Agent runtimes improve operations. They coordinate workflows across accounting, support, and marketing—multiplying the effect of each acquisition.

Influential investor Elad Gil has described the same playbook as a structural advantage in M&A. As he told TechCrunch in June 2025: “If you own the asset, you can transform it much more rapidly than if you’re just selling software as a vendor… you gain enormous leverage… enabling roll-ups others can’t execute.”

Together, these perspectives point to the same conclusion: a new playbook is emerging, and runtimes are the difference between incremental efficiency and compounding transformation.

The Thrasio Effect

Thras.io, one of the fastest-growing acquirers of Amazon-native consumer brands, offers a clear glimpse. For readers unfamiliar: Thrasio pioneered rolling up third-party Amazon sellers, acquiring hundreds of small but profitable businesses, and scaling them on a shared platform.

What set Thrasio apart wasn’t just financial engineering—it was automation. By running back-office functions on AI, they reduced costs and made acquisitions profitable almost overnight. Those fatter margins became fuel for more acquisitions.

Each new brand didn’t just add revenue—it contributed data that improved demand forecasting, pricing, and supply chain decisions for every other brand in the portfolio. The flywheel was real, and it was already spinning.

Some of this context comes from a forthcoming episode of the Invisible Machines Podcast (UX Magazine), which unpacks Thrasio as a case study in how runtimes reshape acquisition economics. Thrasio’s automation stack includes workflows built on the OneReach.ai platform, a system designed to orchestrate agentic runtimes across enterprise functions. OneReach.ai CEO and Co-Founder, Robb Wilson often describes this trajectory as progress toward a narrower form of artificial general intelligence at the organizational level—a concept he calls OAGI.

The Investor Angle

For investors, this shift is seismic. Venture and private equity firms are realizing that AI runtimes create structural advantages that go far beyond traditional cost synergies.

  • Super roll-ups: Portfolios where every new company makes the system smarter and more profitable.
  • Early adopters: Firms building reusable AI operating systems enjoy structurally lower costs and faster integrations.
  • Late adopters: Those who hesitate stack up AI debt—outdated processes and bloated costs that drag down valuations.

As one investor put it: “If you don’t figure this out, you’re not just behind—you’re someone else’s target.”

In other words, betting that most companies won’t figure out AI isn’t just pessimism—it’s a sound investment thesis.

The Simple Math

Take a $50M revenue company purchased at 8× EBITDA.

  • SG&A consolidation adds +$3M.
  • AI-driven automation adds +$2M.
  • Pricing and retention improvements add +$1.25M.

EBITDA rises from $10M to $16.25M. The paper value of the company increases by $50M—before debt repayment or multiple expansion. Repeat that across ten acquisitions, each feeding a smarter runtime, and the growth becomes exponential. This is the compounding logic of a super roll-up.

Why It Matters

The AI roll-up isn’t tomorrow’s trend—it’s already here. Operators are running this playbook. Investors are watching closely. And laggards are learning that the risk isn’t just thinner margins—it’s waking up to find themselves on the wrong side of the roll-up race.

This is the next frontier of organizational design: self-driving companies. Not fully autonomous, but autonomous enough to make acquisitions compound like never before.

Related Thinking

  • For a deeper look at why agentic runtimes matter, see Robb Wilson, “Understanding AI Agent Runtimes and Agent Frameworks,” UX Magazine (2024).
  • The Invisible Machines podcast has explored these shifts—see “AI and Commerce with Don Scheibenreif,” UX Magazine, 2024 and “Universal Commerce with Prakhar Mehrotra,” UX Magazine, 2025.
  • The non-profit initiative AI First Principles provides a structured lens for evaluating AI adoption.
  • OneReach.ai, identified by Gartner and Forrester as a leader in agent orchestration, continues to push enterprise-scale runtimes forward.

Sources & References

The post What the AI Roll-Up Looks Like appeared first on UX Magazine.

  •  

AI-Powered UX/UI Design: A Breakthrough in Modern App Design

AI-Powered UX/UI Design: A Breakthrough in Modern App Design

Discover how Google's Stitch and AI-powered UX/UI design tools are revolutionizing the design process. Learn 5 proven ways AI and ML enhance user experience, reduce bias, and create personalized interfaces. Explore trending AI design tools and techniques for 2025.

Continue reading AI-Powered UX/UI Design: A Breakthrough in Modern App Design on SitePoint.

  •  

How I Auto Delete WordPress Form Entries (& Stay GDPR-Compliant)

Have you checked your old WordPress form submissions lately? 🤔

Forms are one of the best ways to connect with visitors. You might use them for questions, orders, surveys, or even donations. But once those entries are answered or processed, what happens to them?

If you’re not managing your submissions, all that personal data just piles up in your database. That can create many problems.

For example, many privacy rules like the GDPR say you can only keep personal details for as long as they’re needed, so holding on to them indefinitely could put your site at risk. Auto-deleting also keeps your form inbox uncluttered so you only see what’s relevant.

The good news is that WPForms has a feature that automatically deletes old entries for you. I’ve used this on my own sites, and it’s saved me hours of cleanup while keeping things fast and compliant.

In this guide, I’ll show you exactly how to set it up.

Auto Delete Form Entries in WordPress (GDPR-Friendly)

Why Should You Auto Delete Form Entries in WordPress?

Auto-deleting old form entries in WordPress keeps your site fast and secure while reducing the risk of storing unnecessary personal data. It’s also an easy way to stay compliant with privacy laws.

Privacy regulations like the GDPR and CCPA require that you only keep personal data for as long as it’s needed. That means once a visitor’s question has been answered or an order is fulfilled, you shouldn’t hold on to those details indefinitely.

Here are the other main benefits of auto-deleting entries:

  • Lower security risks: Deleting old entries limits the personal information available with you.
  • Improve performance: Keep your WordPress database lean and your site fast.
  • Smaller backups: Save storage space and make backups quicker to run.
  • Clarity & organization: Auto-deleting keeps your records clean and manageable.

I’ve seen this firsthand on small business sites I’ve helped set up. For example, freelancers or coaches often get daily inquiries through a contact form. Once those messages are answered, there’s no reason to store them indefinitely.

WordPress contact form example

👉 In short: auto-deleting old form submissions protects user data, speeds up your site, and helps you focus only on the entries that matter.

In the next section, I’ll show you how to set up auto deletion step by step. You can use the quick links below to jump straight to different parts of the tutorial:

How to Auto Delete Form Entries in WordPress

The easiest way to delete form entries automatically is by using WPForms, the best drag-and-drop form builder plugin for WordPress.

To handle form entry cleanup, WPForms offers an Entry Automation addon, which lets you set up automated tasks like deleting or exporting entries for specific forms.

You can choose exactly when the task should run — daily, weekly, monthly, or on a custom schedule. You can even set rules to only delete entries with specific data or a certain status.

WPForms homepage

At WPBeginner, we use WPForms for everything from simple contact forms to advanced surveys, and we’ve tested the Entry Automation addon thoroughly. It works reliably behind the scenes and helps you keep your sites GDPR-compliant.

If you want to learn more about the plugin, check out our full WPForms review, where we evaluate all its features.

Now, let’s walk through how to set up form entry deletion, step by step.

✅ Step 1: Install and Activate WPForms

To get started, you’ll need to install and activate the WPForms plugin on your WordPress site.

If you haven’t done this before, don’t worry — it’s easy! We have a step-by-step guide on how to install a WordPress plugin that walks you through the process.

🚨 Note: WPForms has a free version. However, the Entry Automation addon is only available with the Elite plan.

This version also includes other powerful features for business owners, like advanced payment integrations, surveys and polls, and premium support. That makes it a great choice for growing businesses.

After you activate the plugin, go to the WPForms » Settings page from your WordPress dashboard to add your license key. Make sure you are in the ‘General’ tab.

Note: You can find your license key number in your WPForms account profile in the Downloads tab.

WPForms license key field

Once you enter your license number, click the ‘Verify Key’ button.

Now, all the premium features available in your plan, including access to addons like Entry Automation, will be unlocked.

Next, go to the WPForms » Addons page in your WordPress admin sidebar and look for the ‘Entry Automation’ addon.

Install and activate the Entry Automation addon

When you find it, simply click the ‘Install Addon’ button to activate it on your website.

✏️ Step 2: Choose or Create the Form You Want to Auto Delete Entries From

Now that WPForms is set up, the next step is to choose or create the form you want to auto delete entries from.

If you’re working with an existing form, just go to the WPForms » All Forms page in your WordPress dashboard.

Find the form you want to use and click the ‘Edit’ link under its name.

Click the Edit link to open the form in the WPForms visual builder

This will open the form in the visual builder.

If you don’t have a form yet, then you can create a new one by going to the WPForms » Add New page.

Start by giving your form a name, like ‘Contact Form’ or ‘Support Request.’ I recommend choosing a title that clearly defines the purpose of the form.

Choose a form template in WPForms

Then choose a template that fits your needs. WPForms offers many beginner-friendly templates, like a simple contact form, a quote request form, a feedback form, and more.

If you’re not sure which template to use or want help getting started, then you can click ‘Generate with AI’ to try the AI Form Builder.

WPForms AI Builder

In the field that says ‘What would you like to create?’ just describe the type of form you want.

For example, you could write “a basic contact form with name, email, and message,” and it will generate the layout for you.

Once you have opened your new or pre-existing form in the drag-and-drop builder, you can add fields like name, email, phone, message, dropdowns, checkboxes, and more.

Form in form builder

You can easily move them around to customize the layout however you want — no coding needed.

If it’s your first time creating a form, you might find these tutorials helpful:

Once you’re happy with your form, you’re ready for the next step.

💡 Step 3: Back Up Your Data by Exporting Entries First (Optional but Recommended)

Before setting up the automatic deletion, I strongly recommend that you back up your form data first.

While auto-deleting entries helps keep your website clean and compliant, the insights you get from that data can be very valuable for your business.

This is where you can create a smart workflow: first, automatically save the data you need for business analysis in a secure, off-site location.

Then, have the old personal data removed from your WordPress site. This is the best way to balance data analysis with GDPR compliance.

For example, I know business owners who send new lead forms straight to their CRM so they can track sales without worrying about old entries piling up.

Nonprofits I’ve worked with have downloaded donor surveys into a CSV file at the end of a campaign so they can review the results, then clear the original entries to protect privacy.

Choose the Export Entries option in WPForms

The good news is that the same Entry Automation addon makes exporting or downloading entries just as easy as deleting them.

For a step-by-step walkthrough, see our tutorial on how to auto-export form entries in WordPress.

🔁 Step 4: Create a Deletion Task for the Form

Once you’ve set up your exporting workflow, you’re ready to set up the deletion automation.

To do this, go to the Settings » Entry Automation tab in the left-hand menu of the WPForms builder. Here, you can create tasks that automatically export or delete form entries based on your schedule and rules.

Once you’re in the ‘Entry Automation’ tab, simply click the ‘Add New Task’ button.

Click the Add New Task button in WPForms

A pop-up will appear asking you to name your task. I recommend choosing something simple and clear, like ‘Auto Delete Contact Entries‘ or ‘Cleanup Task for Survey.’

Naming your tasks helps you quickly recognize them later if you ever want to make edits or check your automation settings.

This task will work like a mini workflow that runs behind the scenes.

☝ Keep in mind that if you want to auto-delete entries for other forms, you’ll need to repeat this process for each one.

However, you can create multiple automation tasks for the same form — for example, one to export entries to Google Drive, and another (like this one) to automatically delete old data.

After you add a title, just click the ‘OK’ button.

Add a name for the auto form entry deletion task

On the next screen, choose ‘Delete Entries’ as the task type.

Doing this will open some new settings on your screen.

Choose Delete Entries as task type in WPForms
🧹 Step 5: Set Up Filters to Control What Gets Deleted

After choosing to delete entries, you’ll see the Filters section. This part gives you precise control, so you only remove what you don’t need.

First, you can filter entries based on what users type into your form fields. This is perfect for automatically cleaning out low-priority submissions.

For instance, a popular blog might receive dozens of guest post submissions and reader questions, and many of these are off-topic pitches or spam.

In this case, setting up a filter to delete entries where the ‘Inquiry Type’ field is marked as ‘Guest Post Pitch’ or ‘Spam’ helps keep the inbox focused on genuine reader questions and high-quality submissions.

Add filters to delete specific form entries

Next, you can filter entries by their status. This is really useful for getting rid of junk submissions and incomplete entries.

The available statuses are:

  • Published – Fully submitted entries.
  • Partial – Entries where someone started the form but didn’t finish.
  • Abandoned – Incomplete entries that timed out.
  • Spam – Entries flagged as spam by tools like CAPTCHA.
  • Trash – Entries you have already moved to the trash.

I always recommend selecting ‘Partial’ and ‘Spam’ here. It’s an easy way to automatically clear out clutter from your database.

Delete form entries based on status in WPForms

You can even combine these filters for more powerful automation.

For instance, you could set up a rule to delete only ‘Published’ entries that are related to a past event or a closed job application.

🗓️ Step 6: Schedule Automatic Deletion of WordPress Form Entries

Once your deletion settings and filters are all set up, the final step is to schedule when WPForms should run the automatic cleanup.

To do this, scroll down to the ‘Schedule’ section.

Here, you can easily decide how often you want the deletion task to run — daily, weekly, or monthly — depending on how often you want to clear out old or unwanted entries.

Next, choose the specific day(s) for the task to run. For example, you might want to delete entries every Friday, or on the 1st of each month.

You can even add a start date and an optional end date if this is a short-term cleanup.

Schedule Form entries deletion in WPForms

By default, the task will run at midnight (based on your website server’s time), but you can customize the time to fit your workflow, like after office hours or before your team starts their day.

Once you save the schedule, WPForms handles everything in the background — automatically deleting entries based on your settings without any manual effort.

🚨 Important: Just as a final reminder, this deletion is permanent. Once an entry is gone, it cannot be recovered from WordPress, which is why I recommend exporting it first if the data is important.

Finally, click the ‘Save’ button at the top to store your settings.

If you’re editing an existing form, then the deletion schedule will start running automatically — no extra steps needed.

However, if you’ve just created a new form with this auto delete feature, make sure to embed it on a page or post so it can start collecting entries.

Adding WPForms block

📌 Need help with that? Check out our step-by-step guide on how to embed a form in WordPress.

🔐 Bonus: Go Beyond Auto Deletion — Make Your Forms GDPR Compliant

Once you’ve set up automatic form entry deletion to reduce data and stay GDPR-friendly, you can take things further by enabling additional privacy features in WPForms.

It’s one of the best GDPR-friendly plugins available and offers several built-in tools to help you limit personal data collection, request user consent, and support compliance across your site.

Here’s how you can improve compliance with just a few clicks:

  • Add a GDPR Agreement Field: Use this to get clear consent from users before collecting their data. It’s required and unselected by default to meet GDPR standards.
  • 🔒 Turn Off User Tracking: Disable the collection of IP addresses, user agent info, and cookies to reduce data collection from the start.
  • 🧾 Allow Data Access and Deletion Requests: Build forms that let users request to view or delete their personal info, as required by law.
  • ⚙️ Adjust Settings Per Form: Choose which forms collect sensitive data and apply stricter rules only where needed.

These features work together to make your entire data collection process more transparent, secure, and compliant.

For a complete walkthrough, check out our tutorial on how to create GDPR-compliant forms in WordPress.

Frequently Asked Questions About Deleting Form Entries in WordPress

Now, let’s answer some of the most common questions our readers have about automatically deleting form entries in WordPress.

How does auto deleting entries help with GDPR?

GDPR requires you to store personal data only as long as necessary. By auto deleting entries after a certain period, you minimize data retention risks and stay compliant. It also shows users that you care about their privacy.

What is the best schedule for deleting form entries?

That depends on your site’s needs. For busy sites, daily or weekly deletion keeps things clean. For lower-traffic sites, monthly might be enough.

WPForms gives you the flexibility to choose a schedule that works for you. Plus, you can change it anytime you like. Just set it, and WPForms will handle it automatically in the background.

Can I delete form entries from all forms at once?

The auto-delete feature in WPForms is designed to work on a per-form basis. This means you will need to enable it individually for each form where you want to use it, and you can set up different rules. For example, you might want to delete contact form entries quickly but keep survey responses for a longer period.

What happens when an entry is auto deleted?

When WPForms auto-deletes an entry, it’s permanently removed from your WordPress database. It won’t be sent to the Trash or stored in a backup inside WPForms. That’s why it’s a good idea to export important entries before the deletion runs, just in case you need them later.

Can I stop WPForms from storing entries at all?

Yes, you can! WPForms has a feature that lets you disable entry storage completely. This is useful if you just want to receive form submissions by email and don’t want to keep them in the database. It’s a great option for GDPR compliance and data minimization.

📚 More Tips to Stay GDPR-Compliant in WordPress

Want to go beyond auto deleting entries? We’ve put together some helpful guides to make your WordPress site even more privacy-friendly.

Whether you’re new to GDPR or just want to tighten things up, these resources will walk you through each step:

If you liked this article, then please subscribe to our YouTube Channel for WordPress video tutorials. You can also find us on Twitter and Facebook.

The post How I Auto Delete WordPress Form Entries (& Stay GDPR-Compliant) first appeared on WPBeginner.

  •  

I Tested 7 AI Tools for Content Marketing: Here’s What I Found

I have been using AI tools since ChatGPT first launched. And like many content marketers, I wanted to improve my skills for the AI era. This means I frequently test a wide range of AI tools as part of my actual content marketing workflow.

This regular testing has helped me move past the noise and identify which tools genuinely save time and improve content quality for other bloggers and marketers.

My goal was to find what helps drive traffic and engagement, not just add another subscription to the list.

In this guide, I’ll share that clarity with you. Here are my recommendations for the best AI tools for content marketers, based on my daily use and the results I got from them.

I tested AI tools for content marketing

Quick Comparison – My AI Toolkit for Content Marketing

If you are in a hurry, here is a quick list of all the AI tools I use in my daily workflow as a content marketer:

ToolBest ForKey FeatureStarting Price
ChatGPTContent WritingVersatile conversational AIFree – Paid plans start at $20 / mo
GeminiResearch & Technical WritingReal-time web access & sourcingFree – Paid plans start at $19.99
All in One SEOSocial & Email CopyIntegration inside WordPressFree – Paid plans start at $49.60 / yr
SeedProdLanding Page CopyAI writer inside page builderFree- Paid plans start at $39.50 / yr
CanvaImage EditingMagic eraser & background removerFree – Paid plans start at $4.58 / mo
RunwayText-to-VideoHigh-definition, cinematic outputFree – $15 / mo
ElevenLabsText-to-AudioNatural, human-like voiceFree – $5 / mo

TL:DR Summary: Draft content with ChatGPT, verify with Gemini, optimize with AIOSEO, build in SeedProd, design in Canva, create a video with Runway, and add voiceovers with ElevenLabs.

Next, I’ll show how I tested each tool and why you can trust my picks.

How I Tested & Reviewed These AI Content Tools

The AI industry is exploding with innovation, making it harder to separate hype from reality, and choosing the wrong tool can waste time and money.

I aim to cut through the noise with real-world usage to save time and money.

Here’s a breakdown of my testing process:

  • I used them for real-world tasks. I used these tools for actual content marketing at WPBeginner: brainstorming articles with ChatGPT, creating social media posts with AIOSEO, and designing graphics with Canva’s AI. This process shows how they perform in a real business, not just a demo.
  • I analyzed what truly matters. Each tool was judged on the quality of its output, ease of use for non-experts, practical time-saving features, and overall value for money.
  • I tested with a variety of prompts. I didn’t just accept the first result. Instead, I experimented with different tones, styles, and complex commands to check the flexibility and control of the AI’s output.
  • I categorized them for specific needs. A blogger’s needs are different from a landing page designer’s. That’s why I’ve categorized each tool by its best use case, helping you find the right solution for your specific task.

Why You Can Trust WPBeginner

As a content creator at WPBeginner, I use marketing tools daily to create and promote content for our millions of readers.

Our team also uses plugins like All in One SEO and SeedProd across our business, so we have direct, first-hand experience with how their AI features perform.

Furthermore, everyone at WPBeginner follows a strict editorial process to ensure our reviews are always thorough, fair, and trustworthy. My recommendations come from hands-on experience and a commitment to helping you find the right tools to succeed.

1. ChatGPT

Best For: Content writing, brainstorming, illustrations, and organizing marketing workflows.

ChatGPT is one of the most versatile AI tools I’ve used. It works well for quick idea generation, long-form articles, and even creative media like images.

As one of the most advanced AI companies, OpenAI (the company behind ChatGPT) is spending huge resources on research and innovation. This means more capable and faster models are released quite frequently.

ChatGPT allows you to switch between search, chat, deep research, and agent modes so you can perform different types of tasks from the same window.

ChatGPT user interface

How I use ChatGPT:

ChatGPT is my primary AI for a variety of tasks. I use it daily for updating existing articles, brainstorming blog post ideas, writing new articles, and more.

I learned that using Projects and ChatGPT’s memory feature allows the AI to learn my preferred tone, structure, and formatting rules. This saves me a lot of time in the long run.

ChatGPT switch between tools

I also use it to create illustrations for articles and general blog images. It sometimes misspells words in images, but I can easily correct those using Photoshop or Canva.

Key Features & Where It Excels:

  • Handles multiple content formats: blog posts, scripts, captions, and social copy.
  • Excellent image generation model included.
  • Powerful memory system to personalize results to your brand voice.
  • Integrates with ChatGPT plugins for WordPress and automation tools like Uncanny Automator and Zapier to create powerful workflows. However, you’ll need an API key for integrations, which has a separate pay-as-you-go pricing not included in the monthly ChatGPT subscription.
Pros of ChatGPT 👍Cons of ChatGPT 👎
Extremely versatile across writing and creative tasksRequires human fact-checking
Remembers preferences with the memory featureOutput quality depends heavily on prompts
Integrates with top automation and marketing toolsThe free plan has limited access to the latest models

Practical Tips for Marketers:

  • Use the project feature to group related tasks and save time switching between contexts.
  • For recurring formats (like newsletters), train the memory feature with examples so that ChatGPT automatically matches your style.
  • Learn to improve your prompts for better outputs. You can see my collection of AI prompts for marketers for practical examples.
Pricing

A free plan is available with limited model access. Paid plan starts at $20/month, GPT-5, memory features, faster responses, and priority access during peak times.

2. Gemini

Best For: In-depth research, fact-checking, and writing technical or data-driven content.

While ChatGPT is my go-to for creative tasks, Gemini is my trusted research assistant.

Its biggest advantage is its direct, real-time integration with the Google search index, which means the information it provides is current and often comes with source links.

Gemini is better at research with sources cited from the web

This makes it incredibly reliable for tasks where accuracy is critical. I’ve found its ability to understand and explain complex, technical subjects is second to none.

It’s also excellent at generating structured data like tables and comparing information from multiple sources.

Plus, Google is continually updating Gemini with its latest AI models and connecting it with its ecosystem of Google Workspace apps like Google Docs, Sheets, and Gmail. These integrations make it a powerful productivity hub.

How I use Gemini:

I turn to Gemini whenever I need to write content that requires up-to-date information or fact-checking.

For instance, when writing a review of a new software release, I’ll ask Gemini to summarize the latest features, find recent user reviews, and compare its pricing to competitors.

Gemini is faster at research and brainstorming

I also use it to simplify technical topics.

When working on an article about website security, I can ask Gemini to explain “what is a DDoS attack” in a simple analogy that a non-technical reader can understand. Its ability to provide sourced information saves me a significant amount of research time.

Related Article: See my pick of the best ChatGPT alternatives.

Key Features & Where It Excels:

  • Connects directly to Google Search for real-time, sourced answers.
  • Excellent at summarizing articles, research papers, and web pages via a link.
  • Generates multiple “drafts” of a response so you can choose the best one.
  • Integrates directly with Google Workspace apps (Docs, Sheets, Gmail) for a seamless workflow (with Gemini for Workspace).
Pros of Gemini 👍Cons of Gemini 👎
Provides current, sourced informationCan be less “creative” in tone than ChatGPT
Excellent for research and fact-checkingImage generation capabilities are less advanced
Great at simplifying complex topicsFewer third-party integrations compared to OpenAI

Practical Tips for Marketers:

  • Use the “Double-check response” feature (the Google icon) to have Gemini highlight statements it’s confident about and find sources for ones it’s less sure of.
  • When researching, ask it to “act as a research assistant” and request information in a specific format, like a table comparing three products on features and price.
  • For complex topics, ask it to “explain this to me like I’m a beginner” to get clear, easy-to-understand copy.
Pricing

The standard Gemini model is free to use. To access the most powerful models (like Gemini 2.5 Pro) and larger context windows, you can subscribe to Google AI Pro, which starts at $19.99/month as part of the Google One AI Pro plan.

3. All in One SEO – AI Content Generator

Best For: Creating SEO-optimized titles, meta descriptions, FAQs, key points, and social media posts directly inside WordPress.

All in One SEO’s AI Content Generator is built right into your WordPress dashboard, making it incredibly easy to create ranking-ready content without switching between tools.

Generating social content using AIOSEO's AI content generator

You can instantly generate:

Because it’s part of the AIOSEO plugin, all the AI-generated content can be inserted into your post or page with a single click. This helps you save time and ensure everything is properly optimized for search engines and engagement.

How I use AIOSEO AI Content Generator:

I use AIOSEO’s AI content generator when I need to speed up the optimization process for new and updated articles.

For example, after writing a post, I’ll use the AI Content Generator to create a compelling meta description, add FAQ blocks for featured snippets, and generate a TL;DR section to improve readability.

AIOSEO meta description

It’s also my go-to for creating platform-specific social media captions. I can generate tailored copy for Facebook, LinkedIn, Instagram, and X (Twitter) in seconds, which saves me from rewriting the same message multiple times.

Plus, I love its Marketing Email feature, which allows you to instantly generate an email based on the content of your article.

Note: All in One SEO is the most comprehensive WordPress SEO tool. We use it on all our websites, including WPBeginner.

To learn more, see our full AIOSEO review.

Key Features & Where It Excels:

  • Works inside WordPress and uses your article content for context, which significantly improves the quality of output.
  • Generate SEO titles and meta descriptions that improve click-through rate (CTR).
  • Create FAQ blocks with built-in schema markup for better rankings and AI Overviews.
  • Produce “Key Points” summaries to boost readability and capture featured snippets.
  • Instantly write platform-specific social media posts for multiple networks.
  • Generate and publish an llms.txt file to get discovered and cited by AI chatbots like ChatGPT and Gemini.
Pros of AIOSEO 👍Cons of AIOSEO 👎
All-in-one content optimization directly in WordPressCredits are limited based on the plan
Includes advanced features like FAQ schema and llms.txtRequires the AIOSEO plugin
Saves time by creating multi-platform content instantly

Practical Tips for Marketers:

  • Use FAQ and Key Points in every post to target featured snippets and AI Overviews.
  • Leverage the social media post generator to maintain consistent branding across platforms.
  • Enable the llms.txt file feature to help AI chatbots find and cite your best content.
Pricing

Available for both Lite and Pro users. Lite users get 100 free credits, with additional credits available for purchase. Pro users get generous credits included with their license. All users can buy extra credits at any time.

4. SeedProd AI Writing & Image Generator

Best For: Creating landing page copy, headlines, and unique images directly inside the WordPress page builder.

SeedProd is one of the most popular WordPress website and landing page builders. Alongside its drag-and-drop builder, it comes with built-in AI tools for text and image creation.

It integrates with ChatGPT for copywriting and DALL·E for generating images, so you can create a complete, custom landing page without ever leaving the editor.

How to generate website text using AI

The AI assistant is available inside many SeedProd blocks, letting you generate text or rework existing copy with just a click.

You can also instantly translate your page content into 50+ languages and fine-tune tone and style with over 30 options, from professional to playful.

Plus, you can even use SeedProd to create an entire website from scratch. For details, see our guide on how to create a WordPress website with AI.

How I use SeedProd’s AI features:

I use SeedProd’s AI writing assistant when I’m building landing pages or product pages and need polished copy fast.

Instead of starting from scratch, I can select a block, click “Generate AI Text,” and have a strong starting draft instantly.

Creating an online resume using artificial intelligence (AI)

For visual content, I use the AI image generator to create custom illustrations or hero images that match the page’s theme. If I don’t like the first result, then I can create multiple variations until I find the perfect fit.

Key Features & Where It Excels:

  • AI-powered text generation and editing directly inside the SeedProd builder.
  • 30+ tone of voice options to match your brand style.
  • One-click text transformations: simplify, shorten, lengthen, or translate into 50+ languages.
  • DALL·E-powered AI image creation with variation support for consistent design themes.
  • 300+ templates, full WordPress theme builder, and easy WooCommerce integration.
Pros of SeedProd 👍Cons of SeedProd 👎
Integrated AI copywriting and image generation in one builderAI Assistant is only available on premium plans
30+ tone options and translation into 50+ languagesImage results may require multiple attempts for best output
Seamless drag-and-drop website building with 300+ templatesAI credits are tied to your SeedProd plan

Practical Tips for Marketers:

  • Use tone options to match the style of each landing page — formal for B2B, casual for lifestyle brands.
  • Leverage AI translations to localize pages for international audiences without hiring translators.
  • Create multiple image variations to maintain a consistent visual style across your campaign.
Pricing

SeedProd offers a free plan for its page builder. AI writing and image generation are available on premium plans as a paid add-on. Pricing starts at $39.50/year for the base builder, with AI features included in higher tiers.

5. Canva Magic Studio

Best For: Image editing, quick social media graphics, and AI-powered visual content creation.

Canva is already one of the easiest tools for creating designs, but its Magic Studio AI features take it to another level with AI-powered image editing and media generation.

Using Canva AI to generate and edit images

It’s perfect for marketers who need professional visuals without advanced design skills.

From background removal to text-to-image, text-to-video generation, Canva’s AI tools save time while expanding creative possibilities.

Canva’s Magic Studio is powered by a mix of its own AI technology and models from leading partners like Google. This allows it to offer powerful image and video generation tools right inside the Canva editor as an all-in-one design solution.

How I use Canva Magic Studio:

I use Canva for creating and editing blog images, social media graphics, and quick promotional materials.

Generating social media images using AI in Canva

The Magic Eraser is a huge time-saver when I need to remove unwanted elements from a photo, and the Expand tool is perfect for adjusting aspect ratios.

I often tweak AI-generated visuals with Canva’s design tools for a polished final product. In particular, I use it to edit images generated with ChatGPT or Gemini because those platforms don’t have the same image editing capabilities as Canva.

Editing your AI generated images using Canva editor

Key Features & Where It Excels:

  • Magic Eraser for removing unwanted objects in seconds.
  • Easily expand to resize and reframe images without cropping important content.
  • Text-to-image AI generation for new AI artwork.
  • AI resize tool for instantly adapting designs to multiple social media formats.
  • Background remover and object eraser for clean, professional images.
  • Hundreds of templates and drag-and-drop editing for non-designers.
Pros of Canva 👍Cons of Canva 👎
Fast, beginner-friendly interface with professional resultsAI image generation can struggle with accurate text rendering
Magic tools make editing and resizing effortlessMost AI features are limited in free plans
Huge library of templates and design assets
Low-cost monthly subscription

Practical Tips for Marketers:

  • Use Magic Resize to instantly create platform-specific versions of your designs for Instagram, Facebook, LinkedIn, and more.
  • Pair text-to-image generation with your brand colors and fonts for on-brand custom visuals.
  • Combine Magic Eraser and background remover to repurpose stock images for unique content.
Pricing

Free plan available with limited AI features. The Pro plan starts at $4.58 /month and includes Magic Studio AI tools, brand kits, premium templates, and unlimited background removal.

6. Runway

Best For: AI-powered video creation, editing, and special effects.

Runway is one of the most innovative AI tools for marketers who need professional-quality video without a production crew.

It offers text-to-video generation, background replacement, and advanced editing features, all inside a simple browser interface.

Runway video generation

I am not a video editor, but as part of a marketing team, I sometimes need quick videos.

Runway is a great option for creating product promos, social media clips, and creative visuals that stand out in your campaigns. You can even start from an image or video clip and transform it entirely with AI.

How I use Runway:

I’ve used Runway to try out quick video clips and fun personal projects.

I thoroughly tested Runway Aleph against Google’s Veo-3 (limited preview available in Gemini). Runway performed quite well and, in some areas, exceeded Veo.

Runway offers easy to use video editing tools built-in

I also liked Runway’s ease-of-use, storyboard, and remix features. As someone with limited video editing experience, I found Runway to be much easier to use than Veo.

Key Features & Where It Excels:

  • Text-to-video generation from prompts or images.
  • Green screen and background removal without a studio setup.
  • Wide range of visual styles and camera movement controls.
  • Fast rendering compared to traditional video software.
Pros 👍Cons 👎
Generates high-quality videos in minutesNegative prompts are not supported
Easy to use, even for beginnersBest results often require multiple tries
No expensive video equipment needed

Practical Tips for Marketers:

  • Use reference images to guide the AI’s style and accuracy.
  • Pair Runway videos with Canva or AIOSEO for complete campaign materials.
  • Batch create multiple clips in one session to save time.
Pricing

Free plan available with limited exports and watermarks. Paid plans start at $12/month, offering higher-quality output, faster rendering, and commercial usage rights.

7. ElevenLabs

Best For: Creating natural, human-like voiceovers for videos, podcasts, and marketing content.

I discovered ElevenLabs when our WPBeginner YouTube team was trying it out for their videos and shorts. It is one of the most advanced AI voice generation platforms I’ve tested.

Its voices sound remarkably realistic, with natural pacing, emotional nuance, and subtle inflections that make them almost indistinguishable from real human narrators.

ElevenLabs text to speech

With support for over 70 languages (in the upcoming Eleven V3 model) and a library of 120+ pre-built voices, it’s a flexible tool for any marketer looking to add professional-quality audio to their content.

You can also fine-tune voices with precision controls to match your brand tone or creative style.

How I use ElevenLabs:

I first used ElevenLabs for a quick AI video experiment. It was a fun non-work project, but I was hooked.

I am not a podcaster or video editor, and don’t have any professional audio equipment. ElevenLabs came as a blessing to easily add quick narrations to short videos.

ElevenLabs voice-over studio

For example, I can paste a pre-written script for a video, choose a voice that fits the tone, then adjust stability and style sliders for a polished delivery. I then use Audacity to edit audio for my videos to add pauses and music.

I’ve also used its multi-language support to quickly generate audio for a personal project. The new Eleven V3 model surprised me. It was able to distinguish Urdu from Hindi (two almost identical South Asian languages), and the pronunciation was surprisingly good.

Key Features & Where It Excels:

  • Ultra-realistic voice generation with natural pacing and emotion.
  • Large voice library (120+ voices) plus the ability to fine-tune delivery.
  • The Eleven V3 model supports 70+ languages, making it great for multi-lingual audiences.
  • Fast rendering, even for longer scripts.
  • Ability to clone voices (paid feature) for brand consistency.
Pros 👍Cons 👎
Highly realistic and expressive voicesThe free plan has strict character limits
Fast generation timeDoes not edit or mix audio, so a separate tool is required
Supports multiple languages for localization

Practical Tips for Marketers:

  • Match your voice choice to your target audience — formal tones for B2B, friendly tones for casual content.
  • Use precision controls to tweak pacing and emotion for maximum authenticity.
  • For social media videos, keep scripts short to stay within free-tier character limits.
  • Combine with editing tools like Descript or Audacity to add music, sound effects, or clean up audio.
Pricing

Free plan includes 10,000 characters/month. Paid plans start at $5/month with higher character limits, faster generation, and access to voice cloning. For daily content creation, the $22/month plan is the most practical choice.

How to Choose the Best AI Tool for Your Marketing Needs

AI moves fast. New features arrive every month, and “best” depends on your workflow, budget, and goals.

Use these quick checks to pick tools that fit how you work today while staying flexible for tomorrow.

Smart Selection Tips
  • Start with a free plan or trial. Test on one real task before you commit.
  • Audit what you already have. Many tools you use (SEO, design, CMS) now include AI features. For instance, I use WPCode in WordPress, which has a built-in AI code snippet generator.
  • Match the tool to the task. That means you should pick writing tools for long-form, image models for visuals, and voice tools for narration.
  • Check ease of use. A clear UI saves more time than a complex feature set. For instance, I prefer to use Runway, which is easier than the more powerful Veo available in Gemini.
  • Look for solid integrations. Useful integrations include WordPress, email marketing platforms, and automated workflows with tools like Uncanny Automator or Zapier.
  • Evaluate pricing at scale. Credits can add up if you publish often. If you are using APIs for integrations, make sure to calculate the costs and set a cut-off budget.
  • Review data and privacy settings. Know how prompts and outputs are stored and used. You don’t want your trade secrets to be used by AI models for training.
  • Confirm export options. Make sure you can move drafts, images, and audio into your stack.

Honorable Mentions: Other AI Tools I Use

I have shared the tools that I use daily and are part of my workflows as a content marketer. Here are some more tools that I use quite frequently.

ToolSuitable for
SEOBoostKeyword clustering, content briefs, and search intent planning for data-backed outlines.
ManusA multi-purpose AI agent suitable for deep research.
MidJourneyHigh-quality AI imagery for social posts, blog headers, and campaign visuals.
Copy.aiFast social captions, ad angles, and email subject lines with ready-made templates.
JasperTeam workflows, brand voice training, and multi-channel content production.

Frequently Asked Questions About AI Tools for Content Marketing

The following are some of the most common questions that I hear from WPBeginner users on Reddit and LinkedIn.

Which AI tool is best for beginners?

If you’re starting out, I recommend ChatGPT. It’s versatile, easy to learn, and has a free plan so you can practice without spending money.

Do I need to pay for AI tools to get good results?

Not always. Many AI tools, like ChatGPT and Canva, have free tiers that work well for smaller projects. Paid plans usually offer faster responses, higher quality outputs, and more advanced features.

Can AI tools replace human writers and designers?

AI tools are great for speeding up tasks and sparking ideas, but they can’t fully replace human creativity and judgment. I still review and edit everything to make sure it fits my style and is factually correct.

How do I know if an AI tool is right for me?

Check if the tool solves a problem you face often, offers a free trial, and integrates with your existing workflow. If it saves you time or improves quality without adding complexity, then it’s worth keeping.

Will AI tools keep getting better?

Yes. The AI industry is evolving fast. Expect new features, better accuracy, and more integrations over the next few years. That’s why I suggest testing tools regularly to see if better options appear.

Conclusion

These AI tools help me plan, write, design, and publish faster while keeping quality high. You can start with the free plans, test on one real task, and keep the tools that save you time without adding extra steps.

Just make sure to keep human editing and fact-checking in the loop so your content stays accurate and on brand.

You may also like to see these articles related to AI:

If you liked this article, then please subscribe to our YouTube Channel for WordPress video tutorials. You can also find us on Twitter and Facebook.

The post I Tested 7 AI Tools for Content Marketing: Here’s What I Found first appeared on WPBeginner.

  •  

How to Add WordPress Search to Blog Archives Page (The Easy Way)

I’ve been running WordPress blogs for years, and one thing that used to frustrate me was seeing my visitors get stuck on archive pages. They’d land on a category or date archive, scroll for a bit, and then leave without finding what they needed.

I realized the real issue wasn’t the archives themselves, but how visitors were using them. People wanted a faster way to narrow down my blog posts instead of scrolling through everything.

That’s when I started testing different solutions and discovered that using a plugin like SearchWP made a huge difference. It powers a smarter search experience and lets you place a search bar right where your readers will use it.

In this guide, I’ll show you how to set it up step by step so your readers can find the right content faster and stay engaged with your blog longer. ⚡

How to Add WordPress Search to Blog Archives Page

Why Do You Need a Search Function on Your Blog Archives Page?

A search bar on your blog archives page makes it much easier for visitors to find exactly what they’re looking for. Instead of endlessly scrolling through older content, they can simply type a keyword and instantly see relevant results.

In WordPress, archive pages are automatically generated pages that group your content by type, such as:

Adding a search bar on any of these archive pages can keep visitors engaged and make older content easier to discover.

Previewing the archive search

A search bar can also nudge visitors to explore more pages on your blog, whether it’s a recent post or something from years ago.

On the flip side, without a search option, archive pages can feel cluttered or overwhelming. And your best content may get buried and overlooked.

Plus, if your blog has more than a few dozen posts or covers a variety of topics, adding a search bar isn’t just helpful. It’s essential for delivering a great user experience.

This is especially helpful for WordPress blogs with growing content libraries. For example:

  • 📚 Educational blogs filled with tutorials and guides
  • 🥘 Food blogs with hundreds of recipes organized by category or date
  • 🌍 Lifestyle and travel sites sharing personal stories or destination reviews
  • 🌐 Tech blogs publishing updates, reviews, and evergreen advice
  • 🗞 Magazine-style or news sites with a steady publishing schedule

With that said, I’ll walk you through how to add WordPress search to the blog archives page.

Here’s a quick overview of all the steps I’ll cover in this guide:

🧑‍💻 Pro Tip: Adding a search bar is just part of the solution. You’ll also want to make sure your archived posts are still relevant and up to date. If visitors land on outdated content, it can hurt their trust and lead them to leave, even if your search works perfectly.

To improve your content strategy, check out our guide on how to automatically schedule content updates to keep everything fresh and accurate.

Step 1: Install and Activate SearchWP

If you’d rather not install a plugin, then you can skip ahead to step 4, where I show you how to add a Search block to your archive pages. This will work with WordPress’s built-in search.

Just keep in mind that the default WordPress search is pretty limited. It only looks at basic post content and often shows results that aren’t very helpful.

That’s why I recommend using SearchWP instead, which is the best WordPress search plugin on the market.

This plugin lets you improve your WordPress search algorithm in multiple ways. For example, you can add all types of content to the results, including custom post types, WooCommerce products, and even PDF content.

We use SearchWP on some of our business websites, and we’ve found that it works great. You can find out everything about it in our detailed SearchWP review.

To get started, you’ll need a SearchWP plan. You can head over to the SearchWP website and click ‘Get SearchWP Now’ to purchase the plan that best fits your needs.

Is SearchWP the right search plugin for you?

After you sign up, you’ll get a user account. Simply log in to your new SearchWP account, download the plugin’s .zip file, and locate your license key.

You can find it in your SearchWP account under the ‘Downloads’ section. At this point, you need to copy your license key or leave the browser tab open so you can access it easily later.

Next, let’s navigate to Plugins » Add New Plugin from your WordPress dashboard. From there, click the ‘Upload Plugin’ button at the top of the page.

On the next screen, click ‘Choose File’ and select the SearchWP .zip file you downloaded earlier.

Select plugin zip file to upload and install in WordPress

Click ‘Install Now’ then ‘Activate’ once the button appears.

If you need help, you can check out our guide on how to install a WordPress plugin.

Once the plugin is activated, you’ll need to go to SearchWP » Settings » General.

Enter SearchWP license key

Then, go ahead and paste your license into the ‘License Key’ box.

Step 2: Customize your Search Algorithm

Once SearchWP is activated, the next step is to fine-tune your website’s unique search engine settings for your blog archive pages.

To do that, go to SearchWP » Algorithm in your WordPress admin dashboard and click ‘Add New.’

At the top, you’ll see the ‘Sources & Settings’ button. Go ahead and click on it.

Search sources and settings

This is where you choose which content types SearchWP should include in your search results.

You’ll see options for posts, pages, media, and more.

By default, WordPress displays blog posts on archive pages. To make sure all your articles are searchable, you’ll definitely want to check the ‘Posts’ box.

Choosing the Posts attribute

You may also be considering what additional elements are important to include.

If your site has a lot of valuable information on ‘Pages’ or ‘Comments,’ consider adding those too.

On the other hand, I recommend skipping sources like ‘Tags’ that could clutter results.

You might notice some options grayed out — this is normal for the ‘Default engine.’ They’ll be available if you create a new engine.

🧑‍💻 Pro Tip: Does your site use custom post types, like a ‘Portfolio’ for your projects, ‘Recipes’ for a food blog, or ‘Listings’ for a real estate site? If so, you’ll likely see the boxes for those custom post types here. You can check the boxes so all your valuable content is included in the search results.

You can then close the popup by clicking ‘Done.’

Step 3: Tell SearchWP What Content Is Most Important

After selecting your content sources, you can customize how SearchWP ranks the content in your search results. This helps show the most relevant results based on what your visitors are likely to look for.

On the SearchWP » Algorithm screen, you can click ‘Add/Remove Attributes.’

Add/Remove attributes in SearchWP

In the popup, you’ll choose which parts of your content you want SearchWP to consider.

They include sources such as:

  • Title – Prioritize results that match the post or page title.
  • Content – Index the main body text of your posts or pages.
  • Slug – Include the post’s URL-friendly name (useful for SEO keywords).
  • Excerpt – Search within manually written or auto-generated summaries.
  • Author – Allow visitors to find content written by a specific author.

I recommend picking the ones that make searches more relevant and skipping unrelated sections.

For example, if your visitors rarely search by “Author,” leaving it out can help keep results clean and focused.

Managing post search attributes

You can include extra content stored in custom fields. Additionally, you can let users find posts grouped under specific topics or labels in the ‘Taxonomies’ field.

Once you’ve added the attributes, you’ll see a set of sliders for each content source.

Think of these sliders as a scoring system that tells SearchWP which content is most important. By giving an attribute a higher ‘relevance weight,’ you’re telling the search plugin to give it more points.

For example, if you slide ‘Title’ far to the right, a post where the search term appears in the title will get a huge point boost.

This makes it much more likely to show up at the top of the results. So, this is a great way to ensure the most relevant content surfaces first.

Setting up attribute relevance

For most users, the default weights are a great starting point. You can always come back and fine-tune it later based on your site’s needs.

When you’re happy with the settings, click the ‘Save’ button in the top-right corner.

Saving your custom WordPress search algorithm

SearchWP will now start rebuilding the index automatically.

This might take a few minutes, depending on the amount of content on your site and the performance of your WordPress hosting server.

Once you see ‘Index Status: 100%’, it means all your content has been successfully indexed and your settings are ready to go.

Rebuilding your WordPress search index

Step 4: Add the Improved Search to the Archives Page

SearchWP is now powering your site’s search behind the scenes. The final step is to add a search bar directly to your archive pages so visitors can use it.

There are two easy ways to do this: using the Full Site Editor (FSE) or the WordPress search widget.

Which method you choose will depend on whether you’re using a block theme (option 1) or a classic theme (option 2). Keep scrolling to find the right choice for you.

Option 1: Add the Search Bar to the Archives Page Using FSE

If your theme supports Full Site Editing (FSE), like Twenty Twenty-Four, you can go to Appearance » Editor in your WordPress dashboard to get started.

Navigating to the Full-Site Editor from the WordPress dashboard

In the Site Editor, click ‘Templates’ from the left-hand menu.

Next, you’ll need to find the template that controls your blog archives.

Choosing the Blog Home template

The name of this template can vary depending on your theme. It can be ‘Archive,’ ‘Blog,’ ‘Home,’ or ‘Index,’ among others.

The key is to select the one that your theme uses for the main blog listing. A good way to be sure is to click on one and see if you have the look for the Query Loop block (that’s what WordPress uses to display your list of posts).

📝 Note: In WordPress, “archive” doesn’t mean just one thing. It includes your main blog page, category pages, tag pages, and date archives. Standalone pages like “About Us” or “Contact” are not archives.

Now that you’ve found the right blog archives page and opened the template, you’ll need to add the search bar to it.

Simply click the ‘+’ button wherever you want, and look for the ‘Search’ block. Click on it to insert it in your template.

Adding the search block in FSE

After you add the search block, you can go to the ‘Block’ tab in the right-hand panel to customize its style.

Here, you can adjust the block’s color, typography, position, to border to match your site’s design.

Customizing the Search block in FSE

This is a great chance to add a touch of personality.

For instance, instead of the default ‘Search’, you could use something more engaging like ‘Find a recipe…’, ‘Search our tutorials…’, or ‘Looking for something specific?’ to guide your visitors.

When you’re happy with how everything looks, go ahead and click ‘Save’ in the top-right corner to apply your changes.

Now, if you visit your blog archive page, you can see your custom search bar in action.

Previewing the archive search
Option 2: Add the Search Bar to the Archives Page with a Classic Theme

Adding the search bar to a widget area like a sidebar is the quickest and easiest method for most classic themes.

To get started, navigate to Appearance » Widgets.

Go to Appearance Widgets

On the next screen, you can choose where you’ll add a widget. The best part is that SearchWP automatically improves any default search bar. Whether it’s in the sidebar or somewhere else, the plugin enhances it behind the scenes.

For this tutorial, I’m going to add it to my site’s sidebar.

You can go ahead and click the ‘+’ button and look for the ‘Search’ widget.

Search widget

From here, you can update the label or placeholder to something more specific. For example, you can edit it to “Search blog posts…” or “Looking for a tutorial?”

Feel free to get creative and choose wording that best fits your content.

Editing the search widget label

Once everything looks good, simply click ‘Update’ to save and apply the search bar to your site.

Now, if you visit your blog archive page, you can see your custom search bar in action.

Previewing the archive search

📝 Note: You can also place the search bar directly above your list of posts, which usually involves editing your theme’s archive.php file.

However, editing theme files is for advanced users only. A single typo or mistake in these files can cause a critical error and make your entire website inaccessible.

If you must edit theme files, we strongly recommend creating a child theme first to avoid losing your changes when you update your theme.

Step 5: Test and Optimize Your Archive Search Functionality

Now that your custom search bar is live on the blog archive page, it’s important to make sure everything is working smoothly across devices and browsers.

You can start by opening your website in incognito or private mode. This lets you view it as a new visitor would, without cached data affecting the results.

From here, you can test different search terms to make sure the right results appear. If anything seems missing or irrelevant, you can go back to SearchWP » Algorithm to adjust your content sources or attribute relevance settings.

Setting up attribute relevance

If this doesn’t resolve the issues, you can try these quick fixes:

  • Clear your cache – Cached JavaScript files can prevent SearchWP from loading correctly. Use a plugin like WP Rocket to clear the cache and optimize performance.
  • Deactivate conflicting plugins – Temporarily disable other plugins one by one to see if one of them is causing issues.
  • Rebuild the index – To force a fresh search data rebuild, you can go to SearchWP » Settings » General and click the ‘Rebuild Index’ button.
Rebuilding the search index in SearchWP

For more troubleshooting tips, you can refer to our guide on how to fix WordPress search not working.

Once visitors start using your new search bar, you’ll want to know what they’re looking for.

This is where the SearchWP Metrics extension is incredibly powerful. It shows you exactly what terms people are searching for, which searches get no results, and more.

Search analytics from SearchWP Metrics

For details, you can check out our guide on how to see search analytics in WordPress.

Bonus Tip: Add Search by Category in WordPress Blogs

Want to make your blog’s search even more useful? One easy way is to let visitors filter results by category.

Categories help organize your content and make it easier for readers to browse related posts. But when combined with search, they become even more powerful. This allows users to narrow down results and find exactly what they need.

Here are a few ways this can come in handy:

  • Lifestyle or personal WordPress blogs: Let visitors search posts only within categories like Travel, Recipes, or Wellness.
  • Tutorial or knowledge base sites: Allow users to search by topic, such as WordPress, SEO, or eCommerce.
  • News sites: Help visitors focus on sections like Business, Sports, or Tech.
  • WooCommerce stores: Let shoppers search by product category to find what they need faster and boost conversions.

With SearchWP, you can create a custom search form that limits results to a selected category. You can do this either through a dropdown filter or pre-defined settings.

Example of a search by category form made with SearchWP

For step-by-step instructions, check out our full guide on how to search by category in WordPress.

FAQs About Adding WordPress Search to Blog Archives Page

Still have questions? Let’s quickly go over some of the most common things WordPress users ask when setting up search on their blog archive pages.

How do I add a search bar to my WordPress blog archive page?

You can do this by editing your archive template. Just go to Appearance » Editor, find your blog archive template, and insert the Search block. You can also customize how the search form looks by adjusting the placeholder text, button style, margins, and more.

If you’re using a classic theme, you can add the search form to a widget-ready area like the sidebar.

What is the best search plugin for WordPress blog archives?

I recommend SearchWP because it’s the best WordPress search plugin on the market. It works seamlessly with archive pages and is much more accurate than the default WordPress search. Plus, it gives you full control over what content gets searched, how results are ranked, and even what custom fields or post types to include.

Can I make my old blog posts searchable in WordPress?

Absolutely. As long as your old posts are published and included in your search engine settings (like in SearchWP’s ‘Sources & Settings’ panel), they’ll show up in the results.

Can I limit archive search results to just blog posts or certain categories?

Yes, you can. For example, with SearchWP, you can customize your search engine to include only certain post types, like blog posts. You can even fine-tune it further by limiting searches to specific categories or tags using search filters or custom search forms.

How do I improve the search functionality on my WordPress site?

You can start by replacing the default WordPress search with a powerful plugin like SearchWP. It lets you include more content types, adjust relevance settings, and deliver better results overall. You can also improve the experience by customizing the search results page, using smart suggestions, or adding filters to narrow down results.

Additional Resources: More Guides to Improve WordPress Search 

I hope this guide has helped you learn how to add WordPress search to your WordPress blog archives.

If you want to take your WordPress search to the next level, you may find these guides helpful:

If you liked this article, then please subscribe to our YouTube Channel for WordPress video tutorials. You can also find us on Twitter and Facebook.

The post How to Add WordPress Search to Blog Archives Page (The Easy Way) first appeared on WPBeginner.

  •