5+ WordPress Plugins for Developers To Use in 2025

Continue reading 5+ WordPress Plugins for Developers To Use in 2025 on SitePoint.
“How do I make this page private for members only?” That’s one of the most common questions I get asked by my friends who use WordPress. I remember asking the same question myself when we were building our video membership site at WPBeginner.
Luckily, it’s surprisingly easy to restrict page access to logged-in users in WordPress. You don’t need to hire a developer or learn complex coding. As long as you have the right plugin, you can set it all up in almost no time.
After helping different website owners solve this exact problem, I’ve narrowed it down to 2 foolproof methods that work for any WordPress site. Let me show you how to make WordPress login required to view a page or even your entire website.
Not every page on your website needs to be locked, but in some cases, requiring users to log in is the best way to protect your content.
Here are a few situations where requiring user login is a good idea:
If any of these apply to your site, then setting up a login requirement is a smart move.
Now, let’s take a look at 2 easy ways to require login to view a page in WordPress. I’ll show you how to do this with both specific pages and all pages.
You can use the quick links below to jump to the method you want to use:
If you’re looking for an easy and powerful way to restrict access to specific pages or posts, then MemberPress is a great choice.
With MemberPress, you can easily control who gets access to your content, whether it’s for members, subscribers, or paying customers. It allows you to create a powerful membership website that fits your specific needs.
In my opinion, it’s the best content protection plugin for WordPress. It makes it super simple to require users to log in before viewing a page.
At WPBeginner, we used MemberPress to create our free video membership website where only subscribers can access the lessons. For details, see this guide on how WPBeginner uses a free video membership site to grow our email list.
Now, to get started, you’ll need to install and activate the MemberPress plugin. For step-by-step instructions, see our tutorial on how to install a WordPress plugin.
Once you’ve activated the plugin, head over to the MemberPress » Settings page to enter your license key. You can get this information in your account area on the MemberPress website.
Then, you need to switch to the ‘Payments’ tab to add a payment gateway. The plugin comes with built-in support for PayPal and Stripe.
Go ahead and click the ‘+ Add Payment Method’ button and choose the gateway of your choice. If you need step-by-step instructions, see this tutorial on how to accept Stripe payments in WordPress.
Once you have set up your payment methods, you will need to create different membership levels. With each membership, you can specify the level of access a user has for viewing restricted content.
To get started, go to the MemberPress » Memberships page from the WordPress admin panel and click the ‘Add New’ button.
This will open the membership editor, where you’ll need to add a name and description for your membership.
Then, set the price and expiration for your membership plan. For instance, you can select the billing type as recurring or one-time and choose the interval to be yearly, monthly, weekly, or custom.
If you are new to using MemberPress, then you can check out WPBeginner’s ultimate guide to creating a membership website for more instructions.
After you’re happy with your membership plan, click the ‘Publish’ button to store your settings. You can now repeat the process to add as many membership levels as you like.
Next, you have to restrict access to your content so that only logged-in users can view it. To do this, head over to the MemberPress » Rules page from the WordPress dashboard.
Here, click on the ‘Add New’ button at the top.
This will take you to a new screen, where you must choose the ‘A Single Page’ option from the ‘Protected Content’ dropdown menu.
Next, enter the slug (URL) of the page where you want to require users to log in before being able to view the content.
Note: Although using MemberPress is ideal for having granular control over restricted content, you can also choose the ‘All Pages’ option from the dropdown menu to require WordPress login for all pages on your site.
Now, you need to set a condition for the kind of members who can view this page.
To do this, select ‘Member’ from the dropdown menu and type ‘logged in’ in the field next to it. This means that anyone with the Member user role can access this content once they log in.
After that, scroll down to the ‘Unauthorized Access’ section and choose the ‘Show’ option for the login form from the dropdown.
Then, click the ‘Save Rule’ and ‘Publish’ buttons at the top.
At this point, you’ll need to create the login page that users will see when they try to access your restricted content.
To do this, head over to Pages » Add New Page from the WordPress admin sidebar.
This will open the block editor, where you can customize the page. Once here, I recommend giving the page a descriptive title, like ‘Unauthorized’ or ‘Login Here,’ to make it clear to users why they are seeing the page.
Below the title, you might also want to add a simple message like “You cannot view this page because you haven’t logged in.”
Next, click the ‘Add Block’ (+) button and choose the ‘Login Form’ block.
Wondering where this handy block came from? MemberPress creates it automatically, so you don’t have to. This is just another perk of using the plugin.
Adding the login form here allows users to sign in quickly so they can view your exclusive page.
Once you’ve added the login block to your page, I highly recommend including a link to your main signup or pricing page using the link icon in the toolbar. This gives visitors a clear next step if they’re not members yet.
You can add a short, friendly message along with the link to encourage signups — something like: “New here? Visit our Sign Up Page to choose your membership plan.”
Make sure your message is clear, inviting, and matches the tone of the site. If you’re not sure how to insert a link, see our step-by-step tutorial on how to add a link in WordPress.
Then, when you’re happy with your changes, click the ‘Publish’ button in the top right corner of your editor to make your login page live.
Now, copy the URL of your new login page. You’ll need it in a moment.
💡 Haven’t created your signup page yet? Check out our in-depth MemberPress review to learn more about the plugin’s built-in registration features and how they can save you time.
Visit MemberPress » Settings » Pages from your admin sidebar and scroll down to the ‘Unauthorized Access’ section.
Now, simply check the ‘Redirect unauthorized visitors to a specific URL’ option.
Then, add the URL for the published page that you copied earlier and click the ‘Update Options’ button to save your changes.
Now, when users try to visit your page with exclusive content without logging in, they will be automatically redirected to the ‘Unauthorized’ page.
Here, they can log in to view the locked content on this page.
If a new visitor lands on this page, they can simply click the signup link to be taken directly to your registration or membership plans page.
Now that your ‘Unauthorized’ page is set up with clear login and signup links, it’s easy for visitors to take action — whether they are returning users or new to your site.
But what if you want to go a step further and give new visitors a glimpse of what they’re missing if they don’t sign up? That’s where MemberPress really shines.
It lets you go beyond simply locking pages. You can actually show a snippet or preview of your content using the Excerpts feature.
This is perfect for teasing blog posts, lessons, or gated resources.
For example, you might display the first few paragraphs of an article to everyone, but then prompt them to register or upgrade their plan to continue reading.
This approach not only improves user experience but can also boost your conversions since visitors get to see the value of your content before signing up.
For more information about this feature, see our guide on how to create paywall options in WordPress (with preview options).
Alternative: While I highly recommend MemberPress, there are other options for creating members-only content. For more recommendations, see my expert pick of the best WordPress membership plugins.
If you are looking for a free and simple way to restrict access to your entire website, then using My Private Site is a great option.
This free plugin locks down your WordPress site, requiring users to log in before they can view any page. However, keep in mind that it doesn’t allow you to choose which pages you want to make private, so it won’t be suitable unless you want to require login for your entire website.
First, you need to install and activate the My Private Site plugin. For details, see this tutorial on how to install a WordPress plugin.
After you activate the plugin, you need to head over to the My Private Site » Site Privacy page from the WordPress dashboard and check the ‘Enable login privacy’ box.
Then, click the ‘Save Privacy Status’ button to store your changes. Now, users will need to log in to view any page on your website.
Next, go to the ‘Landing Page’ section. This is where you decide where users should be redirected after they log in.
You can choose to return them to the same URL, so they land back on the page they were trying to access, or you can redirect them to the home page. You can also send users to the WordPress dashboard after they log in.
If none of those options work for you, then you can set a custom URL instead. This way, you can redirect users to a specific page, like a welcome page or members-only content area.
Make sure to click the ‘Save Landing Page’ button to store your changes.
After that, switch to the ‘Home Page’ tab.
Here, you can check the ‘Allow site home page to remain accessible without requiring login’ box if you want the home page to remain accessible to everyone.
Then, click the ‘Make Page Public’ button.
Now, when you visit your website, your home page will be visible to everyone.
However, when users try to access any other page without logging in, they will be taken to the default WordPress login page, where they can add their details.
Looking for more tips and tricks to manage your membership site or user login pages? Check out these useful guides below:
If you liked this article, then please subscribe to our YouTube Channel for WordPress video tutorials. You can also find us on Twitter and Facebook.
The post How to Require Login to View a Page in WordPress (2 Easy Ways) first appeared on WPBeginner.
I’ve spent the last ~5 years leading the Material Design team at Google, arguably the world’s largest and most recognized design system. I’ve worked with brilliant minds, backed by incredible resources. And yet, I can’t shake this feeling: design systems have failed us. They don’t do what they say on the (proverbial) box.
Let’s rewind. The promise of design systems was alluring: accelerate the process of building cohesive experiences, ensuring high quality and consistency at scale. We envisioned systems that encompassed patterns, components, motion, content strategy, and even micro-interactions. A holistic guide to creating delightful experiences.
But somewhere along the way, we got lost in the weeds of components, tokens, and documentation. Design systems became rigid rulebooks + glorified Figma sticker sheets — stifling creativity and burying designers in endless updates. And so adoption becomes the main challenge. Any design system professional will tell you that they spend more time trying to convince people to adopt their design system than actually designing it. Could it be that we have not quite reached Product Market Fit for design systems?
Here’s the brutal truth:
And the biggest lie of all? That adherence to a design system guarantees a good product. A truly great app is usable and desirable because of thoughtful design, not because it religiously follows a set of rules.
So sure, use Material 3. It’s a great design system with some awesome resources. But is it enough? Code reuse is great, and it’s very helpful to have your design and code aligned. But a full adoption of a design system is an expensive proposition; for most organizations, it is not justifiable just for the cost savings alone.
So why do we continue to push design systems as the solution for design at scale? Should we consider that while they might be part of a solution, there are other tools and ideas that we need to develop?
So, what’s the next chapter? How do we harness the power of AI to create designs that are consistent when they need to be but also truly dynamic, intelligent, and adaptable?
I’m on a mission to find out…
The article originally appeared on LinkedIn.
Featured image courtesy: Itai Vonshak.
The post The Broken Promises of Design Systems: Why Following the Rules Won’t Get You to Great Products appeared first on UX Magazine.
When building digital products, thinking in terms of single features and urgent client needs can lead to a large portfolio of products with high maintenance costs. At first, this approach makes sense, as you’re offering new value to customers and keeping important clients happy. But, over time, you often end up with a collection of highly bespoke solutions that ignore two key principles:
So the reality often looks like this: large legacy product portfolios have grown over time, and the effort required to clean up is hard to prioritize against other seemingly more pressing topics.
This article highlights the benefits of going through a clean-up exercise and explains how to conduct a “Product Kondo” exercise on your product portfolio. Like Marie Kondo, the Japanese master of cleaning up closets and houses to keep what brings you joy, discard what you no longer need, and organize what you keep into a workable order, this exercise seeks to identify the most valuable items for both your business and your customers. This article discusses the issues with large legacy portfolios and explains how to simplify and organize them into customer-centric portfolios, with stakeholder buy-in throughout the process.
Overflowing Product CupboardsThere are many reasons why an organization might end up with a large legacy product portfolio, which, similar to the cupboards organized by Marie Kondo, is in dire need of a good clean-up. Whether your portfolio is overgrown from crafting bespoke solutions for important enterprise clients (a common B2B scenario), from testing new features with a B2C customer segment, or various other possible reasons, incentive structures chiefly among them — overgrown portfolios are very common. And the problem is they need to not just be developed in the first place, they need to be maintained, and that gets ever more costly and complex over time.
While this might be oversimplified, the general logic holds true: the more bespoke your product portfolio, the harder it is to keep clean and tidy. Or as Marie Kondo would say, “In a messy cupboard, it’s impossible to find the pieces that truly bring you joy.” In this context, joy translates into:
If you want to work out how to find that joy in your product portfolio again, this article outlines the practical steps taken for such a “Product Kondo” exercise in a global not-for-profit organization with a large legacy portfolio, including the moment when theory met reality, and the learnings from this effort.
We conducted this clean-up in a globally distributed organization undergoing a wider transformation. For more than 20 years, the organization had been gathering and distributing data in various formats: from raw to modelled data, scores, and advanced data products. However, it had not been focused on customer centricity nor regarded products as strategic differentiators. This meant that key indicators of success for product organizations had never been tracked. So the challenge was to map out and simplify the portfolio with very few indicators available to track product performance (e.g., user analytics data).
So, how do you start understanding where the value lies in your portfolio and what factors are driving this portfolio clean-up in the first place?
As part of the wider organizational transformation, one consideration was to simplify the product portfolio in order to reduce maintenance costs and the technical effort required for a planned migration to a new platform. Another important concern was to align future development with the newly developed business strategy. Therefore, reducing costs and planning for the future were the key drivers.
The “Product Kondo” Portfolio Clean-upSo if you find yourself in a similar situation, where you have a complex legacy portfolio, and where across many years features have been added, but hardly anything has ever been sunset, a “Product Kondo” clean-up, i.e., a cleaning out of your product cupboards, might be what’s needed.
To do that, it’s useful to go in with two ideas:
Getting buy-in and building a narrative everyone understands and sees as relevant is crucial when trying to clean up — especially in large companies, where you’ll always find someone who thinks “we need everything,” and the relative importance of different customer segments is unclear, with no accurate portfolio overview in place.
If you’re unclear about the state of your current portfolio, how do you know where to focus next strategically?
Not knowing where the highest value lies in your portfolio and how it all maps out as a whole has another implication: If you don’t know your current status quo, it’s hard to plan ahead and it’s equally hard to get out of the delivery mode many product organizations find themselves in, where you simply build what gets requested, but can’t act as a driver of future growth.
To organize a portfolio in order to define how to handle it going forward, while not having much information to base decisions on, the high-level approach was this:
Note: Every company is different, especially regarding the information that’s available. So this is not an attempt at building the next framework or providing a one-size-fits-all approach to portfolio organization. Instead, it is a proposed solution for how to approach mapping out your current portfolio to start from a cleaner slate, with your customer segments in mind. These four areas of work should be considered as necessary when attempting a “product kondo” exercise in your own organization.
First things first, if you’re not clear about your primary and secondary customer segments, then this is where to start. If you want teams to be able to focus, it’s crucial to define priorities. Identifying key external user groups/segments, understanding their differences, and assessing their importance to the organization’s overall business success is a great start. Building a user segmentation matrix is a great foundation for prioritizing efforts and aligning services/products around user needs.
Apart from establishing the key jobs-to-be-done, goals, and pain points for each customer segment, it fosters transparency around the following factors:
How to define user segments, with different levels of relevance to the organization and its future strategy, is described in more detail here. It was the initial mental model shared across teams prior to starting this portfolio simplification effort.
Next up: Understanding the current status quo and building a “source of truth” of everything considered under the remit of the product organization. Because you need a clear reference point to get started.
To determine the best approach and size the task ahead, understanding what had been done before was crucial, so as not to reinvent the wheel. It was clear that the organization had a sprawling product catalogue that contained a varied mix of different items, lacking clear definitions and categorization.
The initial audit was about updating the product catalog that had been assembled three years earlier and adding information that would be relevant for assessing relative value. As revenue, user numbers, or development effort had never been tracked, this is where we gathered additional insights on each item from the product owners (POs) responsible.
The assessment criteria were partly taken from the previous effort (criteria 1-9), and further criteria were added to obtain a more holistic picture (criteria 10-15). See the table below.
In order to be transparent about decision-making, it was important to agree on the evaluation criteria and scoring with key stakeholders upfront and ensure every contributor understood that a lack of data would lead to low scores. To that end, we asked all 36 product owners (POs) to submit data for each product under their remit. As the organization had not previously tracked this information, the initial responses were often quite vague, and many cells were left blank.
To increase data quality and make data-based decisions, 1:1 interviews with POs allowed us to answer questions and build out “best guess” assumptions together in cases of missing data.
Note: While not technically perfect, we decided that moving forward with assumptions grounded in subject matter expertise, rather than completely missing data, would be preferable.
Lastly, some inputs like “automation potential” were hard to assess for less technical POs. Our approach here followed the product mindset that while it is important to make data-informed decisions, “done is better than perfect.” So once we had enough confidence in the picture that emerged, we proceeded with scoring in the interest of time.
As a side note regarding data quality: 1. Manually cleaning inputs throughout (e.g., removing duplicates) and 2. following up until clear inputs were provided, helped increase input quality. In addition, predefined ranges led to higher data quality than inputs requiring hard-to-quantify data, like, e.g., expected impact.
Defining the scoring methodology upfront and getting stakeholders to align on the relevance of different criteria transparently was crucial for this work. Particularly keeping in mind that simplifying (in other words, reducing) the portfolio has an immediate impact on various teams, communicating openly about what is being done, how, and why is important, so everyone understands the longer-term goal: to reduce cost, maintenance, and prepare for future growth.
The image below illustrates the three stages that led to the prioritized list and score for each item.
The outcome of this stage now ranked the business and user value for each data product, and the initial expectation was that this was the end of the portfolio cleanup. A list of all items ranked by their value to the business, so that, e.g., the bottom half could be cut and the rest migrated to the new technical platform in order of priority.
At least that was the theory, and this is where it met reality.
Once the weighted list was ready and the whole portfolio was ranked, it became clear that what was considered the “Product portfolio” in fact consisted of 12 different types of items, and roughly 70% of them could not be considered actual products.
While inside the organization, everything was called a PRODUCT, it became clear that the types of items referred to as “products” were in fact a mixed bag of trackers, tables, graphs, extracts, data sets, dashboards, reports, tools, scoring, and so on. And many low-ranking internal-facing tools enabled highly relevant customer-facing products.
The list was essentially comparing “apples to oranges,” and that meant that simply cutting the bottom half of lower-scoring items would lead to the whole “house of cards” tumbling down, especially as a lot of items had dependencies on each other.
First and foremost, we worked with leadership to explain the issue of missing categorization in the portfolio and the risks that cutting the lower-scoring half of the list would entail, especially due to the time pressures of the wider ongoing transformation effort.
Next, we proposed to work with key product owners and leaders to help categorize the portfolio correctly, in order to determine how best to handle each item going forward.
We used the following five buckets to enable sorting, with the intention of keeping the “other” category as small as possible.
Aside from simplifying the terminology used, this categorization meant that each category could be handled differently in terms of future work.
For example, all raw data items would be automated, while the process around “low effort” data items didn’t have to be changed going forward, once it was clear how low the manual effort actually was. Notably, the categorization included a “Sunset/Stop” category to allow stakeholders to already move items there during the deep dives of their own volition, rather than through top-down decision making.
To get buy-in and allow for active contributions from subject matter experts, we planned workshops per customer segment (as defined by the user segmentation matrix — the initial starting point). Aside from organizing the portfolio items, these workshops allowed key people to be actively involved and thereby act as advocates for the future success of this work.
Using Miro boards to share all audit findings, goals, and the purpose of the clean-up, we conducted seven workshops overall. With 4–6 participants, we spent 3 hours categorizing all items per customer segment. In order to avoid groupthink, all participants were asked to cluster their part of the portfolio as part of the preparation.
The “product tree” concept, developed as an innovation game called “prune the product tree” by Luke Hohmann to organize features around customer needs, helped create a shared mental model among participants. In contrast to Hohmann, we applied the product tree concept here to organize the current portfolio logically and actively reduce it, rather than imagine new products.
In this context, the roots of the tree signified raw data, the tree trunk equated to modeled or derived data, with the crown of the tree signifying data products, and the outer branches were left for “other” items — to capture what could not be easily grouped but had to be included.
Grouping items in this way served a second purpose: to guide how to handle them in the future transformation effort. The plan was to automate raw data first, based on priority. While modeled or derived data would have to be checked for complexity to determine future handling. The actual data products identified would be crucial for the company’s future strategy and were to be reimagined with a product mindset going forward.
The tree metaphor worked well here, despite being used in a different way from its original context, as it provided a mental model for categorization. By clustering items, it was possible to better determine their value for each customer segment in the portfolio. According to the feedback gathered after each workshop, the joint mapping and visualization helped teams trust the process and feel actively involved.
FindingsAnalyzing the findings from the workshops revealed the complexity of this effort, with many different factors playing into the prioritization. To visualize this complexity, we used the following approach:
For each workshop, we cleaned up the boards, making sure to include crucial comments, especially those about future treatment, such as when a legal obligation to deliver would end.
Using swimlanes helped participants organize data items, while the tree metaphor clarified the interconnectedness and dependencies between items. Especially in the context of data products, this makes a lot of sense, e.g., with raw data being at the root of all other possible versions of “products” derived from them, whether these might be scores, modelled data, automated reports, or more advanced products.
Doing this Product Kondo exercise also helped the teams and all stakeholders gain a shared understanding of how the portfolio was structured for each customer segment. The visualization in swimlanes and with colour-coding and various different frames provided a way to illustrate the complex reality that the initial ranked list format wasn’t able to clarify.
Only once this portfolio mapping was in place, and once quantitative as well as qualitative insights were combined, was it possible to make good decisions about how to handle each item going forward.
For example, all items in the “raw data” category would be automated as part of the wider transformation effort, while all items in the “sunset” category would definitely not be considered for migrating over to the new tech platform. Moreover, the items grouped under “low effort” would continue to be handled manually, while all items grouped under “derived & modelled” would have to be assessed further by a team of tech leads to determine whether or not they might be automated in the future. The items most relevant for the future business strategy of this organization were those grouped under “data products”, i.e., those products that would have to be re-imagined with clear customer needs in mind, based on the user segmentation matrix.
LearningsIn total, we achieved a portfolio reduction of 67.8% from 198 items initially to 118 post clean-up. However, what matters here is not simply the reduction but the categorization, i.e., separating and organizing the portfolio into different swimlanes and introducing the product tree metaphor. The product tree visualisation helped all stakeholders understand the interconnectedness of the portfolio, where the roots signify the core product and the branches different, more advanced products or features built on top of that core.
Similarly, the categorization into swimlanes helped to organize and cluster similar items, getting away from comparing apples and oranges in the initial big portfolio audit table. It illustrated very clearly that not all items are alike and can’t be judged and rated in the same way.
It is worth mentioning that there is no one best way to label your swimlanes, but a good starting point is to think of naming different clusters, e.g., from basic to most complex, and to always include a “sunset/stop” cluster and potentially one that covers “redesign/tech upgrade” items. Having these two buckets allows contributors to actively shape the decision-making around the quick-win items, usually the most obviously outdated or clunky parts of the portfolio.
Whether or not you categorize your products in order to determine how to handle them in an organizational transformation, e.g., to assess automation potential, will largely depend on why and when you’re cleaning up your product portfolio. Even outside of a transformation effort, clustering your portfolio into different categories, understanding interconnectedness, and whether or not each customer segment has a well-rounded product tree, with solid roots and future-looking branches, is a useful exercise in sense-making and keeping your organization lean.
In all this, our biggest learning was that
Terminology matters because simply referring to things as “products” doesn’t make them so. Comparing like for like is a key factor when assessing a product portfolio.
Correct categorization was the biggest challenge that had to be dealt with first, to enable the organization to iterate and focus on where to play and re-imagine products to match the future business strategy.
This portfolio clean-up had to pivot and expand to include a mapping exercise because we hadn’t factored in the unclear terminology used across the organization, and that, instead of simply gathering and ranking, the biggest task was to correctly categorize and structure. And this is likely to be different from organization to organization. So I would always recommend checking which categories of items you’re comparing in your portfolio. If you’re not entirely sure, you should always include a clustering or mapping exercise right from the start.
Product Kondo: The Groundwork For TransformationIf you’re struggling with a large legacy portfolio and no longer confident that everything in it serves a purpose and brings joy to users and the business, it’s time to clean up.
It’s often necessary and needed to focus on the next shiny thing, but if you don’t balance that with cleaning up your existing portfolio, your organization will eventually become slow. Overgrown product portfolios can’t be sustained forever.
Particularly in organizations bound by various contractual obligations, this is the groundwork that enables product teams to iterate.
Moreover, doing this clean-up and clearing out effort across teams is a highly transparent way to include teams in change. And it is a useful way for getting teams to contribute and actively shape a transformation effort. Business decisions have to be taken, but taking them with transparency and in an evidence-guided way ensures that you are bringing people along.
Last but not least — if you don’t have the capacity to do the full portfolio clean-up (which took us about 4 months, with a core team of roughly 4 people) — start smaller. And start with including these considerations in your day-to-day, for example, by always checking if products or features should be stopped or sunset every time you’re launching new products. Or start by mapping out the different categories of items in your portfolio — with swimlanes and the product tree metaphor in mind. What is core, and what is the future state of play?
Upside: Once you’ve got that big picture overview and worked out what to sunset or where to slim down, you have more capacity to focus on current and future priorities strategically.
Reality check: Of course, the work doesn’t stop there. The next step is to align it all back to your user segments and check how your portfolio serves each of these, particularly the primary segments.
The work of a designer largely consists of inventing new things, which requires creativity that is generally believed to depend on inspiration, making it unpredictable and difficult to control. Many designers, as well as those who would like to try their hand at design, are wondering: what to do if inspiration does not come at the right moment?
There are many practical recommendations from experienced designers and design managers on how to work without inspiration. These mainly rely on discipline, planning, and working with references. I would like to suggest an alternative approach: how to boost creativity and “lure” inspiration with the help of neuroscience.
I’m Marina, and I have been deeply interested in neuroscience for a long time. I have tried many methods from my own experience and observed the experience of my colleagues. In this article, I want to share the ways that seemed to me the most effective in luring creativity, which I eventually built into my life routine on an ongoing basis.
How Our Brain WorksThe brain has been and remains an important topic that is underexplored, especially in the context of design and design thinking. No other profession represents the blend of creativity and logic quite like design, in my opinion. This raises a fair question: which part of the brain is more important, the left or the right? To start with, let’s briefly refresh which part of the brain is responsible for what:
Left Hemisphere | Right Hemisphere |
---|---|
Language and Speech: Language-related activities like speaking, writing, and comprehension | Creativity and Artistic Abilities: Imagination, creative thinking, music, visual arts, etc. |
Analytical Thinking: Mathematical operations, sequential processing, and problem-solving | Emotional Processing: Emotion recognition, facial expressions, tone of voice, gestures |
Linear Thinking: Step-by-step way of information processing | Holistic Thinking: Looking at the big picture rather than focusing on details |
While each part of the brain is responsible for certain functions, they work together to process information. For some activities (analyzing data, solving equations, and working with precise calculations), it might be more important to rely on the left hemisphere, while for others (composing music, acting), the right hemisphere.
However, when it comes to the design process and design thinking, it’s essential to stimulate both hemispheres and not limit the role of a product designer to being either predominantly left- or right-brained.
Interhemispheric Interaction In Product Design: Why Are Both Equally Important?In product design, the need for well-established interhemispheric interaction is especially noticeable since this work requires a balance between logic and creativity. The left hemisphere’s logical functions help designers break down complex problems, analyze user needs, and organize structured workflows, ensuring the product’s functionality and usability.
For example, logical processes are crucial in creating wireframes and user flows and adhering to technical constraints. On the other side, the right hemisphere’s creative and spatial abilities play a critical role in developing visually appealing designs and innovative user experiences. It’s extremely important for a designer to think outside the box and solve user problems without forgetting about the balanced and attractive visual part at the same time.
A harmonious interaction between the two hemispheres allows product designers to seamlessly integrate both practical functionality and creative innovation. This balance results in products that not only meet technical and user requirements but also deliver an enjoyable, intuitive, and visually captivating user experience.
The Relevance Of This SubjectThe idea that two parts of the brain are interconnected and complement each other during creative tasks isn’t new, nor is it my invention. One of the most influential works for product designers is Experiences in Visual Thinking by Robert H. McKim, an Emeritus Professor of Mechanical Engineering. The value of this book lies in the author’s attempt to explain visual thinking through the lenses of psychology, neurology, semantics, art, and perception. This work was later included in Stanford University’s list of recommended readings for engineering and art design students, further highlighting its significance beyond the field of design.
In the context of the brain’s left and right hemispheres, the author explains and demonstrates through a range of experiments that, to achieve productive thinking — the kind that leads to creative actions — we need to achieve an “internal transfer” between the so-called rational and intuitive halves of the brain. In our thinking process, to achieve creativity, we need to build bridges to “integrate the artist and scientist within each one of us.”
He offers a series of exercises (“3-1/Food for Thought,” “3-2/Dominant Eye,” “3-3/Internal Transfer”) that demonstrate that both brain hemispheres complement each other in cognition and creativity, and he offers to practice them to achieve the so-called “internal transfer”.
One of the simplest exercises offered by McKim is the “3-2/Dominant Eye”. Look at the picture and try to describe what you see:
If you see a duck first (most people see it first) — your left hemisphere is more active. This is because the left hemisphere was activated before reading. If you see a rabbit — often after it’s mentioned — your right hemisphere is more active. This exercise shows that we can consciously choose to shift between hemispheres, training ourselves to engage either side more effectively.
In his work, Professor H. McKim not only demonstrates how to activate the left or right hemisphere but also explains the complementary modes of thought, which consist of two stages. The first stage involves generating an array of ideas, often through a visual thinking process, while the second stage focuses on selecting and refining these ideas (or objects) for further development. Creativity is born during the first stage, but to be executed tangibly, it requires the second stage. Even mathematicians do not only think in terms of mathematical symbols; many, particularly creative ones, use vague images and visuals as part of their thought processes.
According to McKim, creativity requires a balanced development of both hemispheres, as creative thinkers are ambidextrous and capable of transferring ideas into actionable steps. Another important aspect of visual thinking is the right environment, which leads to creativity. McKim describes it as “relaxed attention” — a mental state where ideas emerge spontaneously. Relaxed attention is often achieved through side activities like meditation, taking breaks, physical relaxation, and engaging in non-linear thinking, such as doodling or daydreaming.
I will further share my perspective on enhancing creativity through side activities and present my top three mental and physical occupations. However, it’s important to understand the complementary nature of our brain and how visual thinking often stems from diverse activities and practices.
What Helps CreativityWhile it is clear that creativity is driven by both the left and right hemispheres, an important question remains: how can we boost creativity while keeping the process enjoyable? It may not be obvious, but non-design-related activities can, in fact, be an opportunity to enhance creativity.
Physical ActivityThe interconnection between our body, mind, and thinking process might be key to awakening creativity. Motor skills are controlled by both hemispheres, with the right hemisphere controlling the left side of the body and the left hemisphere controlling the right side. But it also works in the opposite direction — movements trigger active brain activity.
Sports that combine the need to develop a strategy while also requiring active movement may work best for turning up creativity.
Understanding the intricacies of the brain highlights the importance of integrating all parts of the brain. In order to learn, you must first have a sensory experience, then reflect and make connections. Finally, you must take action based on the experience. The knowledge that your first movements, even inside the womb, help build your brain underscores the fact that you actually move to learn. In other words, movement is essential to learning. (Source: Anne Green Gilbert. Brain-Compatible Dance Education, 2019)
Here are the top activities that positively impact creativity, and I will explain why they have this effect.
The basis of a good game is a well-thought-out and trained strategy. Tennis requires a quick analysis of the situation, prompt decisions, and maximum involvement. No wonder this sport is called “chess in motion”: in the process, it is developing memory, concentration, and strategic thinking. At the same time, working in a group and communicating during workouts help reduce stress levels and improve mood.
Table tennis also develops concentration. The need to memorize combinations, develop motor skills, visual and motor types of memory, and compare the opponent’s movements, speed, angle of flight of the ball, and its rotational force form the basis of a successful game. It is suitable for those who do not have the opportunity to play lawn tennis.
I asked several designers if they do any of these things in their free time and how they think it affects their productivity and professional skills. Here is what they’ve shared:
“I started playing tennis a couple of years ago. I work out once or twice a week individually with a coach or in a group. This is a sport that requires high concentration during the game. It seems to me that this skill helped me in my work as well; before that, I was often distracted, and it was difficult for me to do the same task for a long time.
At the same time, due to the fact that I have to fully concentrate during the game, I manage to switch from everyday problems and unload my brain. I prefer to play in the morning or afternoon and take a break from work. Therefore, I return to work more energetically and can take a fresh look at my tasks.”
— Ilia Kanazin, Product Designer with 7+ years of experience working in SaaS
Dance challenges the brain by requiring the integration of movement, rhythm, coordination, and memory, which promotes neuroplasticity, or the brain’s ability to form new neural connections. The more varied the movement patterns and rhythmic complexities, the more the brain is stimulated to adapt and reorganize. Neuroplasticity has a positive effect on memory capacity, learning abilities, and problem-solving skills, which are good for the design process.
At the same time, cognitive flexibility supports the developed design because you always need to adjust your decisions, getting new data from user testing and feedback from the stakeholders. Dancers often have to improvise or adapt to changes in the rhythm and conditions. Also, they constantly learn new movements and combinations of them. Such experience in choreography and expression develops connections between hemispheres, which influences a person’s ability to think creatively in general.
In my opinion, the balance board is one of the most convenient and affordable home simulators. With its help, you can do a short workout at any time to take a break from long work and return to work with a fresh look.
Board balance exercises can be quite diverse. It can be added to your usual exercises and diversified with squats, exercises with a slight weight on the upper body, or shoulder and neck warm-up, which will increase cognitive activity as a result.
You can also just stand on the balance board while listening to work calls, which don’t require active participation, watching TV shows, or chatting on the phone with friends.
“By training your body to move more creatively, you train your mind to think more creatively.”
— Jennifer Heisz. Move The Body, Heal The Mind, 2022
While it may be challenging to find documented real-life cases that provide clear examples of famous designs fueled by sport and physical activity, there are historically backed examples and research studies demonstrating that physical activity positively influences creativity.
For example, Charles Darwin’s “Thinking Path”. The scientist developed his most famous works, “On the Origin of Species” and “The Descent of Man,” at Down House, where he took daily walks. This activity is known as Darwin’s Thinking Path, and it is well-documented how his walking routine influenced the way he contemplated his scientific theories.
With the emergence of neuroscience as a science in the mid-20th century, we have gained a new perspective on what drives creative thinking, which is ultimately beneficial for design. Neuroscience provides insights into how various activities influence the brain, which, as a result, leads to changes in other fields.
For example, tennis is recognized for its benefits to brain health. It enhances the ability to process sensory information rapidly, improving overall cognitive processing speed and reaction time. In addition, strategic thinking is required in this game and engages the prefrontal cortex — the brain’s hub for decision-making and strategic planning. And we can see how this single activity demonstrates the far-reaching cognitive benefits of physical exercise.
Nowadays, researchers in neuroscience are united in their opinion on what unleashes creativity — physical activity unlocks it. There are even experiments that measure it: Marily Oppezzo, a behavioral and learning scientist at Stanford, studied how walking affects creativity. Her experiment compared walking on a treadmill, walking outdoors, sitting indoors and outdoors, and being pushed in a wheelchair. Surprisingly, even treadmill walking in a dull room boosted creativity by 60% compared to sitting.
“It’s not specific activities but individuals’ experiences of them that determine their effect.”
— Amir-Homayoun Javadi, Associate Professor at the University of Kent
Another study goes further, explaining that not all sports impact creativity to the same extent.
“It may surprise you — it wasn’t artistic sports but net and combat sports. Why? Because cultivating a creative mind depends on how we train. In artistic sports (figure skating, gymnastics, synchronized swimming), athletes memorize a series of predefined steps. Although creating these routines may involve creativity, the training itself is structured, predictable, and planned.”
Training that is mostly predictable makes our brain less mentally flexible, in contrast to net and combat sports (such as badminton, tennis, volleyball, and fencing), which make us learn to act instinctively. As we train physically, our brain also adapts, becoming more flexible — particularly in terms of cognitive flexibility. This, in turn, enhances our creativity. (Source: Jennifer Heisz. Move The Body, Heal The Mind, 2022)
Mental ActivityHowever, physical activity is not the only way to achieve a ‘relaxed attention’ state and learn to balance the left and right hemispheres of the brain. Mental activities also trigger the same process. I have selected the top 3 activities that will enhance your creativity at work.
As we discussed above, during the design process, both brain hemispheres are used, and when you’re learning foreign languages, it leads to similar processes in your brain, so you train it through similar activities.
Language processing primarily occurs in the left hemisphere, but emotional intonation and context (e.g., sarcasm, tone) are understood by the right hemisphere. When someone says “Oh, great!” after receiving bad news, the left hemisphere processes the words and grammar, understanding the literal meaning, while the right hemisphere interprets the tone and context, allowing the person to get the real point of the message.
Learning a second language exposes people to new methods of expressing the same thoughts, which promotes creativity. Finding synonyms, understanding idiomatic terms, and gaining the ability to flip between languages all promote divergent thinking, which is the ability to generate several solutions to a given problem.
In parallel, learning foreign languages helps to develop storytelling and self-presentation skills, which are also very useful in a designer’s work.
“I’ve lived in several countries for a long time, so in addition to my native language, I speak three other foreign languages as well. It helps me to build communication with different people, which is very important in the designer’s work.
I think because I know how to say the same thing in different languages, I also use this approach in design. To solve the same problem, I can offer several solutions and choose the most appropriate one together with the stakeholders.
Now I am a Senior Growth Designer, and this job requires constantly looking for non-standard solutions and implementing them quickly. I think the use of different languages contributes to this from the point of view of brain function.
Speaking multiple languages also comes really handy when you are dealing with personas from different nationalities. For example, Western Saas products use a more minimalist approach, whereas Saas from Asia or China, for example, more information is better than less.”
— Maxence Akodjenou, Senior Growth Designer (working on complex B2B apps)
Table games develop strategic thinking, require players to anticipate opponents’ moves, solve problems in real-time, and sometimes think outside the box. Traditional games like chess encourage critical thinking, as players must analyze the current situation, weigh potential outcomes, and decide on the best course of action. This improves the brain’s executive functions, including decision-making, planning, and strategic thinking.
Some tabletop games are based on role-playing or storytelling, such as Dungeons & Dragons or Dixit. These games encourage players to invent stories, create characters, and navigate imaginative scenarios, fostering creative thinking and imagination.
Board games also train communication skills, which product designers have to use a lot in their jobs. Playing table games, especially in groups, encourages the participants to convince their teammates of their decisions and carefully listen to others. The games that involve cooperation help the players develop their collaboration skills, such as finding compromises, negotiating, and making concessions.
Playing a musical instrument has been a widely researched topic in neuroscience in recent decades. It has been proven that music lessons improve cognitive abilities by improving the neural connection between the left and right hemispheres of the brain, which leads to a positive effect on memory, learning ability, and non-verbal thinking, as a result of which the brain as a whole works much more productively in other areas of life.
The brain learns to hear and interpret sounds, which happens only while playing an instrument and is impossible while simply listening to music. As a result, a person is better able to process complex information. Playing musical instruments involves the relationship between the motor, sensory, auditory, visual, and emotional components of the central and peripheral nervous systems. Such brain training includes artistic and aesthetic aspects of learning, which is a unique feature of playing a musical instrument. The combination of linguistic and mathematical activity in the left hemisphere gets used to working in coordination with creative functions in the right hemisphere.
An interesting fact: Albert Einstein often played the violin during moments of deep thinking, claiming that music was an extension of his thought process and helped him solve particularly difficult problems.
It is worth noting that it works both ways — both your music lessons enhance your creativity in design, and design pushes your success in music.
In the book Enchanted Neurons, Pierre Boulez, French composer and conductor, talks about the lessons that Paul Klee (Swiss-born German artist. His highly individual style was influenced by movements in art that included expressionism, cubism, and surrealism) taught at the Bauhaus (German art school which became famous for its approach to design based on unifying individual artistic vision with the principles of mass production and emphasis on function).
“Theoretical reflection is particularly interesting to me when it is applied to something that is completely foreign to music because it then makes it possible to discover solutions that you would never have found if you had remained bound by the limits of your art.
I’ll give you a personal example: the discovery not only of Klee’s painting but also the lessons that he gave at the Bauhaus, which we spoke about earlier, was extremely important to me, especially from the point of view of composition. I understood how using very simple elements like two motifs made it possible to think about the way in which these two motifs could interact. I remember, in particular, an exercise given by Klee to his students: a straight line and a circle. That’s it. The exercise consisted of trying to invent something, a meeting of this line and this circle.”
— Pierre Boulez, Jean-Pierre Changeux, Philippe Manoury. Enchanted Neurons, 2020
This lesson shared by Pierre Boulez demonstrates how interdisciplinary inspiration — such as the course of visual artist Paul Klee — shaped his creative process and how concepts from outside music can lead to new solutions.
In my opinion, the reverse can also be true: music and its principles can inspire creativity in other disciplines.
“I started composing music even earlier than I started designing. Music has a composition and rhythm-like design. And development in one area also entails a boost in another. It works both ways; success in music develops my design skills. Design helps me make more complex music.
In addition, there is also a practical benefit; I make my own covers for my tracks and use my tracks for my showcases. Plus, I listen to a lot of different music, and it develops my world perception, fills me with energy, and creates the right mood for working on projects.”
— Sergei Diuzhev, Design Leader at MuseScore
Whenever you feel stuck in your work or overly critical of your designs or prototype, think about the strategies from the above that might help your creative process.
I shared examples of designers who have rebuilt their creativity through activities like tennis, music, and languages, and I feel the impact in my own daily routine when I try new things and hobbies. Whatever approach you decide to follow, I guarantee your brain will feel the difference and reward you with fresh ideas and inspiration.
ConclusionCreativity may be developed in a variety of ways, including browsing reference sites and putting in a lot of practice — both of which are important. Outside these classic ways, you can engage in activities that not only promote creativity but also improve your mental and physical health.
There are many possibilities for increasing brain activity, and you can develop your own entertaining and useful ways of spending time. Finally, trying something new will generate new thoughts and break down the monotony.
When you experience virtual reality, read poetry or fiction, see a film, listen to a piece of music, or move your body to dance, to name a few of the many arts, you are biologically changed. There is a neurochemical exchange that can lead to what Aristotle called catharsis, or a release of emotion that leaves you feeling more connected to yourself and others afterward. (Source: Susan Magsamen, Ivy Ross. Your Brain on Art, 2023)
[00:00:19] Nathan Wrigley: Welcome to the Jukebox Podcast from WP Tavern. My name is Nathan Wrigley.
Jukebox is a podcast which is dedicated to all things WordPress, the people, the events, the plugins, the blocks, the themes, and in this case, what’s new for developers.
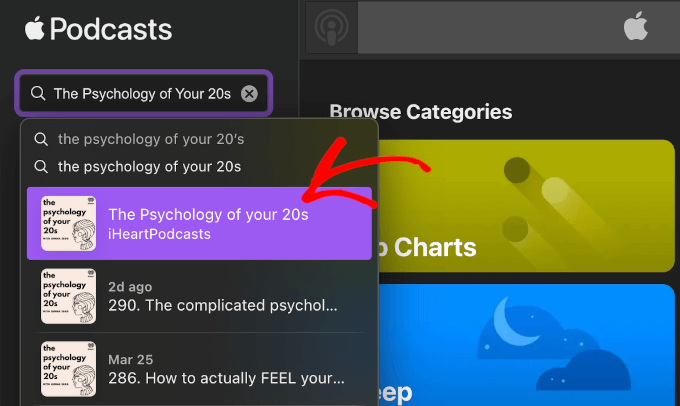
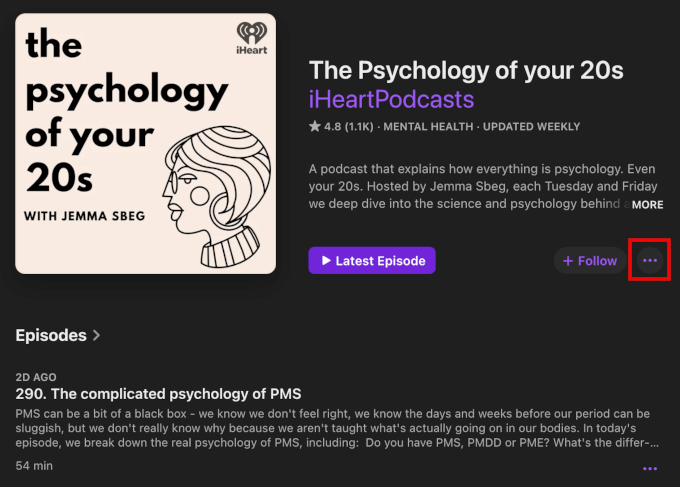
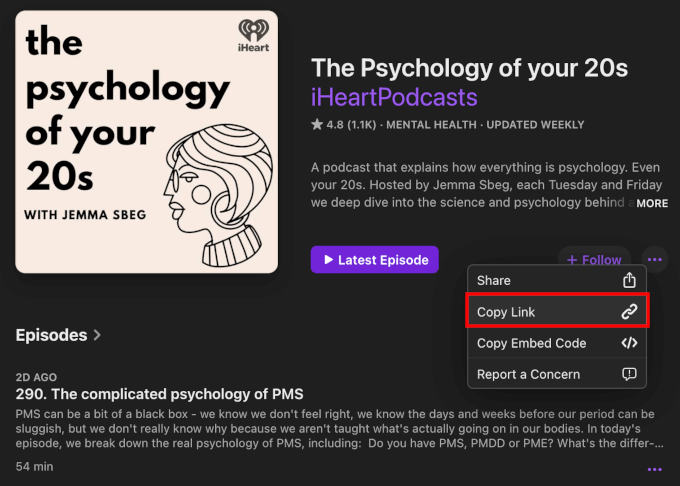
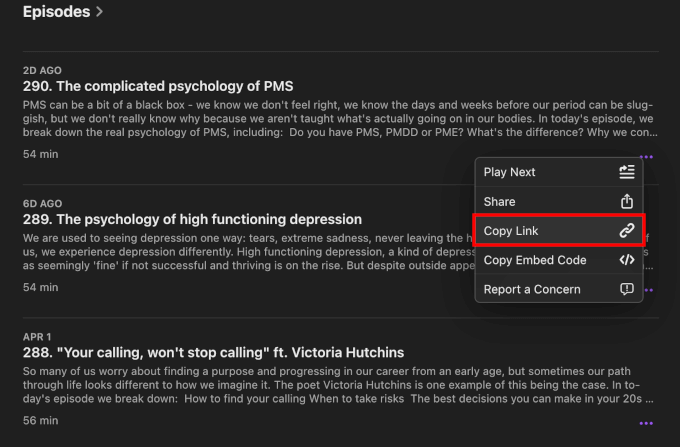
If you’d like to subscribe to the podcast, you can do that by searching for WP Tavern in your podcast player of choice, or by going to wptavern.com/feed/podcast, and you can copy that URL into most podcast players.
If you have a topic that you’d like us to feature on the podcast, I’m keen to hear from you and hopefully get you, or your idea, featured on the show. Head to wptavern.com/contact/jukebox and use the form there.
So on the podcast today we have Ryan Welcher. Ryan is a developer advocate sponsored by Automattic. He focuses on removing barriers to adoption for developers working with Gutenberg and WordPress. He’s a seasoned WordPress developer, and regular contributor to WordPress and the Gutenberg project. He also streams on Twitch as RyanWelcherCodes, where he focuses on custom block development.
This interview was recorded at WordCamp Asia 2025 in Manila, where Ryan was giving his Block Developer Cookbook workshop for the second year running. Ryan spends much of his time creating documentation, running live streams, and writing articles, explaining the knots and bolts of new WordPress features for developers.
He shares his journey from admiring the platform evangelists of the Flash era, to finding his own dream job helping developers understand and implement the new technologies in WordPress.
We talk about some of the biggest recent updates to WordPress Core, including the Block Bindings API, Plugin Template Registration API, Preview Options API, and the new Data Views. Ryan breaks down what these new tools are, why they matter, and how they’re making WordPress Block development both more powerful and more accessible.
He also discusses the growing emphasis on intentional high quality documentation and resources over the past few years, and how many teams are working to make life easier for developers of all skill levels.
We chat about the balance between the increasing flexibility of WordPress’ UI, and the risk of overwhelming new users, as well as exploring how emerging technologies like AI are shaping the future for WordPress developers and hobbyists alike.
If you’re interested in what’s new in WordPress development, want to understand where the project is heading, or are curious about the real impact of recent changes and features, this episode is for you.
If you want to find out more, you can find all of the links in the show notes by heading to wptavern.com/podcast, where you’ll find all the other episodes as well.
And so without further delay, I bring you Ryan Welcher.
I am joined on the podcast by Ryan Welcher. Hello, Ryan?
[00:03:37] Ryan Welcher: Hello. How are you?
[00:03:38] Nathan Wrigley: Yeah, I’m good. Very nice to meet you. This is my second interview in Manila. It’s WordCamp Asia. You have a presentation coming up. No. You’ve got a workshop.
[00:03:47] Ryan Welcher: I do. Yeah. I’m really excited. It’s actually the second year in a row that I’ve given this workshop at WordCamp Asia.
[00:03:52] Nathan Wrigley: And it’s a sellout.
[00:03:54] Ryan Welcher: It is a sellout, yeah. And not in the bad way. It’s a sellout in the sense that there’s a wait list apparently and everything. So I’m very excited. I’m very flattered and very excited about it.
[00:04:02] Nathan Wrigley: So before we get stuck into what it is that you are doing here, and that’s going to be the focus of this conversation around the topic of, well, I’ll explain that in a moment. Would you just tell us a little bit about who you are, what kind of work you do in the WordPress space and who you work for?
[00:04:16] Ryan Welcher: Sure. Well, I am a developer advocate. I’m sponsored by Automattic. I’ve been with Automattic for, I guess it’s going to be my third year. Prior to that I was, I used to work at 10up, I’ve been at a bunch of agencies. I’ve been using WordPress as a developer since maybe 2009.
I’ve been around in this space a while and, yeah, my current role is a lot of fun. I get to do things like this. I get to chat with people in exotic places, and go to conferences and lead workshops and write code that nobody ever has to use in production. It’s fantastic.
[00:04:43] Nathan Wrigley: So you’ve got a really public facing role. Is that the kind of job that you’ve always wished to do, or is it something that you more or less fell into?
[00:04:51] Ryan Welcher: If you’ll indulge me with a bit of an anecdotal story here. When I first started in web work, I used to do a lot of work with Flash. I don’t know if I’m aging myself by saying that, but we used to do a lot of work in Flash. And there was this conference called Flash in the Can, and it’s still around now, it’s not called that anymore. And there was this guy who used to work for Adobe, his name was Lee Brimlow. I think that’s how you say it. He was a platform evangelist. His job was literally go to conferences and give really fun, cool talks on the latest, greatest in Flash.
And I remember seeing this guy, going, this is like my dream job. This is phenomenal. And I just wasn’t at a place in my career where there was anything like that. And then, fast forward however many years later, and there was an opening for Dev Rel. And I was like, yes, this is exactly what I would love to do.
I love writing code. I’ve always enjoyed being a developer, but now this is kind of like, I’m also pretty outgoing, extroverted, so this kind of fills both. You know, I get to write code and like my dream is just like sitting down writing code with some obscure API, and that’s literally all, like I just get to tinker, and that’s what I love about it. It’s so much fun.
[00:05:50] Nathan Wrigley: And is that full-time then?
[00:05:52] Ryan Welcher: It is, yeah. I’m full-time. Yeah, it is fun. It is very cool. And I realise fully how lucky I am, because this is a fun job and I get to hang out with really cool people all the time. And being public facing is fun, but it’s, you know, it’s got its downsides too.
[00:06:06] Nathan Wrigley: We have this expression in the UK and it’s called painting the Forth Bridge. And there’s this bridge in Scotland called the Forth Bridge, and essentially when you’ve finished painting it from one end, you go to the other end and begin again. And I feel that WordPress, maybe for somebody in your position, is a little bit like that. It’s this constant treadmill of, okay, that’s changed. Yeah. Now we need to adapt new content. And yeah, okay, that bit’s changed over there in the meantime. New content. Is that what it’s like a bit?
[00:06:37] Ryan Welcher: A little bit, yeah. I mean it’s, when we started, there wasn’t really a Dev Rel team for the open source project that is WordPress. We were like, you know, there’s a joke, it’s like, yeah, there’s five of us or six of us for 43% of the internet. So there’s like a lot of work to be done, right?
And so there’s a lot of that. We are doing a lot of work around documentation and all that sort of stuff, so it’s like improving that. But every release, there’s like a new cycle of things that, you know, the new stuff like 6.7, all the block binding stuff and, you know, Interactivity API and all that really cool, fun stuff.
And we get to do that, but then it’s like, okay, well then now there’s new changes to the Interactivity API, so we have to kind of like talk about that a bit and stuff. It’s always new, but then there’s always, I love it when we’re like, hey, remember that bug that people have been talking about for two years? Like, oh, it’s fixed now. So we get to also be the harbinger of really good news about things like that.
[00:07:23] Nathan Wrigley: And do you get to put your own roster together of work each week, or does it come in from on high?
[00:07:28] Ryan Welcher: We kind of, it’s usually based around the next release. So whatever’s coming out in the next release, there’s always sort of like, you know, the featured items that are coming out. So that kind of dictates what we focus on for the next release.
There’s no like on high declaration of what we need to work on. It’s more like we’re fairly autonomous in what we do, but I mean, it makes the most sense. If there’s like new features coming with the next version of WordPress, we should probably get that out and, you know, talk to developers and get people testing it and get people working with it, so we can take that feedback, good and bad, and give it back to the teams that are actually working on those features and stuff like that.
[00:07:59] Nathan Wrigley: So given that it’s a Dev Rel job, developer relations, is that your target audience? It’s definitely developers, a hundred percent developers, not novices?
It could be a 101 article on how to use WordPress or, you know, a video piece of content or something like that. Right up to, okay, here’s the nuts and the bolts of exactly how this thing works.
[00:08:22] Ryan Welcher: Yeah, exactly. Like, I did an article on the developer blog, developer.wordpress.org/news. It was on like the internals of webpack, which is like, if you’ve ever messed with webpack, nobody ever wants to deal with internals of webpack, but WordPress handles it. It does this really elegant thing where you don’t have to actually install packages that WordPress provides. It kind of like all of a sudden just uses the ones that are coming, that are with the install.
So like explaining all that, it’s cool, I get to nerd out and get right into the details but, you know, it’s not for everyone. Yeah, but then we’re like, I’ve also written our articles on like an introduction to SlotFill or an introduction to Block Variation so, yeah.
[00:08:55] Nathan Wrigley: It feels like, if we were to rewind the clock like three or four years, there wasn’t so much emphasis put on documentation, knowledge base articles, video content, learn.wordpress.org. But it feels like in the last two or three years, a much greater emphasis has been put on getting the pieces of documentation right. Getting the Learn resources, you know, putting the courses together and those kind of things. Just looking at it from the outside, that’s what I think. But is this on the internal side, is this what’s happening?
[00:09:22] Ryan Welcher: Yeah, there’s definitely a focus on that. I mean, when you’re a developer and you don’t have the resources to get the answers that you’re looking for, that’s extremely frustrating. We’ve always had documentation, we’ve had, you know, it’s like 20-year-old documentation. It’s been around a long time.
But we’ve spent a lot of time improving that. Like, we’ve focused a lot on the Block Editor Handbook because block development is something that can be very difficult, especially if you’re coming from, you know, solely a PHP background, and you’re not really up to speed on React or you just don’t know JavaScript as deeply as other folks do.
And I mean, our job is to like make that transition easier, as much as possible, right? So that’s why there’s a lot of tooling around it that abstracts away the things, like the scripts package, which is like the build process that the Gutenberg plugin uses it, but it’s also like the defacto build process for building blocks.
That handles all that webpack stuff, that handles all that config stuff. You just have to like build your files. Like, you don’t have to worry about that. So there’s a lot of trying to make life easier, simpler. And a lot of that is in improvements to documentation, but there’s also like quality of life fixes for people who are working in the code specifically.
You know, like I spent a lot of time working, like the Create Block package is like my baby. I absolutely love it. It’s not my baby, like I didn’t build it, I’ve just been trying to maintain it as much as I can and adding new features to make life a little bit easier so you can like reuse it and, I don’t know, I could get into the minute details.
But I love that kind of stuff because as a developer, having been one for a long time, I know what I like and I think, I’m not saying like, what I like everyone should like, but I know when something is getting in my way versus helping me. And I think that’s a really, that’s kind of like my compass that I try to work with. It’s like, okay, it’s great, but it’s done all these things I don’t need, now I have to go and delete all that and figure out all this other stuff to get around this scaffold and, I don’t know, I’m really in the weeds right now.
[00:11:04] Nathan Wrigley: Yeah, yeah. But it feels like, I’m kind of asking the same question again really, about the materials being created in a much more, well, intentional way. Yeah, the backstory to that, presumably though, is that there’s more boots on the ground. And I don’t know if it’s, in your case, it’s Automattic sponsoring you into the project. Is there more focus on that from, well, let’s just go from the Auttomatic side, so more investment from them, yeah?
And if that’s the case, is that a reaction to anything? Like, perhaps the rise of SaaS platforms, proprietary platforms, you know, the Wixs and the Squarespaces. Because that’s interesting. It kind of feels like that’s always been talked about, you know, WordPress versus all the other platforms. Pay your $20 over there per month, and you get this, and you get access to their platform and it’s well documented and so on. So I didn’t know if it was connected to that.
[00:11:57] Ryan Welcher: I don’t think there was any, I think that the rise of Dev Rel played a large part in that. Like, I don’t know the reasoning behind the creation of the team, that was decided before I joined. But I think that in the past four and five years, there’s been a real, like just across the tech community, there’s been a real like surge in the concept of developer relations and improving developer experience.
Because I think people realise that developers, like a lot of these platforms, developers are literally their client base, right? And so I think Automattic recognised that and thought, hey, it’d be great if we had a dedicated team of folks that were just making life easier for developers. You know, I always say that there’s no, like I have no KPIs or whatever, I just make things, my mandate is to make things better, as much as possible.
[00:12:40] Nathan Wrigley: Where do you make things? So is it things like YouTube videos, written documentation, knowledge base articles, blog posts?
[00:12:48] Ryan Welcher: A bit of everything. I tend to focus a bit more on the, like I have a live stream that I do on Twitch every Thursday at 10:30 Eastern. I tend to do a lot more of that sort of stuff. That’s kind of like more my wheelhouse. I write articles. I’m not the best writer. I rely on ChatGPT to help me clean that up a little bit. I write the articles, but then I, you know, smarter brains than I help me make it nicer to read.
Yeah, so I think we all, like everyone across our team has their own sort of strengths and we all kind of like play to our strengths a bit. Mine is definitely more like in the video side. I try to use my development experience as much as possible to do more complicated things. That’s not to say that the other folks on our team don’t either, but, I mean, I think I’m in a position to be able to be like, here’s a really complicated issue that people are having and how would we solve that? And it’s fun because I get paid to solve that. And other people who have clients that don’t want to pay them 20 hours just to fart around on a problem is, that’s where I can come in and help with that.
[00:13:39] Nathan Wrigley: Give that to us again though. Where do you do your YouTube stuff? And what handle would that be?
[00:13:44] Ryan Welcher: I stream on Twitch and YouTube. I multistream to both platforms. Thursdays, 10:30 Eastern, every week.
[00:13:50] Nathan Wrigley: And what handle would that be?
[00:13:52] Ryan Welcher: Ryan Welcher Codes.
[00:13:53] Nathan Wrigley: We’ll drop all of the links that we stumble across during this episode into the show notes. Yeah, so you can find it all there.
So WordCamp Asia, the workshop that you are giving is called the Block Developer Cookbook. And I am just going to read the blurb so that you, dear listener, get some idea of what it is that Ryan’s doing. And it says, this is the second year for the Block Developer Cookbook Workshop at WordCamp Asia. Last year in Taipei, we covered lots of topics like block transforms, adding editorial notes, creating a custom format and more.
This year, in addition to the existing recipes from the last year, we will have new ones to choose from that leverage the newest features released in WordPress 6.7, such as Block Bindings API, Plugin Template Registration API, Preview Options API and more. And there’ll be a workshop all about that.
And so I think your intention at this workshop, should the internet hold up, is to do like an interactive thing where the audience say, I want to do this, and you hopefully help them out with that because that’s very brave.
[00:14:58] Ryan Welcher: You can say that, yeah. I’ve had this idea for a while of a workshop where the attendees pick the content. Because, especially with a topic like block development, it’s like saying, come to my WordPress workshop. Like, there’s so many things, right? So like picking something for everyone is really hard.
And so I thought, well you know what? I’ll build this little website and they can go in. It’s like chef theme because it’s block developer cookbooks. So, you know, you login, you have a little chef hat on your avatar and stuff like that. But you can vote on which of the recipes that you’d like to work on. And so that’s the idea. And then they vote and then we go from top to bottom. We get as many done as we can in the 90 minutes or whatever it is.
I’ve been going to conferences and speaking at conferences long enough to know better than to rely on the wifi, but I thought, I’m just going to do it. So this is the second year in a row. I did this last year as well at Taipei. So I’m like super flattered that they accepted my submission is a second time in a row, so.
[00:15:49] Nathan Wrigley: I think there’s a push to make WordCamps a little bit more, and I’m going to use air quotes, exciting, interactive. Yeah, it seems like, you know, Jamie Marsland’s, the thing that he does with the Speed Builds, just sort of grabbing the attention of the audience a bit more. Does it feel a bit like that?
And workshops, they seem to grab the audience a little bit more, because it’s more interactive. It’s kind of less being presented to and more interacting with. So I don’t know, kind of opening up the laptop, trying things out. What do you think? Is that a way that you think events should go in the future?
[00:16:23] Ryan Welcher: I think so too. I think for me personally, I gravitate towards workshops more than talks. I’ve given talks and I’ve done workshops before and I think I enjoy, personally enjoy the workshop aspect because there’s a lot more like interaction and back and forth. And like if you have a question, you just raise your hand and we answer, you know. And it’s just more organic, I guess is maybe how I’d describe it.
But, yeah, I think you’re right. These sort of like fun interactive things. I have some 3D printed swag that I’m bringing. I don’t have nearly enough, so I’m going to have to come up with a, maybe whoever asks a question gets a, it’s a little like key chain of like a chef hat with the WordCamp 2025 on it.
[00:16:57] Nathan Wrigley: I am sure it’ll come out on WordPress TV at some point in the near future. But yeah, good luck with that at least anyway.
But some of the bits and pieces that you are going to be talking about, we’re going to get into that now. And the way I want to take this interview is we’re at WordPress 6.7 at this point. It depends really on when you’re listening to this, but we’re at that point at the moment.
There’s a whole bunch of stuff that has dropped, and I feel that the audience for this podcast, there’s a ton of developers. But there’s also lots of people who are not really inside the ecosystem too much. You know, just regular users. Maybe they’re using a page builder, maybe they’re a freelancer, something like that, and they don’t follow the project, they don’t really obsess about it as much as I do, and probably as you do as well.
So let’s just take a couple of these and discuss them. And if we could go in at a low level. So we’re not able to do a video and open a code editor on this podcast, it’s all about the audio, but let’s start talking about the Block Bindings API. What does it do?
[00:17:56] Ryan Welcher: Oh, I love the Block Bindings API. So there has been a long standing need in WordPress to be able to connect custom meta or custom fields with displaying them basically. And so, in classic themes, we would always just have a meta box that you would put some stuff in, and then in your templates you would just pull that information out of the database and show it.
With block themes, it’s a little bit different because we don’t really have, you can do that in some places, anyways. The idea behind Block Bindings is that you can connect a block with a piece of post meta, or a custom field and have it display. So you take a paragraph block, let’s use the example of like a personnel list maybe.
And so you’ve got like job description, you’ve got the date hired, all these pieces of metadata. And so what you can do with the Block Bindings API is you can connect that to say a paragraph block. So you can insert just a regular old paragraph block and then in the UI you can go over and say, okay, I want to connect the content field of that paragraph block with this piece of post meta. And it just shows up in there.
And then you can actually edit it in the block editor, as opposed to having to open up like the custom fields panel down at the bottom. You can edit it and it goes both ways. And it’s like extremely powerful. It’s the beginning of how powerful it’s going to get, but currently it supports, there’s four blocks that are supported. There’s the paragraph block, header block, the image block, and the button block.
So you have to use one of those four blocks, unless you want to get into custom bindings, which is sort of the second piece of it, which is like a means of defining your own binding sources. And then you can connect those binding sources to a block as well.
So if you wanted to connect to any sort of custom field manager plugin that’s out there, you could write your own that connects to that, and then you can have the block just read from that and it’s inline. You get a visual representation of it. It’s really, really cool.
[00:19:41] Nathan Wrigley: So it’s the kind of thing that in the past you would probably have got a plugin to do. Something like, I don’t know, maybe you would’ve downloaded Pods or something like that to do that.
[00:19:50] Ryan Welcher: I mean, it doesn’t manage the custom fields for you. So some of those plugins do that very, very well. But what it does do is it connects the block editor with that meta, which has been the missing piece for a while. It’s still kind of in its infancy, but already it’s shown to be super powerful.
Like, now we’re seeing a lot of people who are not writing custom blocks for this anymore. Like, it used to be like, okay, I want to show the job description, so I have to write a custom block that introduces something in the sidebar where you input the meta there and then that block displays that because you’re handling that, it’s a dynamic block, you’re pulling the meta out and the PHP, all that sort of stuff.
Now you don’t have to do that. Now you can just do a block variation of a paragraph block to auto set the meta that you want. You don’t even have to do that. You can do it right in the admin. But I would recommend doing a block variation, because setting that up every single time is a bit tedious. And especially if you’re doing it for clients, you can just do a block variation that says like, job description, and then you click on it and it just goes in.
[00:20:46] Nathan Wrigley: So you, your face, gave away something a moment ago. And it sounds like you are quite excited about what’s coming and is not yet there. But I guess one of the nice things about your job is that you really have that high level view of what’s going on in the project. And you can imagine scenarios in the near term, maybe 6.8 or something like that. For example, in this case, the Block Bindings API will enable novice users to do, well, more than you’ve just described. Yeah, that’s kind of a nice position to be in.
[00:21:13] Ryan Welcher: I don’t have, I will say this for the record, I don’t have an inside track to anything that’s not available on like Make. But I know some of the folks that are working on it, and like just in conversation, I’m very excited. I can see where it’s going, and that’s not because I have inside information, it’s just because the logical next step, it looks really cool.
Like, more blocks. Being able to do it with custom blocks will be huge once you have a custom block that you can now connect it to meta and stuff like that. There are some technical hurdles that need to be addressed to do that, but it’s going to be a big, I hate using the word game changer, but it’s going to be a game changer.
[00:21:47] Nathan Wrigley: One of the things which I always find interesting when I speak to people who are really in the weeds of it all, is that the stuff just, well, it just keeps on coming out. Because you are in there every day and it’s so self-evident to you. You know, you use all these acronyms, you know where everything connects, and you know how to make everything work. How do you feel like that is project wide?
We’re sort of going off piste a little bit here, but we’ll come back to your presentation, your workshop in a minute. How straightforward is it for people to keep up to date with this, and where would you point them? If somebody was really wanting to find out, for example, about the Block Bindings API, where’s the best place?
And I think what I’m trying to say is, there’s so much coming that it’s hard to keep up, for somebody that it isn’t paid to do it like you are. Is the documentation easy to find? There’s not really a question in there, but it’s just a, well, everything’s just coming so quickly, so fast, and it’s so disparate and you’ve got to spend, you know, like a whole week trying to track everything down and map everything to everything else.
[00:22:48] Ryan Welcher: I would say start with, it is a bit like drinking from the fire hose for sure. Like, there’s a lot of information. You’ve got stuff on the make.wordpress.org. where they sort of talk about what’s coming. You’ve got the Gutenberg releases. Like the Gutenberg, it’s on a two week release cycle, so there’s constant things coming out.
So one really great way of keeping up with that is there’s a, what’s new in Gutenberg post that comes out every two weeks, that talks about high level features. And then it’s got like a change log of everything that was merged in those two weeks. So that’s a really great way to like see what’s coming at a higher level, but also really get in the weeds.
Like, you can say, okay, this bug that I know about, oh look, they fixed it or whatever. That’s a really great place to start. You can hang out in the WordPress Slack where they do the Core Editor meetings, the Block Editor meetings, and sort of like ask questions in the open floor or just see what people are talking about.
Depending on what you’re trying to do, the GitHub repo is kind of an okay place to get some information. You’re going to get a lot of information, but that would be a place. I mean, it’s, I do it full time and it’s hard, so I get it. But the reason, that’s why I exist because if I can compile this stuff and make it palatable and easy to find for others, that’s what Dev Rel is, right? Like that’s what a lot of what we do is.
So like I’ll spend the time messing around with the Block Bindings API, and then I’ll do a live stream on it, where I’m like, okay, so we’re going to do this, and this is why I did it this way, and this is why you should do it this way because it’s easier, you know? And so like I can do all that busy work to help others who don’t, you know, because ain’t nobody got time to do all that, right? You know what I mean? So.
[00:24:15] Nathan Wrigley: Yeah, that’s kind of a nice summation of where I was trying to get to. So let’s move on.
Another thing which is going to be mentioned, well, who knows whether it’ll come up, maybe somebody will ask about it. But the questions basically the same. What is the Plugin Template Registration API? What would that be and why would you want to use it?
[00:24:32] Ryan Welcher: So the example that I have is that you’ve registered a custom post type that manages people. This is going to be a common theme throughout this. And you want to inject a single page template for that particular post type that’s curated, that isn’t part of the theme that’s being shipped.
So it allows you to add templates to the active theme from a plugin, from a WordPress plugin. Which is really, really, really handy. Because if you have a plugin that, you know, you have a jobs list plugin, you probably want to provide some default templates so you can just display all the custom fields and everything, and the person that’s installed your plugin just gets that.
They can just go to the single page for each job and they have a default template. It’s a fairly straight, it’s like one hook, or a filter, I think. So it’s fairly straightforward, but it’s super powerful, it’s like a quality of life thing.
[00:25:16] Nathan Wrigley: I wondered if it was something that developers had been clamoring for.
[00:25:20] Ryan Welcher: I can remember like a year and a half ago spending half an afternoon figuring out, how can I do this? And it’s possible but, wow, is it ever in the weeds? So now it’s not. Now it’s like a filter that you just tell it where your template is and it shows up in your templates list.
[00:25:33] Nathan Wrigley: Once again, we’ll put the links into the show notes. Okay, next one. Alright, Preview Options API.
[00:25:41] Ryan Welcher: That’s a really big, fancy title for a new slot, for a slot fill. So in the preview panel where you can preview it as like a, you know, on mobile, desktop and tablet, there’s a slot that you can put something in there, and that’s kind of what it’s. So you can do whatever you want with it.
I’ve seen an example where people were toggling light and dark mode. You could have it, I mean, whatever you can imagine, you can put it in there because it’s a, like a slot is sort of like a hook, like an action.
[00:26:04] Nathan Wrigley: Yeah, nice and straightforward. This one for me is probably the most interesting one. I don’t know why, I just find myself drawn to this one. And it’s not an API, we’re talking about data views. What is that?
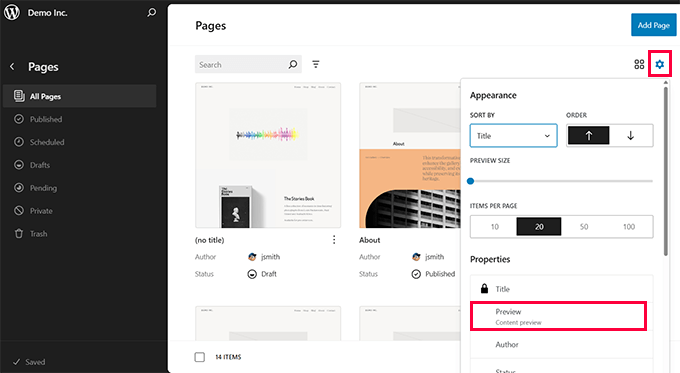
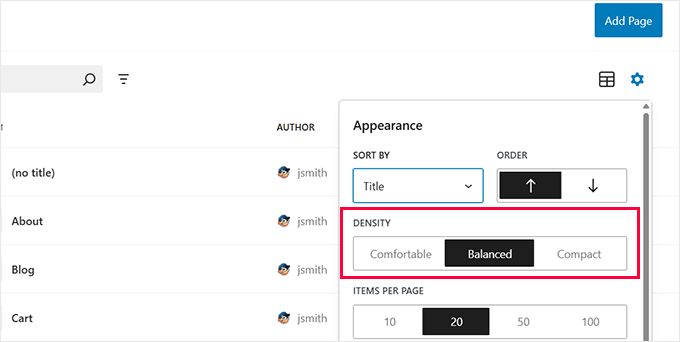
[00:26:16] Ryan Welcher: The data views is wildly powerful. It’s a component, a component in the sense of like a JavaScript component. It’s what powers a lot of the views that you get in the site editors. So if you go into like your templates, or your pages was the first one, you can see it in a grid view, you can see it in a list view.
I believe the intention is that, as the site editor sort of spreads into other parts, you’ll see it being used for things like the post list view and stuff like that. So it’s a super powerful component. It’s being used in Gutenberg. I believe it’s still technically experimental because they’re still working on it.
[00:26:48] Nathan Wrigley: Feels like a nice one, that one, not just for developers who are building websites, but also for clients themselves, because they can suddenly, I don’t know, you’re selling houses, real estate websites, something like that, and suddenly you’ve got this house, custom post type, something like that. And there’s this image and there’s a number of bedrooms and you can make it sortable and filterable. We want to drill into the houses that are between 150,000 and 300,000. We want to reverse the order, that kind of thing.
And the end user, the real estate agent will be able to do that. And so it’s going to make the whole project easier to understand, easier to maintain. So custom post types, pages, posts, users, that’s my understanding anyway. Is that done through a UI? Is that going to be done through a UI, or is that going to be something like opening up templates?
[00:27:37] Ryan Welcher: It’s a React component that you will provide the information. So right now it’s a little lower level I think, than they maybe want it to be because there’s a lot, I’m kind of just going off what I think rather than, like no one’s told me this. But having used it a little bit, there is definitely some API refinement that could be done, in the sense of like being able, because you have to provide literally everything for it to handle all of the actions for like sorting and all that stuff. And I think what they’re trying to do is make it a little bit easier to use. So you just give it data, as opposed to like having to define all the callbacks when you click a specific button and stuff like that.
[00:28:09] Nathan Wrigley: It’ll certainly make the UI, the admin area more, I don’t know, more feature rich. Hopefully this will bring it more into parity with all of those other platforms out there.
Have you, and again, this is not really something that you are talking about, but this was just something that occurred to me. The biggest visual change that I saw in WordPress 6.7 was zoom out, zoom out mode.
Yeah, I just think the first time I, okay, I’ll explain. So let’s say you drop a pattern into a post or a page or something like that. Suddenly the whole thing kind of just zooms away. The page, the pattern is somehow distant. Everything shrinks almost like a mobile view, and it kind of just happens without you invoking it. And so that’s what that is, I think. What’s the point of that?
[00:28:55] Ryan Welcher: So you could get a sense of what you’ve just inserted in the overall size of the content. So like, if you’re writing really long pieces, my workshop website, I have very long content because it’s like a step-by-step, huge code blocks. For me to be able to insert something and get a sense of where it is on the page and look at it, that’s kind of what that’s for.
[00:29:11] Nathan Wrigley: I have a fairly small laptop, and by the time that the left sidebar and the right sidebar and the block editor have all gone in there, by the time I’ve dropped a pattern in, there’s basically no real estate left on the screen for me to see what’s above it or below it. And this pulls it right out and gives you the impression of, well, there’s the whole blog post.
And although that sounds really trivial, if the branding and everything really matters and you want one thing to follow another, I don’t know, it’s a landing page or something like that. It just gives you that overview and you can obviously move things around. Yeah, it’s hard to describe how profound it is. But it makes that editing experience, especially for novices, just so much more straightforward.
[00:29:50] Ryan Welcher: Oh, for sure, like, and if you drop a complicated pattern in the wrong spot, you’ll see that immediately. So yeah, it’s like a, I keep using the phrase quality of life, but it really is like a, oh, that’s just a nice touch. It’s made your life a little easier. And that’s kind of like, you know, I know there’s a lot of refinements going into the UI to make the writing experience better and easier, so yeah.
[00:30:07] Nathan Wrigley: A little bit off piste, and I’m putting you on the spot here. If you had to pick one thing that’s coming that people may not know about, I mean, it doesn’t have to be something revolutionary, but just something that you are curious about that is going to drop soon. I don’t know, the next 6 or 12 months, something like that, that you think people will get something out of and enjoy and be excited about. I know that’s putting you on the spot.
[00:30:31] Ryan Welcher: I don’t have one thing per se. I’m super excited about the concept of bits. It’s a very complicated thing, but being able to define areas that you can edit in the editor. So for example, the example that probably makes the most sense without me showing, like using my hands because nobody can see me, is like when you have a block binding that is connected to a piece of post meta. That’s it. Let’s use the, whatever the byline aspect, you know? So it’s like a bio or something that’s connected in post meta.
If you just want to edit one part of it, you can’t. You could edit the whole field, but you can’t edit just one section of it. Or if you have something like, my block developer cookbook site’s got a cooking time block that says, it’s got a little like cooking timer icon, and then it’s got 10, and then it says minutes.
And, well, the 10 part is actually the post meta. But I can’t edit that in line in the block editor because the whole output is, it’s like a span tag with some stuff, right? And so what bits would allow me to do is delineate that, I want to be able to edit just the 10, just that number. And that’ll be super, super powerful. It’s like an editable area inside of a larger editable area.
[00:31:32] Nathan Wrigley: Oh yeah. And I can see that being powerful in a whole bunch of different ways. Yeah, that’s interesting.
[00:31:37] Ryan Welcher: Yes. Yeah. And there’s obviously the Interactivity API, obviously, but it is one of the most exciting things that I’ve, I mean, it’s already out and there’s just more stuff coming and they’re just doing really, really cool things. I just love it. It is so cool.
[00:31:50] Nathan Wrigley: Do you think, again, just kind of dropping you into it a little bit, do you think we’re at any risk of overcomplicating the amount of things that you can do in WordPress at the minute? Here’s an example. Let’s say I just took somebody off the street and said, here’s a brand new installed WordPress website. It allows you to make content, publish websites, off you go.
How realistic do you think it is with all the different bits and pieces that are dropping? I know you don’t have to get into the weeds of all this, but how easy do you think the UI is right now? Do you think it’s getting more complicated at the expense of, my question basically boils down to, are there too many options right now in the same UI, which make it difficult for people to understand who are new to the project?
[00:32:30] Ryan Welcher: That’s an interesting question. WordPress has had a philosophy of decisions, not options for a long time. And I think Gutenberg is providing more options now, which is good.
So like, if I were to take my mother who’s not technical at all and sit her down and say, build a website, she would probably have a better chance of doing it with Gutenberg than she would’ve pre 5.0, because she can control every part of it. I mean, I’d have to tell her how to do it all because she’s not technical.
But I think that there is a lot of options, but there’s also a lot of potential for creativity. And you have access to almost everything that you would need in the editor experience now, whereas you didn’t before. If you wanted to build a very customised theme, like in classic, and this isn’t like taking a shot at classic, but if you wanted to have a person post type, you couldn’t do that. You needed to edit code to be able to output that meta.
I mean, I’m sure there were plugins and stuff, but now you don’t really need to do that. You have everything that you need as long as you know where to click to find it. But it’s like, anybody who’s never used WordPress would have to figure that out in any platform. You’d have to sort that out. I mean, there’s a lot of options, which can be confusing, but now you can do whatever you want to do, for the most part.
[00:33:38] Nathan Wrigley: I think it’s curious because for the longest time people have been sort of saying, you know, the sky’s falling in, the job market for WordPress developers is just going to get hollowed out because the UI, you know, the ability to do things, a novice being able to do things, it’s difficult. We should make it more straightforward. There’s going to be no left work for, I don’t know, freelancers, implementers, that kind of thing.
I don’t think that’s the case. I think all of these options are getting put in and some of the things that we talked about, you know, the Interactivity API and all of that, that’s the technical stuff. So there’s all of these new possibilities that are getting created, but it’s not going to be, it’s not probably going to be in the boundaries, at the beginning anyway, of a complete novice.
So it’s creating new workflows for developers to push what’s possible inside of a WordPress website, and kind of maintaining the job market for people who are implementing already. But hopefully that fear will go away because of all these different things.
[00:34:32] Ryan Welcher: Yeah, I think it’s kind of like the way a lot of developers are looking at AI right now. People are terrified AI’s going to take over. It’s not, you’re just going going to have to learn to use AI to get the job done. You still need to have the skillset to tell it what you need to do, right?
It’s the same with all this. Like, so the interactivity API, it’s really cool, and it’s ripe for someone to write a library of interactions with a UI. So the implementers who don’t maybe write that level of JavaScript, or any JavaScript, can just install that plugin. And now they can make their animations, and it’s like an animation library that’s got a UI.
I think it’s just going to open up other opportunities for the people writing code and building plugins and things like that. I mean, I think with change, change is hard. People fear change, right? It’s figuring out what the new opportunities are.
[00:35:16] Nathan Wrigley: Okay, let’s just talk about AI for just a minute. I really don’t want to get too much into AI because I’m coming from a real point of ignorance. But like you said, there’s a ton of information, misinformation. I don’t know what the right word is, that AI is basically going to be able to make it possible for anybody to speak a sentence and have a website. Give me a website, I want to read all about cars. And you just go off and it’ll come up with a website for that particular purpose. Is WordPress aligning itself to be useful with AI, do you think?
[00:35:47] Ryan Welcher: Yeah, I think so. I mean, AI is the new hotness, right? And it’s getting less and less expensive to do the AI stuff, you know, the LLMs and all that stuff. And it’s getting better, and it’s only going to get better and smarter and faster. I think that there’s, again, it’s just going to change what you have to do as a developer, right?
I am behind on AI, but I’ve made a concerted effort to start using Cursor AI, which I think is a lot of fun. I’m finding that like, I still have to be a developer to tell it what I want, right? But you can absolutely say, hey, build me a website that sells cars. And it’ll build you a website that sells cars. Who knows what the code looks like, and if you can maintain it, and if there’s a bug in there, can you find it?
So I think there’s like, I don’t know, I’m sure there are people listening that are like, oh, you don’t know what you’re talking about. You can already do that in AI and it’s amazing. Because I’m just not, it’s like the running joke, in JavaScript it’s like, there’s a new library released every other weekend. I feel like there’s a new AI tool that’s like better and better and better like at every day.
[00:36:37] Nathan Wrigley: I am finding it fascinating that a lot of people who are putting out content into the WordPress space, videos and things like that, they’re making a concerted effort to bind AI into WordPress. It’s not like they’ve just pivoted completely to, let’s build websites with AI. It’s more, let’s find a thing in WordPress that we can do in a heartbeat, and we actually want to do it inside of WordPress, and let’s just add a piece of AI on top of that to enable me to do this curious thing, and solve this problem that I’ve got with a client website.
So it seems like people are using AI just to build stuff on top of WordPress, and not really the opposite. I haven’t seen any sort of move away. I don’t need WordPress anymore. That just doesn’t seem to be what I’m seeing.
[00:37:22] Ryan Welcher: And I think it’s because the people that are doing that are, that’s where they work is in WordPress, right? Like, if you’re using, I don’t know, Wix or whatever, or like Next.js or any sort of like other platform for web stuff, I think you would see people trying to apply these AI things to that.
I think it’s a huge opportunity for an AI to be able to create block patterns and create templates that work properly. It’s hard to do right now because I don’t think the LLMs really have the information for it. Like, it’s not because of the way that the data’s stored, it’s sort of different than, like it’s not really that well documented, maybe. I may not be making sense right now. There’s no real like example, right? Because it’s sort of different.
[00:37:58] Nathan Wrigley: We need you to create more examples, yeah.
[00:38:02] Ryan Welcher: I think what’s really exciting is that having to be in an, like an encyclopedia of APIs, having to like to the documentation site all the time, I think that’s going to go away. It’s already going away. Things like GitHub Copilot and these intergrated AI tools in IDEs and everything. Now you can just be like, write me a plugin that does this. Or like, what’s the parameter name that I need for WP Query to be able to do a taxonomy query, right? It’ll just tell you.
You can just do that. Let it do its thing while you’re working on other things. And I think the days of like Stack Overflow, you know what I mean? That’s like, you Google the problem and the first example, and most upvoted answer, gets copied and pasted, right? I think that’s going to, maybe not replace, but the new Stack Overflow is like these AI tools that you can ask questions on, how do I do this? I don’t know, I think it’s just changing things.
[00:38:45] Nathan Wrigley: I think it’s a really interesting time and it doesn’t make me feel I’m nervous. I’m more sanguine about it, in all honesty. Yeah, maybe a year ago I was kind of assuming a bit like the sky was going to fall in, but it really does appear that people who are making interesting things in the AI WordPress space are just finding curious holes, yeah. And filling them up.
Okay, so Jamie Marsland did something the other day where he put a video together where he created a little iPhone app where he could upload images and click a button and it was able to do what Jamie wanted. And I think the same will be true, you know, for clients that will come to you. I’ve got this unique problem. Maybe that would’ve taken a week of developer time in the past. Maybe now it will be able to be done in a heartbeat, in more like an hour or a couple of hours or something like that. So it makes the possibilities for real bespoke websites much more possible.
[00:39:33] Ryan Welcher: Yeah. And like hobbyists, kids who want to get into coding, that’s fantastic. You can just say, I want to build a website for my dog, and then all of a sudden they’re like learning by osmosis how coding works and that sort of stuff.
The number of times that I’ve talked to a developer, and I’ve done this myself, where I’ve built a little like one-off thing, like my wife likes to track, she’s really into gut health. So like all the different like vegetables and stuff, you know, this like little point system. So I built a, just a like a really simple little app for it. It was like a weekend project. I probably could’ve done it in like half an hour in AI, and like that would’ve been nice. And it’s, you know, she doesn’t care about the features. She doesn’t care about what the code looks like. She just wants this thing that she can track information on.
[00:40:13] Nathan Wrigley: Yeah, I think that’s going to be the curious thing. The thing that probably would’ve been a real cost benefit analysis in the past. They’re going to take, you know, something along the lines of that it would take three to six developers, six weeks to pull it off. Whereas now it’ll be, it’s going to take two developers an afternoon to pull it off. I mean, it might be that things need tidying up, but it just suddenly makes the possibilities, I don’t know, much more possible.
[00:40:38] Ryan Welcher: For sure. Like, there’s a classic joke about like unit tests in code. Like, ain’t nobody got time for unit tests, because once you’ve written the code, you’re never going to go back and write those tests. What if you told an AI, hey, go write all my unit tests for this code base. And even if it gets some of it wrong, you’re still going to get, you know, it’s going to save a lot of time, it’s going to do a lot of that busy work for you.
And I mean, I’ve never tested that. It would be really interesting to see, if we pointed it to like the WordPress repo, which has got, I don’t know what the percentage of test coverage is, but it just said, cover everything else in tests and see what happens. That’d be super fun. Who knows if it’d work, but yeah.
[00:41:11] Nathan Wrigley: I think it’s a really exciting time in WordPress. I think there’s so much going on. You’ve just described a whole ton of it over the past 40 minutes or so. Yeah, it’s really, genuinely feels like there’s a lot of scope for WordPress.
Well, whether the number goes up from 43 or stagnates kind of isn’t really what interests me. It’s more what’s possible, and the kind of crowd that you are going to be speaking to this week are the very, very audience that are going to make this stuff possible into the future.
So good luck and thank you. And I hope that the presentation goes well, and I pray that the internet holds up for you.
[00:41:43] Ryan Welcher: It’ll be a very one-sided, vote free presentation. So hopefully, hopefully they get it sorted out.
[00:41:50] Nathan Wrigley: Ryan Welcher, thank you so much for spending time with me today. It was really interesting. Thank you so much.
[00:41:55] Ryan Welcher: Thank you so much for having me.
On the podcast today we have Ryan Welcher.
Ryan is a Developer Advocate sponsored by Automattic. He focuses on removing barriers to adoption for developers working with Gutenberg and WordPress. He is a seasoned WordPress developer and regular contributor to WordPress and the Gutenberg project. He also streams on Twitch as RyanWelcherCodes where he focuses on custom block development.
This interview was recorded at WordCamp Asia 2025 in Manila, where Ryan was giving his “Block Developer Cookbook” workshop for the second year running. Ryan spends much of his time creating documentation, running live streams, and writing articles explaining the nuts and bolts of new WordPress features for developers. He shares his journey from admiring the “platform evangelists” of the Flash era to finding his own dream job helping developers understand and implement the newest technologies in WordPress.
We talk about some of the biggest recent updates to WordPress Core, including the Block Bindings API, Plugin Template Registration API, Preview Options API, and the new Data Views. Ryan breaks down what these new tools are, why they matter, and how they’re making WordPress block development both more powerful and more accessible.
He also discusses the growing emphasis on intentional, high-quality documentation and resources over the past few years, and how many teams are working to make life easier for developers of all skill levels.
We chat about the balance between the increasing flexibility of WordPress’s UI and the risk of overwhelming new users, as well as exploring how emerging technologies like AI are shaping the future for WordPress developers and hobbyists alike.
If you’re interested in what’s new in WordPress development, want to understand where the project is heading, or are curious about the real impact of recent changes and features, this episode is for you.
Ryan’s session at WordCamp Asia: The Block Developer Cookbook: WC Asia 2025 Edition
RyanWelcherCodes on Twitch
RyanWelcherCodes on YouTube
When I first tried to add podcast episodes to my WordPress website, I quickly realized that embedding them from Apple Podcasts wasn’t as straightforward as I’d hoped. Like many of you, I wanted a simple solution that wouldn’t require coding knowledge.
Through trial and error (and plenty of coffee), I discovered several different methods for embedding Apple Podcasts in WordPress. And by testing them all out, I found the best solutions for podcasters and other WordPress users.
In this guide, I’ll walk you through the exact steps you need to embed Apple Podcasts in WordPress, ensuring your audio content looks great and works perfectly on any device.
Whether you’re sharing your own show or featuring episodes from others, these methods make it easy to display an attractive, functional podcast player.
Apple Podcasts is one of the top platforms for discovering and listening to podcasts on iPhones, iPads, and other Apple devices.
If you have an audio show on Apple Podcasts, then embedding episodes on your WordPress site is a great way to promote your production and grow your audience.
Instead of linking out or using a generic player, you can display your episodes right on your podcast website, where listeners can instantly hit play.
When you embed your show:
Perhaps most importantly, any first-time website visitors who discover your brand or business will immediately know about your podcast. This can help you gain tons of new listeners.
Even if you’re not embedding your own show, featuring Apple Podcasts on your website is a great way to share your favorite podcast episodes or curate recommendations.
For example, if you’re a blogger, then you might include relevant episodes to enrich your articles or support key points. Meanwhile, businesses and authors can feature podcast appearances as social proof.
Additionally, online course creators could use embedded interviews or discussions as bonus material for students.
Related Posts: See our expert pick of the best podcasting plugins and the best podcast themes for WordPress.
Now that you know why embedding Apple Podcasts in WordPress is a smart move, I’ll walk you through 2 easy ways to do it – no technical skills required.
You can use the quick link below to jump to the different methods:
Ready? Let’s get started.
Note: The Apple Podcasts interface may look a bit different depending on whether you’re using the web, desktop, or mobile app. In this guide, the steps are based on the web version.
This method works well if you’re using the WordPress block editor and want a quick, free way to embed an Apple Podcasts episode.
You don’t need to install any plugins – just copy the embed code from Apple Podcasts and paste it into a ‘Custom HTML’ block.
That said, please note that some themes may style the embedded podcast player differently. So be sure to preview how it looks on mobile and desktop.
Step 1: Copying the Apple Podcast Embed Code
First, let’s head over to the Apple Podcasts site. You can do this on any browser — no need to use iTunes or the Apple Podcasts app.
Next, use the ‘Search’ bar in the left-hand panel to look for the podcast you want to feature. You can search by podcast title, episode name, and host name.
For example, I looked for a show called ‘The Climate Question.’
Once you find what you’re looking for, click on the relevant search result to open the show or episode.
On the podcast page, click the three-dot menu next to the ‘+ Follow’ button.
From the dropdown, go ahead and select ‘Copy Embed.’
Apple Podcasts will automatically copy the show’s embed code to your clipboard.
If you want to embed a specific episode, then you can scroll down the show page to the ‘Episodes’ list.
Give the three-dot menu in the episode section a click. Then, hit the ‘Copy Embed Code’ button.
Alternatively, you can click on a specific episode title.
This will take you to the episode’s page, where you can see a brief description of what the episode is about. You’ll also find links to social media pages, an email address for inquiries, the episode’s content rating (like Clean or Explicit), and details about the host.
Once there, just click the three-dot menu next to the ‘Play’ button and select ‘Copy Embed’ from the dropdown.
With that done, you have the episode’s embed code copied to your clipboard.
Step 2: Add the Apple Podcast Embed Code to WordPress
Now that you have the Apple Podcasts embed code, it’s time to add it to your WordPress website.
You can embed the player on any post or page. For this tutorial, I’ll show you how to embed it in a blog post using the block editor.
From your WordPress admin area, go to Posts » Add New or open an existing post where you want to add the podcast.
In the block editor, click the ‘+’ button to add a block.
Then, type ‘Custom HTML’ into the search bar and select the ‘Custom HTML’ block.
Paste the Apple Podcasts embed code you copied earlier into the block.
It should look something like this:
If you want to see how the Apple Podcasts player will look on the front end, select the HTML block and click the ‘Preview’ tab in the toolbar.
This will load the front-end preview of the player in the content editor.
If the embedded player looks good, go ahead and click ‘Publish’ (or ‘Update’ if you’re editing an existing post).
Now, your visitors can listen to Apple Podcasts directly from your site.
It’s that simple!
The Custom HTML block is a great free option, but it can feel a bit clunky, especially if you’re not comfortable working with code.
On the other hand, EmbedPress offers more streamlined embedding experience. With EmbedPress, you just need to paste the Apple Podcasts URL into the EmbedPress block, and it instantly shows a mobile-friendly player in your content.
Step 1: Get the EmbedPress Pro Plugin
To embed Apple Podcasts using EmbedPress, you’ll need the Pro version of the plugin.
You can visit the WPDeveloper website and sign up for a Pro account. Then, choose a plan based on how many sites you want to use it on.
After signing up, you’ll be redirected to your EmbedPress dashboard, where you’ll find:
You can download the .zip file and keep the tab open, as you’ll need the license key in the next step.
📝 Note: You’ll need EmbedPress Pro, not its free version to embed Apple Podcasts.
Upgrading to the premium version will also let you make your content exclusive, display video or image ads, tweak the player’s design, and add your own branding. It even allows you to enable lazy loading to improve site speed.
Step 2: Install EmbedPress Pro and Activate the License Key
Once you’ve downloaded the EmbedPress Pro .zip file from your account dashboard, it’s time to install it on your WordPress site.
In your WordPress admin area, go to Plugins » Add New.
Then, you can click the ‘Upload Plugin’ button at the top.
Choose the .zip file you downloaded from EmbedPress.
Then, click the ‘Install Now’ button followed by ‘Activate.’ For more detailed instructions, you can go to our guide on how to install a WordPress plugin.
The next step is to activate the premium plugin using your license key. To do this, go to EmbedPress » License in your WordPress dashboard.
Here, you will need to paste your license key (which you can find in your WPDeveloper dashboard) and click ‘Activate License.’
At this point, a verification code will be sent to the email address you used to purchase EmbedPress Pro.
Simply open the email, copy the verification code, and then return to this page to enter it in the new box that appears below the license key box. Then, hit ‘Verify.’
Once you activate the plugin, you’ll unlock support for premium platforms, including Apple Podcasts, and gain access to extra customization features.
Step 3: Copy the Apple Podcast URL
To embed Apple Podcasts into WordPress using EmbedPress, you’ll need the correct URL for the entire show or a specific episode.
Let’s say you want to copy a show link.
To do this, go to Apple Podcasts and use the search bar to find the show or episode you want to feature.
For example, I searched for ‘The Psychology of Your 20s.’
In the search results, click on the podcast name to open the show’s main page.
Then, click the three-dot button next to the ‘+ Follow’ button to expand the menu.
Now, go ahead and click the ‘Copy Link’ button to get the link for the show.
Apple Podcasts will then automatically copy the link to your clipboard.
Now, to copy a single episode link, scroll through the list of available episodes in the Apple Podcasts show.
Once you find what you’re looking for, click on the episode’s three-dot button and click the ‘Copy Link’ button.
Want to see more details about the episode?
Just click on the episode section to open its page. There, you’ll find a short description of the episode, links to social media pages, an email address for inquiries, the content rating (like Clean or Explicit), and information about the host.
From the episode’s individual page, click the three-dot button next to ‘Play.’
Then, select ‘Copy Link’ to get the episode’s link.
Alternatively, you can copy the show’s or episode’s URL directly from your browser’s address bar.
This saves you from having to find the three-dot menu and click the ‘Copy Link’ button.
Just make sure you’re right where you want to be: a show or a specific episode.
Step 4: Add the Apple Podcast URL to WordPress Using the EmbedPress Block
Next, it’s time to embed your podcast using the EmbedPress plugin.
You can add it to any page or post, but in this example, I’ll show you how to do it in a WordPress blog post.
From your WordPress dashboard, go to Posts » Add New or open an existing post.
In the block editor, you can click the ‘+’ button.
Then, search for the EmbedPress block.
Just select the block when it appears, and WordPress will add it to your content editor.
Next, simply paste the URL you copied before into the EmbedPress block.
Don’t forget to click the ‘Embed’ button or press ‘Enter.’
EmbedPress will instantly fetch and display the Apple Podcasts player right inside your editor.
You can adjust the player’s appearance right inside the ‘Block’ tab.
In the ‘General’ section, just set the width and height to control the size of the embedded player.
You can also toggle ‘Social Share’ to add social share buttons for Facebook, X (Twitter), and more to your Apple Podcasts embed.
This lets visitors easily share the episode on their social media accounts.
In addition, EmbedPress Pro includes monetization and content protection tools. You can find them in the ‘Ads Settings’ and ‘Content Protection’ sections in the ‘Block’ tab:
You can configure these settings as needed.
Once you’re happy with how the Apple Podcasts embed looks, just click ‘Publish’ or ‘Update’ to make it live.
Your visitors can now listen to the show directly from your site — and even share it on social media with a single click.
Embedding your Apple Podcasts in WordPress is just the beginning.
Here are some easy ways to grow your podcast audience and keep listeners coming back:
These small touches can go a long way in building a loyal podcast community. 🌐
Still have questions? Here are some common questions I get from readers looking to feature Apple Podcasts on their WordPress sites:
Can you embed a podcast into a WordPress website?
Yes, you can! WordPress supports both HTML embed codes and direct URLs for many podcast platforms. That means you can easily display podcast episodes using built-in blocks or plugins – no coding required.
How do you embed Apple Podcasts into a website?
The easiest way is to copy the embed code directly from Apple Podcasts and paste it into a Custom HTML block in WordPress.
Alternatively, you can use a plugin like EmbedPress, which lets you embed Apple Podcasts by simply pasting the episode URL.
Do I need a website for my podcast?
While it’s not required, having your own website gives you more control over your content, branding, and audience. You can promote episodes, collect emails, add show notes, and even improve SEO to reach more listeners. For details, see our guide on how to create a podcast.
Is WordPress a good option for a podcast website?
Yes, WordPress is a highly adaptable, beginner-friendly platform that supports a wide range of podcast plugins and themes. WordPress makes it easy to manage and promote your podcast in one place, whether you’re just starting out or growing your show.
I hope this guide has helped you learn how to embed Apple Podcasts in WordPress. Next up, you can check out our guide on how to start a podcast or our expert picks of the best podcast hosting.
If you liked this article, then please subscribe to our YouTube Channel for WordPress video tutorials. You can also find us on Twitter and Facebook.
The post How to Embed Apple Podcasts in WordPress (2 Easy Methods) first appeared on WPBeginner.
Many business owners feel stuck with HubSpot because they worry about losing their content, breaking their SEO rankings, or disrupting their email marketing. These are valid concerns – I had the same worries when I decided to migrate one of my HubSpot sites to WordPress.
The good news is that moving from HubSpot to WordPress is completely doable with the right approach. All you need is to follow the right steps in the right order.
Let me show you exactly how to move your site from HubSpot to WordPress while protecting your content, preserving your SEO rankings, and keeping your sanity intact.
Most people start using HubSpot because it is a powerful customer relationship manager (CRM) with marketing automation.
They tend to be really happy with it as a CRM, which doesn’t surprise me, as I love it myself. I even recommend it! See my detailed HubSpot review for more information.
However, what often happens is people start using the default blogging feature in HubSpot simply because it’s convenient. Then, they end up feeling limited.
I’ve worked with clients who started blogging on HubSpot and eventually felt the same way.
Now, I’ll be honest. HubSpot’s content management system is useful for landing pages and integrated marketing campaigns. But for blogging specifically? WordPress comes out on top.
Just making a simple design tweak or changing the layout of a post on HubSpot can feel like navigating a maze.
WordPress, on the other hand, is built for content. It started as a blogging platform and evolved into a powerhouse.
So, if blogging is a core part of your strategy, and you’re feeling a bit constrained by HubSpot, then WordPress can be super refreshing. You’ll get greater simplicity but more flexibility, more design control, and a whole lot more options to grow your blog the way you want.
Worried you won’t get to keep using all of HubSpot’s other powerful CRM features? The good news is that WordPress integrates seamlessly with the platform, so that won’t be an issue.
With any significant change, it’s helpful to know what lies ahead. Here is a brief roadmap of the journey we will take together:
All that said, you’re probably ready to move your site from HubSpot to WordPress! Here’s how you can do it step by step:
I’ll walk you through the entire process so you’ll be able to follow along even if you’re a beginner. But, if you change your mind at any time, you can always jump to the alternative option – which is getting help from the professionals.
Before you even think about touching anything in HubSpot, the first thing you’ll need to do is export your essential content. Later in this tutorial, you will import this content into WordPress.
It’s also wise to back up the link structure of your website. I’ll show you how to do both.
Exporting Your HubSpot Blog Content
The most important step in your WordPress migration is exporting your HubSpot blog content. Luckily, HubSpot makes it pretty easy to export your blog posts in a way you can import into WordPress.
Simply go to your HubSpot account and find your blog content at Content » Blog.
Now look for the ‘Export blog posts’ option on the ‘Actions’ drop-down menu.
This option will let you export your posts as a .CSV or Excel (XLS or XLSX) file. I personally like using the .CSV option because it can be easily imported into WordPress.
Once your blog has been exported, you will receive a link to the .CSV file in your email. You will have 90 days to download the file before it expires.
Exporting your blog posts like this is a great starting point because you can easily import them into your new WordPress website.
However, the export only includes your blog content, and not other pages like landing pages or sales pages. Later in this article, I’ll show you how to recreate those pages manually.
Backing Up Your Link Structure
Backing up your blog’s link structure is super important for SEO.
For this, you’ll need to gather a list of all the web addresses (URLs) from your HubSpot blog. This is important because we’ll use this list to create redirects. Redirects help maintain the SEO benefits you’ve built up over time, even after moving to WordPress.
For this, I like using a browser extension called Link Klipper, because it’s super handy. It’s also free and works with Chrome and compatible browsers.
To get started, install Link Klipper. Then, go to your HubSpot blog homepage. Click the Link Klipper icon in your browser toolbar and choose ‘Extract All Links.’
This will quickly grab all the links on that page and download them as a .CSV file. When you open this file in Excel or Google Sheets, you will see a list of your blog URLs.
Now, I recommend using Link Klipper as a quick and easy way to grab URLs. However, you can also use an online sitemap generator like XML-Sitemaps.com. This tool crawls your website and creates a list of URLs, which you can then export.
Sitemap generators can sometimes find more URLs than Link Klipper, as they crawl your entire site structure. XML-Sitemaps will generate the usual XML sitemaps, but also create a text file called urllist.txt containing all the URLs that you can easily use when creating redirects.
With your blog content, pages, and URLs exported, you’ve done a great job! You have a safety net and a set of files that can be imported into WordPress.
You need hosting to run a WordPress website. It’s non-negotiable since it provides your site with the resources it needs to be online.
A good hosting provider is like a reliable landlord – you want them to be dependable and keep things running smoothly.
In short, WordPress hosting is where all your WordPress content and files will live. It’s what makes your blog accessible to the world.
Now, you might be thinking, ‘Can’t I just install WordPress on my current HubSpot hosting?’ Unfortunately, no. HubSpot is a closed platform. You can’t install WordPress on HubSpot.
So, you’ll need to get new hosting specifically for your WordPress blog. If you’re new to WordPress or just want a straightforward experience, I recommend Bluehost.
Right now, they’re offering a deal for WPBeginner readers that includes a free domain name and a huge discount on hosting. You can get started for just $1.99 a month.
Alternatives: Hostinger and SiteGround are also popular hosting providers. They have good reputations and offer different features and price points. It’s worth checking them out if you want to compare.
For this guide, just to show you the general process, I’ll use screenshots from Bluehost. But honestly, the steps for most good WordPress hosts are pretty similar.
You can get started by visiting the Bluehost website and clicking the ‘Get Started Now’ button.
You’ll land on a page showing different hosting plans. For a new blog, especially when you’re just migrating over, the Basic plan is usually perfectly fine.
Choose a plan that fits your needs by clicking the ‘Select’ button.
Next up, you’ll need to set up a domain name. This is your blog’s web address, like www.yourblogname.com
.
Now, you probably want to keep using the same domain name you were using with your HubSpot blog, right?
The good news is that you can! Just choose the option that says ‘Use a domain you own’ and type in your current domain name.
Or, if you’re starting fresh with a new domain name, then you can choose to register a new one. This will be free for the first year.
Now, follow the steps to enter your account details and payment info and complete the purchase.
After you sign up, Bluehost (and most WordPress hosting providers) will send you a welcome email with your login details. Keep this email safe! You’ll need it to access your hosting account.
Now, here’s where picking a good WordPress hosting provider pays off.
When you log in to your Bluehost account for the first time, they will automatically install WordPress for you. I love how this streamlines setting up new WordPress websites.
From your Bluehost account page, go to ‘Websites’ then click ‘Edit Site.’
That should take you right into your brand-new WordPress dashboard.
Want a more thorough walkthrough of installing WordPress? My team has created a super detailed WordPress installation tutorial if you’re curious.
Alright, WordPress is installed. Now for the fun part: making it look like your website. That’s where themes come in.
WordPress themes are ready-made design blueprints for your blog. They control everything visual, like the colors, the fonts, and how your blog posts are laid out. It’s like choosing the style of your new house.
WordPress has a huge collection of themes. Seriously, thousands upon thousands. Free themes, paid themes, themes for every niche imaginable.
The WordPress Theme Directory is a good place to start exploring free themes.
But having too many choices can be a bit paralyzing. To help you narrow down the options, my team has created a helpful guide on selecting the perfect WordPress theme.
In my experience, clean, uncluttered designs tend to work best. They look professional, they’re easy for readers to navigate, and they put the focus on your content – which is the most important thing.
Once you’ve chosen and installed a theme, you’ll be ready for the next big step: actually moving your content from HubSpot into WordPress.
This step is like unpacking your moving boxes and arranging your furniture in your new WordPress home. It’s where your blog really starts to take shape.
At this point, you’re going to take the HubSpot content you exported earlier and import it into WordPress. To do that, I’m going to use a plugin called Import any XML, CSV or Excel File to WordPress.
First, you need to install and activate the plugin in your WordPress dashboard. If you need help, see our guide on how to install a WordPress plugin.
Once the plugin is activated, navigate to the All Import » New Import page in your WordPress dashboard. Once there, you should click the ‘Upload a file’ button.
Now, you’ll be asked to choose your import file. Remember the .CSV file you exported from HubSpot in step 1? You need to select it now and then click the ‘Import’ button.
The plugin will automatically detect the type of content you’re importing (usually “Posts” for blog posts). It’s pretty smart like that.
Next, click the ‘Continue to Step 2’ button. You will be shown a preview of the import file and can browse through a spreadsheet view of your posts, one at a time.
Once done, click ‘Continue to Step 3’ at the top or bottom of the page.
Now comes the important part: mapping fields. This is where you tell the plugin how the columns in your .CSV file correspond to fields in WordPress. Don’t worry, you only need to do this step once, not for each post.
For example, you’ll want to drag the column from your import file that contains your blog post titles to the Title field in WordPress.
You can do the same for the post content, tags, and any other data you exported from HubSpot. It’s like matching up labels on boxes when you’re unpacking – you want to put everything in the right place.
Once you’ve mapped all the fields, click ‘Continue to Step 4’ at the bottom of the page.
Next, you’ll be asked to set a unique identifier for your posts. This is used internally by WordPress to keep track of your imported content.
Just click the ‘Auto-detect’ button and the plugin will handle this for you.
Finally, click ‘Confirm & Run Import.’
The plugin will now start importing your content. The time it takes will depend on how much content you’re importing. For a large blog, it might take a few minutes.
Once it’s done, the plugin will show you an ‘Import Complete!’ message.
Now, you can navigate to Posts » All Posts in your WordPress dashboard. You should see your HubSpot blog posts there! Check them out to make sure all your blog posts are imported correctly.
Let’s talk about those special pages you might have built in HubSpot – landing pages, sales pages, or other custom pages.
Unfortunately, these often don’t transfer perfectly with a simple import like blog posts do. HubSpot’s page structure and design elements are quite different from WordPress.
So, the best approach for these pages is to recreate them in WordPress. It might sound like extra work, but it gives you the most control over the final result and makes sure everything looks right.
Now, while you could try to rebuild these pages using the standard WordPress block editor, it’s worth considering a dedicated page builder for landing pages.
The block editor is great for creating regular content pages and blog posts. It uses a system of blocks that you can easily add and arrange to build your page. However, for more complex layouts, a page builder plugin like SeedProd offers more advanced features and flexibility.
SeedProd is a drag-and-drop page builder specifically designed for creating landing pages, sales pages, and other marketing-focused pages. It offers a more visual and intuitive way to design intricate layouts without needing to write code.
Whenever I’ve used SeedProd, I’ve found it to be very user-friendly, even if you’re not a design expert. It has a visual interface, tons of pre-designed templates, and all sorts of elements you can just drag and drop onto your page.
The first step, of course, is to install and activate the SeedProd plugin. For details, see our tutorial on how to install a WordPress plugin.
Once SeedProd is active, you can go to SeedProd » Landing Pages in your WordPress menu and then click ‘Add New Landing Page.’
SeedProd will then show you a library of templates.
Browse through them and pick a template that looks similar to the HubSpot landing page you want to recreate.
Don’t worry about getting it exactly the same at this stage, you can customize everything later.
Next, give your new page a name and set the URL slug.
Click the ‘Save and Start Editing the Page’ button to open the SeedProd page builder.
Here’s where the fun begins! You’ll see a visual drag-and-drop interface. You can click on any element on the template and edit it – change text, images, colors, fonts, everything.
On the left-hand side, you’ll find a panel with all sorts of elements you can add to your page – headings, text blocks, images, videos, buttons, forms, and much more. Just drag and drop them onto your page to build your layout.
Take your original HubSpot landing page as a reference. Section by section, element by element, recreate it in SeedProd.
For more details, see our tutorial on how to create a landing page in WordPress.
Want to explore other page builder options? Thrive Architect is another excellent page builder plugin for WordPress, and it’s also very visual and drag-and-drop based.
Thrive Architect is particularly strong if you are heavily focused on marketing and sales pages. It’s built by the team behind Thrive Themes, which is known for its conversion-focused tools. It excels at creating high-converting sales pages, opt-in pages, and webinar registration pages.
If your primary goal is to build pages specifically designed to drive conversions and sales, Thrive Architect is a powerful alternative to consider.
Yes, recreating your HubSpot landing pages in WordPress takes a bit of hands-on work. However, it’s the most reliable way to bring those important pages over properly.
And the great news is, using a page builder like SeedProd makes the process much smoother and allows you to build even more powerful and customized landing pages in WordPress.
You might notice that after importing your content, your images are still being hosted on HubSpot’s servers. You’ve copied the text over, but the images are still living at their old address.
We need to bring those images into your WordPress Media Library. Why? Because it’s much better to host your images directly within your WordPress website. It’s more reliable, often faster, and gives you more control.
Imagine if HubSpot changed its image hosting structure or, worse case, you decided to close your HubSpot account completely down the line. Your images could disappear!
You’re able to import your images using a fantastic little plugin called Auto Upload Images. Please refer to our guide on how to install a WordPress plugin if you need help.
Note: You may notice that this plugin is outdated, but I tested it for this tutorial, and it was working fine. For details, see this guide on whether you should use outdated plugins.
Once activated, you need to trigger the bulk image import using the WordPress bulk edit feature. Don’t worry, you’re not actually editing anything, but just using the bulk edit to tell WordPress to re-process your posts and pages.
Head over to Posts » All Posts in your WordPress dashboard. Select all the posts where you imported content from HubSpot. You can usually do this by checking the checkbox at the very top of the post list.
Then, in the ‘Bulk actions’ dropdown menu, choose ‘Edit’ and click the ‘Apply’ button.
A bunch of bulk edit options will appear. Don’t panic! You don’t need to change anything here. Just click the blue ‘Update’ button at the bottom.
What this does is tell WordPress to re-save all the selected posts. And that action triggers the Auto Upload Images plugin to kick in.
The plugin will scan the content of each post, look for external image URLs (pointing to HubSpot), and then automatically download each image and import it into your WordPress Media Library.
It will then update the image URLs in your posts to point to the newly imported images in your Media Library.
Next, you need to repeat this exact same process for your Pages. Simply go to Pages » All Pages, select all your pages, choose ‘Edit’ in bulk actions, apply, and then just click ‘Update’.
If you need detailed instructions, then see my tutorial on how to easily import external images in WordPress.
After you’ve done this bulk update for both your posts and pages, go to Media » Library in your WordPress dashboard. You should see all those images from your HubSpot blog and pages in your WordPress Media Library!
If you were already using a custom domain name for your HubSpot blog (like yourblogname.com
), then you definitely want to keep using that same domain for your WordPress blog.
Why? Branding, for starters. You want people to find you at the same address. But also, and maybe even more importantly, for SEO.
Search engines have already associated your domain name with your content and authority. Keeping the same domain helps you maintain your search engine rankings.
To make this happen, you need to adjust your domain name settings. Specifically, you’re going to change something called nameservers.
Nameservers are like the internet’s phonebook for domain names. When someone types your domain name into their browser, the nameservers tell the internet where your website is hosted.
Right now, your domain name is likely pointing to HubSpot’s servers, where your HubSpot blog was hosted. We need to update it to point to your new WordPress hosting account.
Your WordPress hosting provider (like Bluehost, Hostinger, or SiteGround) will give you the nameserver information you need. It usually looks like a pair of addresses, something like:
ns1.yourhostingprovider.com ns2.yourhostingprovider.com
Your hosting provider will have the exact nameservers you need to use.
I usually find this information in my hosting account dashboard, but you can also check the welcome email they sent you when you signed up. If you’re not sure, then their support team can help you out. See the tips in my guide on how to contact WordPress support.
Okay, so where do you actually change these nameserver settings? That’s at your domain name registrar. This is the company where you registered your domain name in the first place.
Sometimes, your domain registrar is the same company as your hosting provider. But often, they are separate. Common domain registrars include companies like Domain.com, Network Solutions, or Namecheap.
You’ll need to log in to your account at your domain registrar. Find the settings for your domain name. Look for something like ‘DNS Settings’, ‘Nameservers’, or ‘Domain Management’.
For example, if your domain is registered with Bluehost, then the nameserver settings in their domain management area will look something like this:
The exact steps vary depending on your domain registrar. But the general idea is always the same: you need to replace the old nameservers (the ones pointing to HubSpot) with the new nameservers provided by your WordPress hosting company.
Our team has written a handy guide on how to easily change domain nameservers at many popular domain registrars if you need more detailed instructions.
Once you’ve updated your nameservers, it takes a little while for these changes to spread across the internet. This is called DNS propagation.
DNS propagation can take anywhere from a few hours to, in rare cases, up to 48 hours. During this time, some people might still see your old HubSpot blog, while others might start seeing your new WordPress blog. This is totally normal, don’t worry!
After DNS propagation is complete, when users enter your domain name into their browsers, they will be automatically directed to your WordPress site at its new hosting location.
You’re in the home stretch now! You’ve moved your content and images and pointed your domain to your new WordPress blog. But there’s another really important step for a smooth migration: setting up permalinks and redirects.
Your HubSpot blog probably had its own way of creating URLs. WordPress, naturally, has its own system too, called permalinks.
And here’s the thing. It’s highly likely that your old HubSpot URLs are different from how WordPress creates URLs by default.
Without proper URL redirection from your old HubSpot blog to your new WordPress site, visitors following the old blog post URLs will encounter 404 errors. These broken links not only frustrate users but also negatively impact your search engine rankings since Google penalizes sites with too many broken links.
To fix this issue, you need to do two key things:
Let’s start with permalinks.
Setting Up WordPress Permalinks
WordPress gives you control over how your website addresses (URLs) are structured. This is managed through permalink settings.
While you can choose any permalink structure, for the sake of this example, let’s choose ‘Post name’.
‘Post name’ permalinks create clean, easy-to-understand URLs that clearly include the title of your page or blog post. It incorporates keywords from your title, providing an additional SEO advantage and making it readable for people.
For example, instead of a URL that looks like this, which gives no context at all
yourblog.com/?p=123
You get something much nicer and more informative, like:
yourblog.com/your-blog-post-title
See the difference? The second option is much clearer.
Setting this up is quick and easy. In your WordPress dashboard, go to Settings » Permalinks.
You’ll see a section called ‘Common Settings.’ Find the option labeled ‘Post name’ and select it.
Then, just scroll down to the bottom of the page and click the ‘Save Changes’ button.
Done! Permalinks are set up. From now on, WordPress will use the post name structure for all your new blog posts and pages.
Setting Up Redirects From Your Old HubSpot URLs
Now for the redirects, which are extremely important for a smooth migration. Remember that list of old HubSpot URLs you grabbed using Link Klipper way back in the export step? We’re going to put it to good use.
To set up redirects in WordPress without pulling your hair out, I recommend the Redirection plugin. It’s free, it’s powerful, and it makes setting up redirects straightforward.
The first step is to install and activate the Redirection plugin. If you need help, then see our guide on how to install a WordPress plugin.
Once activated, you’ll find the Redirection plugin settings under Tools » Redirection.
In the Redirection plugin interface, you’ll see fields for Source URL and Target URL.
https://your-hubspot-blog.com/blog/my-awesome-post
, then you’d just enter /blog/my-awesome-post
.https://your-wordpress-blog.com/my-awesome-post/
, then you’d enter /my-awesome-post/
.Make sure the ‘301 – Moved Permanently’ option is selected for the Redirect Type. Using a 301 redirect is important for search engine optimization, or SEO. It signals to search engines that your content has moved permanently to a new address, and it helps you preserve link equity.
Link equity is the SEO ‘value’ or authority your old pages have built up over time, and 301 redirects help transfer that valuable equity to your new WordPress pages, maintaining your search engine ranking.
Finally, click the ‘Add Redirect’ button to save your redirect.
Now, you need to go through your entire list of old HubSpot URLs and repeat these steps for each one. Yes, it can take a bit of time, especially if you have a lot of blog posts. But it’s essential for a smooth transition.
Once you’ve added all your redirects, test them! Type your old HubSpot URLs into your browser and make sure they correctly redirect you to the right pages on your new WordPress site.
Alternative: Using All in One SEO (AIOSEO) for Redirects
Now, if you’re thinking about SEO seriously (and you should!), you might want to consider All in One SEO (AIOSEO). I use this plugin on my own websites, and it’s fantastic.
Yes, it’s a premium plugin, but it’s packed with SEO features to help your blog rank higher – and it includes a really handy Redirection Manager that lets you set up full site redirects.
What I really appreciate is that AIOSEO is an all-in-one SEO powerhouse. Instead of juggling separate plugins for redirects, sitemaps, schema, and everything else SEO-related, AIOSEO puts it all in one place.
Plus, its Redirection Manager is quite powerful and makes setting up even complex redirects straightforward. It’s a real time-saver and keeps my SEO workflow streamlined.
Now, if you’re like many HubSpot users, then you’re probably using HubSpot CRM to manage your leads and customer interactions. Good news! You can easily connect your new WordPress blog to your existing HubSpot CRM.
Think of it as keeping the best of both worlds – the flexibility of WordPress for your blog and the robust CRM capabilities of HubSpot.
The official HubSpot plugin lets you connect your WordPress site to your HubSpot account and unlock a bunch of useful features right within your WordPress dashboard.
With the HubSpot plugin, you can:
Simply install and activate the HubSpot plugin. For more details, see our step-by-step guide on how to install a WordPress plugin.
Once activated, the plugin will add a new HubSpot menu to your WordPress admin sidebar. This will take you to the setup wizard, where you can click the ‘Sign in here’ link at the top.
Once you have signed in, simply follow the prompts to connect the plugin to your existing HubSpot account.
After connecting, you can explore the HubSpot plugin settings to customize features like form embedding, live chat, and tracking options.
And that’s it! You’ve now integrated your WordPress blog with HubSpot CRM. You can now manage your blog content in WordPress while still making the most of HubSpot’s powerful CRM and marketing tools.
If you’d like a more detailed walkthrough of setting up HubSpot on your WordPress site, then see our guide on how to add a CRM on your WordPress site.
Bonus: Now that you’ve installed the HubSpot plugin, you can also set up HubSpot Analytics and create HubSpot forms in WordPress.
One of the best things about using WordPress is that you can easily extend your site’s features with plugins.
There are thousands of WordPress plugins available, both free and paid.
At WPBeginner, we put together a guide on how to pick the best plugins for your website. It’s worth a read to learn how to evaluate plugins and pick the right ones for your specific needs.
But to get you off to a flying start, here are a few top plugins we often recommend for almost every new WordPress blog:
For even more plugin ideas and recommendations, be sure to check out our comprehensive list of essential WordPress plugins. It’s packed with plugins we use and trust.
Okay, I’ve walked through all the steps to migrate your blog from HubSpot to WordPress. And you know what? For many of you, following these steps will be totally doable!
But let’s be real. Even with a detailed guide, moving a website from HubSpot to WordPress is still quite a technical project. And time-consuming.
Perhaps you’re not super comfortable with the website side of things. Or maybe you’re already juggling a million tasks and just want this migration done quickly, correctly, without headaches.
If that sounds like you, then WPBeginner can help. Our WordPress Website Design service team can design and build you a brand-new, custom WordPress website that’s perfectly tailored to your needs. They can handle the migration of your content from HubSpot, too.
If you’re curious to learn more about these services, or if you just have some questions, then you can easily chat with our support team on our Website Design Services page. They can give you all the details and help you figure out if professional migration help is the right path for you.
You’ve made the move from HubSpot to the wonderful world of WordPress!
Now, you might be looking at your new WordPress dashboard and thinking, ‘Okay, this is different!’ And you’d be right. WordPress works in its own way, and it has a lot of features and options that might be new to you if you’re coming from HubSpot.
Luckily, I can recommend tons of completely free resources to help you become a WordPress pro in no time. Here are just a few that I think you’ll find super helpful:
So, don’t feel overwhelmed by learning WordPress. With WPBeginner as your guide, you have all the resources you need right at your fingertips. Dive in, explore, and start enjoying the power and flexibility of WordPress!
I hope this tutorial helped you move your site from HubSpot to WordPress. You may also want to see my ultimate WordPress SEO migration checklist for beginners or my expert pick of the best WordPress migration services.
If you liked this article, then please subscribe to our YouTube Channel for WordPress video tutorials. You can also find us on Twitter and Facebook.
The post How to Move Your Site From HubSpot to WordPress (Step by Step) first appeared on WPBeginner.
WordPress 6.8 is finally here 🥳, and we’ve been testing it since the early beta. It’s the first major release of 2025 with several important changes.
You’ll notice speed improvements after the update, thanks to the new speculative loading feature that makes pages feel like they load before you click them.
This update also introduces better design tools, stronger password protection, and a more polished site editor.
We’ve explored all the new features, and in this guide, we’ll walk you through what’s changed, with examples and screenshots along the way.
⚠️ Heads up! If you’re not using managed WordPress hosting, then you’ll need to run the update yourself.
No stress — we’ve put together a step-by-step guide on how to update WordPress safely.
ℹ️Important: As always, please don’t forget to create a complete WordPress backup before updating to the new release.
Here is a quick list of what’s new in WordPress 6.8:
WordPress 6.8 now includes speculative loading, a clever technique that helps your site feel faster for visitors.
It works by quietly loading pages in the background before someone clicks a link. This way, the next page opens almost instantly.
Think of it like setting the table before your guest even walks into the room. By the time they sit down, everything’s already ready.
This is powered by the Speculation Rules API. WordPress watches for signs like hovering over a link and starts preloading that page just in case.
Developers can fine-tune how this works by setting rules, such as choosing which links get preloaded and when.
💡 Losing customers due to a slow website? Take a look at our Site Speed Optimization service. For a small fee, our real WordPress experts can completely optimize your website for blazing performance. 🚀
In WordPress 6.8, the Style Book is now available for classic themes that support the Full Site Editor.
Previously, this feature was limited to block themes only. Now more users can access it, even if they haven’t switched to a block-based design.
The Style Book gives you a visual overview of how your blocks look, including buttons, headings, forms, and more, all in one place.
You’ll find it by going to Appearance » Design » Styles when using a compatible classic theme. This makes it easier to preview and manage styles without needing to edit templates.
WordPress has also moved site patterns to Appearance » Design » Patterns. Grouping these settings together helps keep your workflow organized.
It’s a welcome upgrade if you’re using a classic theme but still want access to modern styling tools.
WordPress 6.8 introduces several updates that make customizing your site faster and more intuitive. Whether you’re adjusting global styles or editing individual blocks, these new features help you work more efficiently.
Set Any Image Block as a Featured Image
With just one click, you can now turn any image block into a featured image.
This makes the process quicker and avoids the need to go into post settings. And don’t worry — deleting the image block won’t remove the featured image from your post.
Switch Section Styles from the Toolbar
In zoomed-out mode, the toolbar now lets you switch between different section styles on the fly.
This is great for experimenting with layouts without hunting through menus or sidebars.
Global Styles Panel in the Site Editor
The Styles panel inside the Site Editor sidebar now makes it easier to manage your site’s look and feel.
You can adjust fonts, colors, spacing, and layout all in one place. This is a big time-saver when you want to update your site’s design without digging through settings.
Image Editing Now Includes an Undo Option
After editing an image, like cropping or rotating, you’ll see a success notice with an undo link.
This makes it easier to roll back edits if something doesn’t look right.
New Query Total Block
A new block called Query Total lets you display the total number of posts shown in a Query Loop.
It’s useful for archive pages, category filters, or search results where users want to know how many posts are being shown.
Quickly Set a Posts Page from the Page List
In the Site Editor, you can now assign any page as your blog’s posts page directly from the page list view.
This small improvement makes setting up your site’s structure much more straightforward.
If you’ve ever been frustrated by sticky posts always showing at the top of a query loop, then WordPress 6.8 has a fix.
You can now choose to ignore sticky posts when creating a custom post layout using the Query Loop block.
This gives you better control over the order of your posts, which is especially useful for category pages, blog archives, or custom layouts.
It’s a small checkbox, but it can make a big difference in how your content is displayed.
WordPress 6.8 brings helpful improvements to Data Views, making it easier to manage content in the admin area.
Now, layouts behave more consistently across post types. For example, you can choose to show content previews in the grid view for pages.
You can also change the density of tables in list views.
Depending on your preference, this helps you see more content at once or keep things more spacious.
These changes don’t jump out at first, but they really smooth out the experience of managing your site.
WordPress password security has been due for an upgrade, and it finally arrived in 6.8.
WordPress now uses bcrypt for hashing passwords. It’s much harder to crack and is widely trusted by developers for good reason.
Before this, WordPress used a system called phpass that relied on MD5 hashing. It worked, but it’s outdated, and a sophisticated attack could compromise it.
Expert Tip💡: Even with stronger password hashing, it’s still smart to add two-factor authentication. That way, hackers can’t log in even if they somehow get your password.
Bcrypt adds what’s called a “work factor.” That means it takes longer to process each guess, which slows down attacks and keeps your WordPress account safe.
If you’re running a site, you don’t have to change anything. WordPress will handle it for you quietly in the background.
It’s one of those updates you won’t notice day to day, but we’re glad it’s finally here.
Alongside the big features, WordPress 6.8 includes several smaller improvements that help polish the overall experience:
WordPress 6.8 also brings several behind-the-scenes improvements that developers and power users will appreciate. These changes improve performance, consistency, and flexibility under the hood:
wp_register_block_types_from_metadata_collection()
allows multiple block types to be registered with a single call. This helps plugin developers streamline their code. [Read more]body
tag. They make it easier to style different parts of a website with custom CSS. [#19736]We’ve been following WordPress 6.8 development from planning to the release, and it’s great to see so many thoughtful improvements packed into this update.
The new design tools make it easier to build beautiful websites. Performance updates like speculative loading help your site feel faster without extra effort.
Even behind the scenes, changes like bcrypt password hashing and better accessibility make a real impact, especially if you’re running a busy or growing site.
If you haven’t updated yet, then we recommend doing so after backing up your site. And once you’re in, take a few minutes to explore the new features — they’re easy to miss but fun to use.
If you liked this article, then please subscribe to our YouTube Channel for WordPress video tutorials. You can also find us on Twitter and Facebook.
The post What’s New in WordPress 6.8? (Features and Screenshots) first appeared on WPBeginner.
In an ecosystem built for the orchestration of LLMs, AI agents, and other generative tools, conversation is the tissue that connects all the individual nodes at play. A collection of advanced technologies is sequenced in perpetually intelligent ways to create automations of business processes that continue getting smarter. In these ecosystems, machines are communicating with other machines, but there are also conversations between humans and machines. Inside truly optimized ecosystems, humans are training their digital counterparts to complete new tasks through conversational interfaces — they’re telling them how to contextualize and solve problems.
These innovations, algorithms, and systems that get sewn together start to build what’s referred to as artificial general intelligence (AGI). Building on the idea of providing machines a balance of objectives and instructions, and a sort of system that’s achieved AGI, will only need an objective in order to complete a task. This leads to the more imminent organizational AGI we’ve been talking so much about. Josh wrote about this connection in an article last year for Observer:
There’s the immediate and tangible benefit of people eliminating tedious tasks from their lives. Then there’s the long term benefit of a burgeoning ecosystem where employees and customers are interacting with digital teammates that can perform automations leveraging all forms of data across an organization. This is an ecosystem that starts to take the form of a digital twin.
McKinsey describes a digital twin as “a virtual replica of a physical object, person, or process that can be used to simulate its behavior to better understand how it works in real life.” They describe these twins inhabiting ecosystems similar to what we’re describing here, that they call an “enterprise metaverse … a digital and often immersive environment that replicates and connects every aspect of an organization to optimize simulations, scenario planning, and decision making.”
Something as vast as an enterprise metaverse won’t materialize inside a closed system where the tools have to be supplied exclusively by Google or IBM. If you’re handcuffed to a specific LLM, NLP, or NLU vendor, your development cycles will be limited by their schedule and capabilities. This is actually a common misstep for organizations looking for vendors: it’s easy to think that the processing and contextualization of natural language is artificial intelligence — a faulty notion that ChatGPT in particular set ablaze. But LLMs and NLP/NLU are just individual pieces of technology that make up a much broader ecosystem for creating artificial intelligence. Perhaps more importantly, in terms of keeping an open system, LLMs and NLP/NLU are one of many modular technologies that can be orchestrated within an ecosystem. “Modular” means that, when better functionalities — like improved LLMs — emerge, an open system is ready to accept and use them.
In the rush to begin hyperautomating, LLMS have quickly proven to be the first stumbling block for many organizations. As they attempt to automate specific aspects of their operations with these tools that seem to know so much (but actually “know” basically nothing), the result is usually a smattering of less-than-impressive chatbots that are likely unreliable and operating in their own closed system. These cloistered AI agents are unable to become part of an orchestrated effort and thus create subpar user experiences.
Think of auto manufacturing. In some ways, it would be easier to manage the supply chain if everything came from one supplier or if the manufacturer supplied its own parts, but production would suffer. Ford — a pioneer of assembly-line efficiency — relies on a supply chain with over 1,400 tier 1 suppliers separated by up to 10 tiers between supply and raw materials, providing significant opportunities to identify and reduce costs and protect against economic shifts. This represents a viable philosophy where hyperautomation is concerned as well. Naturally, it comes with a far more complex set of variables, but relying on one tool or vendor stifles nearly every aspect of the process: innovation, design, user experience — it all suffers.
“Most of the high-profile successes of AI so far have been in relatively closed sorts of domains,” Dr. Ben Goertzel said in his TEDxBerkeley talk, “Decentralized AI,” pointing to game playing as an example. He describes AI programs playing chess better than any human but reminds us that these applications still “choke a bit when you give them the full chaotic splendor of the everyday world that we live in.” Goertzel has been working in this frontier for years through the OpenCog Foundation, the Artificial General Intelligence Society, and SingularityNET, a decentralized AI platform which lets multiple AI agents cooperate to solve problems in a participatory way without any central controller.
In that same TEDx talk, Goertzel references ideas from Marvin Minsky’s book The Society of Mind: “It may not be one algorithm written by one programmer or one company that gives the breakthrough to general intelligence. …It may be a network of different AIs, each doing different things, specializing in certain kinds of problems.”
Hyperautomating within an organization is much the same: a whole network of elements working together in an evolutionary fashion. As the architects of the ecosystem are able to iterate rapidly, trying out new configurations, the fittest tools, AIs, and algorithms survive. From a business standpoint, these open systems provide the means to understand, analyze, and manage the relationships between all of the moving parts inside your burgeoning ecosystem, which is the only way to craft a feasible strategy for achieving hyperautomation.
Creating an architecture for hyperautomation is a matter of creating an infrastructure, not so much the individual elements that exist within an infrastructure. It’s the roads, electricity, and waterways that you put in place to support houses and buildings, and communities. That’s the problem a lot of organizations have with these efforts. They’re failing to see how vast it is. Simulating human beings and automating tasks are not the same as buying an email marketing tool.
The beauty of an open platform is that you don’t have to get it right. It might be frightening in some regards to step outside a neatly bottled or more familiar ecosystem, but the breadth and complexity of AI are also where its problem-solving powers reside. Following practical wisdom applied to emergent technologies — wait until a clear path forward emerges before buying in — won’t work because once one organization achieves a state of hyperautomation, their competitors won’t be able to catch them. By choosing one flavor or system for all of your conversational AI needs, you’re limiting yourself at a time when you need as many tools as you can get. The only way to know what tools to use is to try them all, and with a truly open system, you have the power to do that.
As you can imagine, this distributed development and deployment of microservices gives your entire organization a massive boost. You can also create multiple applications/skills concurrently, meaning more developers working on the same app, at the same time, resulting in less time spent in development. All of this activity thrives because the open system allows new tools from any vendor to be sequenced at will.
This article was excerpted from Chapter 11 of the forthcoming revised and updated second edition of Age of Invisible Machines, the first bestselling book about conversational AI (Wiley, Apr 22, 2025).
Featured image courtesy: by north.
The post Orchestrating LLMs, AI Agents, and Other Generative Tools appeared first on UX Magazine.
To ensure that technology remains truly useful as its power grows exponentially, we need to keep a few basic questions at the center of our thinking. Who is this technology built for? What problems will the people it benefits need to solve and want solved by AI? How might they employ AI agent solutions to find a resolution?
I began asking these questions decades ago, while doing user-centered design work that eventually led to the founding of one of the world’s first UX agencies, Effective UI (now part of Ogilvy). Terms like user-centric and customer experience weren’t in the vernacular, but they were central to the work we did for clients. For one project, I was part of a cross-disciplinary team tasked with redesigning the cockpit of the 747 for the 787 Dreamliner. The Dreamliner was going to have a carbon fiber cockpit, which allowed for bigger windows, which left less space for buttons, and the Dreamliner was going to need more buttons than the button-saturated 747.
Our solution changed the way I thought about technology forever. We solved the button problem with large touchscreen panels that would show the relevant controls to the pilots based on the phase of the flight plan the plane was in. While there’s some truth to the idea that these planes do a lot of the flying automatically, the goal wasn’t to make the pilots less relevant, it was to give them a better experience with a lighter cognitive load. To fly the 747, pilots had to carry around massive manuals that provided step-by-step instructions for pressing buttons in sequence to execute specific functions during flight — manuals that there was barely room for in the crowded cockpits.
The experience of flying a commercial airplane became more intuitive because we were able to contextualize the pilot’s needs based on the flight plan data and provide a relevant interface. Context was the key to creating increasingly rewarding and personalized experiences. The other massive takeaway for me was that if you can automate a 787, you can automate a company.
Of all the experiences people have with technology, conversational ones are typically some of the worst, though thankfully, that’s changing. Creating a framework where conversational AI and AI agents can thrive, though insanely difficult work, creates unmatched potential.
As a technologist, builder, and designer, I’ve been deploying and researching conversational AI for more than two decades. Some of my early experiments with conversational AI came to be known as Sybil, a bot I built about 20 years ago with help from Daisy Weborg (my eventual co-founder of OneReach.ai). The internet was a less guarded space back then, and in some ways, it was easier to feed Sybil context. For example, Sybil could send spiders crawling over geo-tagged data in my accounts to figure out where I was at any given moment. Daisy loved the “where’s Robb” skill because I was often on the move in those days, and she could get a better sense of my availability for important meetings.
Recently, I had a conversation with Adam Cheyer, one of the co-creators of Siri. When I was working on Sybil, I wasn’t fully aware of the work Adam was doing at Siri Labs. Likewise, he wasn’t hip to what I was doing either. Interestingly, though perhaps unsurprisingly in retrospect, we were trying to solve many of the same problems.
Adam mentioned a functionality that was built into the first version of Siri that would allow you to be reading an email from someone and ask Siri to call that person. That might sound simple, but it’s a relatively complex task, even by today’s standard. In this example, Siri is connecting contact information from Mail with associated data in Contacts, connecting points between two separate apps to create a more seamless experience for users.
“At the time, email and contacts integration wasn’t very good,” Cheyer said on our podcast. “So you couldn’t even get to the contact easily from an email. You had to leave an app and search for it. And it was a big pain. “Call him.” It was a beautiful combination of manipulating what’s on the screen and asking for what’s not on the screen. For me, that’s the key to multimodal interaction.”
Adam went on to mention other functionalities that he assumed had been lost to the dustbin of history, including skills around discovery that he and Steve Jobs fought over. Apple acquired Siri in 2010, and the freestanding version of the app had something called semantic autocomplete. Adam explained that if you wanted to find a romantic comedy playing near you, typing the letters “R” and “O” into a text field might auto-complete to show rodeos, tea rooms, and romantic comedies. If you clicked “romantic comedy,” Siri would tell you which romantic comedies were showing near you, along with info about their casts and critical reviews. This feature never made it into the beta version of Siri that launched with the iPhone 4S in October 2011.
“I feel that because I lost that argument with Steve, we lost that in voice interfaces forever. I have never seen another voice assistant experience that had as good an experience as the original Siri. I feel it got lost to history. And discovery is an unsolved problem.”
I’m sharing these stories from Adam for two reasons. One, to remind you that there are people who have been working for decades on conversational AI. ChatGPT blew the doors open on this technology to the public, but for those of us who’ve been toiling on the inside for years, the response was something along the lines of, “Finally, people will believe me when I talk about how powerful this technology is!”
Another reason for sharing is that Adam’s experience with Steve Jobs illustrates that the choices we make now with this technology will set a trajectory that will become increasingly difficult to reset. With their ability to mine unstructured data (like written and recorded conversations), large language models (LLMs) have the power to solve the problem of discovery, but this is a problem that Adam and I have been circling for more than 20 years. Things might have been different if he’d won that argument with Jobs.
You see, the ultimate goal isn’t that we can converse with machines, telling them every little thing we want them to do for us. The goal is for machines to be able to predict the things we want them to do for us before we even ask. The ultimate experience is not one where we talk to the machine, but one where we don’t need to, because it already knows us so well. We provide machines with objectives, but they don’t really need explicit instructions unless we want something done in a very specific way.
Siri’s popularity, along with the widespread adoption of smart speakers and Amazon’s Alexa, made something else clear to me. Talking to speakers in your house can be fun, but there’s really only so much intrinsic value in an automated home. Home is generally a place for relaxation, not productivity. Being able to walk into your office and engage in conversation with technology that’s running a growing collection of business process automations is where the real wealth of opportunity lies. Orgs are going to want their own proprietary versions of Alexa or Siri in different flavors. Intelligent virtual assistants that are finely tuned to meet an organization’s security and privacy needs. Still, coming up on ten years after the introduction of Alexa, there’s still no version of that within a business.
Due to the inherently complex nature of the tasks, the lack of maturity in the tools, and the difficulty in finding truly experienced people to build and run them, creating better-than-human experiences is extremely difficult to do. I once heard someone at Gartner call it “insanely hard.” Over the years, I’ve watched many successful and failed implementations (including some of our own crash-and-burn attempts). Automating chatbots on websites, phone, SMS, WhatsApp, Slack, Alexa, Google Home, and other platforms, patterns began to emerge from successful projects. We began studying those success stories to see how they compared to others.
My team gathered data and best practices over the course of more than 2 million hours of testing with over 30 million people participating in workflows across 10,000+ conversational applications (including over 500,000 hours of development). I’ve formulated an intimate understanding of what it takes to build and manage intelligent networks of applications and, more importantly, how to manage an ecosystem of applications that enables any organization to hyperautomate.
For most companies, ChatGPT has been a knock upside the head, waking them up to the fact that they’re already in the race toward hyperautomation or organizational artificial general intelligence (AGI). As powerful as GPT and other LLMs are, they are just one piece of an intelligent technology ecosystem. Just like a website needs a content strategy to avoid becoming a collection of disorganized pages, achieving hyperautomation requires a sound strategy for building an intelligent ecosystem and the willingness to quickly embrace new technology.
We’ve seen how disruptive this technology can be, but leveraged properly, generative AI, conversational interfaces, AI agents, code-free design, RPA, and machine learning are something more powerful: they are force multipliers that can make companies that use them correctly impossible to compete with. The scope and implications of these converging technologies can easily induce future shock — the psychological state experienced by individuals or society at large when perceiving too much change in too short a period of time. That feeling of being overwhelmed might happen many times when reading this book. Organizations currently wrestling with their response to ChatGPT — that are employing machines, conversational applications, or AI-powered digital workers in an ecosystem that isn’t high functioning—are likely experiencing some form of this.
The goal for this book is to alleviate future shock by equipping problem solvers with a strategy for building an intelligent, coordinated ecosystem of automation — a network of skills shared between intelligent digital workers that will have a widespread impact within an organization. Following this strategy will not only vastly improve your existing operations, but it will also forge a technology ecosystem that immediately levels up every time there’s a breakthrough in LLMs or some other tool. An ecosystem built for organizational AI can take advantage of new technologies the minute they drop.
It took me 20 years to develop the best practices and insights collected here. I’ve been fortunate to have had countless conversations about how conversational AI fits into the enterprise landscape with headstrong business leaders. I’ve seen firsthand how a truly holistic understanding of the technologies associated with conversational AI can make the crucial difference for enterprise companies struggling to balance the problems that come with this fraught territory. That balance will only come about when the people working with it have a strategy that can put converging technologies to work in intelligent ways, propelling organizations and, more broadly, the people of the world, into a bold new future.
This article was excerpted from Chapter 6 of the forthcoming revised and updated second edition of Age of Invisible Machines, the first bestselling book about conversational AI (Wiley, Apr 22, 2025).
Featured image courtesy: by north.
The post You Can Automate a 787 — You Can Automate a Company appeared first on UX Magazine.
By many accounts, AI Agents are already here, but they are just not evenly distributed. However, few examples yet exist of what a good user experience of interacting with that near-futuristic incarnation of AI might look like. Fortunately, at the recent AWS Re: Invent conference, I came upon an excellent example of what the UX of interacting with AI Agents might look like, and I am eager to share that vision with you in this article. But first, what exactly are AI Agents?
Imagine an ant colony. In a typical ant colony, you have different specialties of ants: workers, soldiers, drones, queens, etc. Every ant in a colony has a different job — they operate independently yet as part of a cohesive whole. You can “hire” an individual ant (Agent) to do some simple semi-autonomous job for you, which in itself is pretty cool. However, try to imagine that you can hire the entire ant hill to do something much more complex or interesting: figure out what’s wrong with your system, book your trip, or …Do pretty much anything a human can do in front of a computer. Each ant on their own is not very smart — they are instead highly specialized to do a particular job. However, put together, different specialties of ants present a kind of “collective intelligence” that we associate with higher-order animals. The most significant difference between “AI,” as we’ve been using the term in the blog, and AI Agents is autonomy. You don’t need to give an AI Agent precise instructions or wait for synchronized output — the entire interaction with a set of AI Agents is much more fluid and flexible, much like an ant hill would approach solving a problem.
There are many different ways that agentic AI might work — it’s an extensive topic worthy of its own book (perhaps in a year or two). In this article, we will use an example of troubleshooting a problem on a system as an example of a complex flow involving a Supervisor Agent (also called “Reasoning Agent”) and some Worker Agents. The flow starts when a human operator receives an alert about a problem. They launch an investigation, and a team of semi-autonomous AI Agents led by a supervisory Agent helps them find the root cause and make recommendations about how to fix the problem. Let’s break down the process of interacting with AI Agents in a step diagram:
A multi-stage agentic workflow pictured above has the following steps:
Just like in the case of contracting a typical human organization, a Supervisor AI Agent has a team of specialized AI Agents at their disposal. The Supervisor can route a message to any of the AI Worker Agents under its supervision, who will do the task and communicate back to the Supervisor. The Supervisor may choose to assign the task to a specific Agent and send additional instructions at a later time when more information becomes available. Finally, when the task is complete, the output is communicated back to the user. A human operator then has the option to give feedback or additional tasks to the Supervising AI Agent, in which case the entire process begins again.
The human does not need to worry about any of the internal stuff — all that is handled in a semi-autonomous manner by the Supervisor. All the human does is state a general request, then review and react to the output of this agentic “organization.” This is exactly how you would communicate with an ant colony if you could do such a thing: you would assign the job to the queen and have her manage all of the workers, soldiers, drones, and the like. And much like in the ant colony, the individual specialized Agent does not need to be particularly smart or to communicate with the human operator directly — they need only to be able to semi-autonomously solve the specialized task they are designed to perform and be able to pass precise output back to the Supervisor Agent, and nothing more. It is the job of the Supervisor Agent to do all of the reasoning and communication. This AI model is more efficient, cheaper, and highly practical for many tasks. Let’s take a look at the interaction flow to get a better feel for what this experience is like in the real world.
For simplicity, we will follow the workflow diagram earlier in the article, with each step in the flow matching that in the diagram. This example comes from AWS Re: Invent 2024 — Don’t get stuck: How connected telemetry keeps you moving forward (COP322), by AWS Events on YouTube, starting at 53 minutes.
The process starts when the user finds a sharp increase in faults in a service called “bot-service” (top left in the screenshot) and launches a new investigation. The user then passes all of the pertinent information and perhaps some additional instructions to the Supervisor Agent.
Now, in Step 2, the Supervisor Agent receives the request and spawns a bunch of Worker AI Agents that will be semi-autonomously looking at different parts of the system. The process is asynchronous, meaning the initial state of suggestions on the right is empty: findings do not come immediately after the investigation is launched.
Now the Worker Agents come back with some “suggested observations” that are processed by the Supervisor and added to the Suggestions on the right side of the screen. Note that the right side of the screen is now wider to allow for easier reading of the agentic suggestions. In the screen below, two very different observations are suggested by different Agents, the first one specializing in the service metrics and the second one specializing in tracing.
These “suggested observations” form the “evidence” in the investigation that is targeted at finding the root cause of the problem. To figure out the root cause, the human operator in this flow helps out: they respond back to the Supervisor Agent to tell it which of these observations are most relevant. Thus, the Supervisor Agent and human work side by side to collaboratively figure out the root cause of the problem.
The human operator responds by clicking “Accept” on the observations they find relevant, and those are added to the investigation “case file” on the left side of the screen. Now that the humans have added some feedback to indicate the information they find relevant, the agentic process kicks in the next phase of the investigation. Now that the Supervisor Agent has received the user feedback, they will stop sending “more of the same” but instead will dig deeper and perhaps investigate a different aspect of the system as they search for the root cause. Note in the image below that the new suggestions now coming in on the right are of a different type — these are now looking at logs for a root cause.
Finally, the Supervisor Agent has enough information to take a stab at identifying the root cause of the problem. Hence, it switches from evidence gathering to reasoning about the root cause. In steps 3 and 4, the Supervisor Agent was providing “suggested observations.” Now, in Step 5, it is ready for a big reveal (the “denouement scene,” if you will) so, like a literary detective, the Supervisor Agent delivers its “Hypothesis suggestion.” (This is reminiscent of the game “Clue” where the players take turns making “suggestions,” and then, when they are ready to pounce, they make an “accusation.” The Supervisor Agent is doing the same thing here!)
The suggested hypothesis is correct, and when the user clicks “accept,” the Supervisor Agent helpfully provides the next steps to fix the problem and prevent future issues of a similar nature. The Agent almost seems to wag a finger at the human by suggesting that they “implement proper change management procedures” — the foundation of any good system hygiene!
There are many reasons why agentic flows are highly compelling and are a focus of so much AI development work today. Agents are compelling, economical, and allow for a much more natural and flexible human-machine interface, where the Agents fill the gaps left by a human and vice versa, literally becoming a mind-meld of human and a machine, a super-human “Augmented Intelligence,” which is much more than the sum of its parts. However, getting the most value from interacting with agents also requires drastic changes in how we think about AI and how we design user interfaces that need to support agentic interactions:
Regardless of how you feel about AI Agents, it is clear that they are here to stay and evolve alongside their human counterparts. It is, therefore, essential that we understand how agentic AIs work and how to design systems that allow us to work with them safely and productively, emphasizing the best of what humans and machines can bring to the table.
The article originally appeared on UX for AI.
Featured image courtesy: Greg Nudelman.
The post Secrets of Agentic UX: Emerging Design Patterns for Human Interaction with AI Agents appeared first on UX Magazine.
Too often, UX design gets confined to a silo, separated from other crucial functions within an organization. This isolation can lead to subpar user experiences, missed opportunities, and ultimately, frustrated users. To truly elevate UX, designers need to break free from this silo and embrace collaboration with product managers, engineers, and stakeholders.
UX design isn’t just about beautiful interfaces; it’s about understanding user needs and creating solutions that are both usable and desirable. This requires a deep understanding of the product’s purpose, technical feasibility, and business goals. Collaboration enables UX designers to:
To create truly user-centric digital experiences, UX designers need to work closely aligned with other disciplines such as product management and engineering. This means collaborating on user research, analyzing data together, and jointly creating user personas. This shared understanding ensures everyone is on the same page when it comes to user needs and priorities. It also means involving UX designers in product roadmap discussions so that user experience considerations are baked into feature planning and release cycles.
Furthermore, design decisions should be driven by data, not just intuition. UX designers and product managers should work together to define key performance indicators (KPIs) and track user behavior. This data can then be used to inform design decisions and validate whether the product is meeting user needs and achieving business goals. This collaborative approach ensures that the user experience is not only delightful but also effective in driving desired outcomes.
Imagine a scenario where UX designers work in isolation, creating a beautiful and user-friendly interface without consulting any other disciplines. Later, it’s discovered that the design is technically infeasible or requires significant compromises. This leads to frustration, delays, and a subpar user experience.
When UX designers and engineers aren’t on the same page, it can lead to some serious design disasters. Imagine a beautiful design that’s impossible to build, or a technically sound feature that’s a nightmare to use. These disconnects often stem from designers focusing solely on aesthetics without considering technical limitations or usability.
Another common pitfall is neglecting performance. A design might look stunning on a high-powered computer but become a slow, clunky mess on a mobile device or slower internet connection. These issues frustrate users, increase support requests, and ultimately damage the brand’s reputation. Effective collaboration is essential to avoid these pitfalls and ensure a smooth, enjoyable user experience.
With product managers, collaboration is essential to ensure that the user experience aligns with business goals. When this collaboration breaks down, you might end up with a fantastic feature that nobody needs, or a functional product that lacks user delight. Designers need to understand the product strategy and business objectives, while product managers need to appreciate the value of user-centered design. By collaborating on user research, analyzing data, and defining key performance indicators (KPIs), UX designers and product managers can create user experiences that are both enjoyable and effective in achieving business goals.
Collaboration can go off the rails when teams work in isolation, communication breaks down, or egos get in the way. This leads to misaligned goals, missed deadlines, and ultimately, a frustrating experience for everyone involved, including the end-user. Remember, teamwork makes the dream work!
Collaboration is not just a buzzword; it’s essential for creating truly exceptional user experiences. By breaking down silos and embracing collaboration, UX designers can tap into a wealth of knowledge and perspectives, leading to more innovative, user-centered, and successful products. Remember, Rodolpho, the best UX is a team effort!
Featured image courtesy: Headway.
The post Beyond the Design Silo: How Collaboration Elevates UX appeared first on UX Magazine.
Remember when online shopping was a novelty? Back then, buying something on the internet felt like an experiment. You’d wait days, sometimes weeks, for your order to arrive, unsure if it would even meet your expectations. Fast forward to today, and e-commerce has transformed retail in Southeast Asia, making online shopping a seamless, everyday habit for millions.
This transformation didn’t happen by accident — it required a keen sense of what might come next. Being able to look ahead, anticipating changes, and preparing for them before they happen. This is what we mean by foresight.
It’s not about guessing the future but thinking through different possibilities and adapting strategies based on what might unfold. In e-commerce, it’s about seeing shifts in technology, like how more people would shop through their phones, or predicting changes in consumer behavior, like the growing appeal of interactive and social shopping.
For e-commerce platforms in Southeast Asia, this meant looking beyond their borders, sometimes borrowing ideas from other markets, but always adapting them to local needs¹. They anticipated that a mobile-first approach would thrive in a region where over 90% of internet users are on smartphones².
They knew that making shopping feel fun and social — by adding live streams or games — would keep people coming back, even when they weren’t ready to buy³. And they adjusted their payment methods to fit markets with different banking habits, understanding that many customers would still prefer cash-on-delivery options.
Adapting to these challenges isn’t unique to e-commerce. Across industries, understanding localized contexts plays a critical role in designing solutions that resonate with users. For instance, tools created for small business owners require tailoring to their specific workflows and aspirations to ensure that the design aligns with their realities and goals. (See case study here.)
In e-commerce, this principle translates into finding ways for platforms to respond to declining purchasing power and shifting consumer habits while evolving to maintain dominance. Scenario analysis provides a valuable framework for anticipating which strategies will be most effective, particularly in today’s context of economic uncertainty.
The current state of e-commerce platforms reflects a scenario where decreasing purchasing power and large platforms dominate — a dynamic we refer to as the dominance of cost-efficient platforms.
In such scenarios, large e-commerce platforms have a better advantage because they can leverage economies of scale to offer competitive pricing while keeping consumers engaged through innovative features. Their ability to tailor payment options, such as Cash on Delivery (COD), further solidifies their foothold in cost-sensitive markets.
As Indonesia faces its current economic situation, the urgency for traditional retailers to adapt cannot be overstated. With deflation occurring over five consecutive months earlier this year (May-September 2024), purchasing power remains strained, and the once-thriving middle class continues to face challenges, with many slipping into the lower-income bracket.
In this environment, traditional retailers — ranging from larger chain stores like Matahari Department Store, Ramayana, and Hypermart, to smaller, family-run shops and warungs, which have long been the backbone of Indonesia’s retail ecosystem — face a harsh reality. Their survival is at risk as they struggle to compete against large e-commerce platforms that are better equipped to handle economic downturns.
For these retailers, foot traffic has always been critical to sustaining business. Whether it’s the busy floors of a department store or a local warung thriving off neighborhood loyalty, the success of traditional retail has long depended on in-person interactions and immediate sales. However, during an economic downturn, fewer consumers are visiting physical stores, opting instead for the convenience and savings offered by online platforms⁴.
The balance of power tilts heavily in their favor. Platforms like Shopee, Lazada, and Tokopedia not only have the ability to offer more competitive pricing but also control vast logistics and distribution networks that allow them to reach consumers faster and more efficiently.
In a situation where purchasing power is low, this control over both cost and convenience makes them the preferred choice for consumers looking to stretch their budgets. On the other hand, traditional retailers, with their higher fixed costs (rent, staffing) and less flexible infrastructure, cannot compete as easily on price or convenience.
In light of these challenges, understanding the future of retail in Indonesia requires more than just looking at present trends — it involves planning for multiple possible futures.
Given the uncertainties in both purchasing power and market structures, we use a foresight framework, a strategic approach widely used by policymakers, business leaders, and innovators to anticipate a range of potential outcomes and assess long-term impacts on industries and societies. By helping decision-makers recognize and prepare for diverse possibilities, foresight enhances resilience and adaptability in uncertain environments. (See here for more details.)
The matrix shown here offers a structured way to examine how different dynamics could unfold over time. The X-axis contrasts decentralized marketplaces on the right with markets dominated by large platforms on the left, while the Y-axis reflects consumer spending, ranging from increasing purchasing power at the top to decreasing purchasing power at the bottom.
With this framework in place, we can better understand how different futures might emerge and where Indonesia is likely to fit into these scenarios.
In this scenario, consumers have more money to spend, and large e-commerce platforms dominate the market. Major platforms benefit from their scalability, offering both budget-friendly essentials and premium products. These giants thrive on their ability to provide efficient logistics, competitive pricing, and a vast range of offerings, from basic goods to luxury items.
Here, consumers seek unique and personalized products from Direct-to-Consumer (D2C) brands. With rising disposable income, consumers are willing to pay a premium for quality, niche products, or sustainability. Independent sellers and smaller brands thrive in this environment, relying on innovation, storytelling, and community-driven commerce to attract customers.
With declining purchasing power, consumers prioritize affordability, and large e-commerce platforms dominate. These platforms use economies of scale to offer lower prices, discounts, and payment flexibility like Buy Now, Pay Later (BNPL). They also engage consumers through entertainment-based shopping while optimizing logistics for fast, cost-effective delivery.
In this scenario, while purchasing power is low, the market is fragmented, with many small D2C brands struggling. Although consumers still seek affordable products, smaller sellers lack the infrastructure and scale of large platforms, leading to operational challenges. These brands focus on local or niche markets but face difficulties in maintaining profitability due to higher costs and logistical constraints.
Given the current economic trends in Indonesia, two scenarios stand out as the most likely outcomes for the future of retail:
Each scenario paints a different picture of how the market may evolve, based on whether large platforms maintain control or smaller, decentralized brands emerge as competitors.
Given the current state of decreasing purchasing power, Indonesia fits squarely into Scenario 3 — where large platforms dominate. E-commerce giants, with their ability to offer lower prices, have a natural advantage.
They can lean heavily on flash sales, deep discounts, and “Buy Now, Pay Later” (BNPL) solutions to attract consumers who are increasingly focused on affordability. Their ability to engage consumers through entertainment-driven experiences (like live-stream sales) is crucial to maintaining consumer attention, even as budgets shrink.
To maintain their advantage, large platforms must optimize their supply chains, invest in last-mile delivery, and offer faster, cheaper shipping options, which would be a key differentiator.
In today’s retail market, brand perception and consumer trust are key, especially when shoppers are cautious with spending. For larger stores, the sheer physical scale itself can convey an image of stability, reliability, and premium quality — qualities that are particularly appealing in economic downturns⁵.
This is the philosophy behind K3Mart’s flagship store in Jakarta, which doesn’t just sell products; it creates a full-fledged brand experience. With its “World’s Biggest Ramyeon Library,” featuring over 12,000 types of Korean ramen, K3Mart taps into Indonesian consumers’ love for Korean culture, particularly popular with younger, trend-conscious shoppers.
This immersion strategy is not just about the products on shelves; it’s about making the store a memorable destination where the brand feels larger-than-life and authoritative in its market presence.
Adding to this brand authority, K3Mart hosts events with prominent figures to generate buzz and strengthen consumer perception of K3Mart as an innovative and influential brand.
This approach resonates especially well with Gen Z, who value experiences and aspirational branding as much as they do products. The strategy of mixing physical retail with experiential elements fosters loyalty and a sense of exclusivity, encouraging customers to view K3Mart not just as a store but as a lifestyle brand that delivers on both quality and experience — an edge that sets it apart from ordinary retail spaces and reinforces consumer trust in the brand’s reliability and relevance.
Building on this approach, businesses can also take cues from other successful collaborations, such as Miniso’s partnerships with beloved brands like Harry Potter and Cinnamoroll. These collaborations leverage the popularity of iconic brands to draw in diverse consumer segments, sparking excitement and increasing foot traffic.
By aligning with globally recognized names, businesses could create similar co-branded experiences that merge their retail space with beloved cultural icons, enhancing their appeal and attracting loyal fans from these brands.
For traditional retailers to stay competitive, especially against digital-first platforms, an integrated omnichannel strategy and a strong physical presence have become essential. This is successfully demonstrated by MAP (Mitra Adiperkasa), Indonesia’s leading lifestyle retailer, with a vast portfolio including brands like Zara, Starbucks, and Sports Station.
MAP merges physical and digital shopping by offering services like click-and-collect, which allow customers to shop online and pick up their items in-store. While home delivery remains a popular option, click-and-collect offers benefits such as avoiding delivery fees, obtaining last-minute purchases quickly, and allowing customers to inspect items in-store for easier returns.
This omnichannel approach resonates particularly well with Millennials and Gen Z consumers. Studies indicate that channel seamlessness significantly enhances younger consumers’ positive attitudes toward omnichannel shopping⁶.
Recognizing this, omnichannel retailers like MAP have prioritized achieving channel consistency and seamless integration, which not only improves the customer experience but also operational efficiency⁷. For instance, the introduction of such strategies helps retailers reduce inventory risks by optimizing total order quantities and streamlining supply chain management.
In addition, MAP’s mobile app elevates the experience by helping customers secure deals through sale tracking and exclusive membership benefits. With its tiered membership system, shoppers can earn points on purchases, which they can later redeem for rewards — an attractive feature for promo hunters⁸.
By combining practical conveniences like seamless channel integration with loyalty-building incentives, MAP strengthens customer satisfaction and engagement, creating a shopping experience tailored to the expectations of today’s tech-savvy and value-driven consumers.
Meeting the diverse expectations of different age groups and socioeconomic classes is essential for success in today’s retail landscape. Younger consumers, who are digitally savvy, prefer flexibility and convenience, and MAP’s digital offerings — such as online shopping, mobile access to deals, and cross-brand gift cards — cater to this audience’s need for variety and spontaneity.
These digital gift cards, usable across brands from Starbucks to Massimo Dutti, foster an ecosystem of choice within MAP’s portfolio, allowing younger customers to explore and experience flexibility without committing to a single brand or outlet.
For older, more established consumers, MAP emphasizes service quality and reliability⁹. This demographic values trusted in-store experiences and established brands but appreciates the convenience of digital enhancements that bridge in-store and online interactions.
By integrating digital experiences across its portfolio, MAP ensures that customers enjoy consistent standards of service and product quality, whether shopping at SOGO in-store or online. This blend of digital adaptability and physical presence helps traditional retailers like MAP and K3Mart remain resilient amid Indonesia’s challenging economic landscape.
This approach not only creates a unified, flexible ecosystem that resonates across age groups but also ensures they remain competitive by appealing to Indonesian consumers’ evolving expectations for both cost efficiency and trustworthy, immersive brand experiences.
In today’s competitive retail landscape, branded credit cards have become a powerful tool for both retailers and financial institutions, offering significant advantages in customer loyalty, spending habits, and brand engagement. MAP (Mitra Adiperkasa) exemplifies this strategy through its partnership with BNI, introducing the MAP-BNI co-branded credit card.
This card provides exclusive benefits — loyalty points, cashback, member-only sales, and special discounts across MAP’s vast retail portfolio. Such benefits create a seamless rewards ecosystem that keeps customers engaged within the MAP network.
Studies indicate that credit card holders tend to spend more than cash users due to the convenience and flexibility offered by credit, with some research suggesting a significant increase in spending compared to cash transactions¹⁰. In Indonesia, this trend is evident as credit card transactions rose by 32% in 2022 alone, signaling the rising influence of credit in driving consumer spending¹¹.
This effect is amplified with co-branded cards, where consumers feel encouraged to shop more frequently to accumulate points and access perks. The MAP-BNI card’s tiered rewards structure, which allows customers to redeem points for discounts and exclusive products, caters to value-conscious consumers, such as promo hunters, who actively seek to maximize rewards. This ongoing engagement fosters repeat visits, embedding MAP into customers’ everyday lives and solidifying brand loyalty.
For MAP, the strategy boosts sales and positions the brand as a preferred choice in customers’ shopping routines.
For BNI, this collaboration opens access to MAP’s dedicated customer base, increasing transaction volumes and extending the bank’s reach to a retail-focused demographic.
The MAP-BNI credit card becomes a touchpoint of engagement, enhancing customer loyalty while expanding BNI’s brand influence within MAP’s loyal customer community.
In this scenario, smaller Direct-to-Consumer (D2C) brands find themselves in a difficult position as consumer spending decreases. Brands in Indonesia, particularly in sectors like fashion, beauty, and lifestyle — for example, Sare Studio (modest fashion), Wardah Cosmetics, and Nama Beauty — have built strong identities around personalization, authenticity, and community-driven commerce.
However, with the current economic challenges, they struggle with high operational costs and logistical constraints that make it difficult to compete on price and convenience against larger e-commerce platforms.
D2C brands are redefining their market presence by shifting from transactional relationships to immersive lifestyle experiences. This approach enables them to connect deeply with consumers and capture a larger share of the market by tapping into diverse lifestyle values.
Wardah Cosmetics, for example, might partner with eco-friendly brands like Sare Studio for sustainability-driven campaigns, allowing both brands to reach like-minded audiences and amplify their message of conscious living. These partnerships not only pool resources but also expand reach beyond traditional e-commerce platforms.
Brands are further enhancing their lifestyle appeal by weaving experiential elements into their offerings. Take Saturdays NYC, which seamlessly integrates eyewear retail with coffee culture, or Oppo’s Finders Cafe, combining tech with a social café experience. Similarly, beauty and wellness brands in Indonesia are blending into health-conscious spaces, collaborating with yoga studios, fitness centers, or running groups.
Wardah Cosmetics could offer skincare samples or discounts for yoga students, while Nama Beauty might co-host wellness events, aligning beauty with health in a way that resonates with today’s lifestyle-driven consumers. Such co-branded events create meaningful, memorable experiences that build deeper brand loyalty¹².
This shift isn’t confined to smaller D2C brands. Established names like Blibli and Tiket.com are leading through initiatives like the EcoTouch “Fashion Take Back” program, which repurposes fashion waste into sustainable materials. Collaborations like these enable them to support the movement toward eco-conscious practices, aligning their brand with lifestyle values that resonate with their audiences¹³.
From large-scale initiatives to intimate D2C partnerships, these strategies meet consumers in spaces where brand interactions and lifestyle values converge, enhancing loyalty and presence across market segments.
During the pandemic, online bartering emerged as a creative solution for consumers looking to exchange goods without spending cash, highlighting a shift towards community-driven, sustainable commerce.
Platforms like Facebook Marketplace became popular hubs for these exchanges, and specialized platforms like Nextbarter have since expanded the concept, allowing businesses to trade surplus products or services for needed resources, all while reducing expenses. This approach aligns well with today’s eco-conscious values, appealing to consumers who appreciate brands that embrace resourceful, environmentally friendly practices.
The appeal goes beyond physical goods. Platforms like Instagram, already popular for unique, niche items — from vintage gold to bespoke fashion — have shown the demand for one-of-a-kind alternatives to mass-produced products.
For D2C brands, this shift means they can offer exclusive bartering options, where customers might trade not only items but also services or specialized skills in exchange for limited-edition products, event spots, or brand experiences. Whether it’s your handmade crafts, expert services, or unique offerings, these exchanges foster a sense of community and exclusivity.
Anticipating challenges before they emerge is key to staying competitive in Indonesia’s fast-paced, evolving business environment. While technology develops rapidly, offering numerous digital tools and strategies, the real value lies in knowing when and how to implement them.
It’s not just about adopting the latest innovations; it’s about assessing if the market and economic conditions are ready for these solutions. Being strategic and thoughtful ensures that businesses don’t just react to change, but actively shape their future.
In this ever-changing landscape, success requires more than just innovation — it calls for strategic foresight. Companies need to evaluate the intersection of technology, market readiness, and consumer behavior to determine which strategies will work in a complex, dynamic environment.
By being agile and focused on real-world applicability, businesses can create ecosystems that are not only forward-thinking but also adaptable to the challenges and opportunities that lie ahead.
The article originally appeared on Medium.
Featured image courtesy: bluejeanimages.
The post Scenarios of Change: How Retail Adapts to Economic Shifts in Indonesia appeared first on UX Magazine.
Continue reading Top 21 Developer Newsletters to Subscribe To in 2025 on SitePoint.
Continue reading Serverless Image Processing Pipeline with AWS ECS and Lambda on SitePoint.
Continue reading How To Begin A WordPress Blog: A Step-By-Step Guide For Beginners on SitePoint.
Continue reading Top 9 WordPress Themes To Use in 2025 on SitePoint.
Continue reading CNCF Arm64 Pilot: Impact and Insights on SitePoint.
So, you’re filling out an online form, and it asks you to upload a file. You click the input, select a file from your desktop, and are good to go. But something happens. The network drops, the file disappears, and you’re stuck having to re-upload the file. Poor network connectivity can lead you to spend an unreasonable amount of time trying to upload files successfully.
What ruins the user experience stems from having to constantly check network stability and retry the upload several times. While we may not be able to do much about network connectivity, as developers, we can always do something to ease the pain that comes with this problem.
One of the ways we can solve this problem is by tweaking image upload systems in a way that enables users to upload images offline — eliminating the need for a reliable network connection, and then having the system retry the upload process when the network becomes stable, without the user intervening.
This article is going to focus on explaining how to build an offline-friendly image upload system using PWA (progressive web application) technologies such as IndexedDB
, service workers, and the Background Sync API. We will also briefly cover tips for improving the user experience for this system.
Here’s a flow chart for an offline-friendly image upload system.
As shown in the flow chart, the process unfolds as follows:
IndexedDB
.IndexedDB
.IndexedDB
, the system waits to detect when the network connection is restored to continue with the next step.IndexedDB
.The first step in the system implementation is allowing the user to select their images. There are different ways you can achieve this:
<input type="file">
element;I would advise that you use both. Some users prefer to use the drag-and-drop interface, while others think the only way to upload images is through the <input type="file">
element. Having both options will help improve the user experience. You can also consider allowing users to paste images directly in the browser using the Clipboard API.
At the heart of this solution is the service worker. Our service worker is going to be responsible for retrieving the image from the IndexedDB
store, uploading it when the internet connection is restored, and clearing the IndexedDB
store when the image has been uploaded.
To use a service worker, you first have to register one:
if ('serviceWorker' in navigator) {
navigator.serviceWorker.register('/service-worker.js')
.then(reg => console.log('Service Worker registered', reg))
.catch(err => console.error('Service Worker registration failed', err));
}
Remember, the problem we are trying to solve is caused by unreliable network connectivity. If this problem does not exist, there is no point in trying to solve anything. Therefore, once the image is selected, we need to check if the user has a reliable internet connection before registering a sync event and storing the image in IndexedDB
.
function uploadImage() {
if (navigator.onLine) {
// Upload Image
} else {
// register Sync Event
// Store Images in IndexedDB
}
}
Note: I’m only using the navigator.onLine
property here to demonstrate how the system would work. The navigator.onLine
property is unreliable, and I would suggest you come up with a custom solution to check whether the user is connected to the internet or not. One way you can do this is by sending a ping request to a server endpoint you’ve created.
Once the network test fails, the next step is to register a sync event. The sync event needs to be registered at the point where the system fails to upload the image due to a poor internet connection.
async function registerSyncEvent() {
if ('SyncManager' in window) {
const registration = await navigator.serviceWorker.ready;
await registration.sync.register('uploadImages');
console.log('Background Sync registered');
}
}
After registering the sync event, you need to listen for it in the service worker.
self.addEventListener('sync', (event) => {
if (event.tag === 'uploadImages') {
event.waitUntil(sendImages());
}
});
The sendImages
function is going to be an asynchronous process that will retrieve the image from IndexedDB
and upload it to the server. This is what it’s going to look like:
async function sendImages() {
try {
// await image retrieval and upload
} catch (error) {
// throw error
}
}
The first thing we need to do in order to store our image locally is to open an IndexedDB
store. As you can see from the code below, we are creating a global variable to store the database instance. The reason for doing this is that, subsequently, when we want to retrieve our image from IndexedDB
, we wouldn’t need to write the code to open the database again.
let database; // Global variable to store the database instance
function openDatabase() {
return new Promise((resolve, reject) => {
if (database) return resolve(database); // Return existing database instance
const request = indexedDB.open("myDatabase", 1);
request.onerror = (event) => {
console.error("Database error:", event.target.error);
reject(event.target.error); // Reject the promise on error
};
request.onupgradeneeded = (event) => {
const db = event.target.result;
// Create the "images" object store if it doesn't exist.
if (!db.objectStoreNames.contains("images")) {
db.createObjectStore("images", { keyPath: "id" });
}
console.log("Database setup complete.");
};
request.onsuccess = (event) => {
database = event.target.result; // Store the database instance globally
resolve(database); // Resolve the promise with the database instance
};
});
}
With the IndexedDB
store open, we can now store our images.
Now, you may be wondering why an easier solution likelocalStorage
wasn’t used for this purpose.
The reason for that is thatIndexedDB
operates asynchronously and doesn’t block the main JavaScript thread, whereaslocalStorage
runs synchronously and can block the JavaScript main thread if it is being used.
Here’s how you can store the image in IndexedDB
:
async function storeImages(file) {
// Open the IndexedDB database.
const db = await openDatabase();
// Create a transaction with read and write access.
const transaction = db.transaction("images", "readwrite");
// Access the "images" object store.
const store = transaction.objectStore("images");
// Define the image record to be stored.
const imageRecord = {
id: IMAGE_ID, // a unique ID
image: file // Store the image file (Blob)
};
// Add the image record to the store.
const addRequest = store.add(imageRecord);
// Handle successful addition.
addRequest.onsuccess = () => console.log("Image added successfully!");
// Handle errors during insertion.
addRequest.onerror = (e) => console.error("Error storing image:", e.target.error);
}
With the images stored and the background sync set, the system is ready to upload the image whenever the network connection is restored.
Once the network connection is restored, the sync event will fire, and the service worker will retrieve the image from IndexedDB
and upload it.
async function retrieveAndUploadImage(IMAGE_ID) {
try {
const db = await openDatabase(); // Ensure the database is open
const transaction = db.transaction("images", "readonly");
const store = transaction.objectStore("images");
const request = store.get(IMAGE_ID);
request.onsuccess = function (event) {
const image = event.target.result;
if (image) {
// upload Image to server here
} else {
console.log("No image found with ID:", IMAGE_ID);
}
};
request.onerror = () => {
console.error("Error retrieving image.");
};
} catch (error) {
console.error("Failed to open database:", error);
}
}
Once the image has been uploaded, the IndexedDB
store is no longer needed. Therefore, it should be deleted along with its content to free up storage.
function deleteDatabase() {
// Check if there's an open connection to the database.
if (database) {
database.close(); // Close the database connection
console.log("Database connection closed.");
}
// Request to delete the database named "myDatabase".
const deleteRequest = indexedDB.deleteDatabase("myDatabase");
// Handle successful deletion of the database.
deleteRequest.onsuccess = function () {
console.log("Database deleted successfully!");
};
// Handle errors that occur during the deletion process.
deleteRequest.onerror = function (event) {
console.error("Error deleting database:", event.target.error);
};
// Handle cases where the deletion is blocked (e.g., if there are still open connections).
deleteRequest.onblocked = function () {
console.warn("Database deletion blocked. Close open connections and try again.");
};
}
With that, the entire process is complete!
Considerations And LimitationsWhile we’ve done a lot to help improve the experience by supporting offline uploads, the system is not without its limitations. I figured I would specifically call those out because it’s worth knowing where this solution might fall short of your needs.
IndexedDB
Storage PoliciesIndexedDB
. For instance, in Safari, data stored in IndexedDB
has a lifespan of seven days if the user doesn’t interact with the website. This is something you should bear in mind if you do come up with an alternative for the background sync API that supports Safari.Since the entire process happens in the background, we need a way to inform the users when images are stored, waiting to be uploaded, or have been successfully uploaded. Implementing certain UI elements for this purpose will indeed enhance the experience for the users. These UI elements may include toast notifications, upload status indicators like spinners (to show active processes), progress bars (to show state progress), network status indicators, or buttons to provide retry and cancel options.
Wrapping UpPoor internet connectivity can disrupt the user experience of a web application. However, by leveraging PWA technologies such as IndexedDB
, service workers, and the Background Sync API, developers can help improve the reliability of web applications for their users, especially those in areas with unreliable internet connectivity.