I Tested 7 AI Tools for Content Marketing: Here’s What I Found
I have been using AI tools since ChatGPT first launched. And like many content marketers, I wanted to improve my skills for the AI era. This means I frequently test a wide range of AI tools as part of my actual content marketing workflow.
This regular testing has helped me move past the noise and identify which tools genuinely save time and improve content quality for other bloggers and marketers.
My goal was to find what helps drive traffic and engagement, not just add another subscription to the list.
In this guide, I’ll share that clarity with you. Here are my recommendations for the best AI tools for content marketers, based on my daily use and the results I got from them.
Quick Comparison – My AI Toolkit for Content Marketing
If you are in a hurry, here is a quick list of all the AI tools I use in my daily workflow as a content marketer:
| Tool | Best For | Key Feature | Starting Price |
|---|---|---|---|
| ChatGPT | Content Writing | Versatile conversational AI | Free – Paid plans start at $20 / mo |
| Gemini | Research & Technical Writing | Real-time web access & sourcing | Free – Paid plans start at $19.99 |
| All in One SEO | Social & Email Copy | Integration inside WordPress | Free – Paid plans start at $49.60 / yr |
| SeedProd | Landing Page Copy | AI writer inside page builder | Free- Paid plans start at $39.50 / yr |
| Canva | Image Editing | Magic eraser & background remover | Free – Paid plans start at $4.58 / mo |
| Runway | Text-to-Video | High-definition, cinematic output | Free – $15 / mo |
| ElevenLabs | Text-to-Audio | Natural, human-like voice | Free – $5 / mo |
TL:DR Summary: Draft content with ChatGPT, verify with Gemini, optimize with AIOSEO, build in SeedProd, design in Canva, create a video with Runway, and add voiceovers with ElevenLabs.
Next, I’ll show how I tested each tool and why you can trust my picks.
How I Tested & Reviewed These AI Content Tools
The AI industry is exploding with innovation, making it harder to separate hype from reality, and choosing the wrong tool can waste time and money.
I aim to cut through the noise with real-world usage to save time and money.
Here’s a breakdown of my testing process:
- I used them for real-world tasks. I used these tools for actual content marketing at WPBeginner: brainstorming articles with ChatGPT, creating social media posts with AIOSEO, and designing graphics with Canva’s AI. This process shows how they perform in a real business, not just a demo.
- I analyzed what truly matters. Each tool was judged on the quality of its output, ease of use for non-experts, practical time-saving features, and overall value for money.
- I tested with a variety of prompts. I didn’t just accept the first result. Instead, I experimented with different tones, styles, and complex commands to check the flexibility and control of the AI’s output.
- I categorized them for specific needs. A blogger’s needs are different from a landing page designer’s. That’s why I’ve categorized each tool by its best use case, helping you find the right solution for your specific task.
Why You Can Trust WPBeginner
As a content creator at WPBeginner, I use marketing tools daily to create and promote content for our millions of readers.
Our team also uses plugins like All in One SEO and SeedProd across our business, so we have direct, first-hand experience with how their AI features perform.
Furthermore, everyone at WPBeginner follows a strict editorial process to ensure our reviews are always thorough, fair, and trustworthy. My recommendations come from hands-on experience and a commitment to helping you find the right tools to succeed.
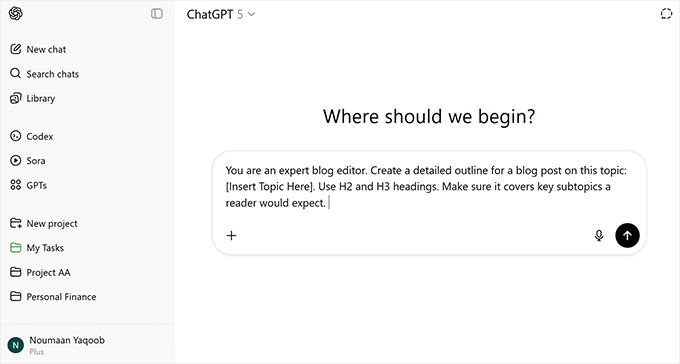
1. ChatGPT
Best For: Content writing, brainstorming, illustrations, and organizing marketing workflows.
ChatGPT is one of the most versatile AI tools I’ve used. It works well for quick idea generation, long-form articles, and even creative media like images.
As one of the most advanced AI companies, OpenAI (the company behind ChatGPT) is spending huge resources on research and innovation. This means more capable and faster models are released quite frequently.
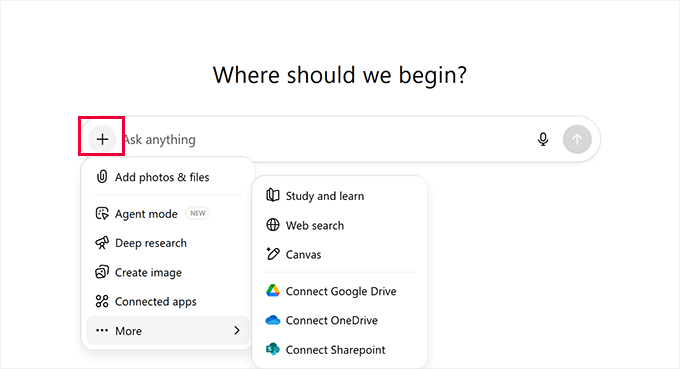
ChatGPT allows you to switch between search, chat, deep research, and agent modes so you can perform different types of tasks from the same window.
How I use ChatGPT:
ChatGPT is my primary AI for a variety of tasks. I use it daily for updating existing articles, brainstorming blog post ideas, writing new articles, and more.
I learned that using Projects and ChatGPT’s memory feature allows the AI to learn my preferred tone, structure, and formatting rules. This saves me a lot of time in the long run.
I also use it to create illustrations for articles and general blog images. It sometimes misspells words in images, but I can easily correct those using Photoshop or Canva.
Key Features & Where It Excels:
- Handles multiple content formats: blog posts, scripts, captions, and social copy.
- Excellent image generation model included.
- Powerful memory system to personalize results to your brand voice.
- Integrates with ChatGPT plugins for WordPress and automation tools like Uncanny Automator and Zapier to create powerful workflows. However, you’ll need an API key for integrations, which has a separate pay-as-you-go pricing not included in the monthly ChatGPT subscription.
| Pros of ChatGPT 👍 | Cons of ChatGPT 👎 |
|---|---|
| Extremely versatile across writing and creative tasks | Requires human fact-checking |
| Remembers preferences with the memory feature | Output quality depends heavily on prompts |
| Integrates with top automation and marketing tools | The free plan has limited access to the latest models |
Practical Tips for Marketers:
- Use the project feature to group related tasks and save time switching between contexts.
- For recurring formats (like newsletters), train the memory feature with examples so that ChatGPT automatically matches your style.
- Learn to improve your prompts for better outputs. You can see my collection of AI prompts for marketers for practical examples.
Pricing
A free plan is available with limited model access. Paid plan starts at $20/month, GPT-5, memory features, faster responses, and priority access during peak times.
2. Gemini
Best For: In-depth research, fact-checking, and writing technical or data-driven content.
While ChatGPT is my go-to for creative tasks, Gemini is my trusted research assistant.
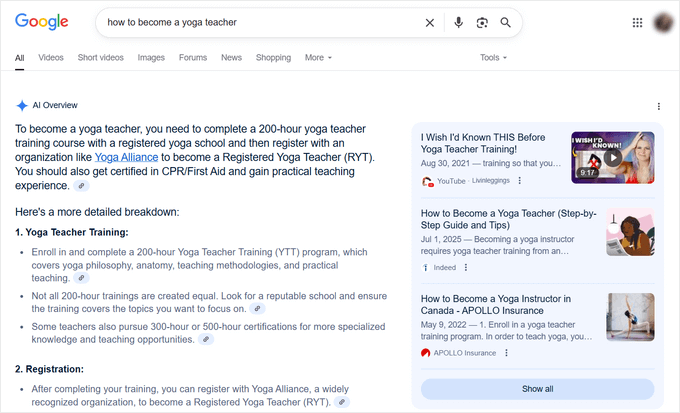
Its biggest advantage is its direct, real-time integration with the Google search index, which means the information it provides is current and often comes with source links.
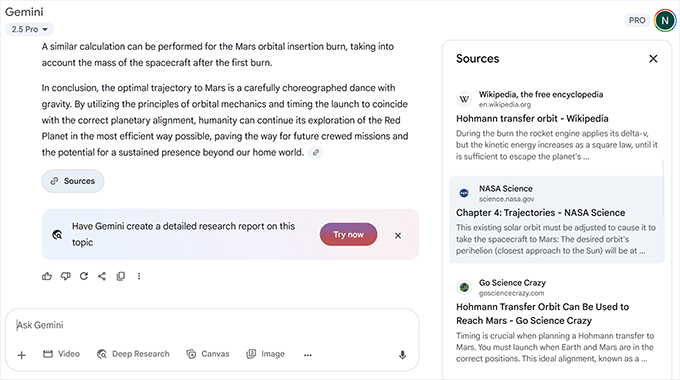
This makes it incredibly reliable for tasks where accuracy is critical. I’ve found its ability to understand and explain complex, technical subjects is second to none.
It’s also excellent at generating structured data like tables and comparing information from multiple sources.
Plus, Google is continually updating Gemini with its latest AI models and connecting it with its ecosystem of Google Workspace apps like Google Docs, Sheets, and Gmail. These integrations make it a powerful productivity hub.
How I use Gemini:
I turn to Gemini whenever I need to write content that requires up-to-date information or fact-checking.
For instance, when writing a review of a new software release, I’ll ask Gemini to summarize the latest features, find recent user reviews, and compare its pricing to competitors.

I also use it to simplify technical topics.
When working on an article about website security, I can ask Gemini to explain “what is a DDoS attack” in a simple analogy that a non-technical reader can understand. Its ability to provide sourced information saves me a significant amount of research time.
Related Article: See my pick of the best ChatGPT alternatives.
Key Features & Where It Excels:
- Connects directly to Google Search for real-time, sourced answers.
- Excellent at summarizing articles, research papers, and web pages via a link.
- Generates multiple “drafts” of a response so you can choose the best one.
- Integrates directly with Google Workspace apps (Docs, Sheets, Gmail) for a seamless workflow (with Gemini for Workspace).
| Pros of Gemini 👍 | Cons of Gemini 👎 |
|---|---|
| Provides current, sourced information | Can be less “creative” in tone than ChatGPT |
| Excellent for research and fact-checking | Image generation capabilities are less advanced |
| Great at simplifying complex topics | Fewer third-party integrations compared to OpenAI |
Practical Tips for Marketers:
- Use the “Double-check response” feature (the Google icon) to have Gemini highlight statements it’s confident about and find sources for ones it’s less sure of.
- When researching, ask it to “act as a research assistant” and request information in a specific format, like a table comparing three products on features and price.
- For complex topics, ask it to “explain this to me like I’m a beginner” to get clear, easy-to-understand copy.
Pricing
The standard Gemini model is free to use. To access the most powerful models (like Gemini 2.5 Pro) and larger context windows, you can subscribe to Google AI Pro, which starts at $19.99/month as part of the Google One AI Pro plan.
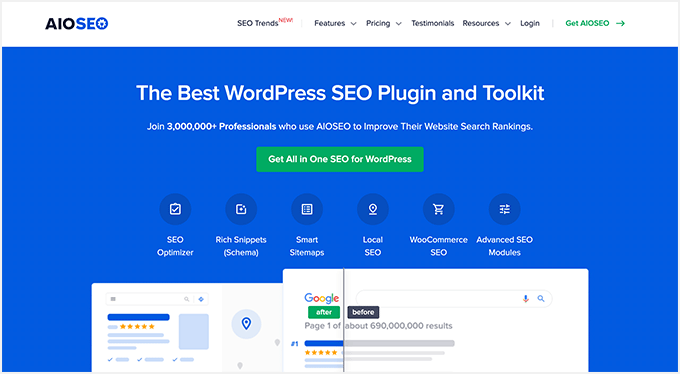
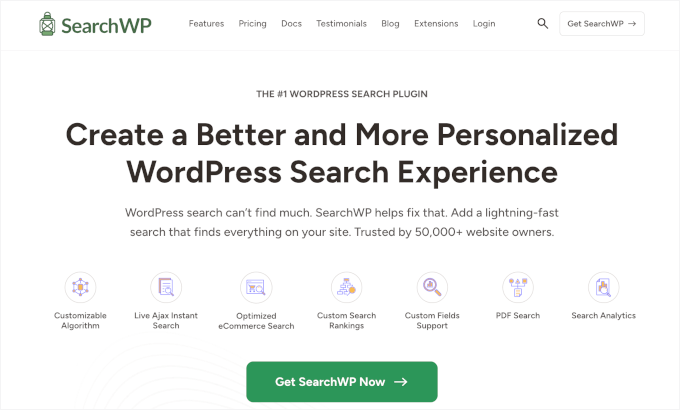
3. All in One SEO – AI Content Generator
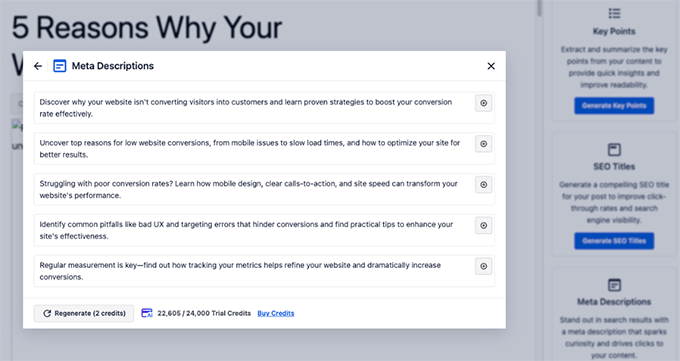
Best For: Creating SEO-optimized titles, meta descriptions, FAQs, key points, and social media posts directly inside WordPress.
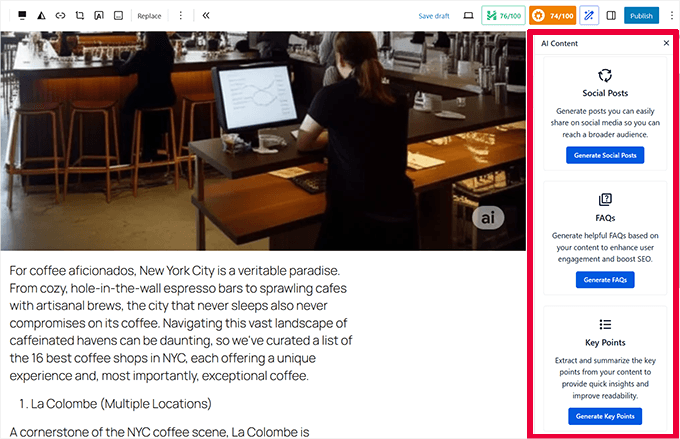
All in One SEO’s AI Content Generator is built right into your WordPress dashboard, making it incredibly easy to create ranking-ready content without switching between tools.
You can instantly generate:
- SEO titles & meta descriptions
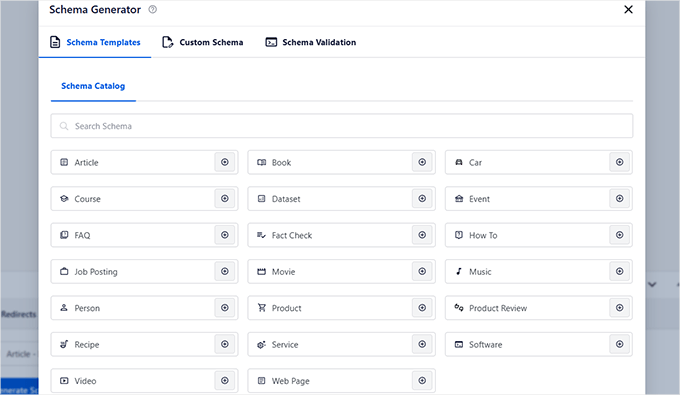
- FAQs with schema
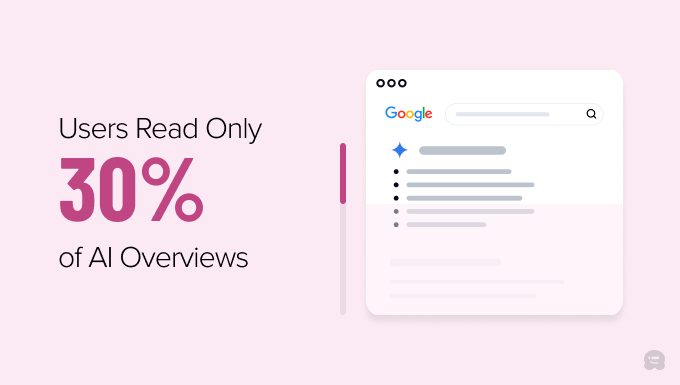
- TL;DR summaries to improve GEO (Generative Engine Optimization)
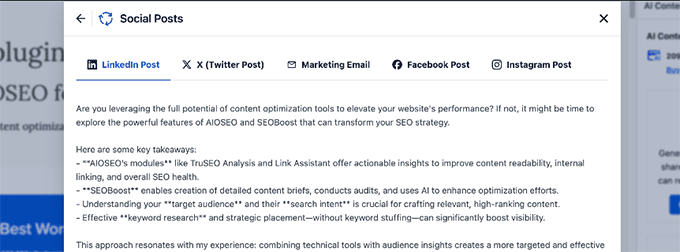
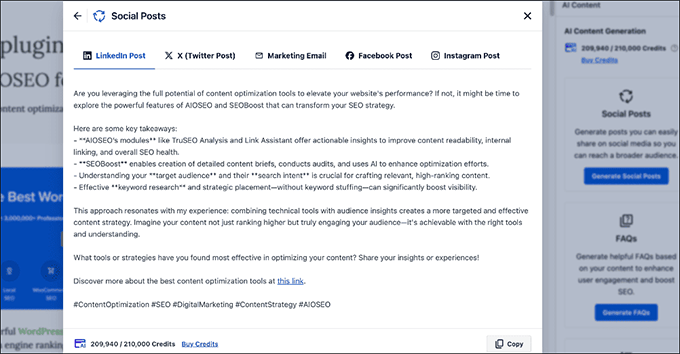
- Social media posts for LinkedIn, X (formerly Twitter), Instagram, and Facebook
- Marketing copy for your email newsletter
Because it’s part of the AIOSEO plugin, all the AI-generated content can be inserted into your post or page with a single click. This helps you save time and ensure everything is properly optimized for search engines and engagement.
How I use AIOSEO AI Content Generator:
I use AIOSEO’s AI content generator when I need to speed up the optimization process for new and updated articles.
For example, after writing a post, I’ll use the AI Content Generator to create a compelling meta description, add FAQ blocks for featured snippets, and generate a TL;DR section to improve readability.
It’s also my go-to for creating platform-specific social media captions. I can generate tailored copy for Facebook, LinkedIn, Instagram, and X (Twitter) in seconds, which saves me from rewriting the same message multiple times.
Plus, I love its Marketing Email feature, which allows you to instantly generate an email based on the content of your article.
Note: All in One SEO is the most comprehensive WordPress SEO tool. We use it on all our websites, including WPBeginner.
To learn more, see our full AIOSEO review.
Key Features & Where It Excels:
- Works inside WordPress and uses your article content for context, which significantly improves the quality of output.
- Generate SEO titles and meta descriptions that improve click-through rate (CTR).
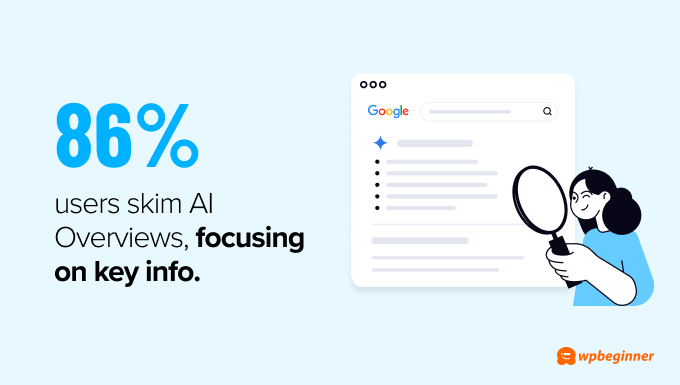
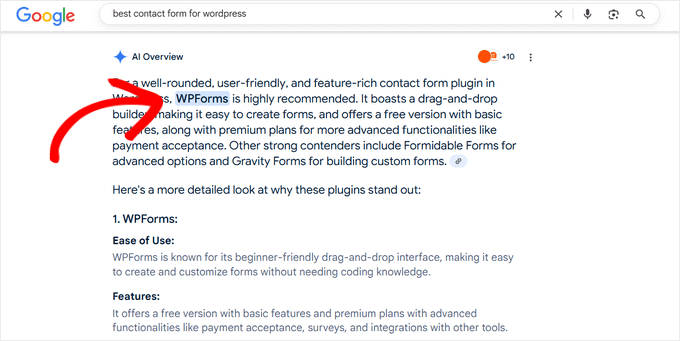
- Create FAQ blocks with built-in schema markup for better rankings and AI Overviews.
- Produce “Key Points” summaries to boost readability and capture featured snippets.
- Instantly write platform-specific social media posts for multiple networks.
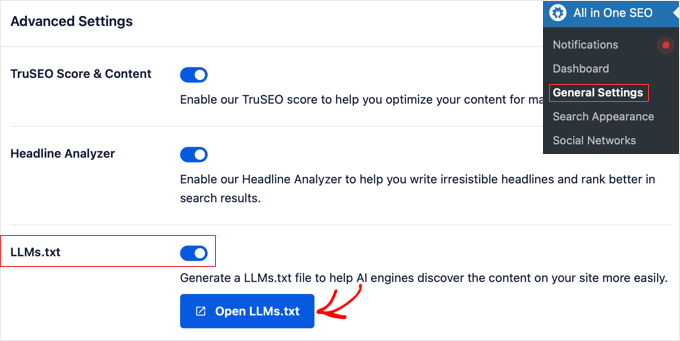
- Generate and publish an llms.txt file to get discovered and cited by AI chatbots like ChatGPT and Gemini.
| Pros of AIOSEO 👍 | Cons of AIOSEO 👎 |
|---|---|
| All-in-one content optimization directly in WordPress | Credits are limited based on the plan |
| Includes advanced features like FAQ schema and llms.txt | Requires the AIOSEO plugin |
| Saves time by creating multi-platform content instantly |
Practical Tips for Marketers:
- Use FAQ and Key Points in every post to target featured snippets and AI Overviews.
- Leverage the social media post generator to maintain consistent branding across platforms.
- Enable the
llms.txtfile feature to help AI chatbots find and cite your best content.
Pricing
Available for both Lite and Pro users. Lite users get 100 free credits, with additional credits available for purchase. Pro users get generous credits included with their license. All users can buy extra credits at any time.
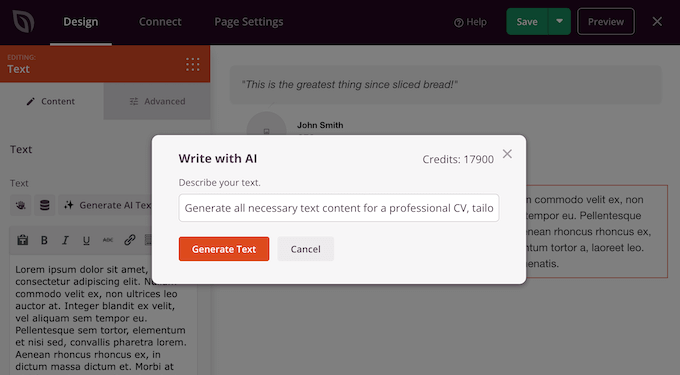
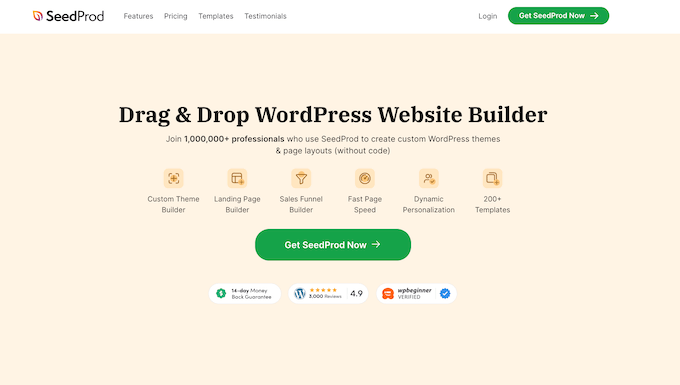
4. SeedProd AI Writing & Image Generator
Best For: Creating landing page copy, headlines, and unique images directly inside the WordPress page builder.
SeedProd is one of the most popular WordPress website and landing page builders. Alongside its drag-and-drop builder, it comes with built-in AI tools for text and image creation.
It integrates with ChatGPT for copywriting and DALL·E for generating images, so you can create a complete, custom landing page without ever leaving the editor.

The AI assistant is available inside many SeedProd blocks, letting you generate text or rework existing copy with just a click.
You can also instantly translate your page content into 50+ languages and fine-tune tone and style with over 30 options, from professional to playful.
Plus, you can even use SeedProd to create an entire website from scratch. For details, see our guide on how to create a WordPress website with AI.
How I use SeedProd’s AI features:
I use SeedProd’s AI writing assistant when I’m building landing pages or product pages and need polished copy fast.
Instead of starting from scratch, I can select a block, click “Generate AI Text,” and have a strong starting draft instantly.
For visual content, I use the AI image generator to create custom illustrations or hero images that match the page’s theme. If I don’t like the first result, then I can create multiple variations until I find the perfect fit.
Key Features & Where It Excels:
- AI-powered text generation and editing directly inside the SeedProd builder.
- 30+ tone of voice options to match your brand style.
- One-click text transformations: simplify, shorten, lengthen, or translate into 50+ languages.
- DALL·E-powered AI image creation with variation support for consistent design themes.
- 300+ templates, full WordPress theme builder, and easy WooCommerce integration.
| Pros of SeedProd 👍 | Cons of SeedProd 👎 |
|---|---|
| Integrated AI copywriting and image generation in one builder | AI Assistant is only available on premium plans |
| 30+ tone options and translation into 50+ languages | Image results may require multiple attempts for best output |
| Seamless drag-and-drop website building with 300+ templates | AI credits are tied to your SeedProd plan |
Practical Tips for Marketers:
- Use tone options to match the style of each landing page — formal for B2B, casual for lifestyle brands.
- Leverage AI translations to localize pages for international audiences without hiring translators.
- Create multiple image variations to maintain a consistent visual style across your campaign.
Pricing
SeedProd offers a free plan for its page builder. AI writing and image generation are available on premium plans as a paid add-on. Pricing starts at $39.50/year for the base builder, with AI features included in higher tiers.
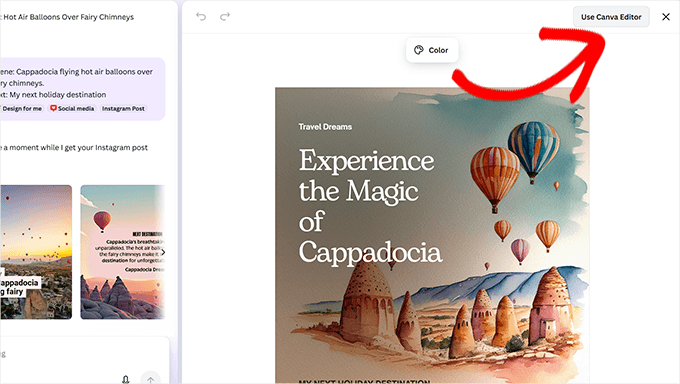
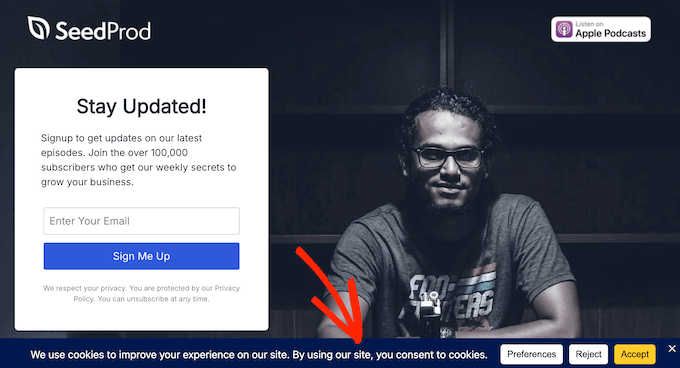
5. Canva Magic Studio
Best For: Image editing, quick social media graphics, and AI-powered visual content creation.
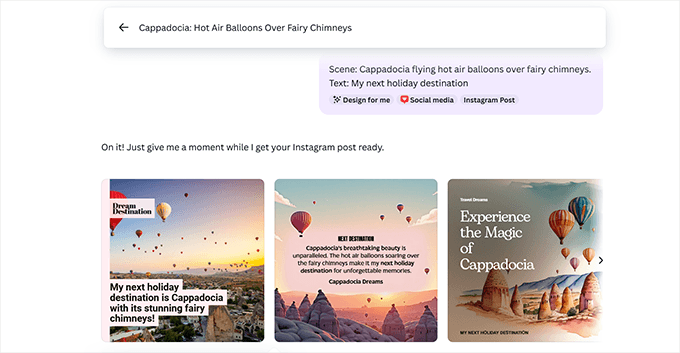
Canva is already one of the easiest tools for creating designs, but its Magic Studio AI features take it to another level with AI-powered image editing and media generation.
It’s perfect for marketers who need professional visuals without advanced design skills.
From background removal to text-to-image, text-to-video generation, Canva’s AI tools save time while expanding creative possibilities.
Canva’s Magic Studio is powered by a mix of its own AI technology and models from leading partners like Google. This allows it to offer powerful image and video generation tools right inside the Canva editor as an all-in-one design solution.
How I use Canva Magic Studio:
I use Canva for creating and editing blog images, social media graphics, and quick promotional materials.
The Magic Eraser is a huge time-saver when I need to remove unwanted elements from a photo, and the Expand tool is perfect for adjusting aspect ratios.
I often tweak AI-generated visuals with Canva’s design tools for a polished final product. In particular, I use it to edit images generated with ChatGPT or Gemini because those platforms don’t have the same image editing capabilities as Canva.
Key Features & Where It Excels:
- Magic Eraser for removing unwanted objects in seconds.
- Easily expand to resize and reframe images without cropping important content.
- Text-to-image AI generation for new AI artwork.
- AI resize tool for instantly adapting designs to multiple social media formats.
- Background remover and object eraser for clean, professional images.
- Hundreds of templates and drag-and-drop editing for non-designers.
| Pros of Canva 👍 | Cons of Canva 👎 |
|---|---|
| Fast, beginner-friendly interface with professional results | AI image generation can struggle with accurate text rendering |
| Magic tools make editing and resizing effortless | Most AI features are limited in free plans |
| Huge library of templates and design assets | |
| Low-cost monthly subscription |
Practical Tips for Marketers:
- Use Magic Resize to instantly create platform-specific versions of your designs for Instagram, Facebook, LinkedIn, and more.
- Pair text-to-image generation with your brand colors and fonts for on-brand custom visuals.
- Combine Magic Eraser and background remover to repurpose stock images for unique content.
Pricing
Free plan available with limited AI features. The Pro plan starts at $4.58 /month and includes Magic Studio AI tools, brand kits, premium templates, and unlimited background removal.
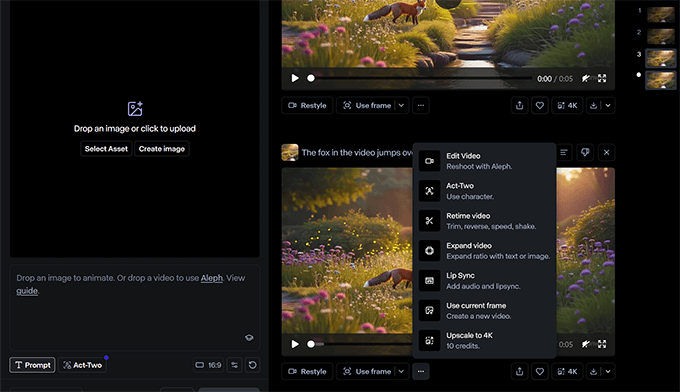
6. Runway
Best For: AI-powered video creation, editing, and special effects.
Runway is one of the most innovative AI tools for marketers who need professional-quality video without a production crew.
It offers text-to-video generation, background replacement, and advanced editing features, all inside a simple browser interface.
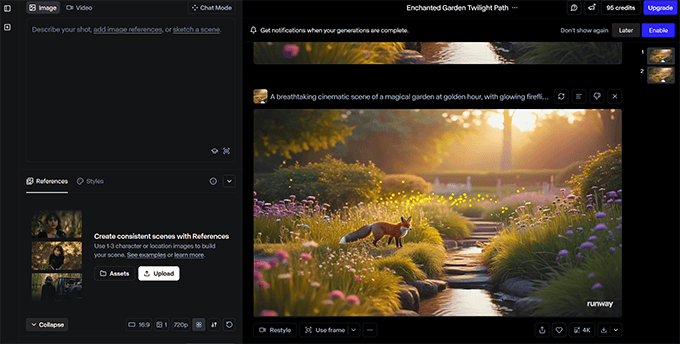
I am not a video editor, but as part of a marketing team, I sometimes need quick videos.
Runway is a great option for creating product promos, social media clips, and creative visuals that stand out in your campaigns. You can even start from an image or video clip and transform it entirely with AI.
How I use Runway:
I’ve used Runway to try out quick video clips and fun personal projects.
I thoroughly tested Runway Aleph against Google’s Veo-3 (limited preview available in Gemini). Runway performed quite well and, in some areas, exceeded Veo.
I also liked Runway’s ease-of-use, storyboard, and remix features. As someone with limited video editing experience, I found Runway to be much easier to use than Veo.
Key Features & Where It Excels:
- Text-to-video generation from prompts or images.
- Green screen and background removal without a studio setup.
- Wide range of visual styles and camera movement controls.
- Fast rendering compared to traditional video software.
| Pros 👍 | Cons 👎 |
|---|---|
| Generates high-quality videos in minutes | Negative prompts are not supported |
| Easy to use, even for beginners | Best results often require multiple tries |
| No expensive video equipment needed |
Practical Tips for Marketers:
- Use reference images to guide the AI’s style and accuracy.
- Pair Runway videos with Canva or AIOSEO for complete campaign materials.
- Batch create multiple clips in one session to save time.
Pricing
Free plan available with limited exports and watermarks. Paid plans start at $12/month, offering higher-quality output, faster rendering, and commercial usage rights.
7. ElevenLabs
Best For: Creating natural, human-like voiceovers for videos, podcasts, and marketing content.
I discovered ElevenLabs when our WPBeginner YouTube team was trying it out for their videos and shorts. It is one of the most advanced AI voice generation platforms I’ve tested.
Its voices sound remarkably realistic, with natural pacing, emotional nuance, and subtle inflections that make them almost indistinguishable from real human narrators.
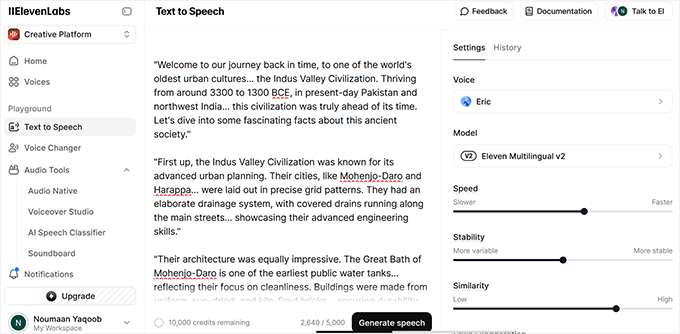
With support for over 70 languages (in the upcoming Eleven V3 model) and a library of 120+ pre-built voices, it’s a flexible tool for any marketer looking to add professional-quality audio to their content.
You can also fine-tune voices with precision controls to match your brand tone or creative style.
How I use ElevenLabs:
I first used ElevenLabs for a quick AI video experiment. It was a fun non-work project, but I was hooked.
I am not a podcaster or video editor, and don’t have any professional audio equipment. ElevenLabs came as a blessing to easily add quick narrations to short videos.
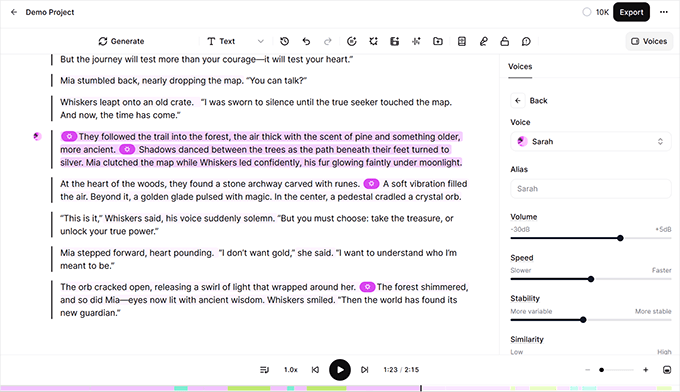
For example, I can paste a pre-written script for a video, choose a voice that fits the tone, then adjust stability and style sliders for a polished delivery. I then use Audacity to edit audio for my videos to add pauses and music.
I’ve also used its multi-language support to quickly generate audio for a personal project. The new Eleven V3 model surprised me. It was able to distinguish Urdu from Hindi (two almost identical South Asian languages), and the pronunciation was surprisingly good.
Key Features & Where It Excels:
- Ultra-realistic voice generation with natural pacing and emotion.
- Large voice library (120+ voices) plus the ability to fine-tune delivery.
- The Eleven V3 model supports 70+ languages, making it great for multi-lingual audiences.
- Fast rendering, even for longer scripts.
- Ability to clone voices (paid feature) for brand consistency.
| Pros 👍 | Cons 👎 |
|---|---|
| Highly realistic and expressive voices | The free plan has strict character limits |
| Fast generation time | Does not edit or mix audio, so a separate tool is required |
| Supports multiple languages for localization |
Practical Tips for Marketers:
- Match your voice choice to your target audience — formal tones for B2B, friendly tones for casual content.
- Use precision controls to tweak pacing and emotion for maximum authenticity.
- For social media videos, keep scripts short to stay within free-tier character limits.
- Combine with editing tools like Descript or Audacity to add music, sound effects, or clean up audio.
Pricing
Free plan includes 10,000 characters/month. Paid plans start at $5/month with higher character limits, faster generation, and access to voice cloning. For daily content creation, the $22/month plan is the most practical choice.
How to Choose the Best AI Tool for Your Marketing Needs
AI moves fast. New features arrive every month, and “best” depends on your workflow, budget, and goals.
Use these quick checks to pick tools that fit how you work today while staying flexible for tomorrow.
Smart Selection Tips
- Start with a free plan or trial. Test on one real task before you commit.
- Audit what you already have. Many tools you use (SEO, design, CMS) now include AI features. For instance, I use WPCode in WordPress, which has a built-in AI code snippet generator.
- Match the tool to the task. That means you should pick writing tools for long-form, image models for visuals, and voice tools for narration.
- Check ease of use. A clear UI saves more time than a complex feature set. For instance, I prefer to use Runway, which is easier than the more powerful Veo available in Gemini.
- Look for solid integrations. Useful integrations include WordPress, email marketing platforms, and automated workflows with tools like Uncanny Automator or Zapier.
- Evaluate pricing at scale. Credits can add up if you publish often. If you are using APIs for integrations, make sure to calculate the costs and set a cut-off budget.
- Review data and privacy settings. Know how prompts and outputs are stored and used. You don’t want your trade secrets to be used by AI models for training.
- Confirm export options. Make sure you can move drafts, images, and audio into your stack.
Honorable Mentions: Other AI Tools I Use
I have shared the tools that I use daily and are part of my workflows as a content marketer. Here are some more tools that I use quite frequently.
| Tool | Suitable for |
|---|---|
| SEOBoost | Keyword clustering, content briefs, and search intent planning for data-backed outlines. |
| Manus | A multi-purpose AI agent suitable for deep research. |
| MidJourney | High-quality AI imagery for social posts, blog headers, and campaign visuals. |
| Copy.ai | Fast social captions, ad angles, and email subject lines with ready-made templates. |
| Jasper | Team workflows, brand voice training, and multi-channel content production. |
Frequently Asked Questions About AI Tools for Content Marketing
The following are some of the most common questions that I hear from WPBeginner users on Reddit and LinkedIn.
Which AI tool is best for beginners?
If you’re starting out, I recommend ChatGPT. It’s versatile, easy to learn, and has a free plan so you can practice without spending money.
Do I need to pay for AI tools to get good results?
Not always. Many AI tools, like ChatGPT and Canva, have free tiers that work well for smaller projects. Paid plans usually offer faster responses, higher quality outputs, and more advanced features.
Can AI tools replace human writers and designers?
AI tools are great for speeding up tasks and sparking ideas, but they can’t fully replace human creativity and judgment. I still review and edit everything to make sure it fits my style and is factually correct.
How do I know if an AI tool is right for me?
Check if the tool solves a problem you face often, offers a free trial, and integrates with your existing workflow. If it saves you time or improves quality without adding complexity, then it’s worth keeping.
Will AI tools keep getting better?
Yes. The AI industry is evolving fast. Expect new features, better accuracy, and more integrations over the next few years. That’s why I suggest testing tools regularly to see if better options appear.
Conclusion
These AI tools help me plan, write, design, and publish faster while keeping quality high. You can start with the free plans, test on one real task, and keep the tools that save you time without adding extra steps.
Just make sure to keep human editing and fact-checking in the loop so your content stays accurate and on brand.
You may also like to see these articles related to AI:
- How AI is Reshaping SEO: 30+ Trends to Watch
- How to Use AI for Customer Service (Tips for Small Businesses)
- Is AI Content Bad for WordPress SEO? (Expert Insights & Tips)
- A Small Business Owners’ Guide to Artificial Intelligence
- WordPress Plugins Using Artificial Intelligence & Machine Learning
If you liked this article, then please subscribe to our YouTube Channel for WordPress video tutorials. You can also find us on Twitter and Facebook.
The post I Tested 7 AI Tools for Content Marketing: Here’s What I Found first appeared on WPBeginner.


 Nicolas Lecocq – Creator of OceanWP & Founder of DigiHold


 Justin Ferriman – Founder of LearnDash


 Sundar Pichai, CEO of Google